
Sponsored

hyankov

2.0L EcoBoost
Member
Joined
Sep 16, 2026
Threads
2
Messages
8
Reaction score
44
Location
MN
Vehicle(s)
Ford Maverick 2024 XL
Engine
2.0L EcoBoost
Note: this is for a Ford Maverick 2.0 2024 XL

I am no mechanic by any means, but I can follow instructions and I'm moderately handy. Thought I'd document my experience with a brake problem that I had, the Ford dealership and the subsequent repair. Bits and pieces may help someone else, or you could just use it as an opportunity to tell me all the things I've done wrong ;)

Problem
Ok, so first thing - at around 15k miles I ran into a problem - the steering wheel and brake pedal were vibrating when I was decelerating from over 60 mph, down through 50mph and 40mph. I thought - ok, one more rotors are probably shot.

Ford Dealership
I got in for a routine oil change and tire rotation. I thought I'd combine it with a resolution of the brakes problem.

The gist of our interaction was:
  • Ford: "Ok, for $250 we will take a look"
  • Me: "But I just paid for 'The Works' package, surely it covers enough for you to be at least able to tell me what's wrong"
  • Ford Mechanic: "Ok, I took it for a ride, it's the rear rotors"
  • Me: "What about warranty?"
  • Ford: "Sorry mate, wearable parts and all..."
  • (keep in mind the vehicle is barely year and a half old, 15-20k miles)
  • Ford: "But for $750 we will put another set of bottom tier brakes in the rear"
  • Me: no thanks
Prep
Not to be taken as an advertisement of any specific brand or a store chain, but in addition to the tools I already had, I purchased:
  • Jack stands
  • Floor jack
  • Impact wrench (turned out I don't need it)
  • Metric impact socket set
  • Loctite (for the anchor plate bolts, we'll get to that)
  • Jack stand pads + floor jack adapters
  • Brake caliper piston tool (costs the same as a C-Clamp, but you can't use a C-Clamp on the rear)
  • 3/8" Drive Hex Bit Metric Socket 7mm (for the guide pins)
  • Brake cleaner
  • Bigger torque wrench

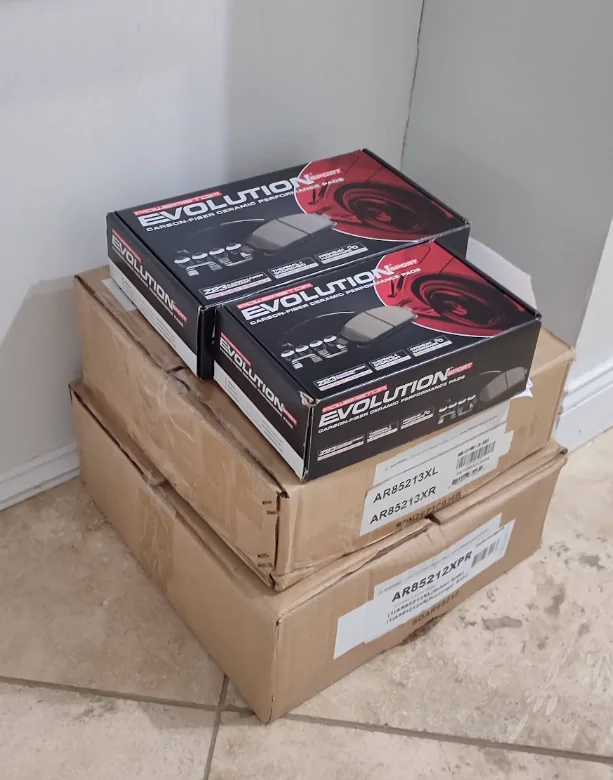
I got myself a complete PowerStop K8940 kit (front and rear), which to my understanding is a premium tier. I got them from a popular online warehouse for less then $300, plus tax and shipping. Which is about 30% cheaper than getting them from popular retailers. And possibly around 50-100% cheaper than getting them from a repair shop.

So for the amount of money Ford quoted me for economy rear brakes, I got myself premium brakes front and rear, plus the tools.

Specs
Libraries in the USA have subscription to ALLDATA. All you have to do is get on one of their computers or connect to their local WiFi. I printed off all the relevant (torque) specs and procedures. That's gold.

Specifically for Ford Maverick 2024 XL AWD EcoBost the specs are:
  • Front Brake Caliper Bolt Torque
    • Guide Pins - 21 lb-ft
    • Anchor Plate Bolts - 81 lb-ft ("do not reuse bolts")
  • Rear Brake Caliper Bolt Torque
    • Guide Pins - 21 lb-ft
    • Anchor Plate Bolts - 46 lb-ft ("do not reuse bolts")
  • Wheels
    • Wheel Lug Nut Torque - 150 lb-ft
Can't comment on other models, Years and trims, there might be some differences

The brake job
I am not going to quote the procedure itself, step by step, as it likely varies for different years and trims. You just follow the process described in ALLDATA for your vehicle, to disassemble, and reverse it, to assemble. I will only call out the "interesting" parts and caveats.

Due to my inexperience with that particular repair, what was supposed to be a 2 hour job turned into an 8 hour job.

In somewhat chronological order ...

Brake maintenance mode
It is actually mandatory not just for the rear, but also for the front as well. Otherwise the system may detect something being wrong with your brakes (leak, etc) and freak out. The process is simple and well documented, if you take it from the right source. I think a lot of people might be doing it wrong, and think that their truck is having an issue with entering maintenance mode. Listen for the retraction of the mechanism, it's very audible! And on the rears, you can't use a C-Clamp, because that would pinch the electronics.

The use of impact wrench
IMO totally unnecessary. First off, the torque (150 lb-ft) on the wheel lugs make it impossible for my cheap impact wrench to undo, at least not without damaging the lug nuts. I just used a breaker bar. And for the tightening, you're not supposed to use impact wrench anyway.

Lifting the vehicle off the ground
Vehicle in Park. Wheel chocks, or various lumber cuttings, whatever you have.
As you know, on those vehicles there's something called pinch welds. And there's a molded arrow pointing you at where you're supposed to place the jack stand. The thing is - you can't place a floor jack AND a jack stand at the exact same spot, obviously. But those pinch welds actually run wide. The arrows, in my opinion, are more for symmetry and balance, when you lift both sides (as you should). So when lifting the front, placing the floor stand a bit to the rear, just enough to place the stand next to it (to the front, where the actual arrow is) is totally fine.

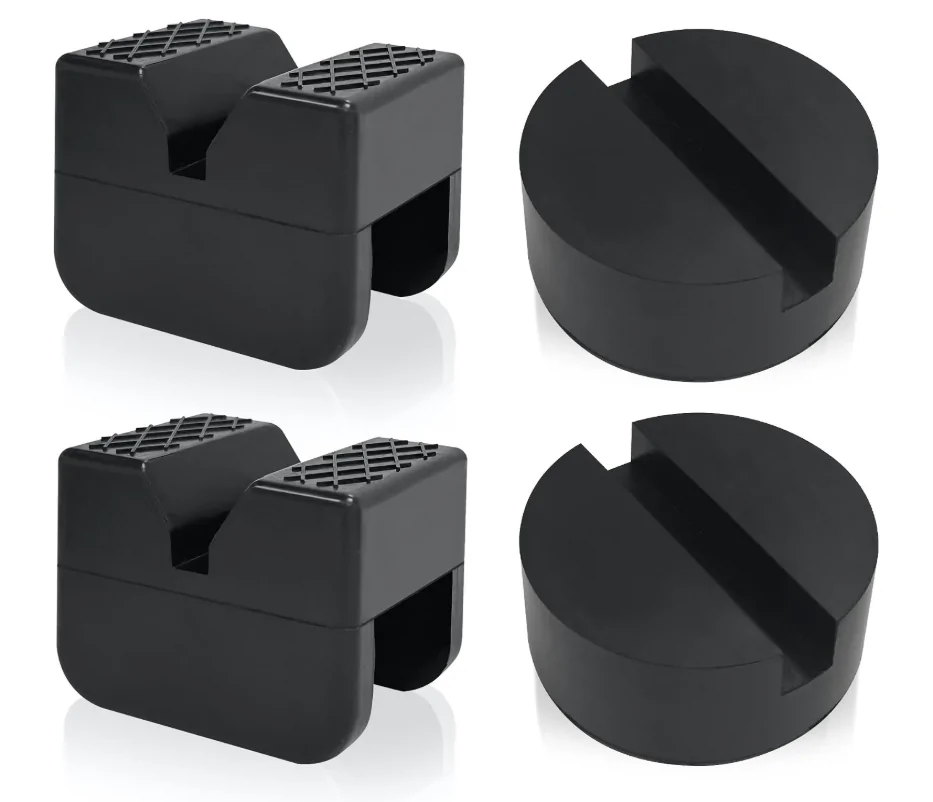
I've mentioned "adapters" in the list of parts and tools. I mean this:
Ford Maverick My brake job and upgrading rotors & pads (DIY how-to) 1790085398448-3l

(they are available on Amazon)

The ones on the left go on the jack stands, the right one goes on the floor jack. If you use jack stands or a floor jack without the rubber adapter, you may damage your vehicle.


Making room
You most definitely can grab an (old) rotor, while still attached, and turn it towards you, to make more room to work on the brake mechanism. This won't lock the steering wheel and won't break anything. If you touch the braking surface of the new rotor, make sure you wipe it off with a cleaner.

Disconnecting hoses and Brake bleeding
The ALLDATA procedure calls for detaching the hose, and subsequently bleeding. No need to do that, IMO. Just make sure you don't twist the hose, and don't let the caliper hang by it! I find hanging the caliper on the suspension convenient.

Disassembling the brake caliper anchor plate (mounting bracket)
It's held in by the two anchor plate bolts. The only thing worth calling out is - don't let that fall on the ground. It would, if you're not holding it.

The anchor plate bolts
If you read the manual, you'd see you're supposed to throw away the anchor plate bolts and install new ones. I would, if I had the OEM ones, but I didn't get them. Those bolts are not true TTY bolts, they don't twist. So as long as you clean off the old Loctite (seems to be red) from them and apply blue one, you should be fine. One thing that's puzzling me a little is that applying blue Loctite would result actually in a higher torque, because it would be a "wet" torque now, and not a "dry" one anymore. Anyway...

Pushing pistons in
The tool makes it easy and hassle free. Of course don't use the tool directly against the piston, place a used brake pad in between them. The trick is to do it slowly and in steps. It's also a good idea to open the brake tank cap, to alleviate pressure. However, don't forget to close it as soon as you're done, as that takes in moisture from the air quickly. And while you're pushing in small increments, watch the level of the fluid, as it would rise. You don't want that tank overflowing, brake fluid strips car paint. If the tank is at MAX before you even start replacing old brake pads, someone must have topped it off. You may need to siphon a bit off. I haven't done the rear yet, but I know for a fact that you don't need to twist/turn, as you push in, as long as you've entered brake maintenance mode. Stop pushing the pistons in when you start feeling resistance.

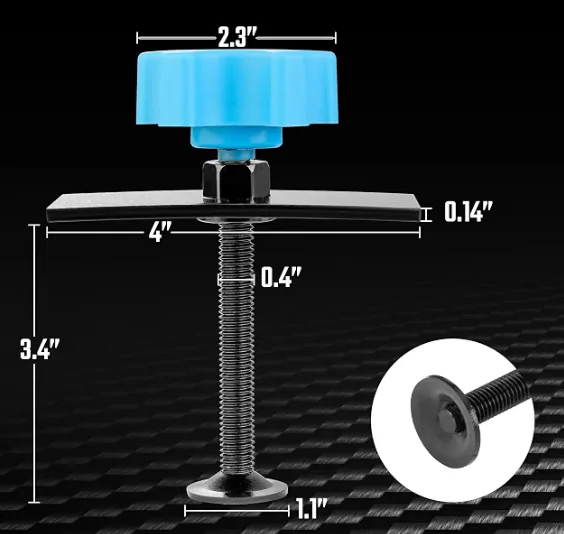
This is what the caliper tool looks like:
Ford Maverick My brake job and upgrading rotors & pads (DIY how-to) 1790085579907-36


Getting the rotor(s) off
I spent 2 hours on the first one. It was totally stuck and nothing would move it. Tip: if you're going to be smacking the rotor face with a rubber hammer, or the hub itself with an iron hammer, put on the lug nuts to protect the bolt threads, in case you hit them by accident.

Then I sprayed the rotor with WD-40 and after 15min it was off. The other side I did in advance and by the time I was done with the bracket, it was already sliding off on its own. On that note, keep one or two lug nuts in, to avoid letting the rotor accidentally fly off.

Upon visual inspection, I have to say my old rotors looked "brand new". Of course, the lateral runout is impossible to detect by touch or look, but I am fairly certain it was there, as confirmed by the results (see below). I should have spent a bit of money on a tool to measure it, just to know HOW bad was it, but oh well.

Bushings
The brake kit usually comes with "hardware" - the rubber bushings. While you're at it, you should replace them, especially if your brakes have made it to higher mileage on them. My understanding of the repair process and diagrams is that the ones in the rear, opposite side of the bleeder, are especially important to replace. Try not to rip the bushings while installing them. The documentation calls for a socket to be used, tp push them in. Outside lubrication (brake grease) is important and helps too.

Cleaning, grease, anti-seize
There are basically 3 compounds that get used during the procedure:
  • Grease - one that can be used on rubber boots. The brake kit comes with it, so I was good. Applied to where metal moves against metal. Funny enough, when I was taking off the old parts, there wasn't any left. So I'd say, that stuff is probably gone from your metal parts in a week. Perhaps some stays in the rubber bushing with the guide pins (which you're supposed to grease too)
  • Anti-seize - got myself a jar. Applied in a few key places, such as the hub head (pressed against the wheel)
  • Brake cleaner - it evaporates and saves you the time it would take to otherwise wash everything in soap and hot water and then get it dry

The result
After the vehicle came back together, there was the break in procedure for the brand that I've purchased. It's very specific and ensures top performance and longevity of the system.

Lo and behold, by just replacing the front brakes, the steering wheel vibration is gone. So I disagree with Ford's finding that the issue is in the rear and I would have spent $750+ on just the rear, only to find out I'd also have to do the front. In sum, it would have been more than $1500, I assume.

I am yet to do the rear, since I already have the parts and I feel a very light vibration in the brake pedal. So I think both - front and rear were shot. My impression so far is that Ford has put in really cheap brakes and tires on this truck. While I am pissed at having to spend time and money on that, I don't mind upgrading it.


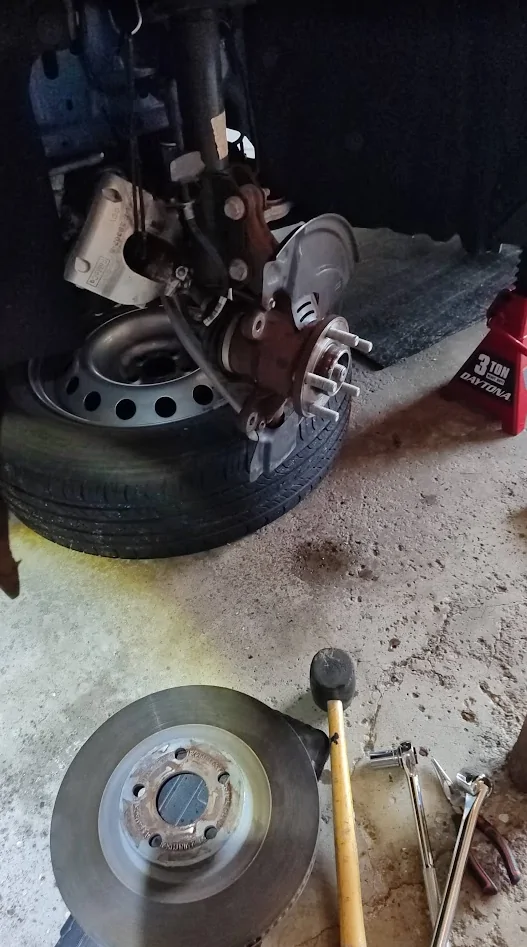
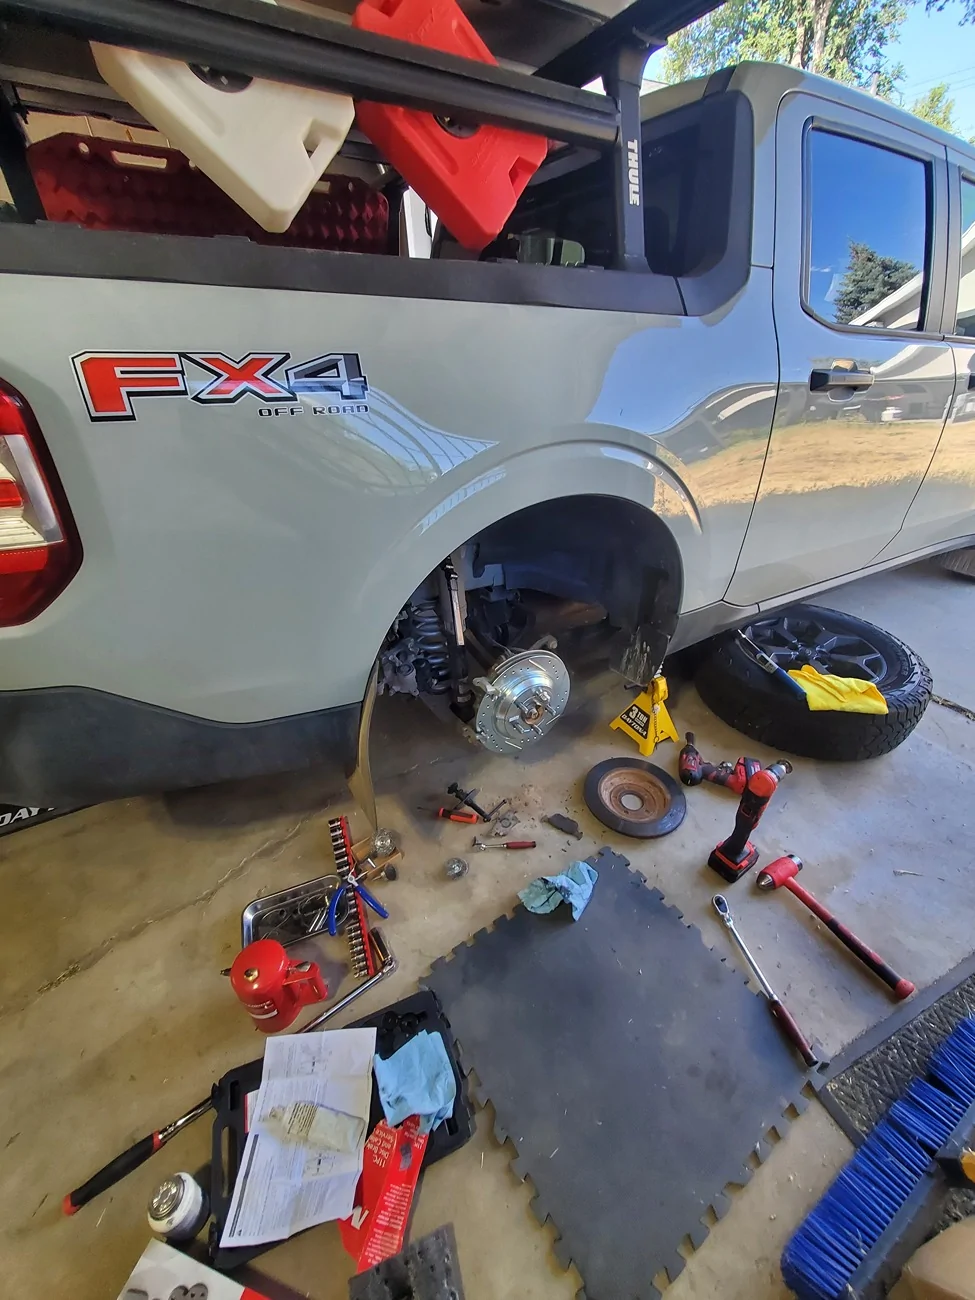
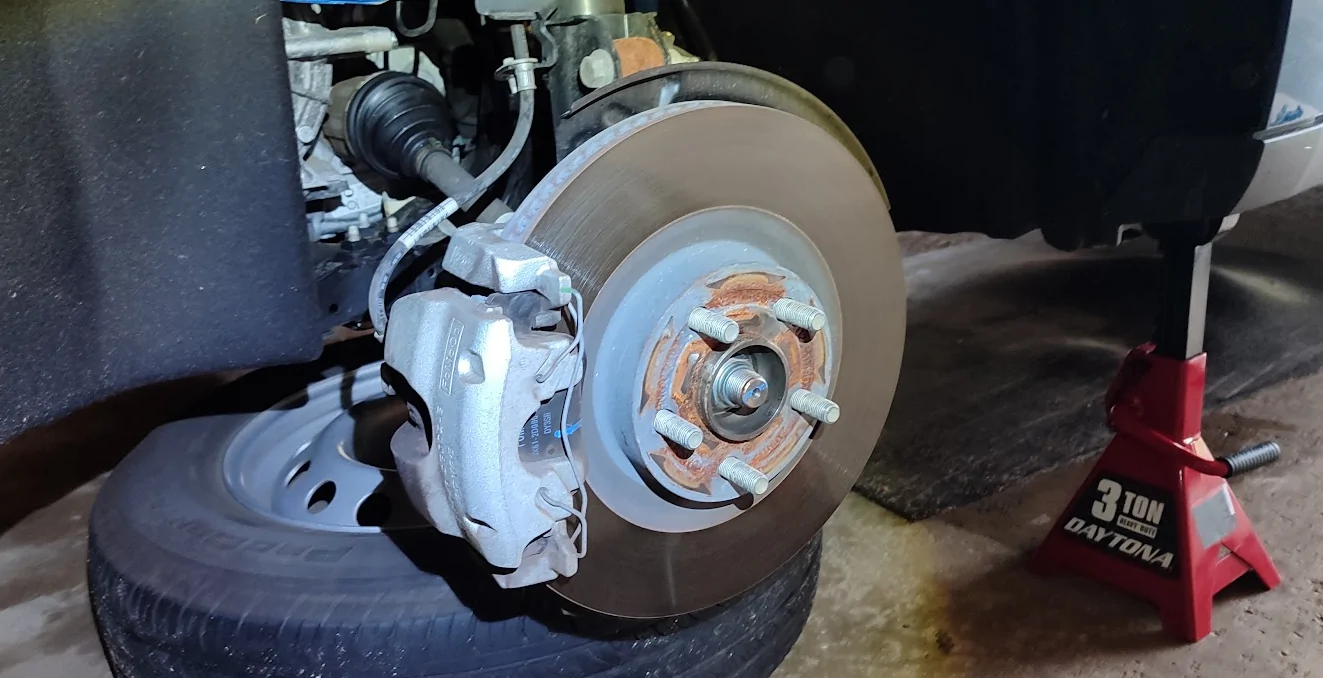
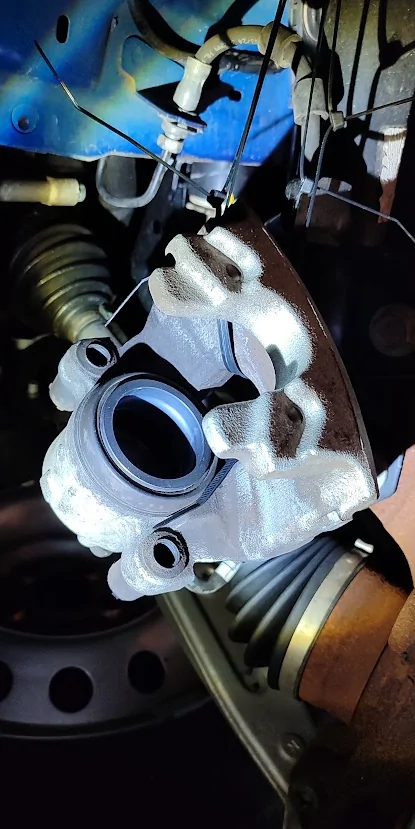
And some photos
Ford Maverick My brake job and upgrading rotors & pads (DIY how-to) 1790013783578-5c

Ford Maverick My brake job and upgrading rotors & pads (DIY how-to) 1790013802498-7h

Ford Maverick My brake job and upgrading rotors & pads (DIY how-to) 1790023818599-cq

Ford Maverick My brake job and upgrading rotors & pads (DIY how-to) 1790023833194-sf

Ford Maverick My brake job and upgrading rotors & pads (DIY how-to) 1790013827231-tq
Sponsored

 
Last edited:

El Kabong

2.5L Hybrid
Well-known member
Joined
Apr 1, 2026
Threads
17
Messages
516
Reaction score
1,007
Location
Carnation, WA
Vehicle(s)
2026 Maverick Lariat Hybrid AWD, 2017 VW Golf Wolfsburg
Engine
2.5L Hybrid
Nice write-up!

I used to do brakes and other "light" mechanical work in a shop and have always done my own brakes at home.

One of the things that can cause vibration in braking systems is pads leaving material stuck to rotors (my '96 V6 Ford Contour did this to me). If you do a lot of high-speed highway driving with repeated hard braking (so, normal commuting for a lot of folks) or live in hilly country where the brakes get a workout what can happen is that on a very hot rotor the pad will clamp it's own dust to the metal and it gets embedded on the surface of the rotor ("sticks"). Subsequent hot cycles make even more of the pad material stick in the spots that are affected and that becomes the source of pulsation/vibration.

In this scenario the rotor may not actually be warped and even if you clean the rotor off on a brake lathe the problem will come back due to the metallurgy of the rotor and the material in the pad.

The upgrade you've done here - better rotors and better quality pads - is the only real "fix".
 

Maverick123

2.5L Hybrid
Well-known member
Joined
Mar 24, 2025
Threads
36
Messages
1,125
Reaction score
2,025
Location
Canada
Vehicle(s)
25 hybrid
Engine
2.5L Hybrid
Awesome write up, you did your research and pretty much nailed the repair.

Alternatively, you can flush the old brake fluid while changing pads by putting a rubber hose from the bleeders into a bottle and cracking the bleeders open when pushing the pistons back into the calipers. The old fluid will get flushed out and once the pistons are retracted all the way just close the bleeders.

Assuming you installed all new pads, refill the master cylinder to the full mark with fresh fluid. If you only changed one axle, refill it half way between full and empty.

Pro tip; you should NEVER routinely top up brake fluid. Unless you have a leak, brake fluid level is a pretty good indicator of brake pad wear. Brake fluid is low? Install new pads, it'll come back up to full

HTH
 

KO Stradivarius

2.5L Hybrid
Well-known member
Joined
May 3, 2025
Threads
2
Messages
197
Reaction score
369
Location
The Disputed Lands
Vehicle(s)
'25 XLT
Engine
2.5L Hybrid
Yours was a 2.0L Ecoboost. Of course, the 2.5L Hybrid has regenerative brakes. I assume they are a different animal than typical brakes. I know they last much longer until needing service.

We have a 2020 Escape Hybrid with 91k miles, still with the original brakes.

I have also done some brake replacements in the past but I’m not sure I would attempt this on a hybrid.

Does anyone have experience with replacing the regenerative brakes?
 

HeyBales

2.5L Hybrid
Well-known member
First Name
Mike
Joined
May 3, 2024
Threads
5
Messages
5,925
Reaction score
5,777
Location
KC Metro area
Vehicle(s)
2005 Toyota RAV4, 2024 XLT Hybrid
Engine
2.5L Hybrid
Yours was a 2.0L Ecoboost. Of course, the 2.5L Hybrid has regenerative brakes. I assume they are a different animal than typical brakes. I know they last much longer until needing service.

We have a 2020 Escape Hybrid with 91k miles, still with the original brakes.

I have also done some brake replacements in the past but I’m not sure I would attempt this on a hybrid.

Does anyone have experience with replacing the regenerative brakes?
Not how that works.
Regen braking/resistance is from the Traction Motor.
That's how it sends electrical back to the HVB. Regen.

If the EB has adaptive cruise - the brake systems are the same, from Electric Brake Booster (which allows the hybrid TM to provide resistance before fluid pressure is applied) to the Electric Parking Brake.

The instructions given apply.
 
Last edited:

Sponsored

Cherokee

2.0L EcoBoost
Well-known member
First Name
Marty
Joined
Jan 3, 2025
Threads
67
Messages
5,002
Reaction score
9,949
Location
North Carolina
Vehicle(s)
2026 Ford Maverick Tremor
Engine
2.0L EcoBoost
Love the drilled disk look.
Outstanding !
 

mwelby

2.0L EcoBoost
Well-known member
First Name
mwelby
Joined
Mar 12, 2026
Threads
4
Messages
233
Reaction score
264
Location
New Mexico
Vehicle(s)
2025 Ford Maverick 2.0
Engine
2.0L EcoBoost
Note: this is for a Ford Maverick 2.0 2024 XL

I am no mechanic by any means, but I can follow instructions and I'm moderately handy. Thought I'd document my experience with a brake problem that I had, the Ford dealership and the subsequent repair. Bits and pieces may help someone else, or you could just use it as an opportunity to tell me all the things I've done wrong ;)

Problem
Ok, so first thing - at around 15k miles I ran into a problem - the steering wheel and brake pedal were vibrating when I was decelerating from over 60 mph, down through 50mph and 40mph. I thought - ok, one more rotors are probably shot.

Ford Dealership
I got in for a routine oil change and tire rotation. I thought I'd combine it with a resolution of the brakes problem.

The gist of our interaction was:
  • Ford: "Ok, for $250 we will take a look"
  • Me: "But I just paid for 'The Works' package, surely it covers enough for you to be at least able to tell me what's wrong"
  • Ford Mechanic: "Ok, I took it for a ride, it's the rear rotors"
  • Me: "What about warranty?"
  • Ford: "Sorry mate, wearable parts and all..."
  • (keep in mind the vehicle is barely year and a half old, 15-20k miles)
  • Ford: "But for $750 we will put another set of bottom tier brakes in the rear"
  • Me: no thanks
Prep
Not to be taken as an advertisement of any specific brand or a store chain, but in addition to the tools I already had, I purchased:
  • Jack stands
  • Floor jack
  • Impact wrench (turned out I don't need it)
  • Metric impact socket set
  • Loctite (for the anchor plate bolts, we'll get to that)
  • Jack stand pads + floor jack adapters
  • Brake caliper piston tool (costs the same as a C-Clamp, but you can't use a C-Clamp on the rear)
  • 3/8" Drive Hex Bit Metric Socket 7mm (for the guide pins)
  • Brake cleaner
  • Bigger torque wrench

I got myself a complete PowerStop K8940 kit (front and rear) pads, which to my understanding is a premium tier. I got them from a popular online warehouse for less then $300, plus tax and shipping. Which is about 30% cheaper than getting them from popular retailers. And possibly around 50-100% cheaper than getting them from a repair shop.

So for the amount of money Ford quoted me for economy rear brakes, I got myself premium brakes front and rear, plus the tools.

Specs
Libraries in the USA have subscription to ALLDATA. All you have to do is get on one of their computers or connect to their local WiFi. I printed off all the relevant (torque) specs and procedures. That's gold.

The brake job
Due to my inexperience with that particular repair, what was supposed to be a 2 hour job turned into an 8 hour job. I will only call out the "interesting" parts.

In somewhat chronological order ...

Brake maintenance mode
It is actually mandatory not just for the rear, but also for the front as well. Otherwise the system may detect something being wrong with your brakes (leak, etc) and freak out. The process is simple and well documented, if you take it from the right source. I think a lot of people might be doing it wrong, and think that their truck is having an issue with entering maintenance mode. Listen for the retraction of the mechanism, it's very audible! And on the rears, you can't use a C-Clamp, because that would pinch the electronics.

The use of impact wrench
IMO totally unnecessary. First off, the torque (150 lb-ft) on the wheel lugs make it impossible for my cheap impact wrench to undo, at least not without damaging the lug nuts. I just used a breaker bar. And for the tightening, you're not supposed to use impact wrench anyway.

Lifting the vehicle off the ground
Vehicle in Park. Wheel chocks, or various lumber cuttings, whatever you have.
As you know, on those vehicles there's something called pinch welds. And there's a molded arrow pointing you at where you're supposed to place the jack stand. The thing is - you can't place a floor jack AND a jack stand at the exact same spot, obviously. But those pinch welds actually run wide. The arrows, in my opinion, are more for symmetry and balance, when you lift both sides (as you should). So when lifting the front, placing the floor stand a bit to the rear, just enough to place the stand next to it (to the front, where the actual arrow is) is totally fine.

Making room
You most definitely can grab an (old) rotor, while still attached, and turn it towards you, to make more room to work on the brake mechanism. This won't lock the steering wheel and won't break anything. If you touch the braking surface of the new rotor, make sure you wipe it off with a cleaner.

Disconnecting hoses and Brake bleeding
The ALLDATA procedure calls for detaching the hose, and subsequently bleeding. No need to do that, IMO. Just make sure you don't twist the hose, and don't let the caliper hang by it! I find hanging the caliper on the suspension convenient.

Disassembling the brake caliper anchor plate (mounting bracket)
It's held in by the two anchor plate bolts. The only thing worth calling out is - don't let that fall on the ground. It would, if you're not holding it.

The anchor plate bolts
If you read the manual, you'd see you're supposed to throw away the anchor plate bolts and install new ones. I would, if I had the OEM ones, but I didn't get them. Those bolts are not true TTY bolts, they don't twist. So as long as you clean off the old Loctite (seems to be red) from them and apply blue one, you should be fine. One thing that's puzzling me a little is that applying blue Loctite would result actually in a higher torque, because it would be a "wet" torque now, and not a "dry" one anymore. Anyway...

Pushing pistons in
The tool makes it easy and hassle free. Of course don't use the tool directly against the piston, place a used brake pad in between them. The trick is to do it slowly and in steps. It's also a good idea to open the brake tank cap, to alleviate pressure. However, don't forget to close it as soon as you're done, as that takes in moisture from the air quickly. And while you're pushing in small increments, watch the level of the fluid, as it would rise. You don't want that tank overflowing, brake fluid strips car paint. If the tank is at MAX before you even start replacing old brake pads, someone must have topped it off. You may need to siphon a bit off. I haven't done the rear yet, but I know for a fact that you don't need to twist/turn, as you push in, as long as you've entered brake maintenance mode.

Stop pushing the pistons in when you start feeling resistance.

Getting the rotor(s) off
I spent 2 hours on the first one. It was totally stuck and nothing would move it. Tip: if you're going to be smacking the rotor face with a rubber hammer, or the hub itself with an iron hammer, put on the lug nuts to protect the bolt threads, in case you hit them by accident.

Then I sprayed the rotor with WD-40 and after 15min it was off. The other side I did in advance and by the time I was done with the bracket, it was already sliding off on its own. On that note, keep one or two lug nuts in, to avoid letting the rotor accidentally fly off.

Upon visual inspection, I have to say my old rotors looked "brand new". Of course, the lateral runout is impossible to detect by touch or look, but I am fairly certain it was there, as confirmed by the results (see below). I should have spent a bit of money on a tool to measure it, just to know HOW bad was it, but oh well.

Bushings
The brake kit usually comes with "hardware" - the rubber bushings. While you're at it, you should replace them, especially if your brakes have made it to higher mileage on them. My understanding of the repair process and diagrams is that the ones in the rear, opposite side of the bleeder, are especially important to replace. Try not to rip the bushings while installing them. The documentation calls for a socket to be used, tp push them in. Outside lubrication (brake grease) is important and helps too.

Cleaning, grease, anti-seize
There are basically 3 compounds that get used during the procedure:
  • Grease - one that can be used on rubber boots. The brake kit comes with it, so I was good. Applied to where metal moves against metal. Funny enough, when I was taking off the old parts, there wasn't any left. So I'd say, that stuff is probably gone from your metal parts in a week. Perhaps some stays in the rubber bushing with the guide pins (which you're supposed to grease too)
  • Anti-seize - got myself a jar. Applied in a few key places, such as the hub head (pressed against the wheel)
  • Brake cleaner - it evaporates and saves you the time it would take to otherwise wash everything in soap and hot water and then get it dry

The result
After the vehicle came back together, there was the break in procedure for the brand that I've purchased. It's very specific and ensures top performance and longevity of the system.

Lo and behold, by just replacing the front brakes, the steering wheel vibration is gone. So I disagree with Ford's finding that the issue is in the rear and I would have spent $750+ on just the rear, only to find out I'd also have to do the front. In sum, it would have been more than $1500, I assume.

I am yet to do the rear, since I already have the parts and I feel a very light vibration in the brake pedal. So I think both - front and rear were shot. My impression so far is that Ford has put in really cheap brakes and tires on this truck. While I am pissed at having to spend time and money on that, I don't mind upgrading it.


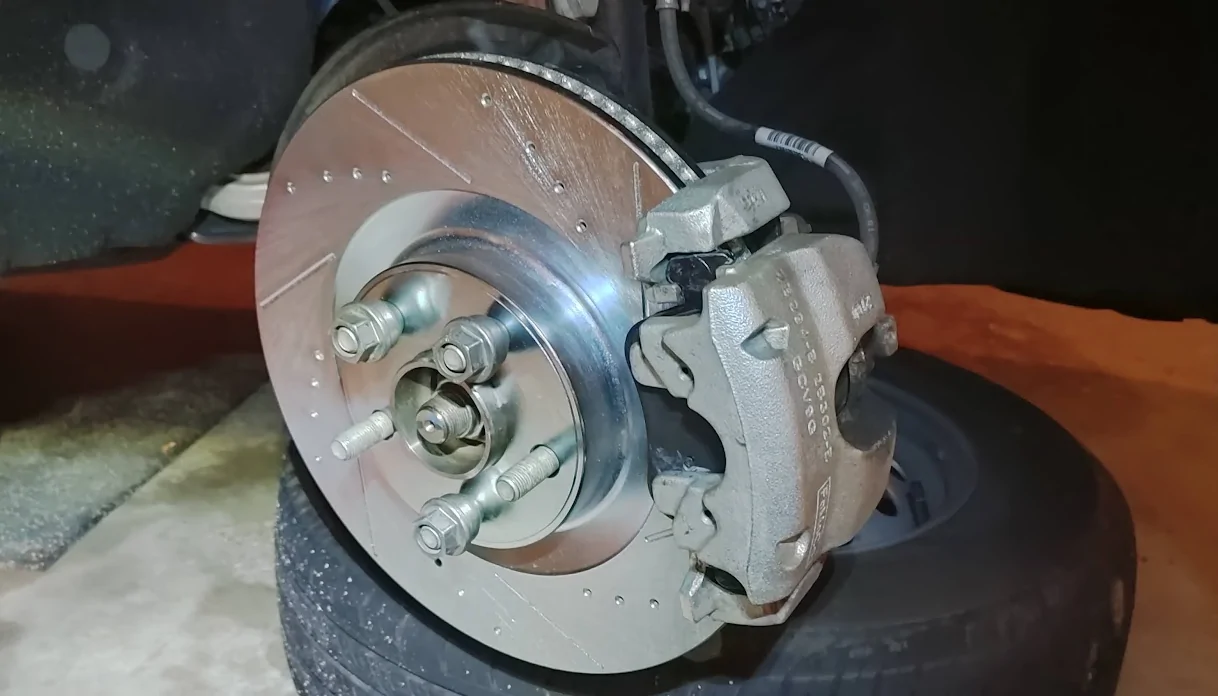
And some photos
1790013783578-5c.webp

1790013802498-7h.webp

1790023818599-cq.webp

1790023833194-sf.webp

1790013827231-tq.webp
Great write-up! 😊👍
Note: this is for a Ford Maverick 2.0 2024 XL

I am no mechanic by any means, but I can follow instructions and I'm moderately handy. Thought I'd document my experience with a brake problem that I had, the Ford dealership and the subsequent repair. Bits and pieces may help someone else, or you could just use it as an opportunity to tell me all the things I've done wrong ;)

Problem
Ok, so first thing - at around 15k miles I ran into a problem - the steering wheel and brake pedal were vibrating when I was decelerating from over 60 mph, down through 50mph and 40mph. I thought - ok, one more rotors are probably shot.

Ford Dealership
I got in for a routine oil change and tire rotation. I thought I'd combine it with a resolution of the brakes problem.

The gist of our interaction was:
  • Ford: "Ok, for $250 we will take a look"
  • Me: "But I just paid for 'The Works' package, surely it covers enough for you to be at least able to tell me what's wrong"
  • Ford Mechanic: "Ok, I took it for a ride, it's the rear rotors"
  • Me: "What about warranty?"
  • Ford: "Sorry mate, wearable parts and all..."
  • (keep in mind the vehicle is barely year and a half old, 15-20k miles)
  • Ford: "But for $750 we will put another set of bottom tier brakes in the rear"
  • Me: no thanks
Prep
Not to be taken as an advertisement of any specific brand or a store chain, but in addition to the tools I already had, I purchased:
  • Jack stands
  • Floor jack
  • Impact wrench (turned out I don't need it)
  • Metric impact socket set
  • Loctite (for the anchor plate bolts, we'll get to that)
  • Jack stand pads + floor jack adapters
  • Brake caliper piston tool (costs the same as a C-Clamp, but you can't use a C-Clamp on the rear)
  • 3/8" Drive Hex Bit Metric Socket 7mm (for the guide pins)
  • Brake cleaner
  • Bigger torque wrench

I got myself a complete PowerStop K8940 kit (front and rear) pads, which to my understanding is a premium tier. I got them from a popular online warehouse for less then $300, plus tax and shipping. Which is about 30% cheaper than getting them from popular retailers. And possibly around 50-100% cheaper than getting them from a repair shop.

So for the amount of money Ford quoted me for economy rear brakes, I got myself premium brakes front and rear, plus the tools.

Specs
Libraries in the USA have subscription to ALLDATA. All you have to do is get on one of their computers or connect to their local WiFi. I printed off all the relevant (torque) specs and procedures. That's gold.

The brake job
Due to my inexperience with that particular repair, what was supposed to be a 2 hour job turned into an 8 hour job. I will only call out the "interesting" parts.

In somewhat chronological order ...

Brake maintenance mode
It is actually mandatory not just for the rear, but also for the front as well. Otherwise the system may detect something being wrong with your brakes (leak, etc) and freak out. The process is simple and well documented, if you take it from the right source. I think a lot of people might be doing it wrong, and think that their truck is having an issue with entering maintenance mode. Listen for the retraction of the mechanism, it's very audible! And on the rears, you can't use a C-Clamp, because that would pinch the electronics.

The use of impact wrench
IMO totally unnecessary. First off, the torque (150 lb-ft) on the wheel lugs make it impossible for my cheap impact wrench to undo, at least not without damaging the lug nuts. I just used a breaker bar. And for the tightening, you're not supposed to use impact wrench anyway.

Lifting the vehicle off the ground
Vehicle in Park. Wheel chocks, or various lumber cuttings, whatever you have.
As you know, on those vehicles there's something called pinch welds. And there's a molded arrow pointing you at where you're supposed to place the jack stand. The thing is - you can't place a floor jack AND a jack stand at the exact same spot, obviously. But those pinch welds actually run wide. The arrows, in my opinion, are more for symmetry and balance, when you lift both sides (as you should). So when lifting the front, placing the floor stand a bit to the rear, just enough to place the stand next to it (to the front, where the actual arrow is) is totally fine.

Making room
You most definitely can grab an (old) rotor, while still attached, and turn it towards you, to make more room to work on the brake mechanism. This won't lock the steering wheel and won't break anything. If you touch the braking surface of the new rotor, make sure you wipe it off with a cleaner.

Disconnecting hoses and Brake bleeding
The ALLDATA procedure calls for detaching the hose, and subsequently bleeding. No need to do that, IMO. Just make sure you don't twist the hose, and don't let the caliper hang by it! I find hanging the caliper on the suspension convenient.

Disassembling the brake caliper anchor plate (mounting bracket)
It's held in by the two anchor plate bolts. The only thing worth calling out is - don't let that fall on the ground. It would, if you're not holding it.

The anchor plate bolts
If you read the manual, you'd see you're supposed to throw away the anchor plate bolts and install new ones. I would, if I had the OEM ones, but I didn't get them. Those bolts are not true TTY bolts, they don't twist. So as long as you clean off the old Loctite (seems to be red) from them and apply blue one, you should be fine. One thing that's puzzling me a little is that applying blue Loctite would result actually in a higher torque, because it would be a "wet" torque now, and not a "dry" one anymore. Anyway...

Pushing pistons in
The tool makes it easy and hassle free. Of course don't use the tool directly against the piston, place a used brake pad in between them. The trick is to do it slowly and in steps. It's also a good idea to open the brake tank cap, to alleviate pressure. However, don't forget to close it as soon as you're done, as that takes in moisture from the air quickly. And while you're pushing in small increments, watch the level of the fluid, as it would rise. You don't want that tank overflowing, brake fluid strips car paint. If the tank is at MAX before you even start replacing old brake pads, someone must have topped it off. You may need to siphon a bit off. I haven't done the rear yet, but I know for a fact that you don't need to twist/turn, as you push in, as long as you've entered brake maintenance mode.

Stop pushing the pistons in when you start feeling resistance.

Getting the rotor(s) off
I spent 2 hours on the first one. It was totally stuck and nothing would move it. Tip: if you're going to be smacking the rotor face with a rubber hammer, or the hub itself with an iron hammer, put on the lug nuts to protect the bolt threads, in case you hit them by accident.

Then I sprayed the rotor with WD-40 and after 15min it was off. The other side I did in advance and by the time I was done with the bracket, it was already sliding off on its own. On that note, keep one or two lug nuts in, to avoid letting the rotor accidentally fly off.

Upon visual inspection, I have to say my old rotors looked "brand new". Of course, the lateral runout is impossible to detect by touch or look, but I am fairly certain it was there, as confirmed by the results (see below). I should have spent a bit of money on a tool to measure it, just to know HOW bad was it, but oh well.

Bushings
The brake kit usually comes with "hardware" - the rubber bushings. While you're at it, you should replace them, especially if your brakes have made it to higher mileage on them. My understanding of the repair process and diagrams is that the ones in the rear, opposite side of the bleeder, are especially important to replace. Try not to rip the bushings while installing them. The documentation calls for a socket to be used, tp push them in. Outside lubrication (brake grease) is important and helps too.

Cleaning, grease, anti-seize
There are basically 3 compounds that get used during the procedure:
  • Grease - one that can be used on rubber boots. The brake kit comes with it, so I was good. Applied to where metal moves against metal. Funny enough, when I was taking off the old parts, there wasn't any left. So I'd say, that stuff is probably gone from your metal parts in a week. Perhaps some stays in the rubber bushing with the guide pins (which you're supposed to grease too)
  • Anti-seize - got myself a jar. Applied in a few key places, such as the hub head (pressed against the wheel)
  • Brake cleaner - it evaporates and saves you the time it would take to otherwise wash everything in soap and hot water and then get it dry

The result
After the vehicle came back together, there was the break in procedure for the brand that I've purchased. It's very specific and ensures top performance and longevity of the system.

Lo and behold, by just replacing the front brakes, the steering wheel vibration is gone. So I disagree with Ford's finding that the issue is in the rear and I would have spent $750+ on just the rear, only to find out I'd also have to do the front. In sum, it would have been more than $1500, I assume.

I am yet to do the rear, since I already have the parts and I feel a very light vibration in the brake pedal. So I think both - front and rear were shot. My impression so far is that Ford has put in really cheap brakes and tires on this truck. While I am pissed at having to spend time and money on that, I don't mind upgrading it.


And some photos
1790013783578-5c.webp

1790013802498-7h.webp

1790023818599-cq.webp

1790023833194-sf.webp

1790013827231-tq.webp
 

rclee

2.5L Hybrid
Well-known member
First Name
Rob
Joined
Jul 15, 2021
Threads
25
Messages
1,400
Reaction score
2,368
Location
Dayton Ohio
Vehicle(s)
2022 XLT Maverick Lux,A51,Hybrid,Rear Slider.
Engine
2.5L Hybrid
Clubs
 
Thanks for taking the time to do this write-up. Great job!
 

rick52

2.0L EcoBoost
Well-known member
First Name
Rick
Joined
Apr 9, 2026
Threads
6
Messages
147
Reaction score
290
Vehicle(s)
2026 Maverick / 1967 Mustang Restomod
Engine
2.0L EcoBoost
Happy to see that you disregarded the instructions to disconnect the brake hose. Can't imagine why they would suggest something which is unnecessary, and could create an additional issue on the reinstallation.
 
Sponsored

Bob The Builder

2.0L EcoBoost
Well-known member
First Name
Butch
Joined
Dec 2, 2021
Threads
55
Messages
2,747
Reaction score
5,440
Location
Vermont
Vehicle(s)
2020 Jeep Cherokee ** 2023 Mav FX/4
Engine
2.0L EcoBoost
Moral of the story, NEVER go to a Stealership to get a brake job. Actually, never go to a Stealership to have anything done unless it is needed for a recall or warranty.

My mechanic charges $75 / Hour. In this day and age that is more than reasonable. $40 for State of VT safety inspection. Dealer, $110.00. You get the story.

BTW, nice write up, you should write how to manuals.
 

wakkawakka22

2.5L Hybrid
Well-known member
First Name
Branden
Joined
Jul 22, 2026
Threads
2
Messages
83
Reaction score
169
Location
Tulsa, OK
Vehicle(s)
2026 Ford Maverick Lariat Hybrid AWD
Engine
2.5L Hybrid
Clubs
 
Those old rotors make excellent door stops and tarp hold-downs, don't throw em away!
 

TKranbuhl

2.0L EcoBoost
Well-known member
First Name
Tim
Joined
Dec 24, 2021
Threads
1
Messages
227
Reaction score
248
Location
45013
Vehicle(s)
2024 Ford Maverick
Engine
2.0L EcoBoost
Nice write up. That's pretty much what this forum is for. I've had both a '22 XLT and a '24 XLT and the brakes were just OK, no problems but just OK. The brakes on my '26 Lobo are excellent. I haven't checked out why they're so much better, but they are. I'm just now , after a few thousand miles, getting used to them.
 

Maverick123

2.5L Hybrid
Well-known member
Joined
Mar 24, 2025
Threads
36
Messages
1,125
Reaction score
2,025
Location
Canada
Vehicle(s)
25 hybrid
Engine
2.5L Hybrid
Those old rotors make excellent door stops and tarp hold-downs, don't throw em away!
Good suggestions, but clean them well because brake dust is messy & isn't good for your health.

And if you don't need them for uses like that, bring them to a metal recycler or take them to a local garage, they always have a "scrap metal" bin or container for used parts which gets picked up by recyclers ... better than throwing them in the trash and having them end up in a landfill.

Also forgot to add earlier - I always put a tiny dab of anti-seize on every fastener while installing it (except wheel studs). Future you / future owners will be thankful for that
 

801Maverick801

2.0L EcoBoost
Well-known member
Joined
Jun 29, 2022
Threads
23
Messages
452
Reaction score
955
Location
Utah
Vehicle(s)
Subaru Forester
Engine
2.0L EcoBoost
I had the same issue as you, vibration through the steering wheel on downhill braking. Rear Rotors were totally warped, but I got 65k miles out of them. The fronts still have tons of life on them. Got a Powerstop kit for pads and rotors for like 150$. Pretty easy brake job, just took the parking brake motor apart and spun it back by hand. I cant imagine paying someone else to do my brakes.

Ford Maverick My brake job and upgrading rotors & pads (DIY how-to) 20260709_164854
Ford Maverick My brake job and upgrading rotors & pads (DIY how-to) 20260709_191340
Sponsored


Top