Sponsored

Jacques_rock

2.0L EcoBoost
Active member
First Name
Jacques
Joined
Feb 22, 2022
Threads
0
Messages
26
Reaction score
32
Location
California
Vehicle(s)
None
Engine
2.0L EcoBoost
Thanks to everyone doing all the research! I'm curious how long I can pull 400W from the outlet. I have to admit I'm a bit lost amidst all the technical jargon.

I have a Hybrid, so the 400W inverter pulls from the 12V battery, which in turn pulls from the traction battery, which in turn gets topped up by the ICE. Do I have that correct?

If I've got it all straight in my head, I should be able to pull 400W for about an hour (the RC of the Hybrid battery) before tapping the traction battery, and after that, assuming the traction battery had a good charge to start, another three hours before the ICE needs to spin up?
Your math lines up with mine! 4hrs isnt bad for only using battery
Sponsored


icegradner

2.5L Hybrid
Well-known member
Joined
Nov 5, 2021
Threads
19
Messages
3,806
Reaction score
5,918
Location
British Columbia, Canada
Vehicle(s)
2022 XLT Maverick Hybrid
Engine
2.5L Hybrid
Clubs
 
Thanks to everyone doing all the research! I'm curious how long I can pull 400W from the outlet. I have to admit I'm a bit lost amidst all the technical jargon.

I have a Hybrid, so the 400W inverter pulls from the 12V battery, which in turn pulls from the traction battery, which in turn gets topped up by the ICE. Do I have that correct?

If I've got it all straight in my head, I should be able to pull 400W for about an hour (the RC of the Hybrid battery) before tapping the traction battery, and after that, assuming the traction battery had a good charge to start, another three hours before the ICE needs to spin up?
You've got it right for the most part. The 12v gets charge whenever the vehicle is on, the ICE does not have to be on. Also, if the vehicle is off, the plug doesn't stay hot forever, never timed it though. The 12v battery is only 45Ah, so it's not very big. If you use it a lot, you'll kill that little thing rather fast charging and discharging it often. It's just basic battery, not a deep cycle or anything like that.
 

TedTX

2.5L Hybrid
Well-known member
First Name
Ted
Joined
Aug 12, 2022
Threads
20
Messages
1,614
Reaction score
1,311
Location
San Antonio TX
Vehicle(s)
Maverick
Engine
2.5L Hybrid
Great job! However the hybrid eats above 4A when in ready mode. ICE will kick in 3X per hour in my observation even with minimal load. There is about 400wh in the active range of the high voltage battery and will not allow the 12v to drop low to get full power out of that source. So you are really just cycling the big battery.
It’s still the best portable generator by gallons used per day (3 gallons per day if camping with A/C on and about 100w per hour for my stuff )
 

Ranch

2.0L EcoBoost
Well-known member
First Name
Bob
Joined
Sep 19, 2022
Threads
0
Messages
928
Reaction score
1,011
Location
Sacramento CA
Vehicle(s)
2023 Marverick FX4 4K
Engine
2.0L EcoBoost
Alright, guys so I finally finished my 500Watt inverter install. I made a quick video walking through the setup and how I ran my wires. Sorry for turning the camera all over the place, I'm far from a professional YouTuber 😅. That said, I'll also give you guys a written rundown of the installation along with links to all the parts I used.


Pats List:
40A Breaker
2 Nema 5-15r Sockets
500 Watt Inverter
15ft Nema 5-15p Exstentions
Battery/Inverter DC Terminal ends
DC Power Cables (Side note, for safety reasons you should probably step this up to a 6 gauge wire to protect more than 40A over the cable run. I realized this after the fact so take that into consideration when making your purchase)
Body Trim Tools
Optional Grommets

For mounting screws, I went to Homedepot and just grabbed a flat-top screw + nut combo set from the fastener section I can't remember what size I got. I'd suggest taking the outlet receptacle with you and checking to see what size screw fits best. I also got the switch and female spade connectors from Home depot.


Written Install:
Starting from the Inverter I just used some 1/4" nuts, bolts, and a few washers to mount it on one of the unused brackets behind the rear seat (see video). I ran the ground to the factory ground used near my installation location since it was close and easy.

For the AC cable, DC positive, and the optional switch I ran the wires across the back behind the middle seat belt and into the rear driver-side door panels. I did my best to route the cables smoothly without sharp bends (harsh bends are bad for high amperage wires) then I tried using the ford cable routing channels but they were impossible to get into without snapping some clips. Once I got into them it was super easy to run wires since there was plenty of space, but I don't think it was worth the effort.

Continuing I went to the driver seat belt holder body pannel and about halfway through I split off the AC cable and switch cables. These ran under the driver's seat and into a custom hole in the center console. I showed in the video how you can actually drill the hole pretty far from the Great of the console since there is an opening that has some free space (This is where the factory inverter is installed if I'm not mistaken). I then mounted the AC receptacle where the old barrel plug used to be. replacing the barrel plug took some massaging since the hole needed to be opened up but a file or Dremel could easily accomplish this. For the wiring, I just cut off the female end and cut away the sheathing to get access to the 3 cables I needed. I used the space connectors (seen in the video) to make the final connection from the wire to the plug terminals.

On the inner panel of the center console, I drilled a hole and opened it up for the switch that I wanted. This is totally optional but I found that the extra effort made my life a little easier if I ever needed to use the interior plug and didn't want to go into the back seat to turn it on.

Back to the driver door panel, I continued the DC power cable up to where the hood handle is. When you pull the cable all the way through there's an opening by the footrest (I pointed this out in the video as well). In the firewall, there is an unused grommet that I drilled a small hole in and ran my cable through.

Now that we've made it to the engine bay it's a little cramped to be able to grab the wire, I ended up using an old metal coat hanger as a wire puller and this worked fairly well. I pulled the cable up and put it through the 40A circuit breaker to protect the circuit. Definitely make sure to use a fuse or breaker to keep things safe. Too much power through too thin of cable is always bad news. After the fuse, I ran a short cable to the battery post and made sure to tighten the nut back to where it was marked.

After this, the system was installed and I just needed to run my final cable run to the bed. This was a shorter run and honestly easier than the inside run. I found an easy-to-access grommet that ford uses for their bed cables and tapped into that again. I pushed the wire down using the coat hanger and was able to pull it through from under the bed. Then I used some zip ties to keep the cable secure (if you tie a zip tie to another zip tie in a sort of figure 8 pattern you can avoid future wire rub). I made sure to keep a good distance from the exhaust since that gets pretty hot. Then I just opened up the back panel in the bed and installed the socket just like how I mounted the interior one. Drill a small hole, open it up to fit the socket, mount it with nuts and screws then use the space connectors to connect the wires to the plug terminals.


Conclusion:
Overall this took me about 2-3 hours on 4 separate occasions so I'd say ita an 8-10 hour project that you could easily finish in 1 day if you know what you're doing. I made sure to take my time and be safe with all the wires and installed things as neatly as I could. Honestly, anyone with time and patience could do this project and save a bunch of money rather than letting some pro do it. Good luck to anyone trying it and please feel free to ask me questions.
I have this post and your video book marked for when I get my Maverick. I may install an inverter even if I don't really need one just because it's a cool and fun project that doesn't cost a lot of money.

One thing to consider is spending a bit more on the inverter to battery cables. I would use pure copper/welding cables instead of the copper clad aluminum/CCA on you parts list. While the CCA cables may work fine considering the small loads that will be found with a 500 watt inverter I plan on using 6 Ga welding cable.

Here's a link for 25Ft for $35.

https://www.amazon.com/Welding-Batt...1-2-270ce31b-afa8-499f-878b-3bb461a9a5a6&th=1
 

Jacques_rock

2.0L EcoBoost
Active member
First Name
Jacques
Joined
Feb 22, 2022
Threads
0
Messages
26
Reaction score
32
Location
California
Vehicle(s)
None
Engine
2.0L EcoBoost
I have this post and your video book marked for when I get my Maverick. I may install an inverter even if I don't really need one just because it's a cool and fun project that doesn't cost a lot of money.

One thing to consider is spending a bit more on the inverter to battery cables. I would use pure copper/welding cables instead of the copper clad aluminum/CCA on you parts list. While the CCA cables may work fine considering the small loads that will be found with a 500 watt inverter I plan on using 6 Ga welding cable.

Here's a link for 25Ft for $35.

https://www.amazon.com/Welding-Battery-Flexible-Inverter-WindyNation/dp/B01LP0J2M0/ref=sxin_17_ac_d_bv?ac_md=2-1-VW5kZXIgJDUw-ac_d_bv_bv_bv&content-id=amzn1.sym.8f2bf95d-b9c2-4e6d-96a9-5fdf77a1951d:amzn1.sym.8f2bf95d-b9c2-4e6d-96a9-5fdf77a1951d&crid=X3U13HZ5MCQB&cv_ct_cx=6+gauge+welding+cable&keywords=6+gauge+welding+cable&pd_rd_i=B01LP0J2M0&pd_rd_r=ab76f8cd-52ca-48ae-a4c3-1f5103c97106&pd_rd_w=ka2ck&pd_rd_wg=ySH3k&pf_rd_p=8f2bf95d-b9c2-4e6d-96a9-5fdf77a1951d&pf_rd_r=ZDKHACTTNCVZ11A6QRHF&qid=1676237006&sprefix=6+gauge+welding+cable,aps,203&sr=1-2-270ce31b-afa8-499f-878b-3bb461a9a5a6&th=1
You got exactly what I was thinking with the wire. I don't ever plan on using 500watts sustained on the inverter so I'm not very worried but it's defiantly a better idea to over-build than under-build. If I do trip the breaker more than once or twice Ill defiantly make sure to grab that cable you mentioned.
 

Sponsored

Ranch

2.0L EcoBoost
Well-known member
First Name
Bob
Joined
Sep 19, 2022
Threads
0
Messages
928
Reaction score
1,011
Location
Sacramento CA
Vehicle(s)
2023 Marverick FX4 4K
Engine
2.0L EcoBoost
You got exactly what I was thinking with the wire. I don't ever plan on using 500watts sustained on the inverter so I'm not very worried but it's defiantly a better idea to over-build than under-build. If I do trip the breaker more than once or twice Ill defiantly make sure to grab that cable you mentioned.
I really don't need to add an inverter at all because I already have a 300 watt pure sine plug in inverter that I can use with any 12v power port.

I also have a 150 watt pure sine Tecknet power station, a 300 watt Jackery, and a 1000 watt EBL Voyager 1000 power station. So I already have multiple A/C power sources that will fit under the rear seat waiting for use.

What attracts me about doing your inverter project is for around the same price as the factory option you get a better pure sine inverter with a reasonable amount of time to install.

Thanks for sharing with us.
 

Jacques_rock

2.0L EcoBoost
Active member
First Name
Jacques
Joined
Feb 22, 2022
Threads
0
Messages
26
Reaction score
32
Location
California
Vehicle(s)
None
Engine
2.0L EcoBoost
I really don't need to add an inverter at all because I already have a 300 watt pure sine plug in inverter that I can use with any 12v power port.

I also have a 150 watt pure sine Tecknet power station, a 300 watt Jackery, and a 1000 watt EBL Voyager 1000 power station. So I already have multiple A/C power sources that will fit under the rear seat waiting for use.

What attracts me about doing your inverter project is for around the same price as the factory option you get a better pure sine inverter with a reasonable amount of time to install.

Thanks for sharing with us.
No problem! I'm glad you like it. I'm just trying to add as much value to my car without breaking the bank. Anyone who can benefit off of the work I'm already doing is just another plus.
 

Ranch

2.0L EcoBoost
Well-known member
First Name
Bob
Joined
Sep 19, 2022
Threads
0
Messages
928
Reaction score
1,011
Location
Sacramento CA
Vehicle(s)
2023 Marverick FX4 4K
Engine
2.0L EcoBoost
No problem! I'm glad you like it. I'm just trying to add as much value to my car without breaking the bank. Anyone who can benefit off of the work I'm already doing is just another plus.
I have a question. How many feet of red cable did it take to run from your inverter to the battery and how much black cable to the ground?

I'm trying to get an idea on how much cable I need to buy. I have some extra 6 ga and 2 ga from previous projects that I can use for the ground. The positive I will need to buy.
 

Jacques_rock

2.0L EcoBoost
Active member
First Name
Jacques
Joined
Feb 22, 2022
Threads
0
Messages
26
Reaction score
32
Location
California
Vehicle(s)
None
Engine
2.0L EcoBoost
I have a question. How many feet of red cable did it take to run from your inverter to the battery and how much black cable to the ground?

I'm trying to get an idea on how much cable I need to buy. I have some extra 6 ga and 2 ga from previous projects that I can use for the ground. The positive I will need to buy.
For the red cable, I had like 3-4ft extra so I'd suggest getting around 25ft just in case.
The black cable run was maybe 2ft.
 

Ranch

2.0L EcoBoost
Well-known member
First Name
Bob
Joined
Sep 19, 2022
Threads
0
Messages
928
Reaction score
1,011
Location
Sacramento CA
Vehicle(s)
2023 Marverick FX4 4K
Engine
2.0L EcoBoost
For the red cable, I had like 3-4ft extra so I'd suggest getting around 25ft just in case.
The black cable run was maybe 2ft.
Thanks. I was wondering if I could get away with buying 15ft. The WindyNation cable that I linked is the same price for 25ft as is the 20ft. So 25ft it is.

ETA. This means that someone could buy the 25ft of red cable and use some of the leftover for the ground. Just wrap it with black electrical tape if the red cover is a problem.
 
Last edited:
Sponsored

Jacques_rock

2.0L EcoBoost
Active member
First Name
Jacques
Joined
Feb 22, 2022
Threads
0
Messages
26
Reaction score
32
Location
California
Vehicle(s)
None
Engine
2.0L EcoBoost
Thanks. I was wondering if I could get away with buying 15ft. The WindyNation cable that I linked is the same price for 25ft as is the 20ft. So 25ft it is.

ETA. This means that someone could buy the 25ft of red cable and use some of the leftover for the ground. Just wrap it with black electrical tape if the red cover is a problem.
Yea you could defiantly get away with doing that. Save some money on that second wire. I just found that combo set and picked it up since it was easy.
 

MakinDoForNow

2.5L Hybrid
Well-known member
First Name
James
Joined
Sep 24, 2021
Threads
2
Messages
8,438
Reaction score
6,008
Location
Texas
Vehicle(s)
2022 Maverick
Engine
2.5L Hybrid
Yes we do. Here is a picture of it under the armrest middle console in my hybrid xlt.
PXL_20220517_000104015.jpg
Label that says ""SCRAP IF DROPPED" Instills confidence in ordering one online with USPS, FEDEX, UPS, AMAZON OR ANY OTHER CARRIER! delivery!😂
 

MakinDoForNow

2.5L Hybrid
Well-known member
First Name
James
Joined
Sep 24, 2021
Threads
2
Messages
8,438
Reaction score
6,008
Location
Texas
Vehicle(s)
2022 Maverick
Engine
2.5L Hybrid
Thanks to everyone doing all the research! I'm curious how long I can pull 400W from the outlet. I have to admit I'm a bit lost amidst all the technical jargon.

I have a Hybrid, so the 400W inverter pulls from the 12V battery, which in turn pulls from the traction battery, which in turn gets topped up by the ICE. Do I have that correct?

If I've got it all straight in my head, I should be able to pull 400W for about an hour (the RC of the Hybrid battery) before tapping the traction battery, and after that, assuming the traction battery had a good charge to start, another three hours before the ICE needs to spin up?
Note:. The traction battery being 1.1kw is a temporary storage battery that will have about 20% reserved to protect from over discharge 20-30% reserved for waiting to start ice and ready truck to drive 30-40% is used to cycle ice on and off and provide traction current and/or 12v charging 40-70% used for high amperage Regen capture and traction drive current. 70-100% soc of hvb will be used for lower amperage charge and discharge in order to help prevent over heating of battery and I suppose to provide buffer for lesser capacity as battery ages. Over 70%, I believe is when engine braking occurs due to less high amperage allowance of HVB. Also note that high amperage use of 12v most likely will cause ice to start in order for mg1 to furnish current and prevent 12v high temps. Ice should also start at bms request when the open voltage reading of 12v drops below a trigger point. I have noticed that when truck is sitting with all optional 12v items, lights, radio, HVAC off, etc the charging of 12v will cycle ice on and off in 15-30 minutes with time between on-offs becoming longer as 12v becomes charged. I doubt seriously that you will see anywhere close to an hour before ice comes on!
 

JG307

2.5L Hybrid
Well-known member
First Name
John
Joined
Jan 21, 2022
Threads
7
Messages
87
Reaction score
82
Location
Bremerton, WA
Vehicle(s)
2016 Civic
Engine
2.5L Hybrid
Note:. The traction battery being 1.1kw is a temporary storage battery that will have about 20% reserved to protect from over discharge 20-30% reserved for waiting to start ice and ready truck to drive 30-40% is used to cycle ice on and off and provide traction current and/or 12v charging 40-70% used for high amperage Regen capture and traction drive current. 70-100% soc of hvb will be used for lower amperage charge and discharge in order to help prevent over heating of battery and I suppose to provide buffer for lesser capacity as battery ages. Over 70%, I believe is when engine braking occurs due to less high amperage allowance of HVB. Also note that high amperage use of 12v most likely will cause ice to start in order for mg1 to furnish current and prevent 12v high temps. Ice should also start at bms request when the open voltage reading of 12v drops below a trigger point. I have noticed that when truck is sitting with all optional 12v items, lights, radio, HVAC off, etc the charging of 12v will cycle ice on and off in 15-30 minutes with time between on-offs becoming longer as 12v becomes charged. I doubt seriously that you will see anywhere close to an hour before ice comes on!
This is very informative, thank you for all that. Given the BMS monitoring of the 12V and the reserved capacity of the HVB, is it safe to say the inverter could be used indefinitely without damage to either battery?
 

MakinDoForNow

2.5L Hybrid
Well-known member
First Name
James
Joined
Sep 24, 2021
Threads
2
Messages
8,438
Reaction score
6,008
Location
Texas
Vehicle(s)
2022 Maverick
Engine
2.5L Hybrid
This is very informative, thank you for all that. Given the BMS monitoring of the 12V and the reserved capacity of the HVB, is it safe to say the inverter could be used indefinitely without damage to either battery?
With the truck in ready mode so ice can be started freely as needed. There will be, of course a limit due to heat build up. How efficient is ice radiator running ice at rpm sufficient for mg1 to generate your draw current plus current needed to run pumps and possibly the AC condenser to help cool trans fluid, Hvb coolant. If I remember correctly someone posted over a year ago that there were around 40 possible codes just for the cooling system. I would be reluctant to hook an inverter requiring more than 30amp service. Maybe 40amp. At some point finding an open fuze position on the HVB 3phase bus might be desired. 🤔 
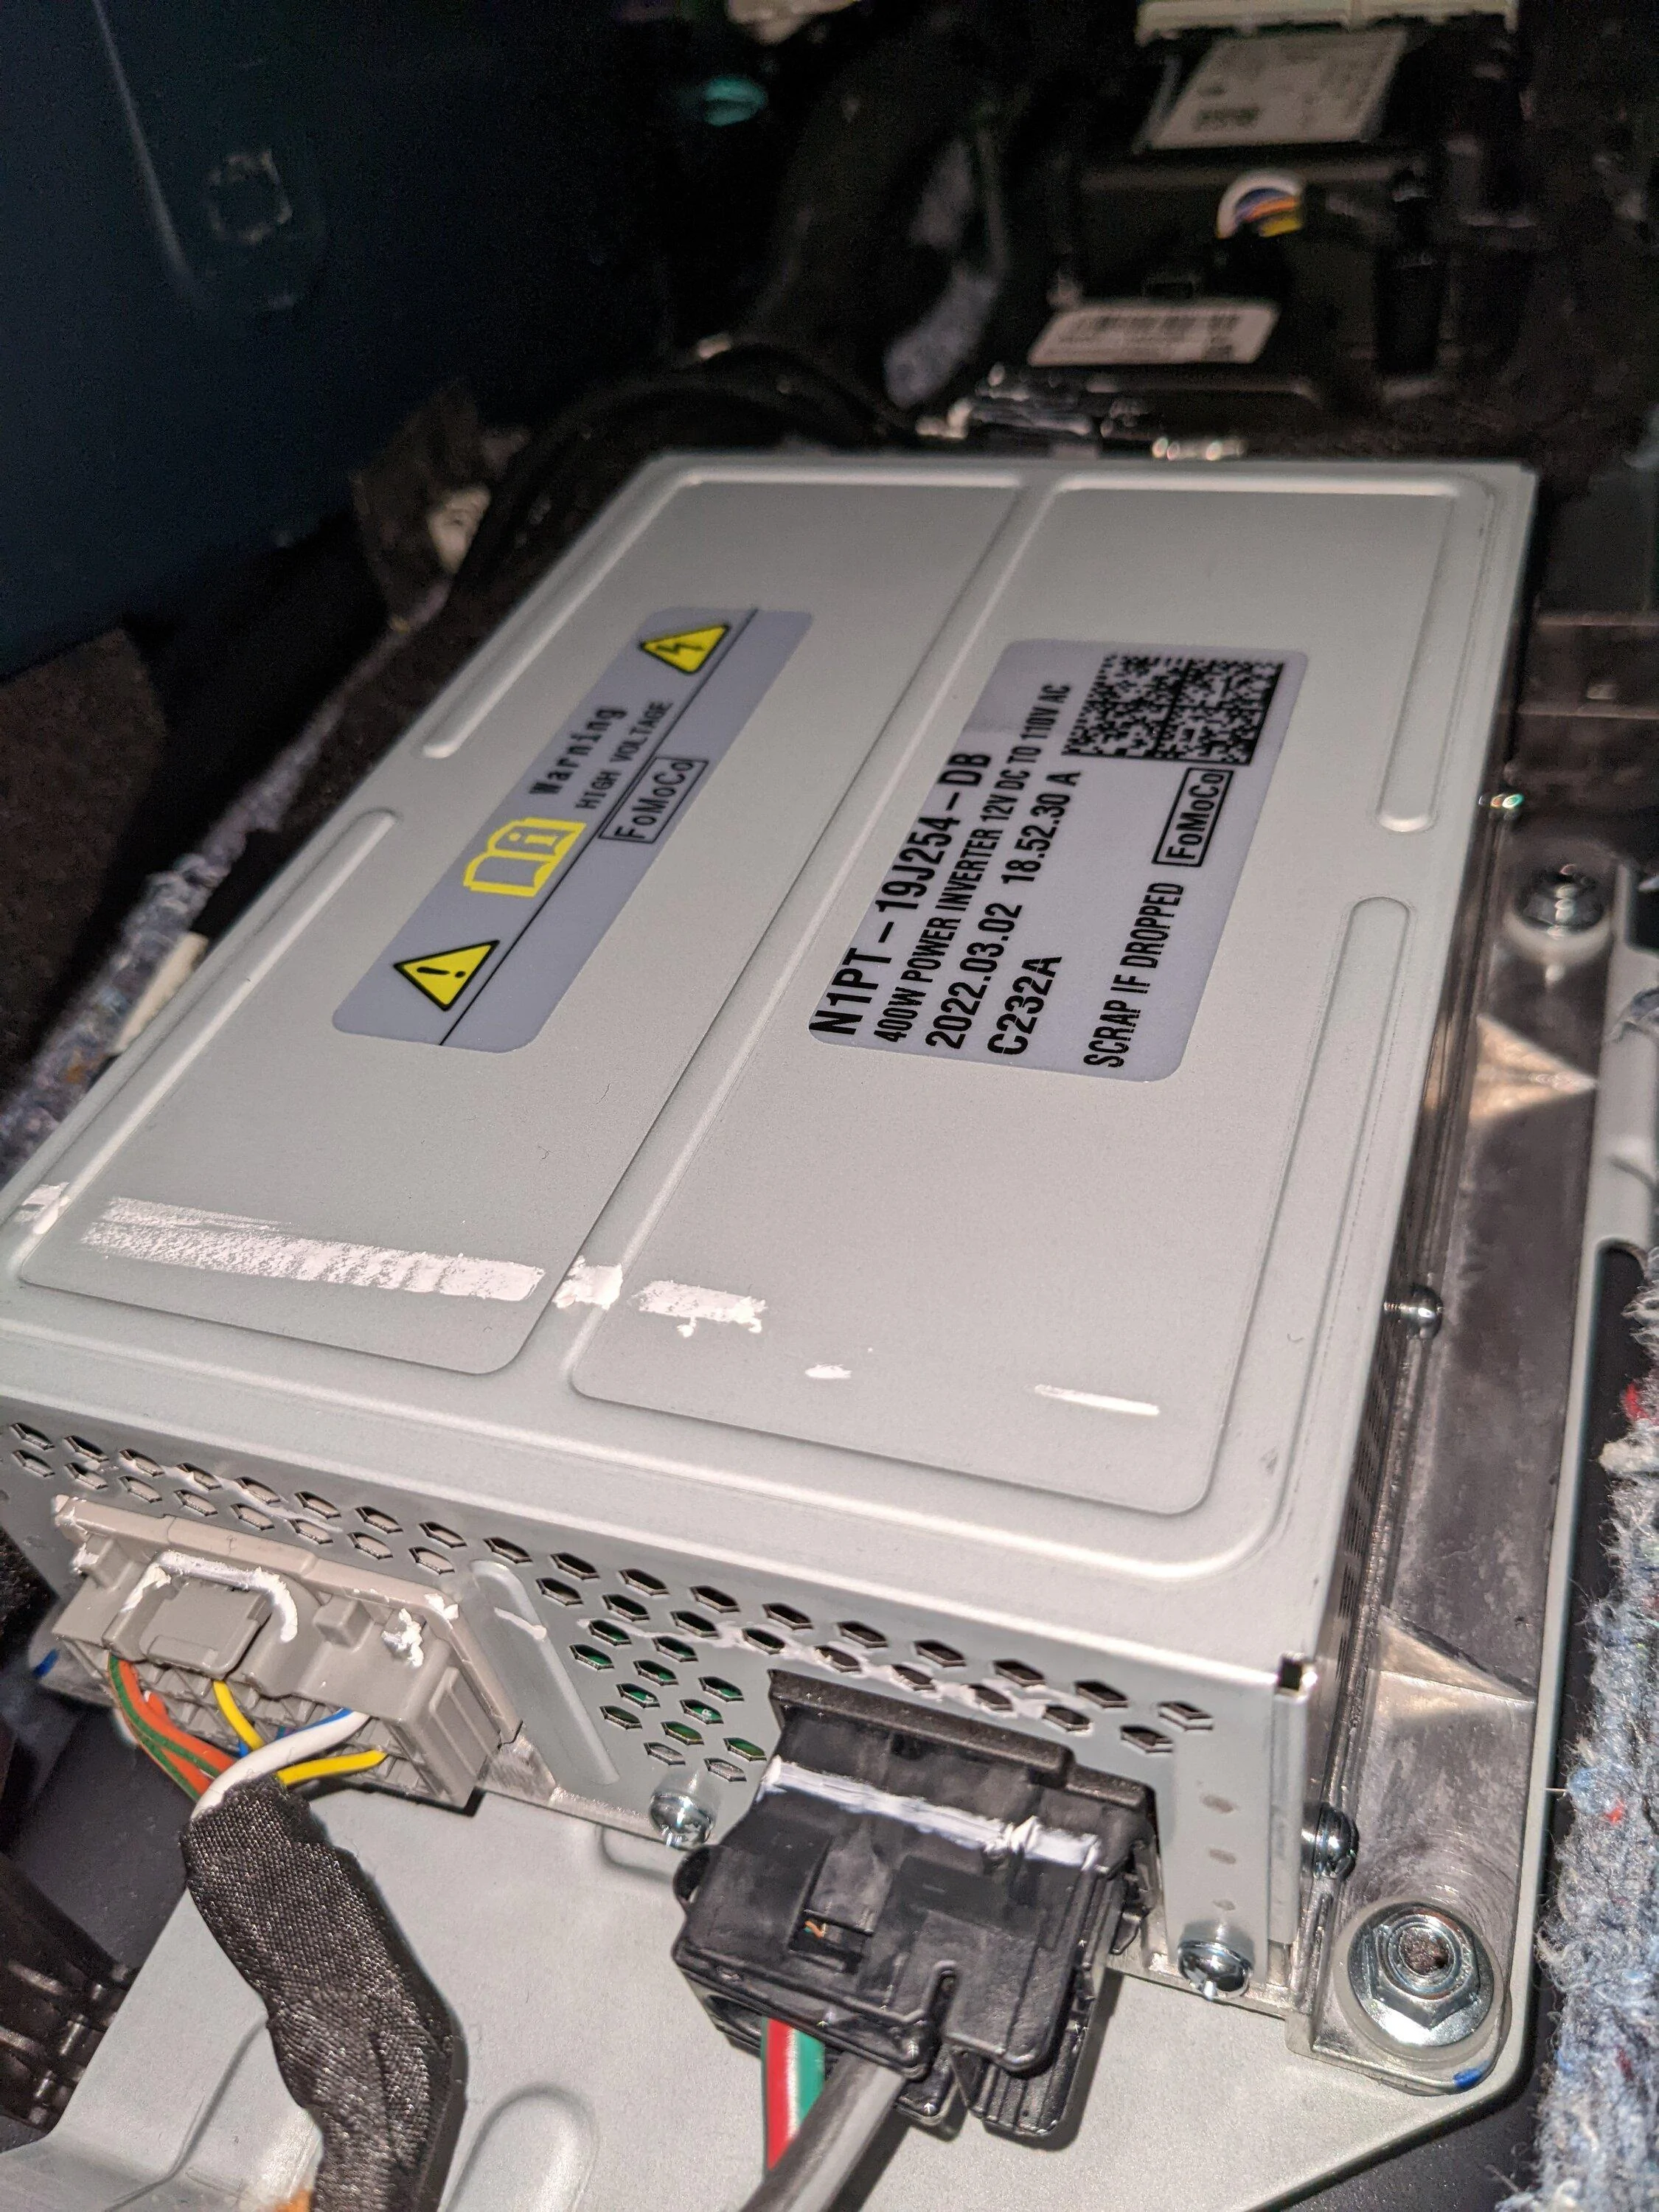
Would the hood need to be raised and two shop fans turned on to simulate 70 mph air flow? Good luck.
Sponsored


Top