Not sure I can get a pic outside in the dark at the moment. This is his pic of the original panel with the outlet, light, and switch removed.Looks good.
Can someone post a picture of what all this looks like from the Factory?
Sponsored
Not sure I can get a pic outside in the dark at the moment. This is his pic of the original panel with the outlet, light, and switch removed.Looks good.
Can someone post a picture of what all this looks like from the Factory?
https://www.ebay.com/itm/185439327445Can you elaborate on the wiring from the OEM bed light to the bed rail lights?
 pigtail and soldered a DC5525 barrel connector to it and plugged that into the plug where the OEM led light used to be. the DC5525 barrel connector then plugs into the after-market LED controller box.. I bought a 10 pack of those DC5525 barrel connectors for a couple of $$ -- they were thin af -- maybe that's why the LEDs are kinda dim?
  it's easy to fix tho, I just need to find a better quality DC5525 barrel connector.. either way that pigtail from eBay is the way to go if you want it to be plug and play to the OEM LED connector..
Did you reinstall the bed light with the other LEDs?https://www.ebay.com/itm/185439327445
I ordered a this
no, the og LED bed light is out of the picture.. I just reused the connector.. if you wanna retain the og bed light you'd need to hack together a passthrough with a splitter between the og harness plug and the OEM led bed light, then add a barrel connector or whatever you need to the splitter for your after-market LED lights..Did you reinstall the bed light with the other LEDs?
Oh I see. So the flexbed connector is the same as the OEM light?https://www.ebay.com/itm/185439327445
I ordered a this
I ordered a different 12v light for the other side, was hoping to be able to reinstall the oem bed light if possible after the cubby install. Gonna see if one is available to purchase from the parts dept if it’s reasonably priced. If not, will get another of the ones I have coming from amazonno, the og LED bed light is out of the picture.. I just reused the connector.. if you wanna retain the og bed light you'd need to hack together a passthrough with a splitter between the og harness plug and the OEM led bed light, then add a barrel connector or whatever you need to the splitter for your after-market LED lights..
idk where you live but ill be willing to pay you for your time in doing this to my truck if you ever come to vegas
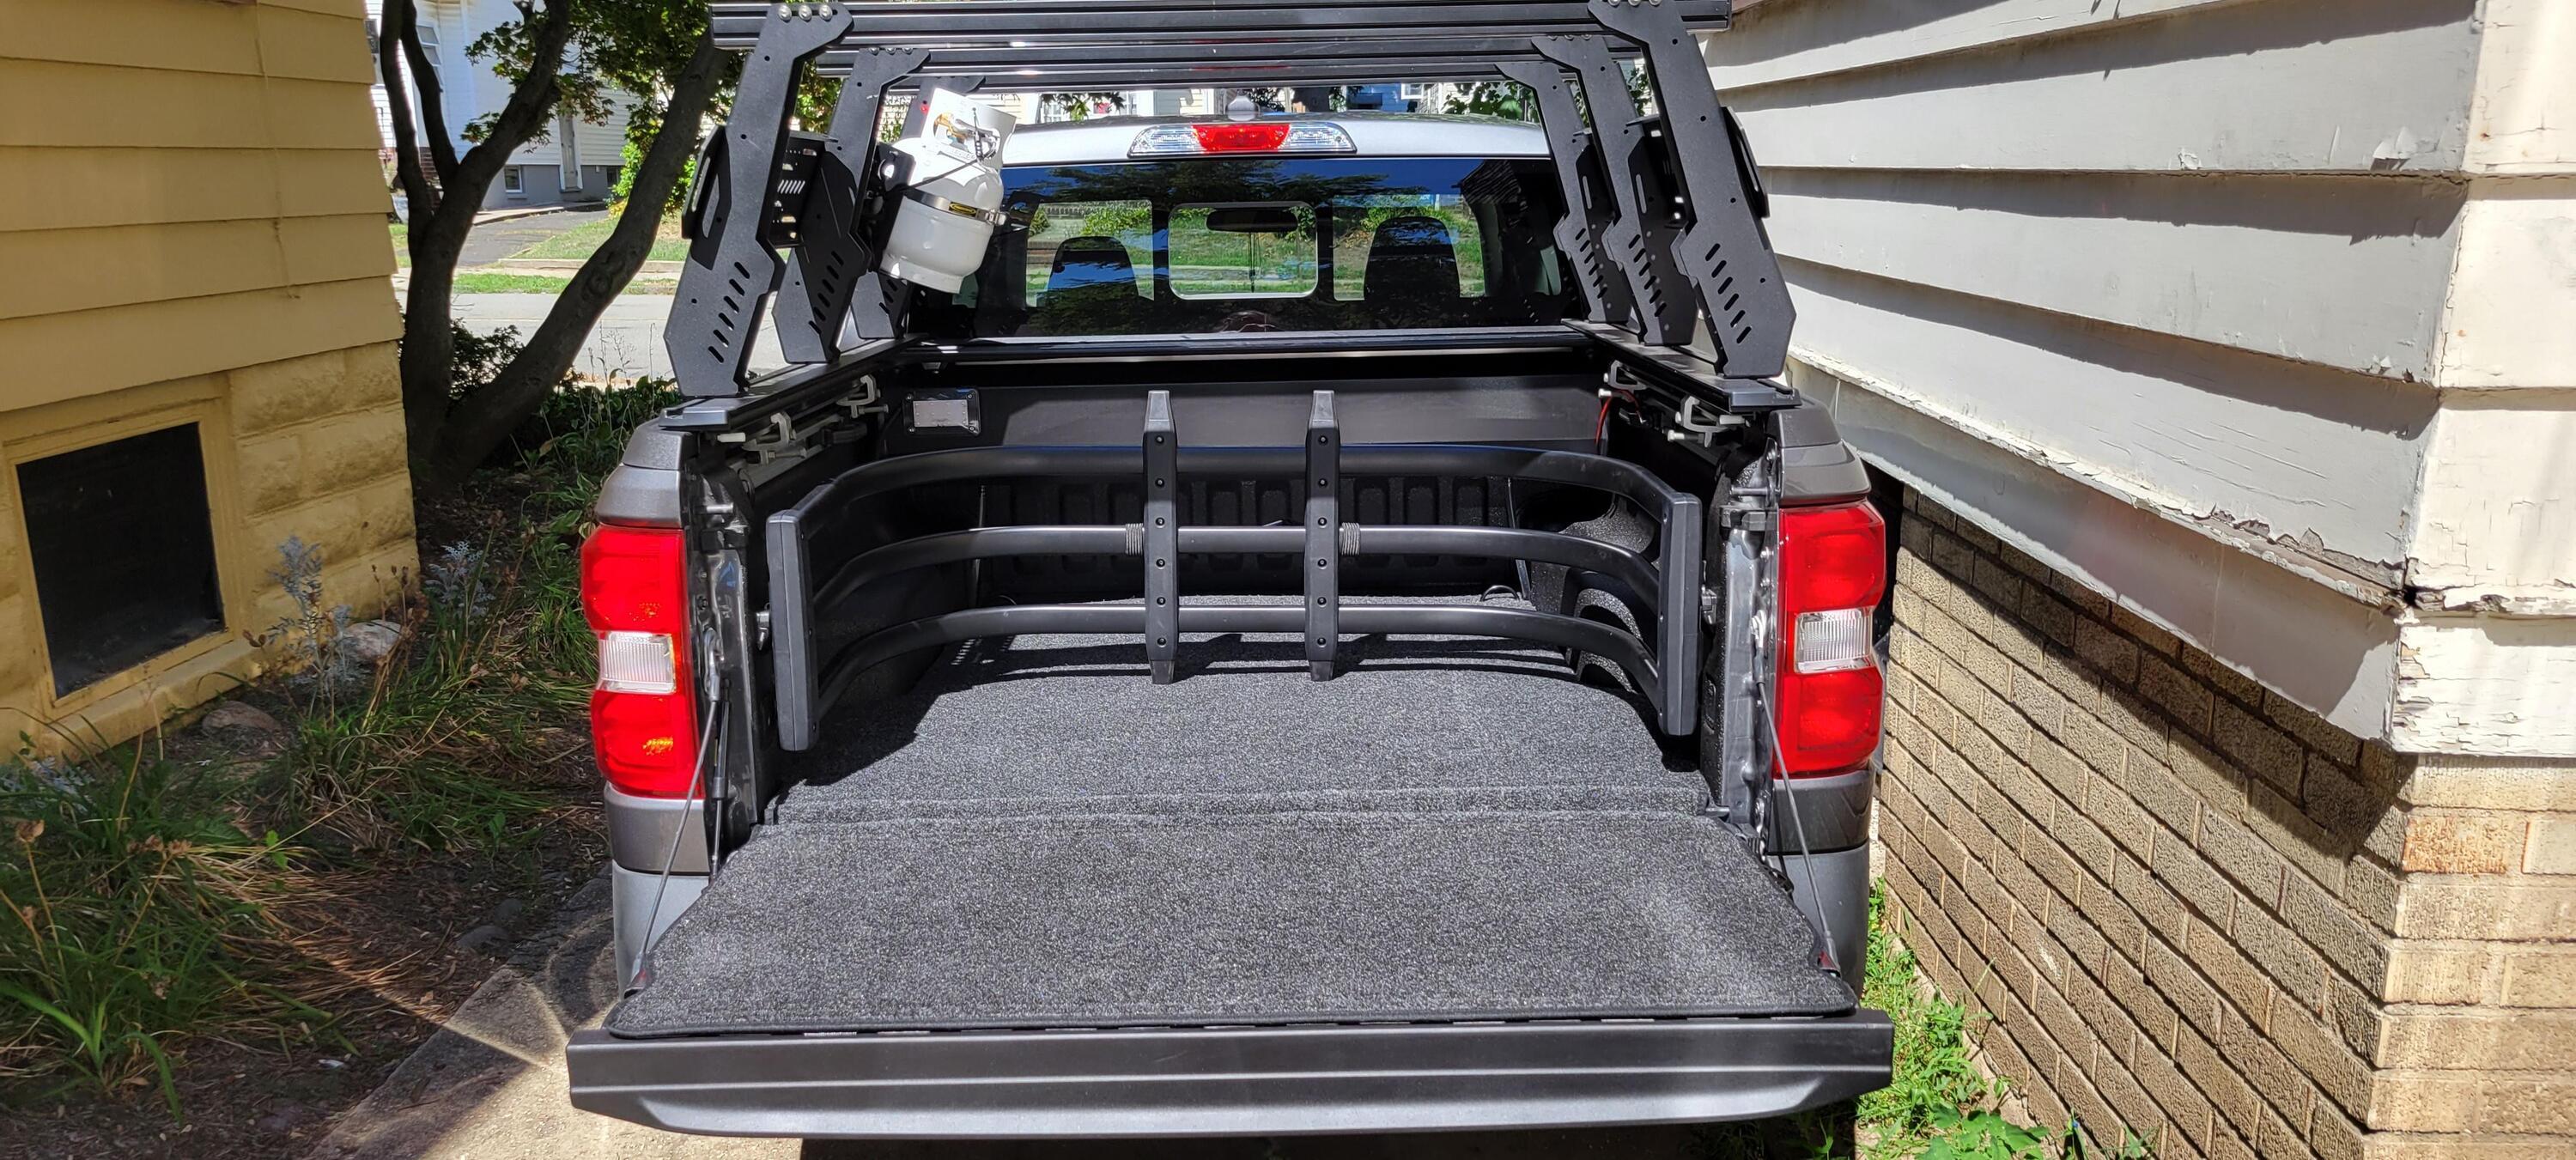
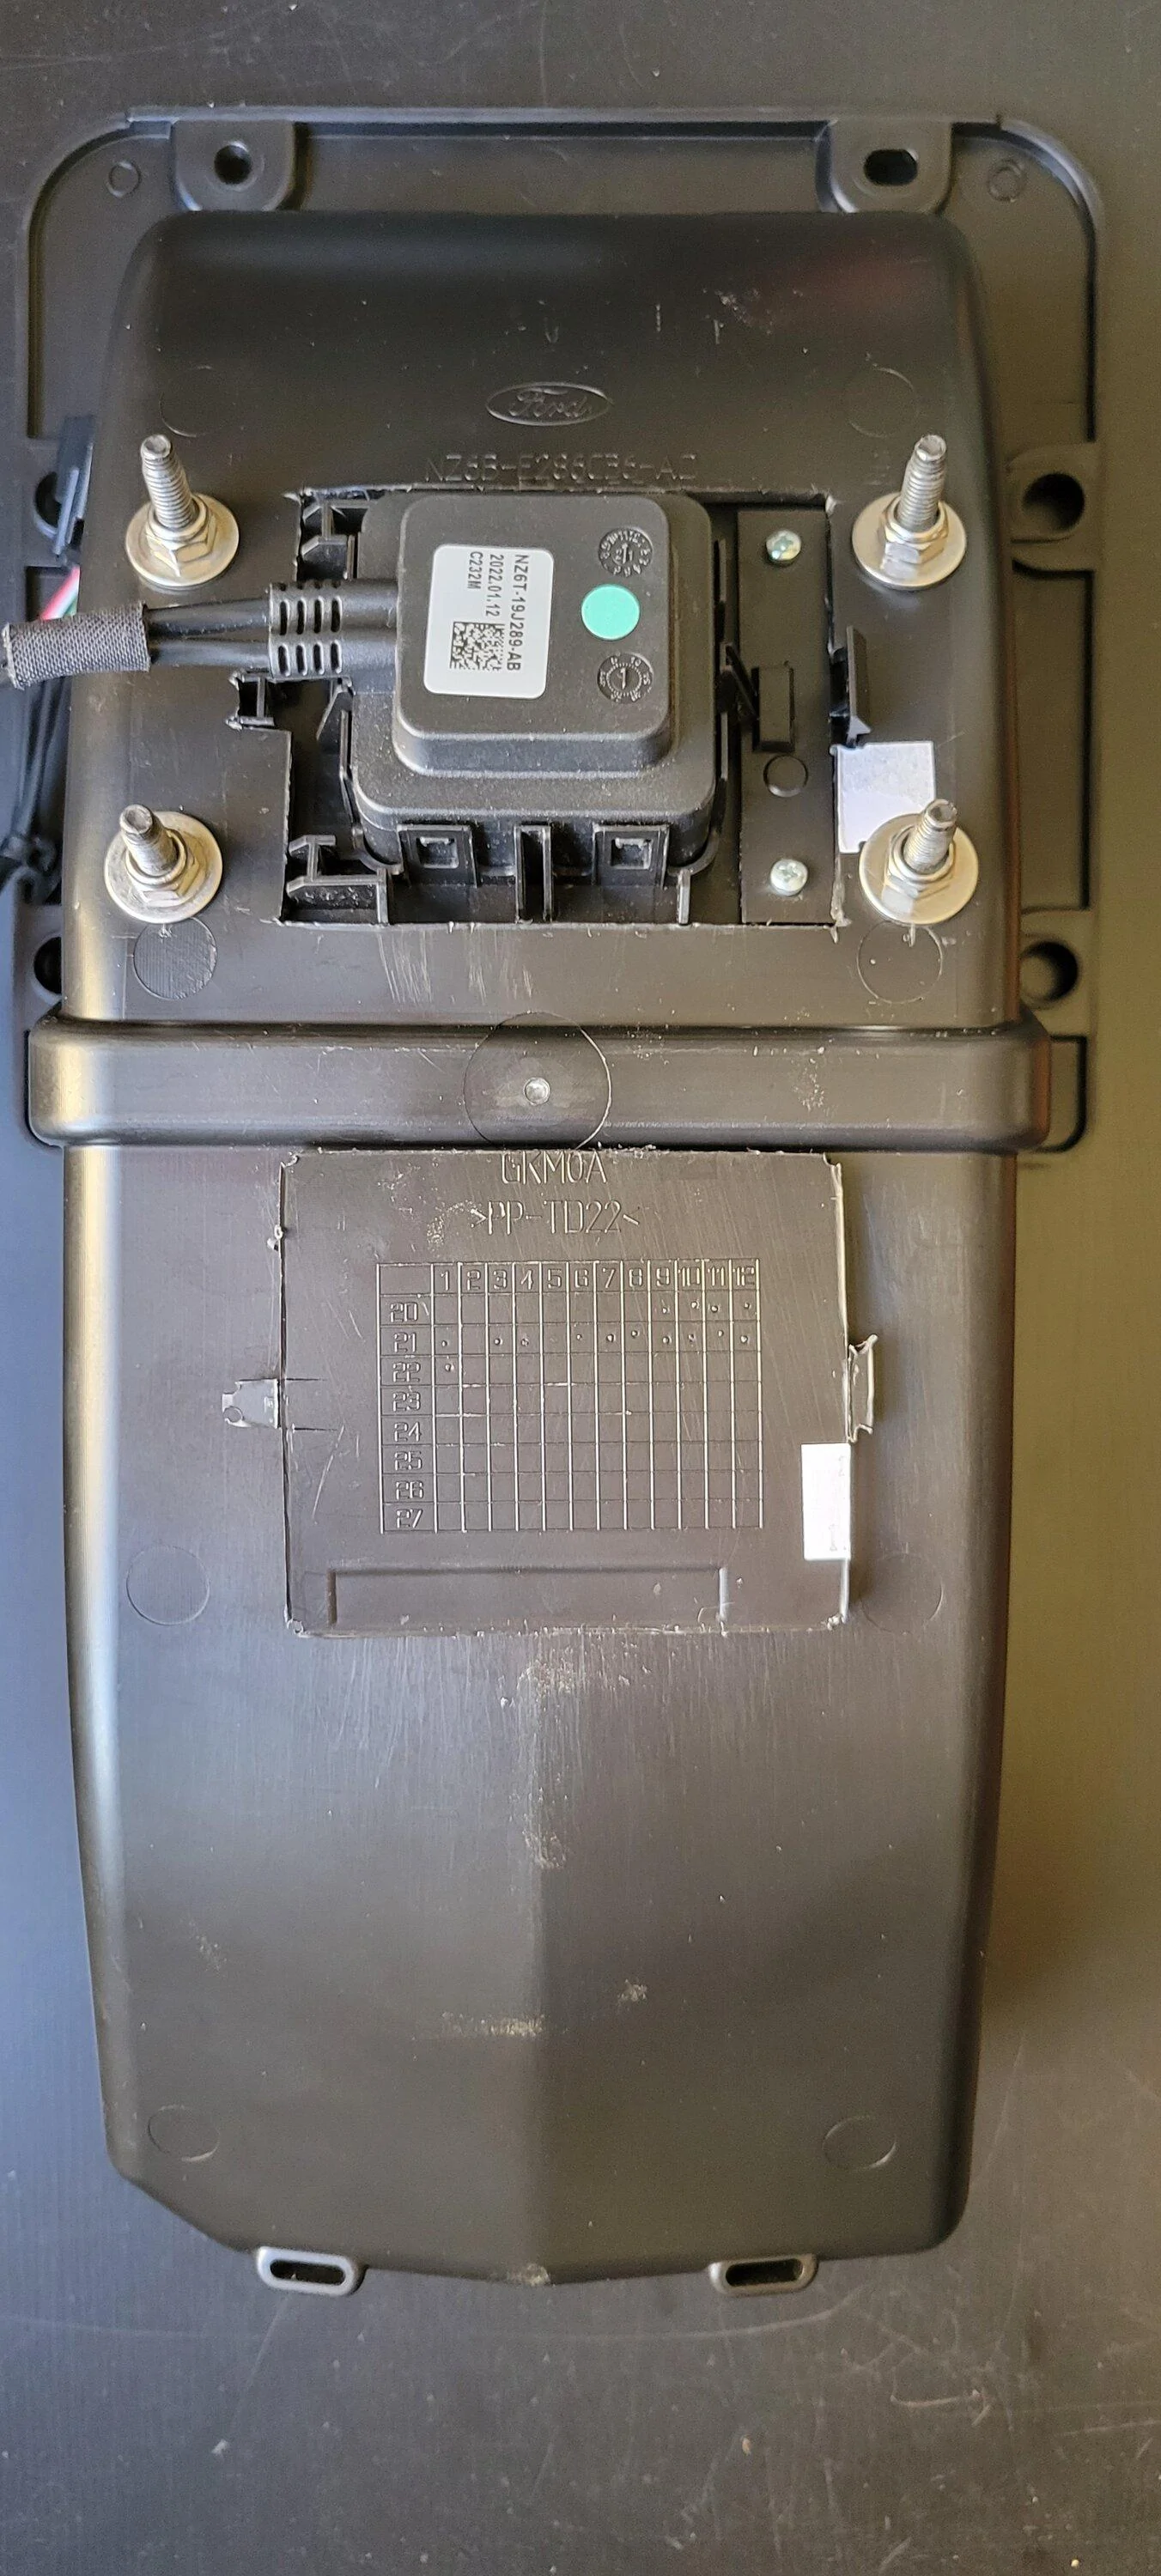
inspired by this video, I ordered a Ford NZ6Z-60286A72-A Compartment along with a pair of extra bolts W505424-S450B.
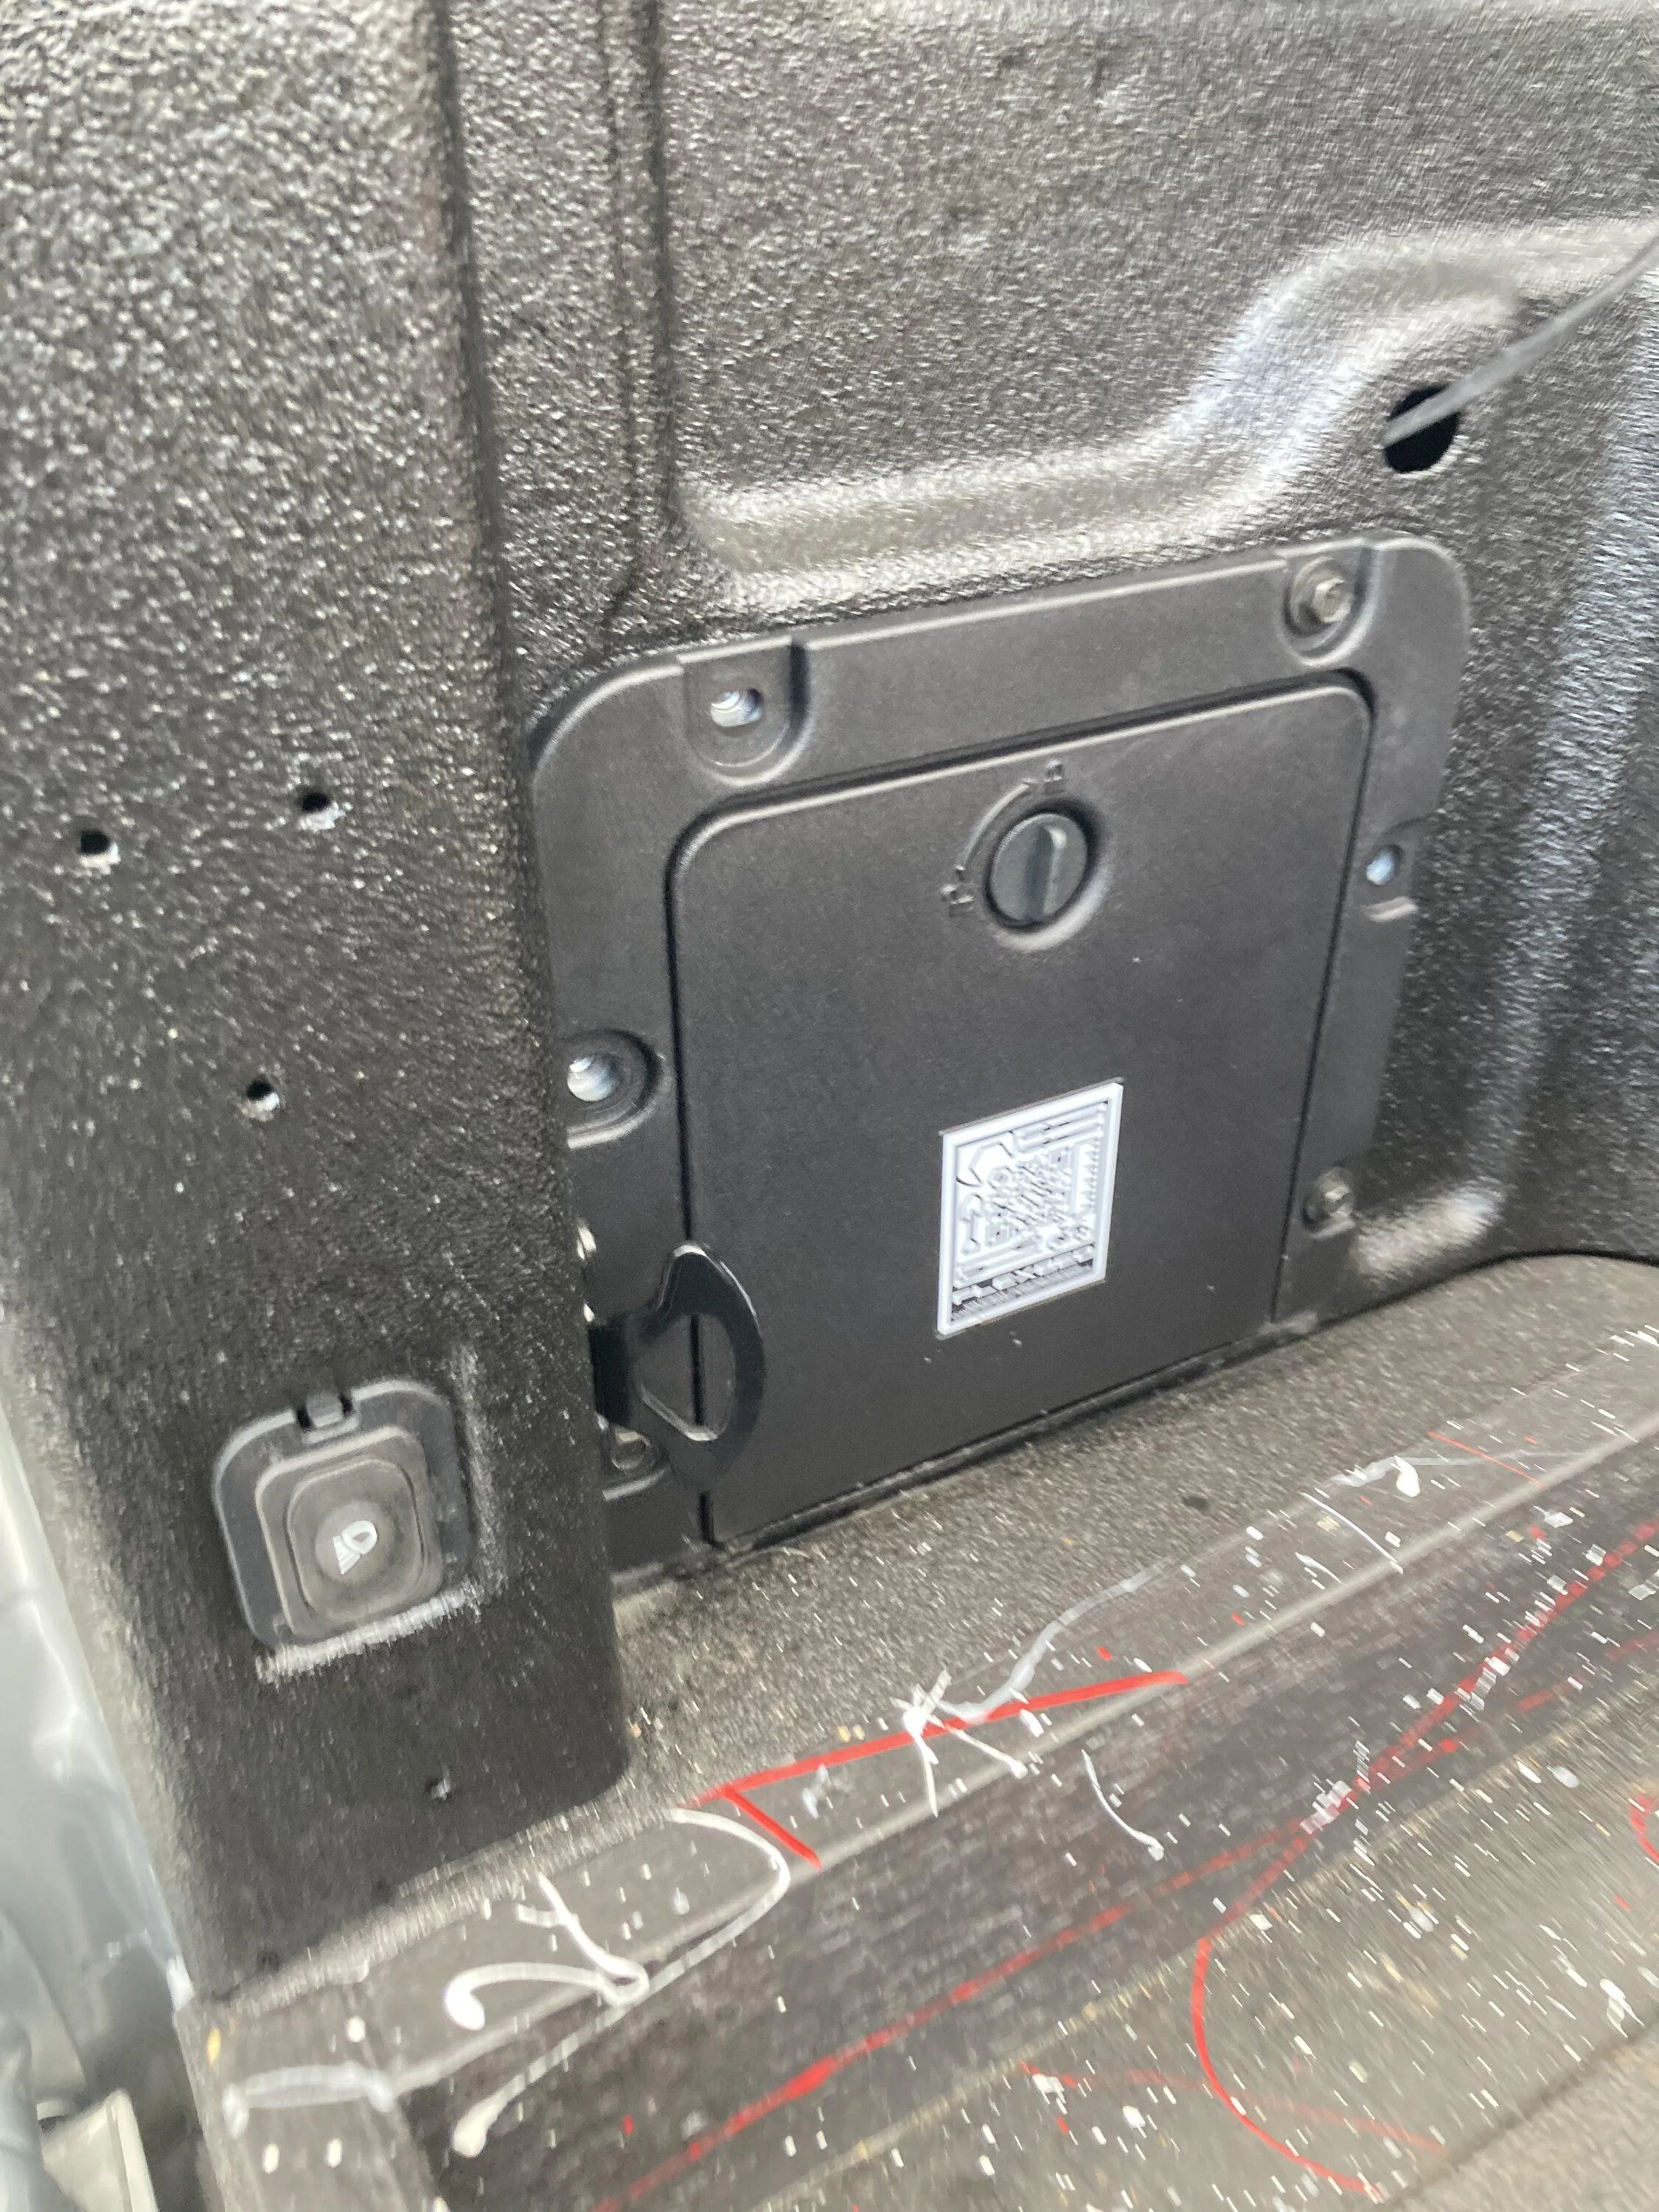
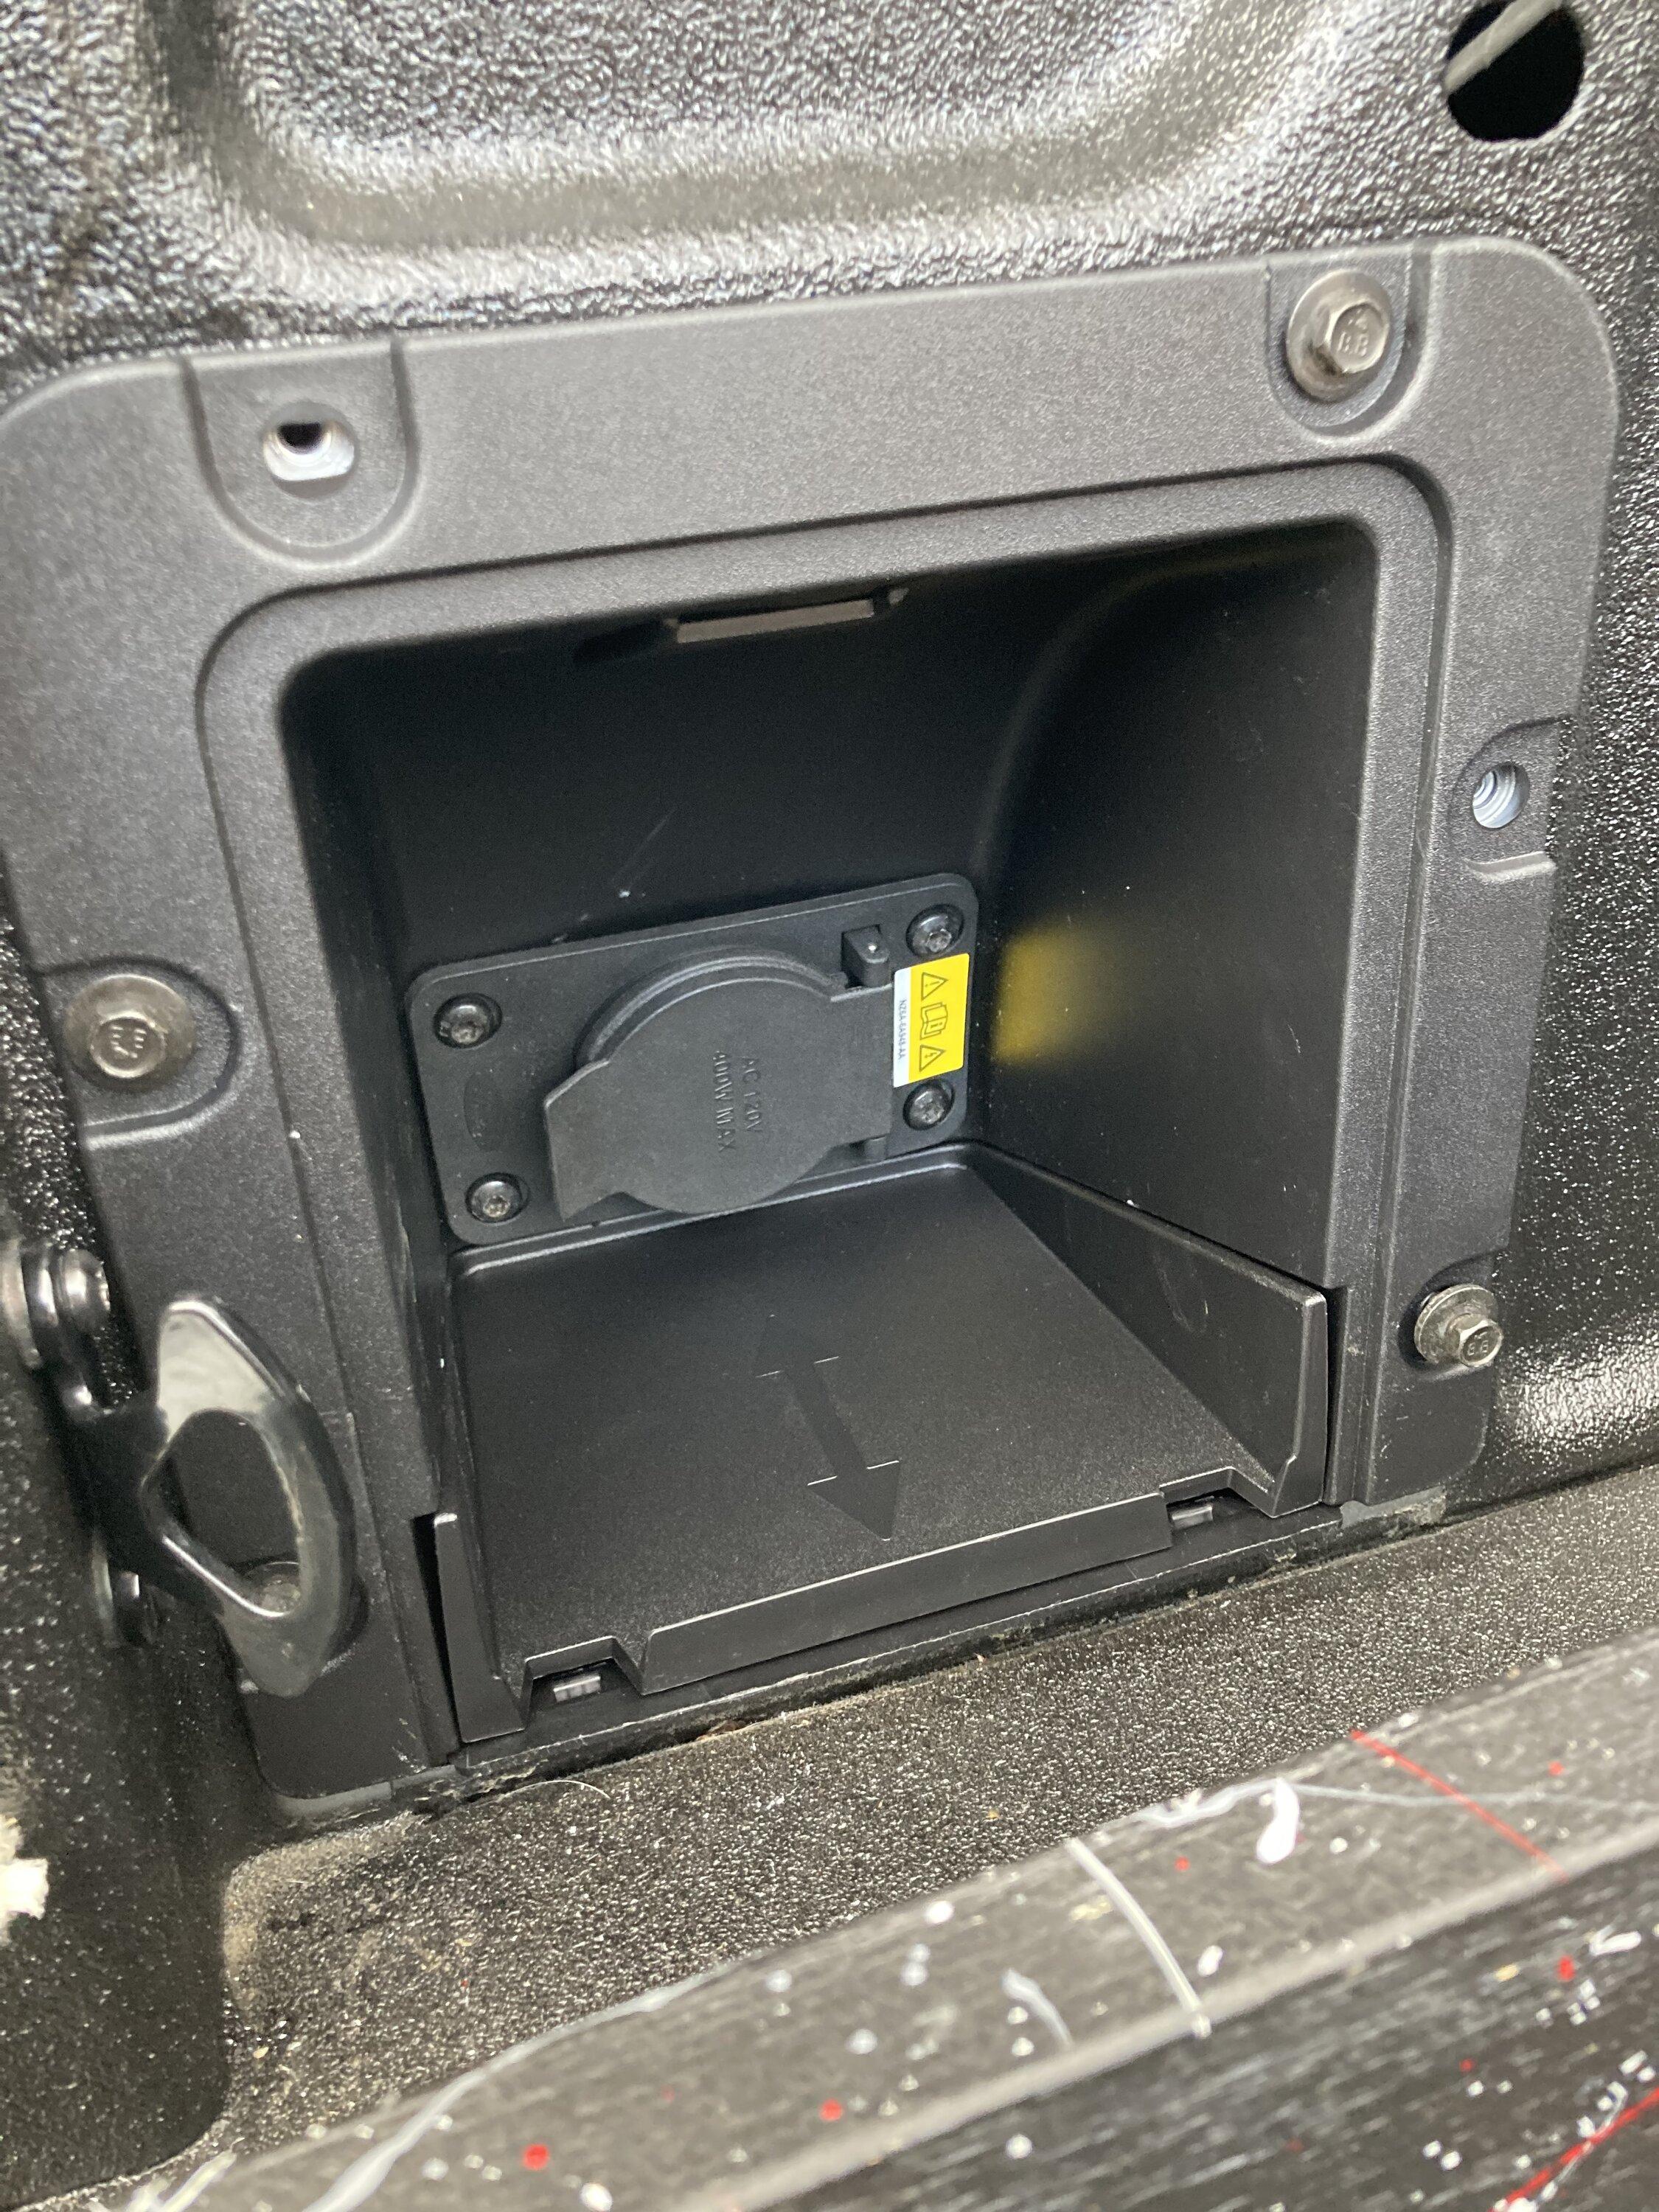
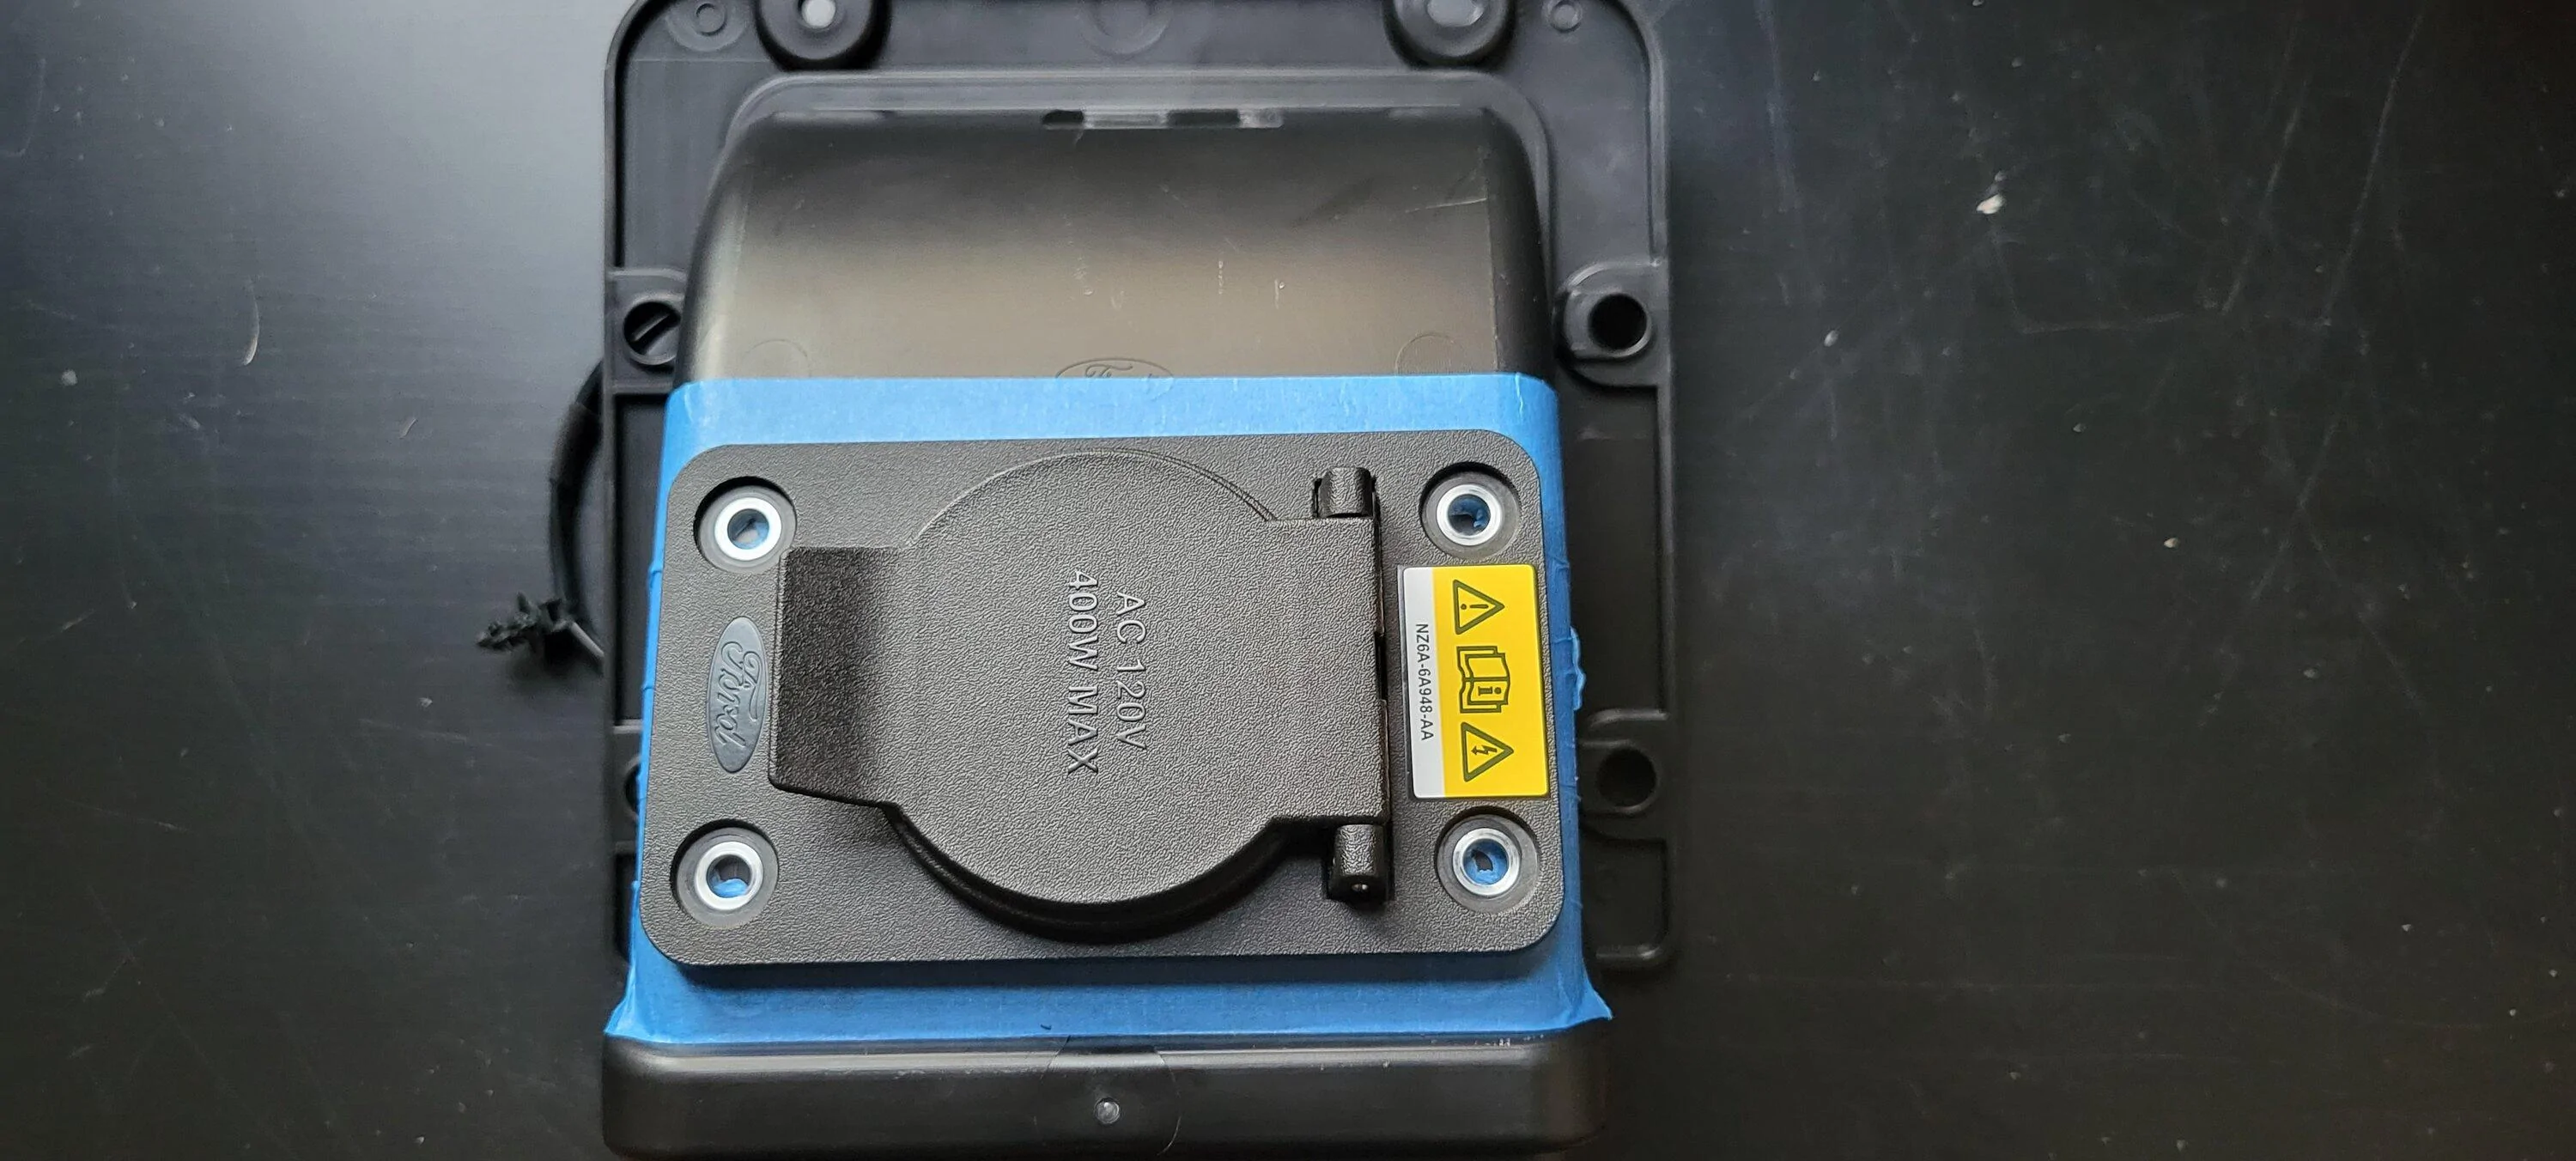
since my Lariat Lux came with the factory 120V AC outlet and LED light, I transplanted the AC outlet to inside the cubby and moved the bed lighting on/off switch to the DIY wiring cover.
not shown, I ordered a DIY wiring pigtail from eBay -- this same pigtail also fits the plug for the factory LED from that bed panel. this allowed me to get rid of the factory LED and reuse that plug for LED strips I mounted on both sides of the bed. that on/off switch now controls the third-brake-light bed lights as well as the aftermarket LED strips.
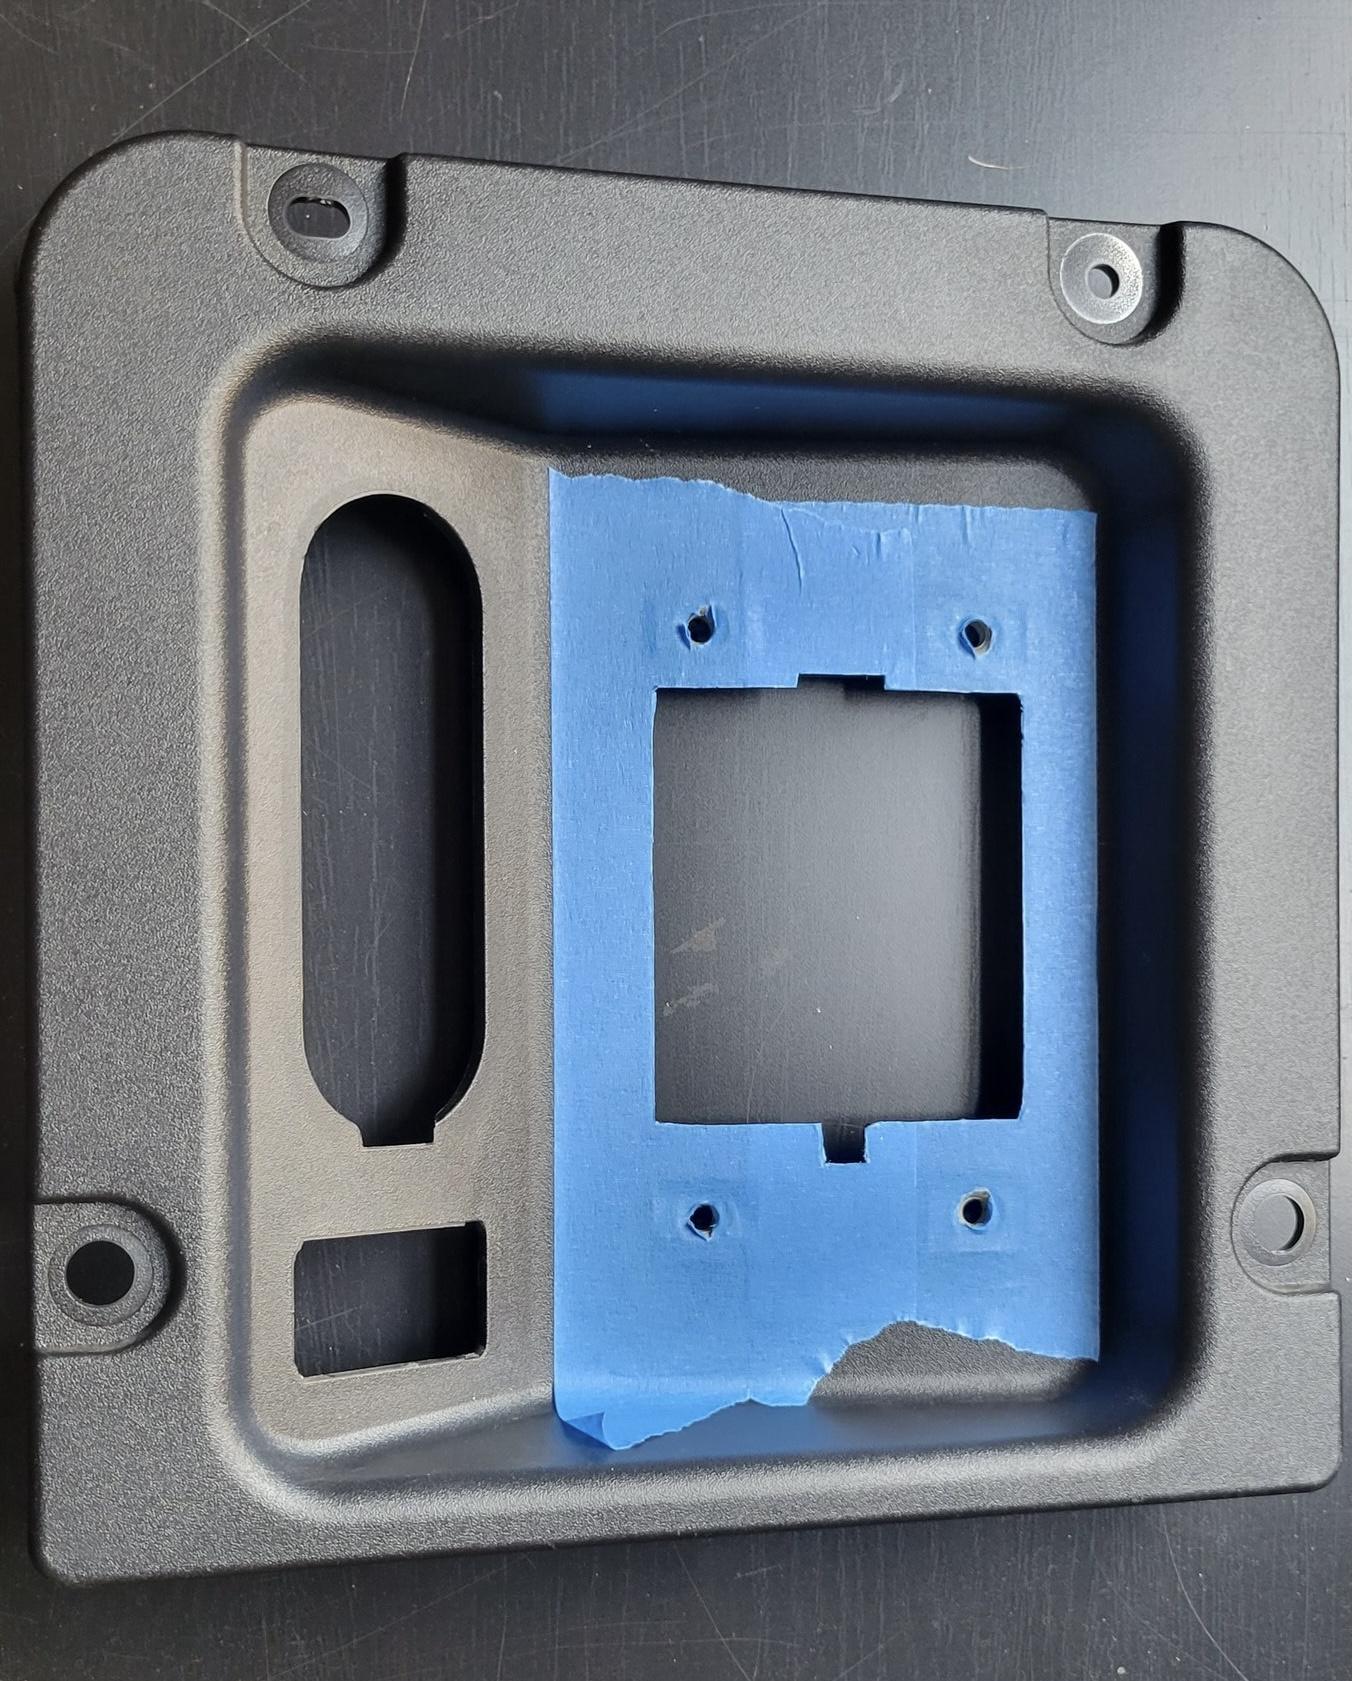
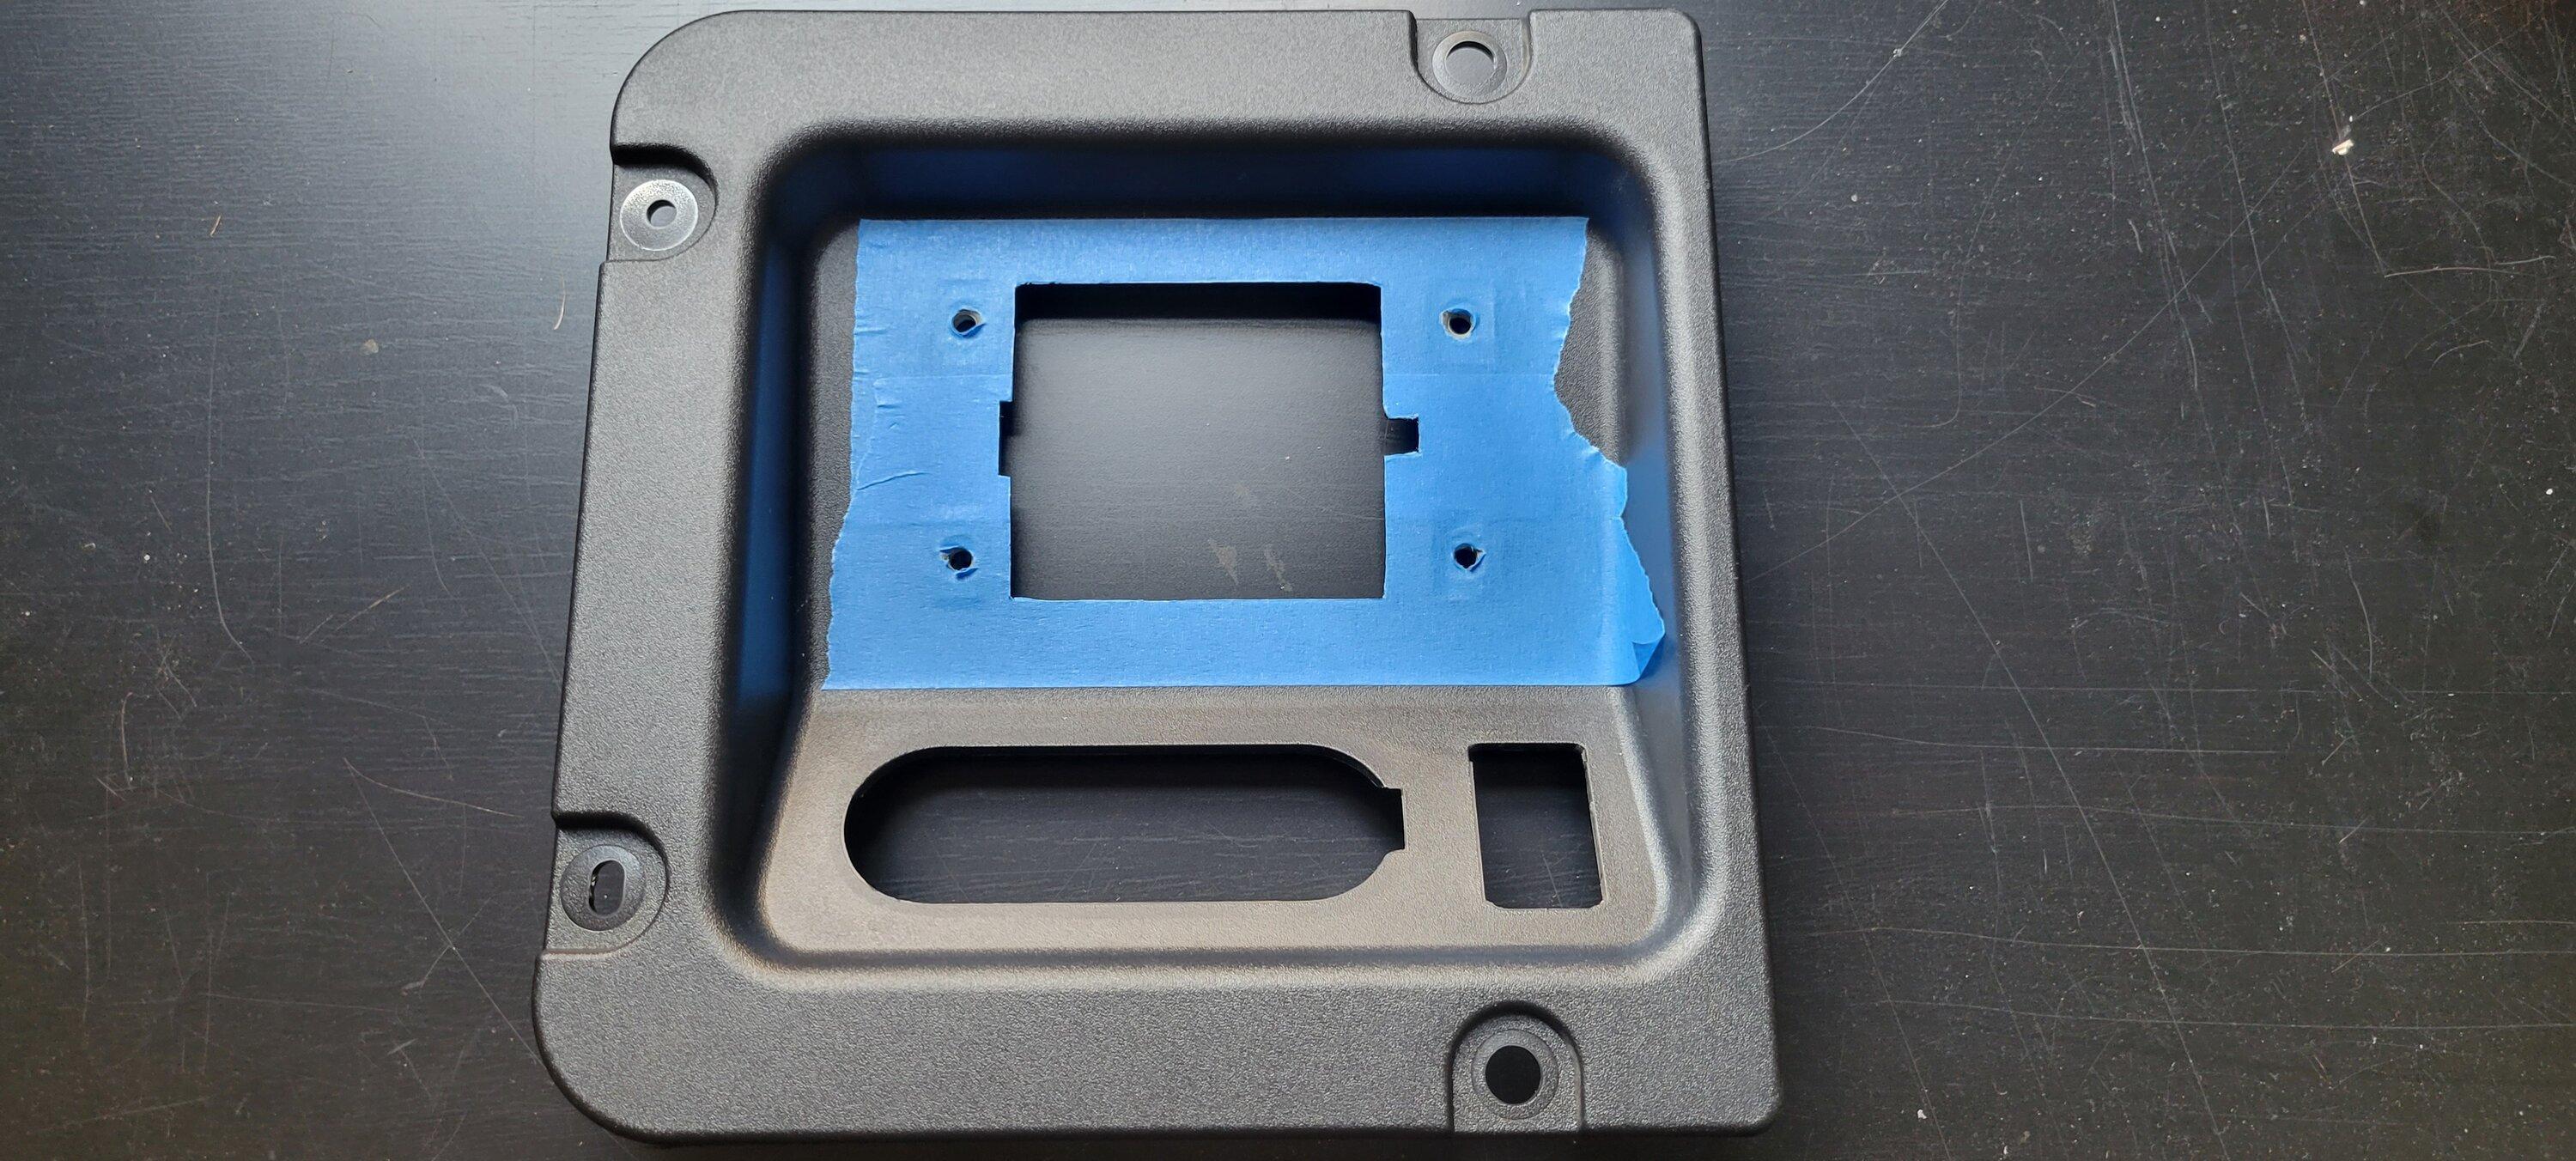
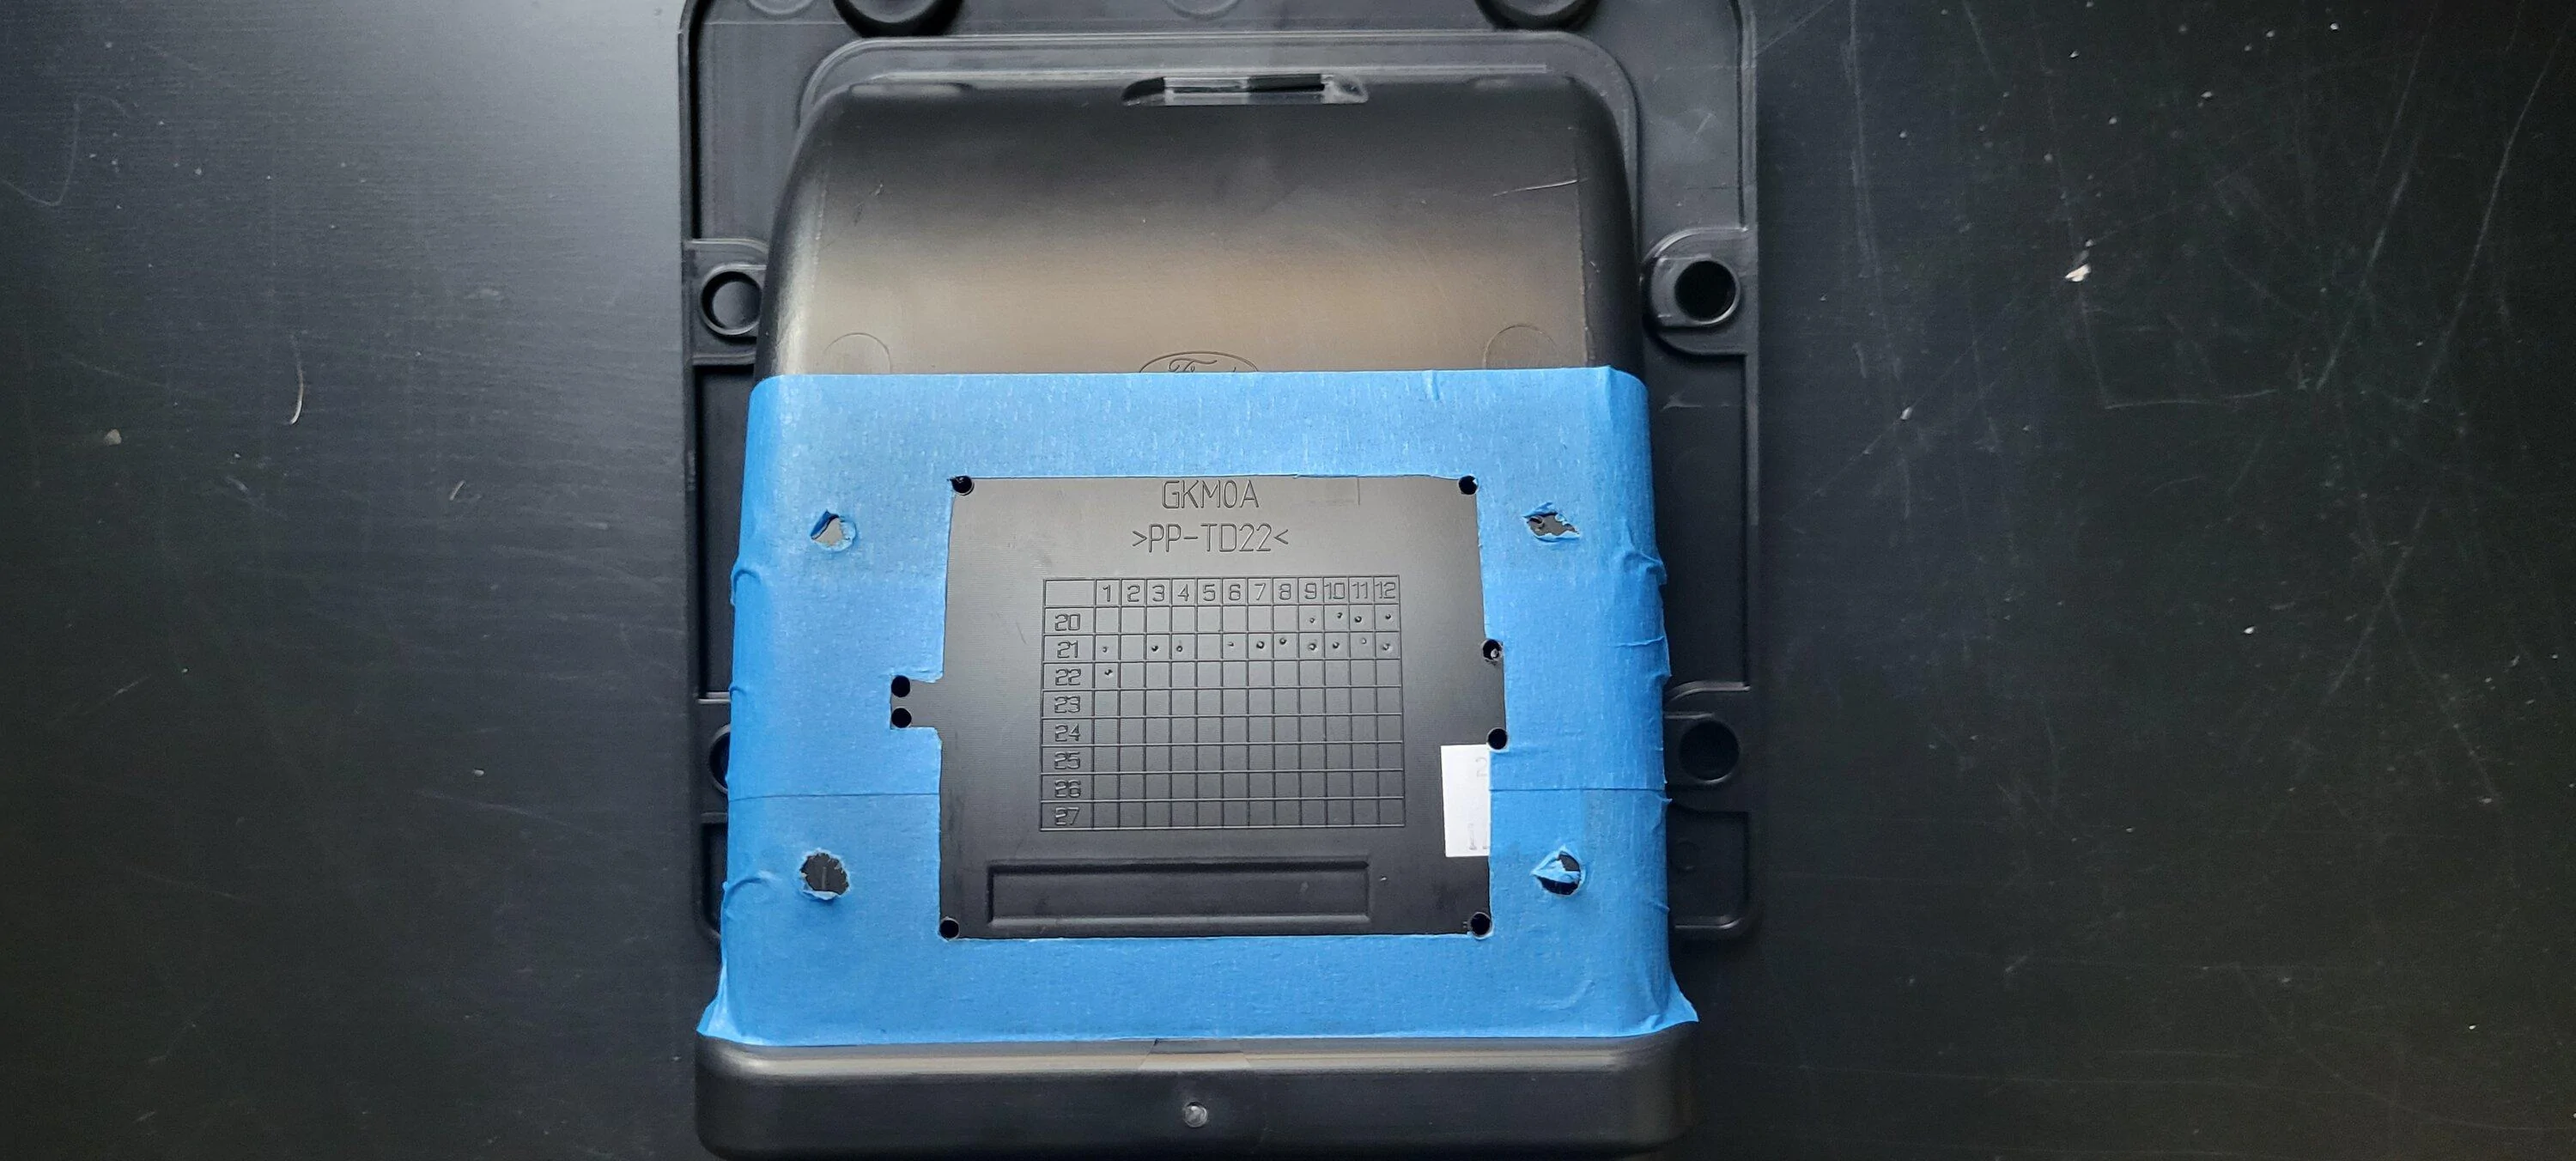
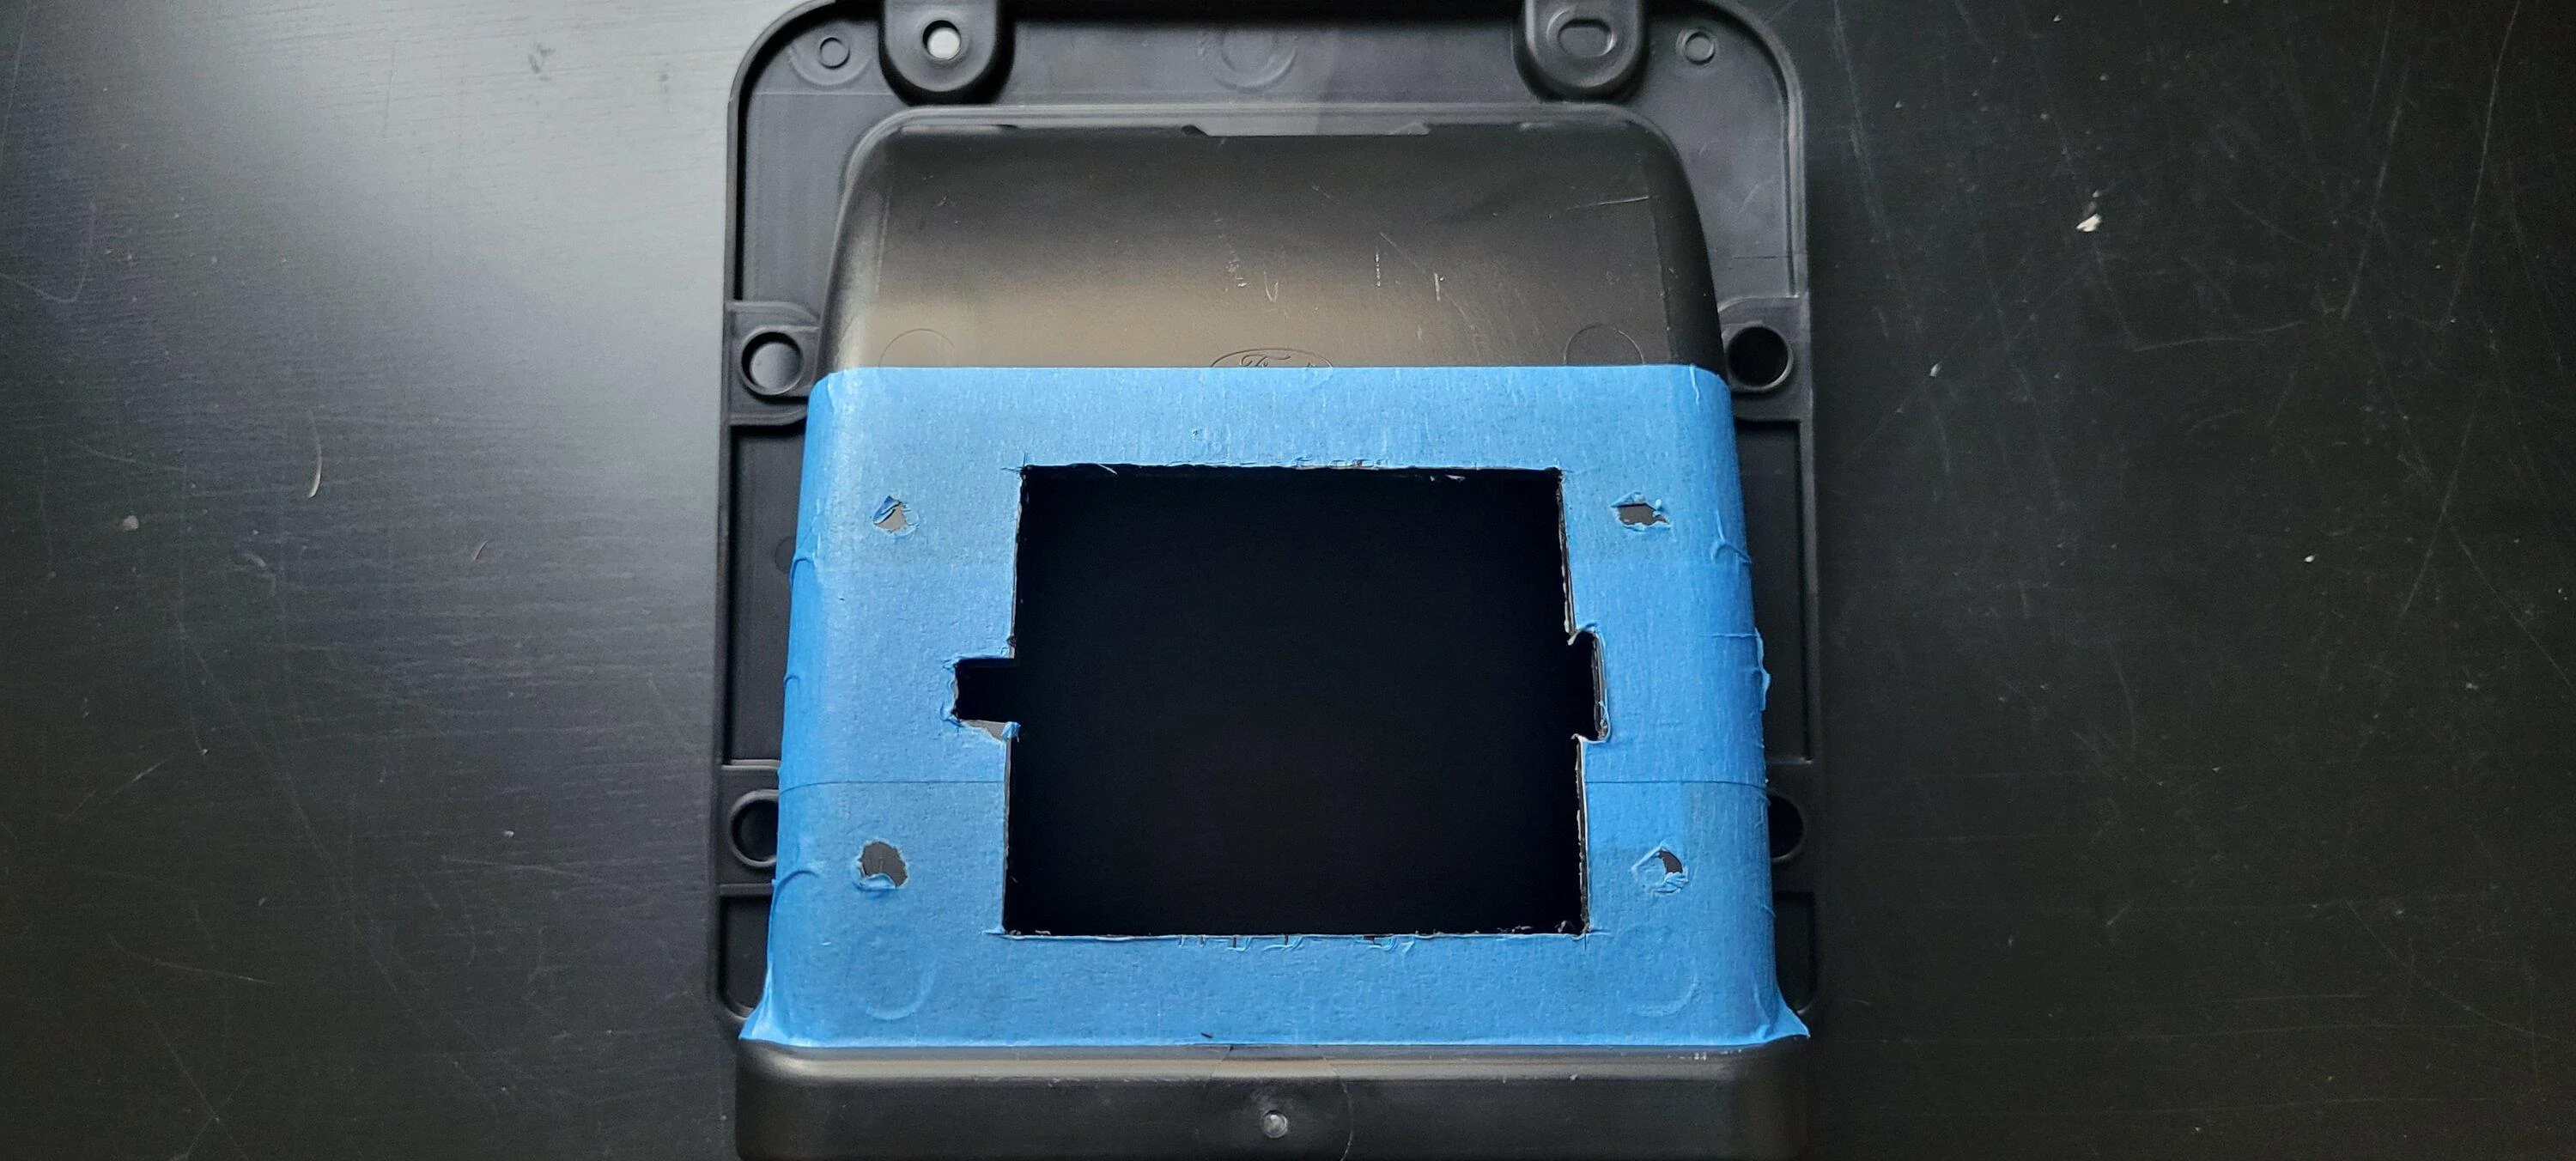
I used painter's tape on the og panel to cut a template in the tape for the opening to cut in the cubby. I then transferred the painters tape template to the back of the cubby, drilled a hole in each of the corners, and cut the opening out with a boxcutter using the drilled corner holes and a metal ruler to keep things lined up. I then inserted the outlet from the back and used the outlet itself as a template to drill the holes for the bolts.

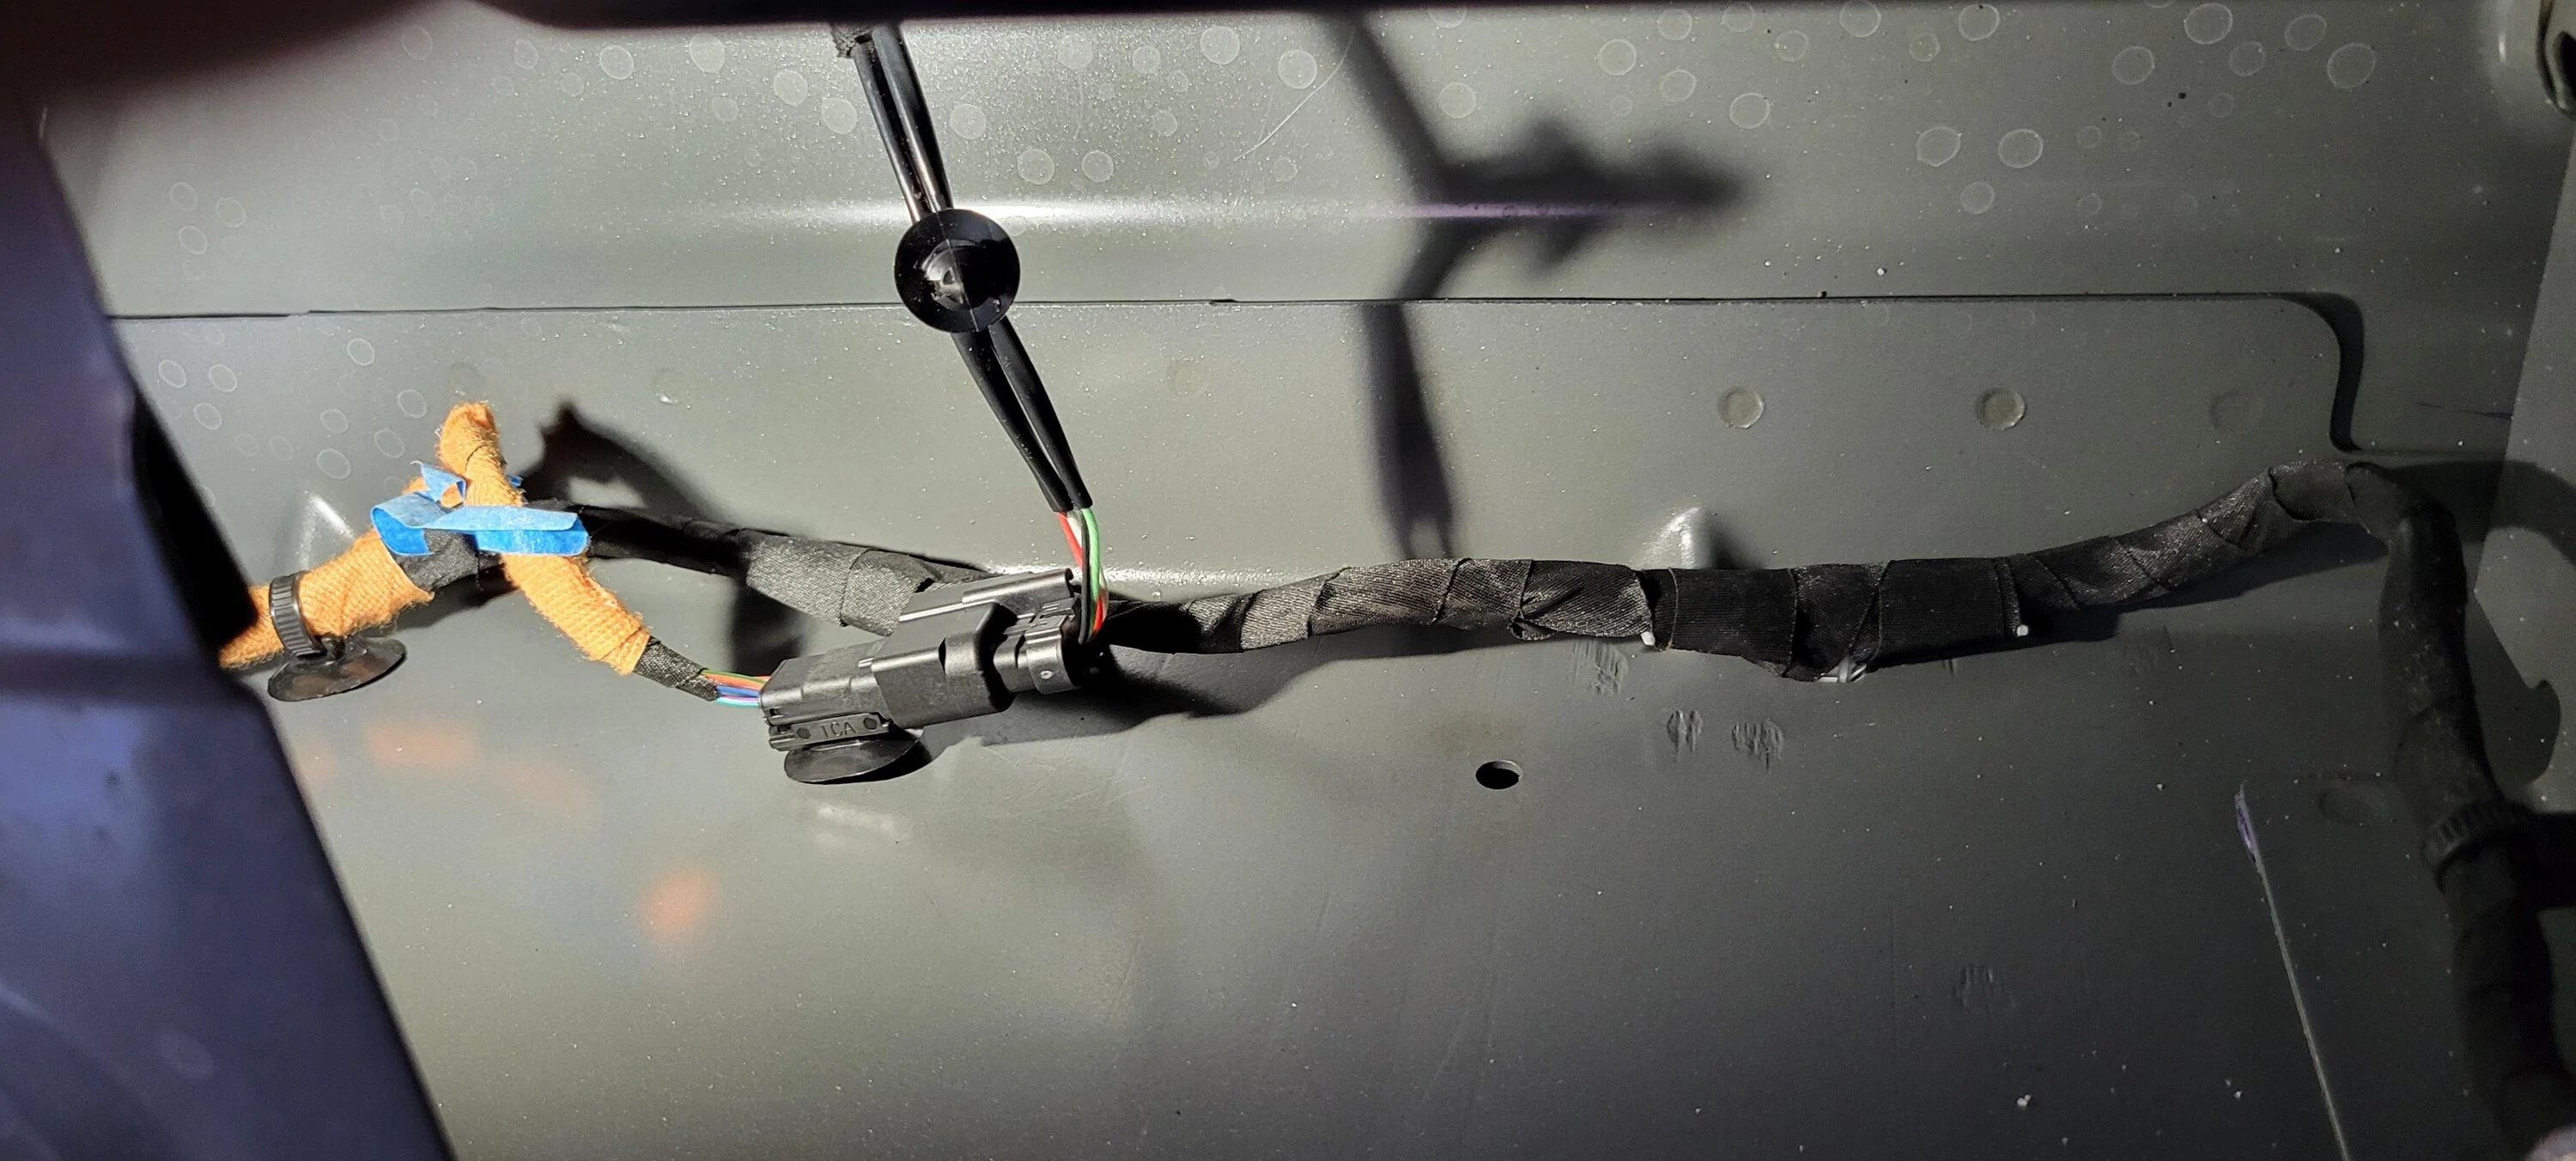
this last image shows the plug above the muffler which connects to the factory AC outlet. to reach the back of the cubby, the wires going straight up needed to be unclipped from the hole in the metal there. I used a plastic crowbar shaped tool to rip that clip out without scratching up the paint.
 . Good job!
yah.. there might be some plastic tab that's slightly different, but the plugs fit and the lights work and that's good 'nuff for gov'ment work..Oh I see. So the flexbed connector is the same as the OEM light?
thx.. I'm on the bEast coast in Dirtee Jerzee.. I'll ping you if I'm ever out in Vegas.. the mod is really not that hard to do if you don't rush any of it.. I'm real happy with the mod now that I've lived with it for a while.. truth be told I have never used the AC inverter outlet, I probably never will.. but nice to have it tucked away in there nevertheless.. I do use the cubby all the time, so the mod was definitely worth it for me..idk where you live but ill be willing to pay you for your time in doing this to my truck if you ever come to vegas
Did the cubby come with a bottom panel similar to the passenger side that keeps wheel crap from penetrating the taillight area?
inspired by this video, I ordered a Ford NZ6Z-60286A72-A Compartment along with a pair of extra bolts W505424-S450B.
since my Lariat Lux came with the factory 120V AC outlet and LED light, I transplanted the AC outlet to inside the cubby and moved the bed lighting on/off switch to the DIY wiring cover.
not shown, I ordered a DIY wiring pigtail from eBay -- this same pigtail also fits the plug for the factory LED from that bed panel. this allowed me to get rid of the factory LED and reuse that plug for LED strips I mounted on both sides of the bed. that on/off switch now controls the third-brake-light bed lights as well as the aftermarket LED strips.
I used painter's tape on the og panel to cut a template in the tape for the opening to cut in the cubby. I then transferred the painters tape template to the back of the cubby, drilled a hole in each of the corners, and cut the opening out with a boxcutter using the drilled corner holes and a metal ruler to keep things lined up. I then inserted the outlet from the back and used the outlet itself as a template to drill the holes for the bolts.
this last image shows the plug above the muffler which connects to the factory AC outlet. to reach the back of the cubby, the wires going straight up needed to be unclipped from the hole in the metal there. I used a plastic crowbar shaped tool to rip that clip out without scratching up the paint.
the cubby was just the cubby you see in the op pics -- just the plastic box with the interior divider and cover..Did the cubby come with a bottom panel similar to the passenger side that keeps wheel crap from penetrating the taillight area?
If not, how well does the cubby function for blocking crap from the wheel getting on the taillight?
I looked into this mod as a way to get the taillight better protection (seriously Ford, how long have you been making vehicles anyway). Now that I see it in action, I think I'll do it.
inspired by this video, I ordered a Ford NZ6Z-60286A72-A Compartment along with a pair of extra bolts W505424-S450B.
since my Lariat Lux came with the factory 120V AC outlet and LED light, I transplanted the AC outlet to inside the cubby and moved the bed lighting on/off switch to the DIY wiring cover.
not shown, I ordered a DIY wiring pigtail from eBay -- this same pigtail also fits the plug for the factory LED from that bed panel. this allowed me to get rid of the factory LED and reuse that plug for LED strips I mounted on both sides of the bed. that on/off switch now controls the third-brake-light bed lights as well as the aftermarket LED strips.
I used painter's tape on the og panel to cut a template in the tape for the opening to cut in the cubby. I then transferred the painters tape template to the back of the cubby, drilled a hole in each of the corners, and cut the opening out with a boxcutter using the drilled corner holes and a metal ruler to keep things lined up. I then inserted the outlet from the back and used the outlet itself as a template to drill the holes for the bolts.
this last image shows the plug above the muffler which connects to the factory AC outlet. to reach the back of the cubby, the wires going straight up needed to be unclipped from the hole in the metal there. I used a plastic crowbar shaped tool to rip that clip out without scratching up the paint.
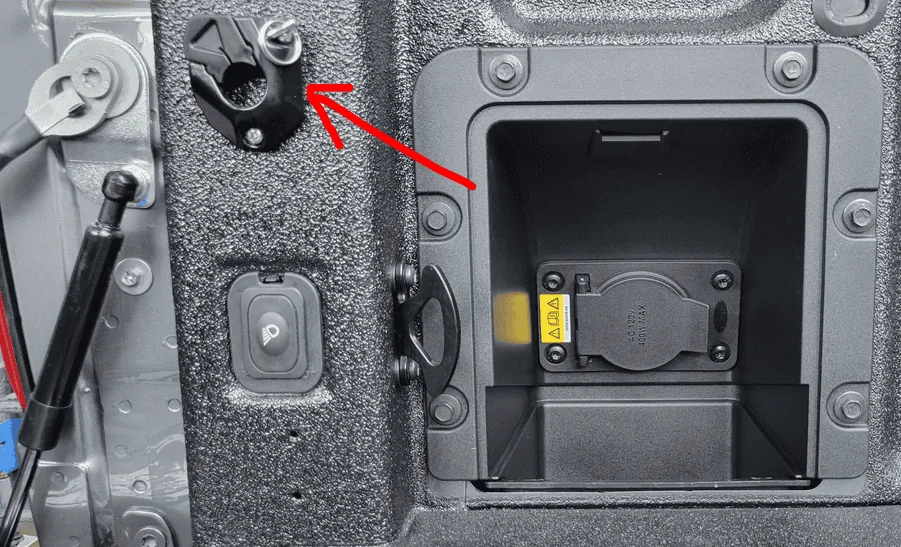
What is the gizmo above the light switch? Is it part of the vertical cargo netting?