
- First Name
- Cory
- Joined
- Jan 2, 2025
- Threads
- 7
- Messages
- 554
- Reaction score
- 1,180
- Location
- North Central Ohio
- Vehicle(s)
- '24 Lariat Hybrid, Shadow Black/'20 Escape Titanium Hybrid/'75 BMW R90/6
- Engine
- 2.5L Hybrid
- Thread starter
- #1
I mentioned in a couple other threads that I'm putting together an instructional in making fender "vent" side marker/turn signals. I know this subject has been covered numerous times on here but I thought I'd go at it from a detailed instructional approach. Many folks on here are skilled w/ do it yourself projects and I'm sure many have far better skills and abilities than I, but there are also some who don"t and my hope is to help that group. My way certainly isn't the "only" way but I try come up with a practical and achievable plan, source and acquire the bits n pieces needed, and then put together something that'll work right, isn't too complicated, and will work and last indefinitely.
I like having the extra safety of side turn signals on my vehicles and was surprised that a newly designed, twenty-first century vehicle doesn't have them from the factory. They are visible and convenient when on the mirrors but I wanted an OEM look AND a modification I could afford. I saw one of the threads here on MTC with a pretty nice looking lens that fits on the fender "vent" perfectly and, in my opinion, looks like it could be OEM. They can be found on Etsy.com from a guy named Ty at GadCad. They are available in Amber, Frost, and Smoke. I got the Smoke color because my Mav is SB. Probably most would find the Amber right for their needs but I can see where the Frost lenses would look really sharp on certain color trucks.
https://www.etsy.com/listing/1375201097/diy-fender-light-lenses-covers-for-the?ref=yr_purchases
I got the LEDs from Amazon. I've used these before on a motorcycle project so I'm familiar w/ them and have found them durable, bright, and inexpensive. I got the three wire lights that have a running light and a brighter turn signal. If you wish you can get the two wire and have just a turn signal. Here is the link for the .75" lights I got. There are probably many different varieties available. Again, I used these on another project and have been pleased w/ them.
https://www.amazon.com/dp/B096J2T74B?ref_=ppx_hzsearch_conn_dt_b_fed_asin_title_2&th=1
I'm not fond of quickie wire connectors; they can leak moisture, break, and I don't think they look professional. T-taps and scotch connectors will work and, yes, I have used them in the past, but I relegate their use to "last choice." Because of that I wanted to go with a cleaner installation for this project. One of the other threads on here had a link for these and though I thought they were a bit on the expensive side I decided to get them. I think if I were going to do this more than once I'd get individual plugs and wire and make my own. Here's the link:
https://customautoworksstore.com/product/2022-24-ford-maverick-side-marker-plug/
In continuing w/ the professional or finished look I've also gone to using woven loom to cover wiring projects. There's a learning curve and sort of a knack to using the stuff but it provides that "finished" look to wiring projects and helps to tidy things up.
https://www.amazon.com/dp/B07F41JTS6?ref_=ppx_hzsearch_conn_dt_b_fed_asin_title_5
Here's picture of the items noted above. In addition some lengths of wire will be needed but we'll get to that in the future.
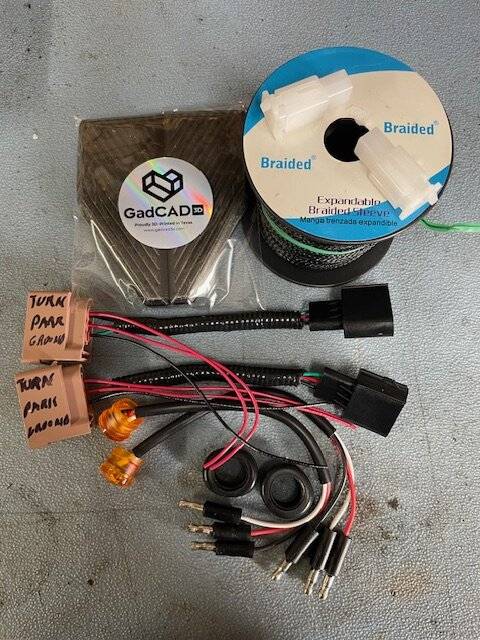
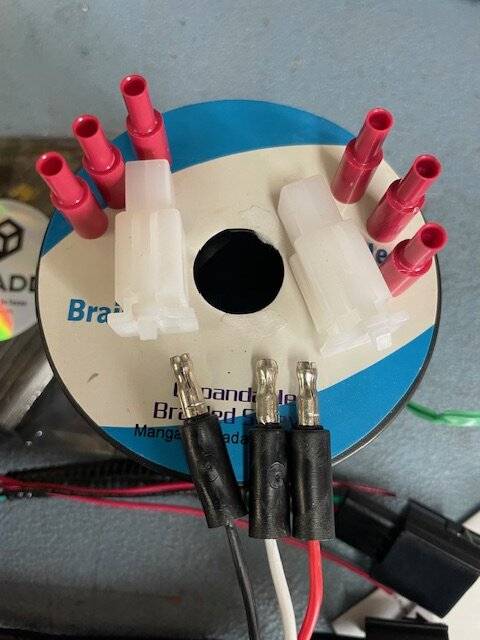
I had planned to use the white connectors that are on top of the wire loom spool, but rather than cur off and replace the connectors that come on the LEDs I think I'm going to use individual bayonet connectors, the red ones in the picture below. Should the need ever arise to replace an LED it'll be much easier to go this route.
Crimp on butt connectors can be used for all the wire connections but I prefer to solder and use heat shrink tubing. It's more secure and looks better. If you don't know how to solder it's an easy skill to learn and isn't very expensive to get into. I haven't looked but I'm sure there are bunches of YouTube vids demonstrating proper soldering tecniques. Check it out, it's one of those life skills everybody should learn. (Yeah, my opinion for what it's worth.)
Next installment I'll show how to extend the wires from the connectors and then put on the wire loom.
I like having the extra safety of side turn signals on my vehicles and was surprised that a newly designed, twenty-first century vehicle doesn't have them from the factory. They are visible and convenient when on the mirrors but I wanted an OEM look AND a modification I could afford. I saw one of the threads here on MTC with a pretty nice looking lens that fits on the fender "vent" perfectly and, in my opinion, looks like it could be OEM. They can be found on Etsy.com from a guy named Ty at GadCad. They are available in Amber, Frost, and Smoke. I got the Smoke color because my Mav is SB. Probably most would find the Amber right for their needs but I can see where the Frost lenses would look really sharp on certain color trucks.
https://www.etsy.com/listing/1375201097/diy-fender-light-lenses-covers-for-the?ref=yr_purchases
I got the LEDs from Amazon. I've used these before on a motorcycle project so I'm familiar w/ them and have found them durable, bright, and inexpensive. I got the three wire lights that have a running light and a brighter turn signal. If you wish you can get the two wire and have just a turn signal. Here is the link for the .75" lights I got. There are probably many different varieties available. Again, I used these on another project and have been pleased w/ them.
https://www.amazon.com/dp/B096J2T74B?ref_=ppx_hzsearch_conn_dt_b_fed_asin_title_2&th=1
I'm not fond of quickie wire connectors; they can leak moisture, break, and I don't think they look professional. T-taps and scotch connectors will work and, yes, I have used them in the past, but I relegate their use to "last choice." Because of that I wanted to go with a cleaner installation for this project. One of the other threads on here had a link for these and though I thought they were a bit on the expensive side I decided to get them. I think if I were going to do this more than once I'd get individual plugs and wire and make my own. Here's the link:
https://customautoworksstore.com/product/2022-24-ford-maverick-side-marker-plug/
In continuing w/ the professional or finished look I've also gone to using woven loom to cover wiring projects. There's a learning curve and sort of a knack to using the stuff but it provides that "finished" look to wiring projects and helps to tidy things up.
https://www.amazon.com/dp/B07F41JTS6?ref_=ppx_hzsearch_conn_dt_b_fed_asin_title_5
Here's picture of the items noted above. In addition some lengths of wire will be needed but we'll get to that in the future.
I had planned to use the white connectors that are on top of the wire loom spool, but rather than cur off and replace the connectors that come on the LEDs I think I'm going to use individual bayonet connectors, the red ones in the picture below. Should the need ever arise to replace an LED it'll be much easier to go this route.
Crimp on butt connectors can be used for all the wire connections but I prefer to solder and use heat shrink tubing. It's more secure and looks better. If you don't know how to solder it's an easy skill to learn and isn't very expensive to get into. I haven't looked but I'm sure there are bunches of YouTube vids demonstrating proper soldering tecniques. Check it out, it's one of those life skills everybody should learn. (Yeah, my opinion for what it's worth.)
Next installment I'll show how to extend the wires from the connectors and then put on the wire loom.
Sponsored

