
Sponsored

Rileyotta

2.0L EcoBoost
Well-known member
First Name
Riley
Joined
May 17, 2022
Threads
3
Messages
380
Reaction score
204
Location
Edmonton
Vehicle(s)
Waiting for Maverick, driving 2013 Kia Sorento
Engine
2.0L EcoBoost
Clubs
 
yes - very cheap on Amazon. Mine were $30-$35+...plus an hour of my labor to install all 4 mud flaps. Most any mud flap will keep side paint cleaner from thrown up dirty road grime. Should have been included but it was a cost savings for Ford...since it's an economy pickup.
They also list “gatorback” mudflaps on the FORD website but they want about $400 for the front and another $400 for the rear and that just seems outrageous, but they sure look like they would last the lifetime of my truck.
Sponsored


ShadowBlack XL440

2.5L Hybrid
Well-known member
First Name
Robert
Joined
Jan 21, 2022
Threads
13
Messages
1,032
Reaction score
1,310
Location
Northern Ohio
Vehicle(s)
Non-Ford, not enought room to list..........
Engine
2.5L Hybrid

Bob The Builder

2.0L EcoBoost
Well-known member
First Name
Butch
Joined
Dec 2, 2021
Threads
54
Messages
2,645
Reaction score
5,075
Location
Vermont
Vehicle(s)
2020 Jeep Cherokee ** 2023 Mav FX/4
Engine
2.0L EcoBoost
You didn't think the cardboard ones would work very well? Just kidding. Nice job.
 

Edge Haley

2.5L Hybrid
Well-known member
First Name
Edge
Joined
Jul 17, 2021
Threads
5
Messages
1,376
Reaction score
1,892
Location
CARBONDALE-Atlanta
Vehicle(s)
PORSCHE
Engine
2.5L Hybrid
Mabett are the best, OEM flaps will rub the fenders and remove paint over time.
I have the 2022 Ford Branded OEM mud flaps (4 years old) and still look the same as the day I installed them...so far no effect on the paint...they're not even close to any painted surfaces. Maybe different OEM mud flaps...mine were ordered from Amazon but a Ford product....$37
 
Last edited:

Sponsored

Timothyd

2.5L Hybrid
Well-known member
First Name
Tim
Joined
Nov 10, 2021
Threads
52
Messages
4,173
Reaction score
3,586
Location
Illinois
Vehicle(s)
Buick Encore, Miata, motorcycles
Engine
2.5L Hybrid
Clubs
 
I wanted a little more protection underneath from debris being kicked up from the tires so I decided to look at mud flaps/splash guards. However, none of the existing brands appealed to me. The look was "off". I had seen other posts with custom mud flaps so gave it a shot. Here's what I came up with. Part guide and part walkthrough of my build.

00 intro text.webp


Research and Prototyping

First thing was to look at the existing brands to see where and how they mount. Most use the same fastener/bolt locations in the fenders. The plastic fasteners are replaced with bolts and U-nuts. Existing brands then have you install brackets to help support the inner sides where needed.

Version 1
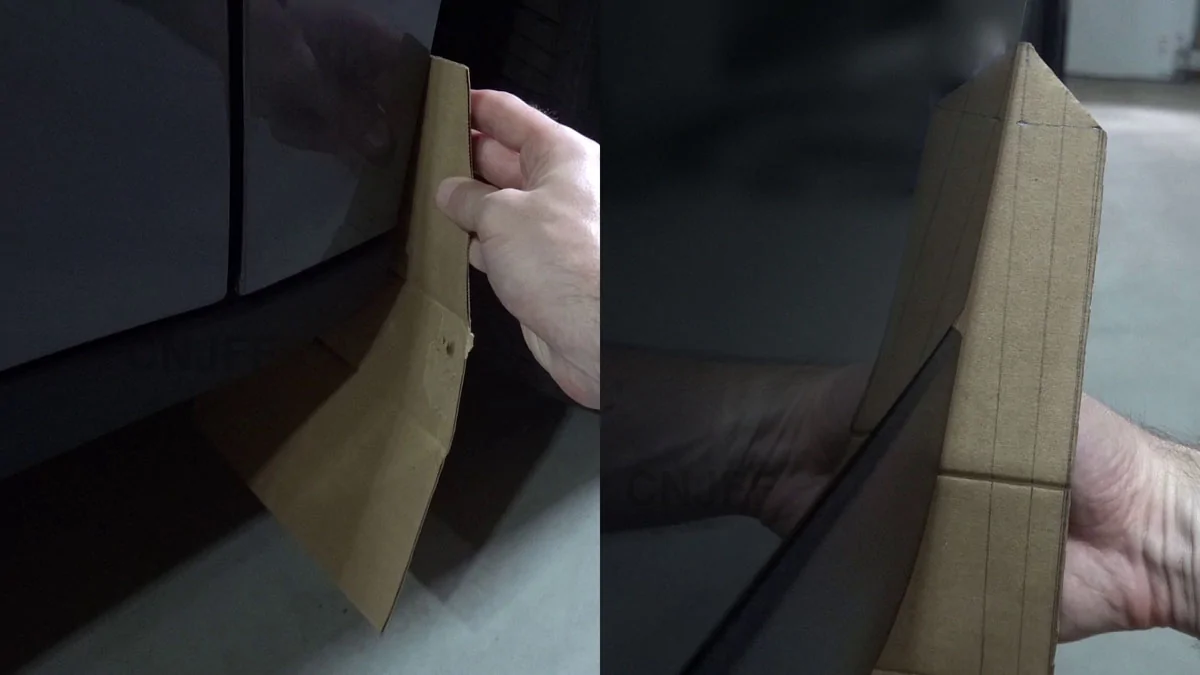
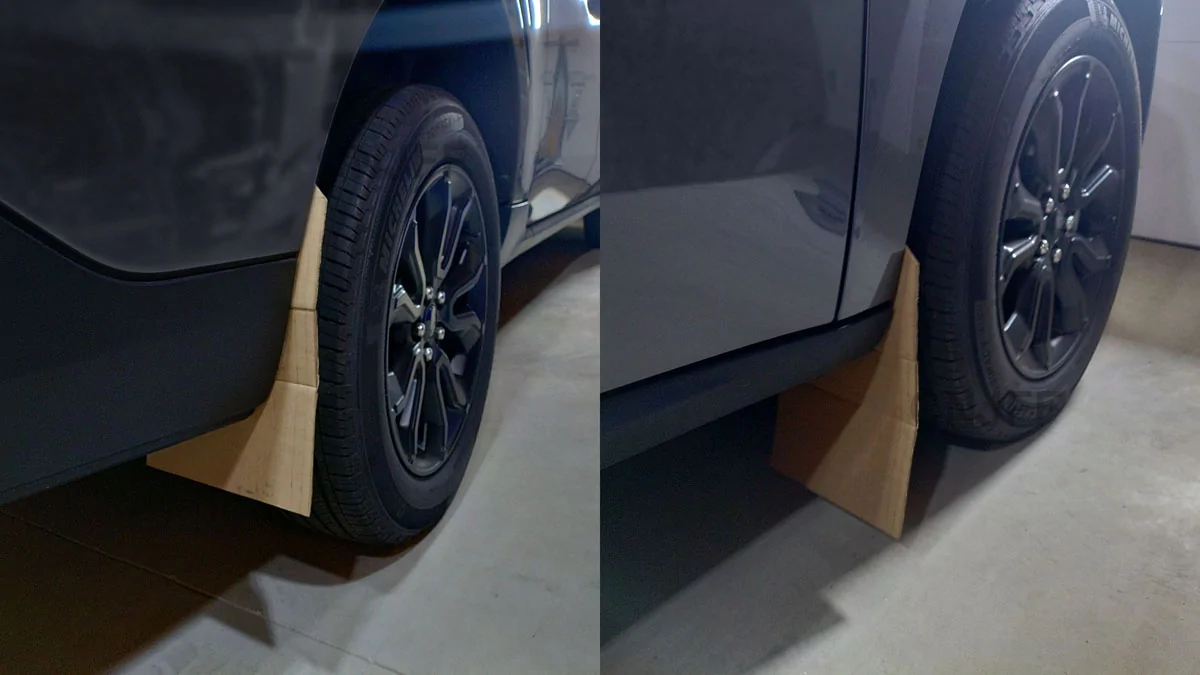
I wasn't entirely sure what I wanted so I cut up a cardboard box and made a basic shape to mess around with. Some initial measurements gave me a piece 10" wide and 14" tall to start. A 1"x1" corner was cut off to designate the top outer edge which most mud flaps have as a transition into the fender. I also made a couple 1/2" vertical lines so I could "step" the piece in and out to see what distance I liked.

01 v0 cardboard.webp


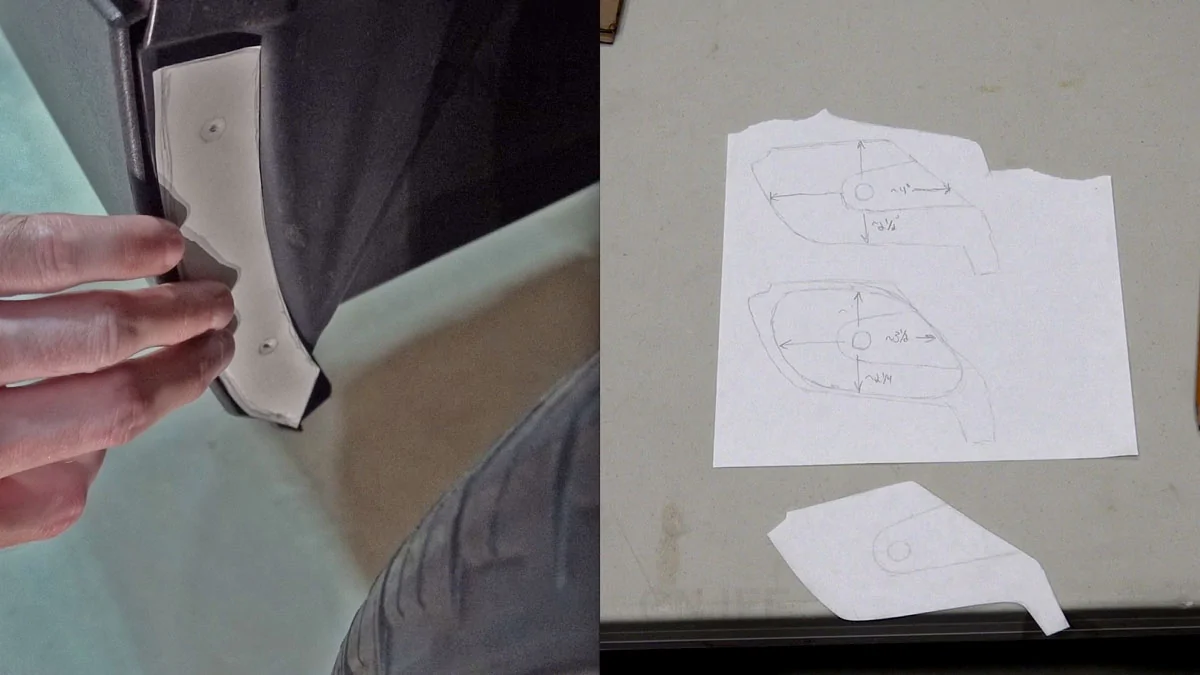
When I found a location that worked, I measured out where to place the top mounting hole. The first iteration had the mounting hole 1" down and 1.5" inward. This created a good border around the mount with the mud flap sticking out 1/2" on the rear. I mounted the cardboard and wedged it flat against the fender to get a better look.

02 v1 cardboard.webp


For anyone that's looked at their front fenders, you know they are not flat. There are ridges that act as support. These are then covered by the fender lining which also has the ridges. These were sketched onto the cardboard to give an idea of where they were and get some basic measurements. I went through many different thoughts on how to get around them. More on that later in Version 2.

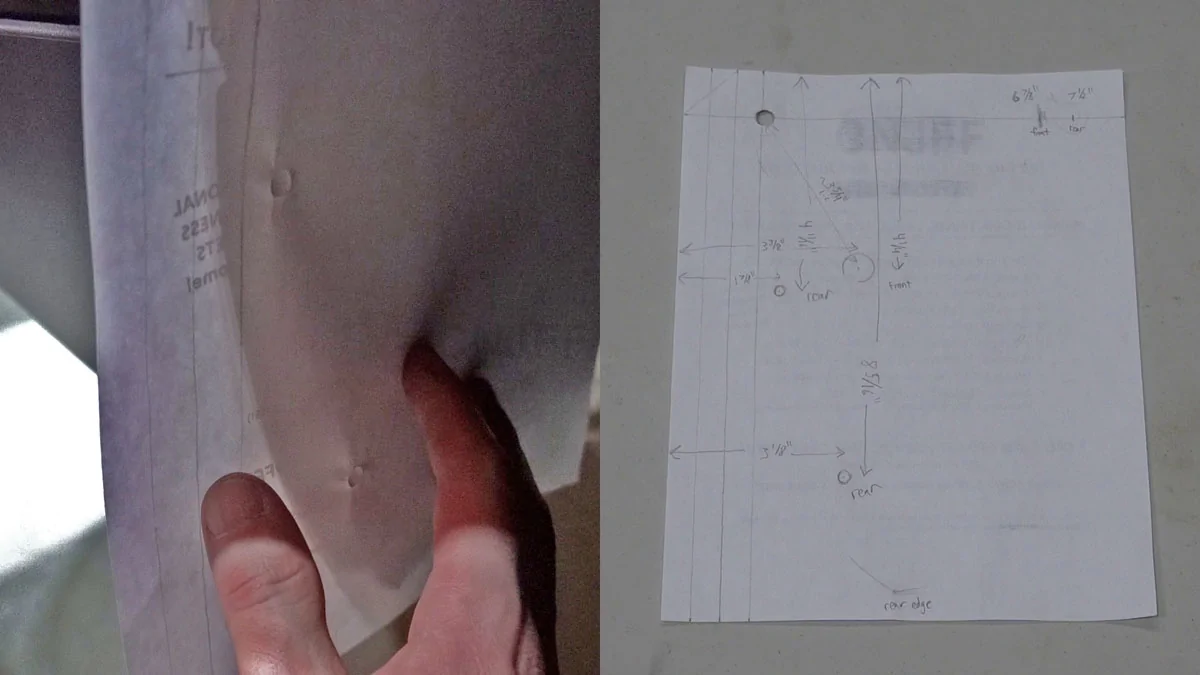
Once the location was confirmed and basic measurements were taken, the cardboard was replaced with regular copy paper. The same corner cut and top mounting hole were made. The paper piece was mounted and held as level & flat as possible against the fender. Then I used a finger to push against the other mounting fasteners/bolts to imprint them into the paper. Measurements were taken and transferred to the cardboard to confirm.

03 v1 paper.webp


With the mounting locations chosen, the last dimension to pick is the height or distance from the mud flap to the ground. This is a matter of preference. The clearance under the front fenders (rear side, from the underside of the truck) is ~11" near the outside, the rears are ~14". I initially was going to make the mud flaps hang 3" below the truck but dropped down to 5". This gave 6" clearance for the front and 9" for the rear. Plenty for tall curbs or other objects I may back up to.

Version 2
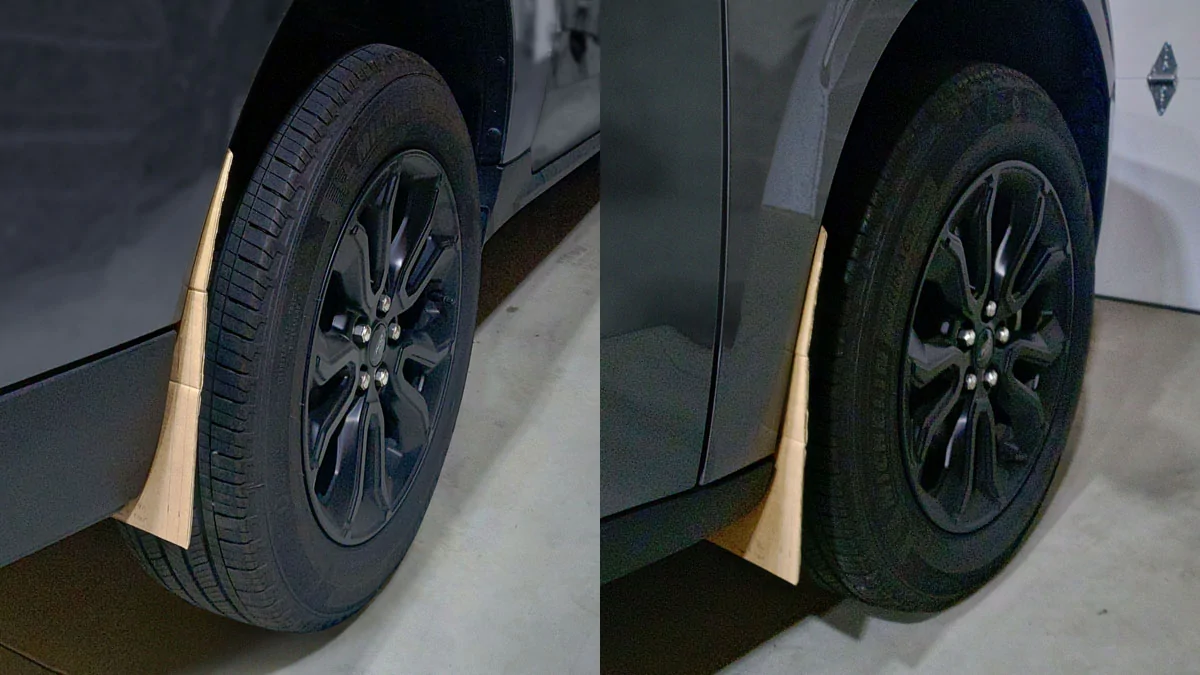
While I initially made prototypes that mimicked the existing brands with minor changes, it still didn't look right and had some disadvantages. I made a second version that went to the next higher fastener in the fender. First, this let me "blend" the mud flap into the fender while keeping it outward enough to still cover the tire treads. This look had me nodding my head with approval. Second, it covered a more flat portion of the inner front fender which provided a place for a new fastener. Third is similar for the rear fenders. It brought the driver side up over a nice flat spot above the open "gap" on that side.

04 v2 cardboard.webp


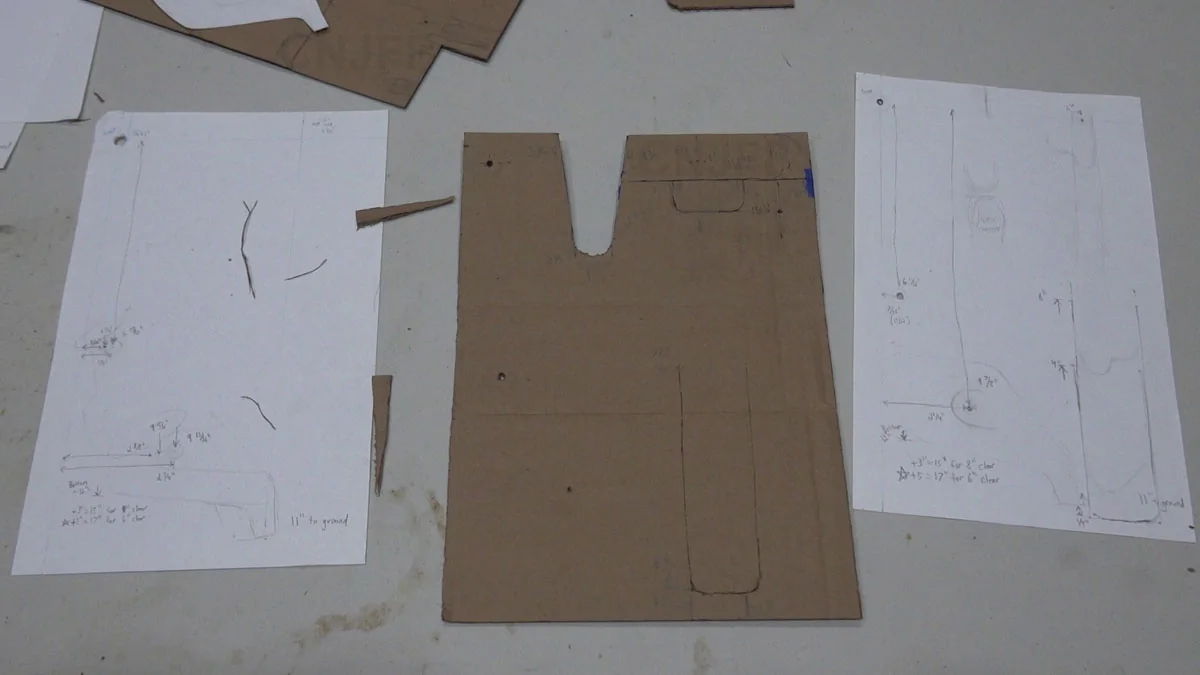
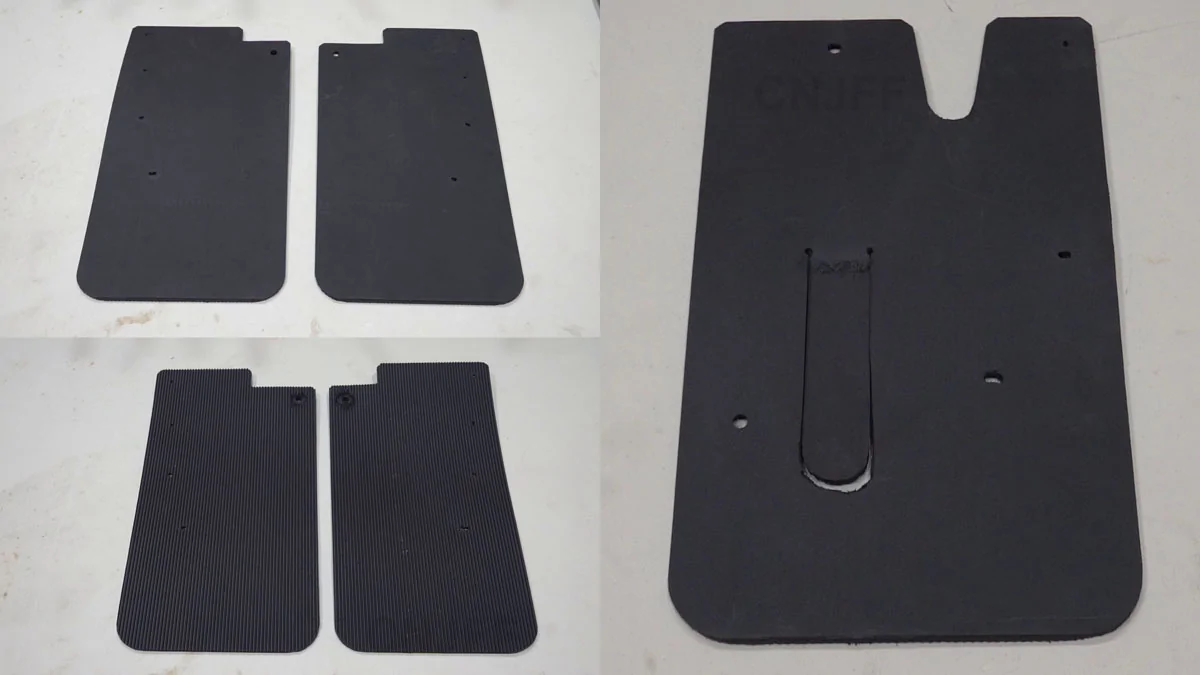
As for the ridges in the front fenders, I went back and forth between paper and cardboard sketching where the ridges were and where to cut the mud flap to get around them while still covering as much area as possible. I ended up with a cutout at the top and another in the middle (lower fender). With my goal of coverage I made the lower cut into a "flap" that draped over the ridge. In hindsight this was probably a waste of time. Cutting out the whole piece wouldn't sacrifice much as water/debris is still getting kicked up under it. With better tools the areas over the ridges could be molded around but that's for the future.

05 v2 front paper-cardboard.webp


The paper template was finalized although I will note some minor things changed or were added afterwards for my build. Notably inner fastener locations were drilled out during the last test fit once everything else was finalized. The cutouts for the front ridges also had to be modified to fit better.

Spacers
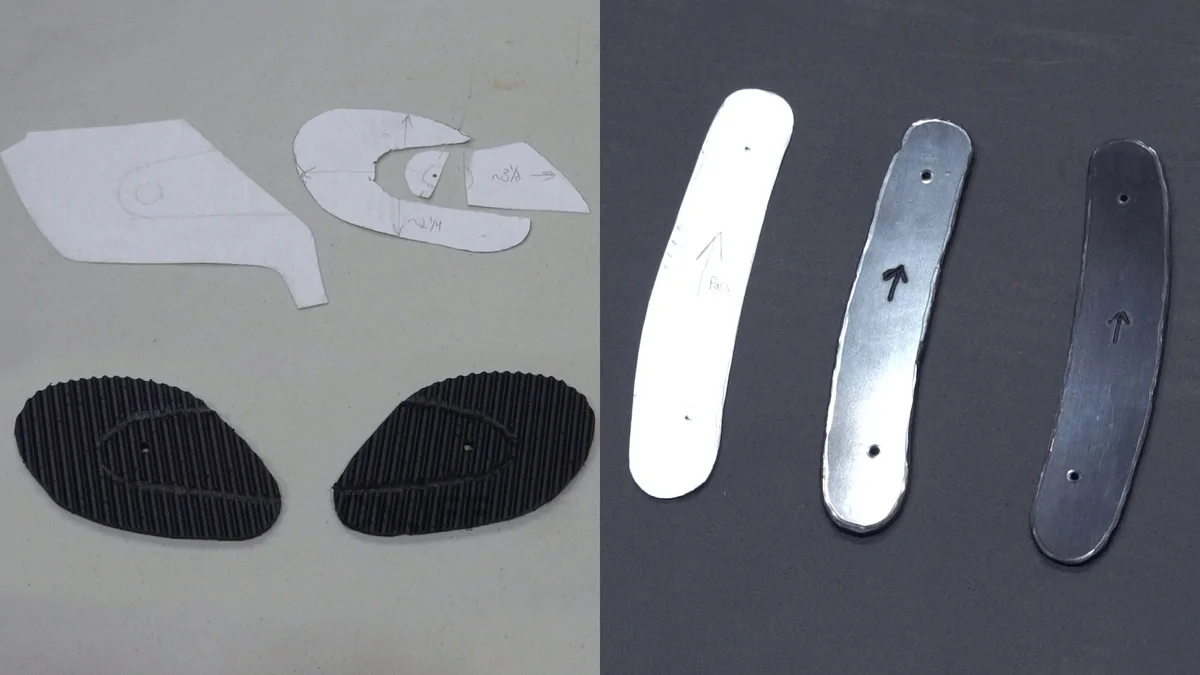
One final thing to figure out was the gaps at the bottom outside edges of the fenders. The rear fenders have an inset area in the lower plastic where the stock bolts are located. Existing brands give you washers to keep the mud flaps flush or off the paint. The rears are inset 1/8" and the fronts ~1/4". Again, I used paper pressed against the fenders to sketch out the sizes and mounting holes.

06 spacers paper.webp


Building the Mud Flaps

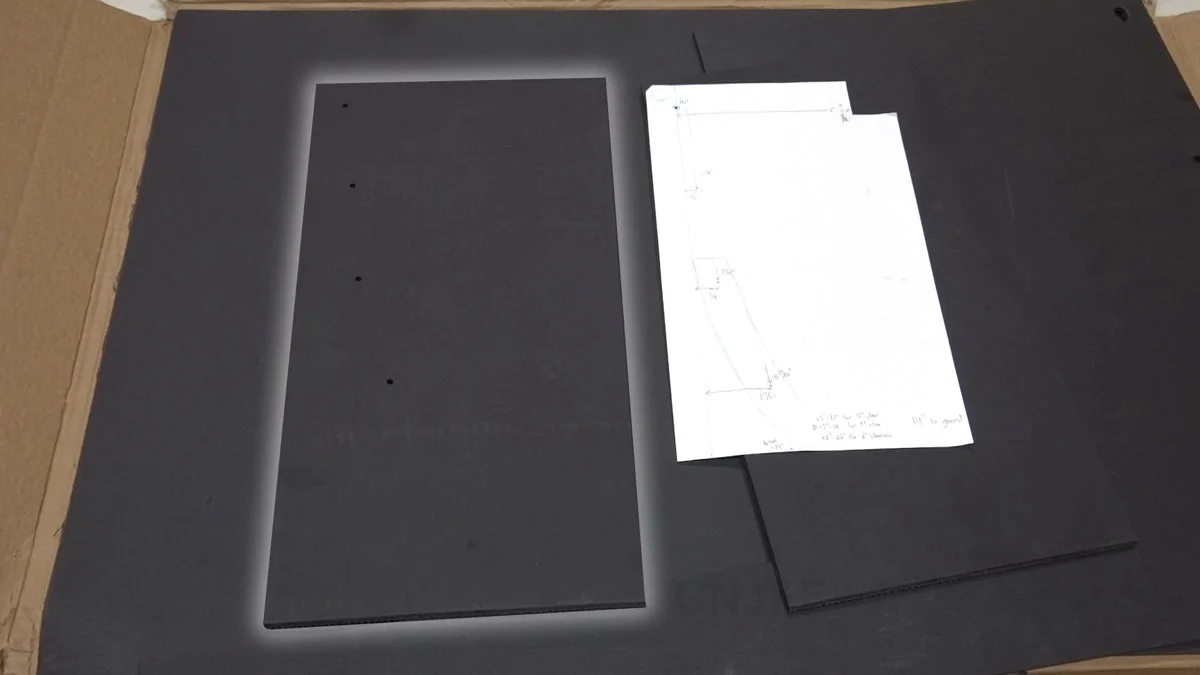
With the design chosen, it was time to start making them a reality. I had some plastic truck mud flaps laying around that were rescued from roadways but they were very stiff and didn't look great. I wanted flexible rubber and some had grooves to move water spray down instead of outward. Shopping around at options, I went with 24"x36"x1/4", grooved, poly-rubber blank mud flaps. Longer fender bolts were ordered since I was adding an extra 1/4" of material.

Items
The following items were bought for the project. Buy as much - or substitute - as needed:
- 1/4" mud flap blanks (https://usaflap.com/product/polyrubber-mud-flap-blanks/)
- 1/8" black ABS plastic sheet (https://www.amazon.com/dp/B0C53GFCMT)
- 1/4" material of your choice
- M4.2x1.41x25 fender bolts and U-nuts (https://www.amazon.com/dp/B0CJ48C16S)

Tools
The following tools are needed or recommended:
- Pry tool or small flathead screwdriver
- 7mm socket
- Drill + 3/16" and 5/16" drill bits
- 1" spade drill bit
- Utility knife or saw blade
- Hot knife/flat edge

Fabrication
I would suggest to start by making the spacers. This way they are ready when you test fit the mud flaps. I made the rears from 1/8" ABS plastic and the fronts from leftover 1/4" mud flap material. The fronts can be thinner, as long as it clears the paint. The front section only has one fastener so by using the mud flap material I could cut grooves that fit the plastic molding inset to help it stay in place. I chose to round-off the spacers for easier fitment. They are hidden from view anyway so do not need to be perfect.

07 spacers.webp


Cut the overall shape of the mud flaps from the blanks. Then use the paper templates to mark out the holes and other cutouts. Drill/cut as necessary. Since I was using the top fastener as the anchor point, I made the lower holes a little wider to allow leveling adjustment later. I suggest leaving the corner cuts until later so it's easier to level everything first.

08 v2 rear mount holes.webp


Installation

Now it's time to put everything together.

Mounting Hardware
Install the U-nuts. The rears are straightforward. Slide the U-nuts onto the sheet metal openings for the upper fasteners. The lowers stay the same.

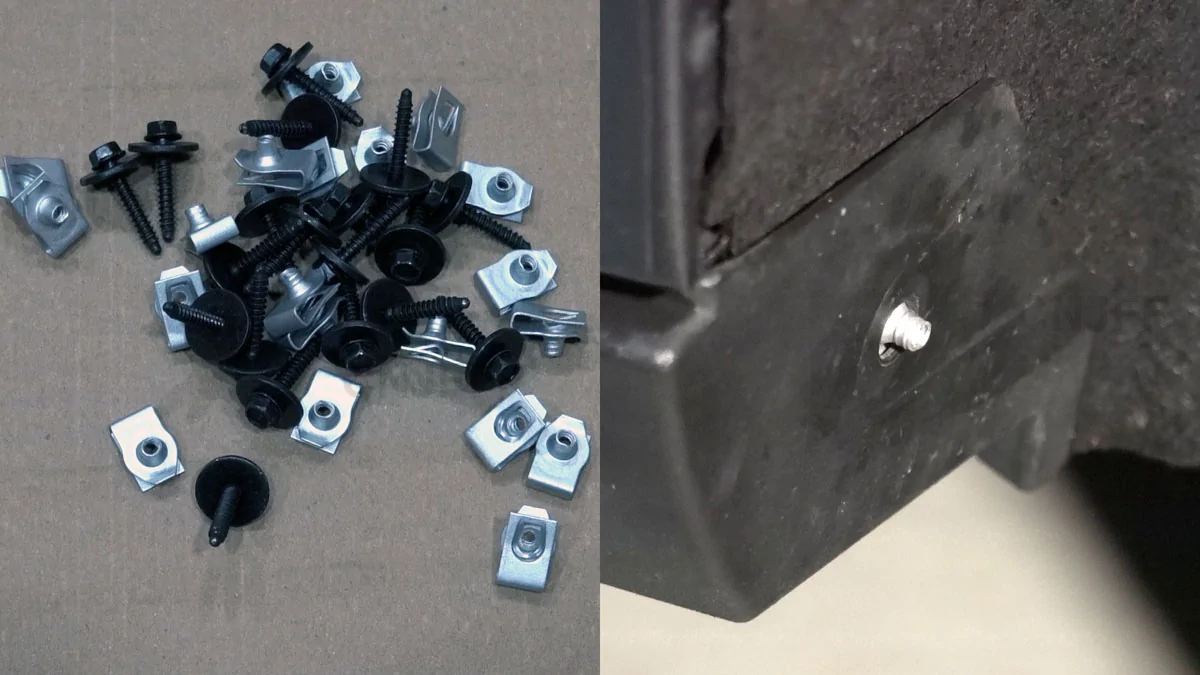
The front fenders are similar but the lowest mount needed some creativity since I was adding 1/2" of material. The simplest solution I found was to slit the fender liner above the existing hole and slip the U-nut in BUT with a catch. I put it in facing backwards so it stuck out towards the wheel. This ensured there was enough thread for the bolt to safely grab onto. Note the funnel shape of the nut means you need to be a little more precise when threading the bolt but it's not too difficult. The hardest part was pulling the fender liner out from behind the plastic trim. Removing a few of the rocker panel fasteners underneath helped loosen things up.

09 hardware front low.webp


Test Fit
Install the mud flaps without tightening things. Check fitment of the mounting holes and level the mud flaps best you can. I was parked on a concrete floor and measured the inner and outer clearances to compare. Once acceptable, I had to drill the final holes for the inner fasteners. I left this for last primarily because the fronts were going to be mounted onto a flat portion of a ridge so it needed to be fairly precise.

Inner Fasteners
One last time I measured and marked the locations for the inner fasteners and pulled the mud flaps back off. Holes were drilled into the rubber and a 1" diameter of grooves around the holes were removed to make room for the fasteners to sit flush. For my build I used a knife to remove the grooves and a cheap soldering iron to smooth things out. A spade bit on a drill would have made it much cleaner.

The fronts were given an extra fastener location low on the inside to ensure the flaps would stay clear of the wheel when turned.

10 v2 final.webp


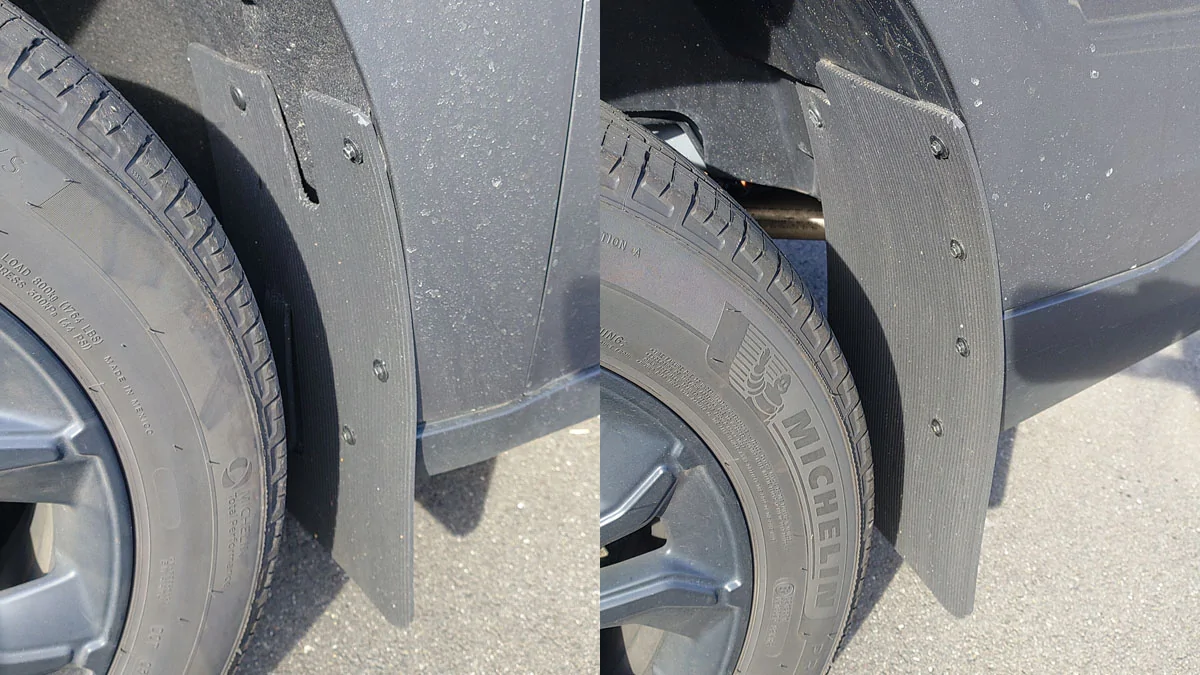
With the holes on the mud flaps complete, I reinstalled the them and used the new holes as guides to drill into the fender liners. I managed to squeeze the drill+bit in behind the wheels. Definitely more convenient to pull them off. The fasteners removed from the truck were then reused at these locations. For the fronts, due to the ridge behind the liner, I had to use the shorter ones. The first install was tight but doable. A few casual pulls with no issues. You could use more bolts/U-nuts but the fasteners are much more convenient.

11 installed.webp


Final Install
Uninstall and/or modify as needed until you are happy with the result. Cut the corners if not done so already. I chose 1-1/2" radius for the bottoms and snipped a 1/4" x 1/4" diagonal on the tops. You may wish to give everything a good cleaning before final install and touch up the bolt heads with some paint.

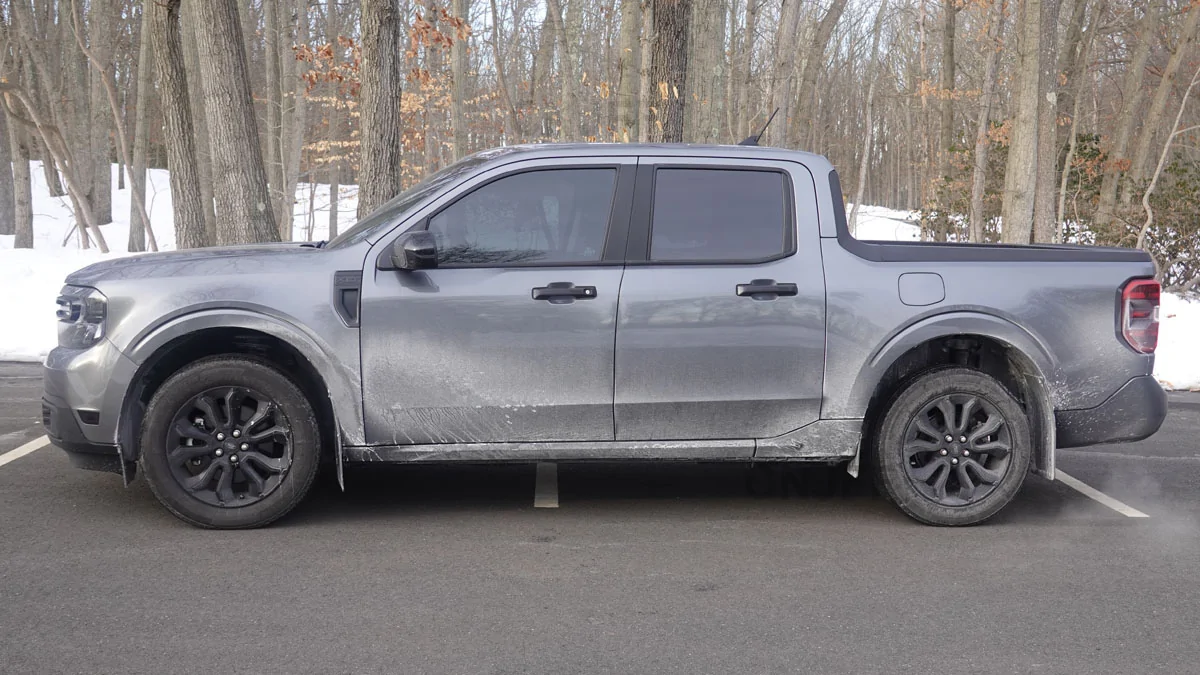
After some winter weather the results were checked. Still plenty of dirt on the sides but again I simply wanted to cut down on some of the debris up into the underside. I liked the "streamlined" look of the flaps coming down from the fenders and not sticking out.

12 installed dirty.webp


Closing

This is a simplified version of the process. I went through a few different styles for the cardboard versions before settling on my final choice. The mud flaps themselves were on and off numerous times as I tweaked things - especially the fronts. The lower cutouts for the front fenders may be removed outright in the future but so far no issues. I may also trim the upper corners a little more or round them off to match the lowers. If I were to build these again I might scale the flaps down another inch just for a little more coverage.

Hopefully you find this useful for your own build!


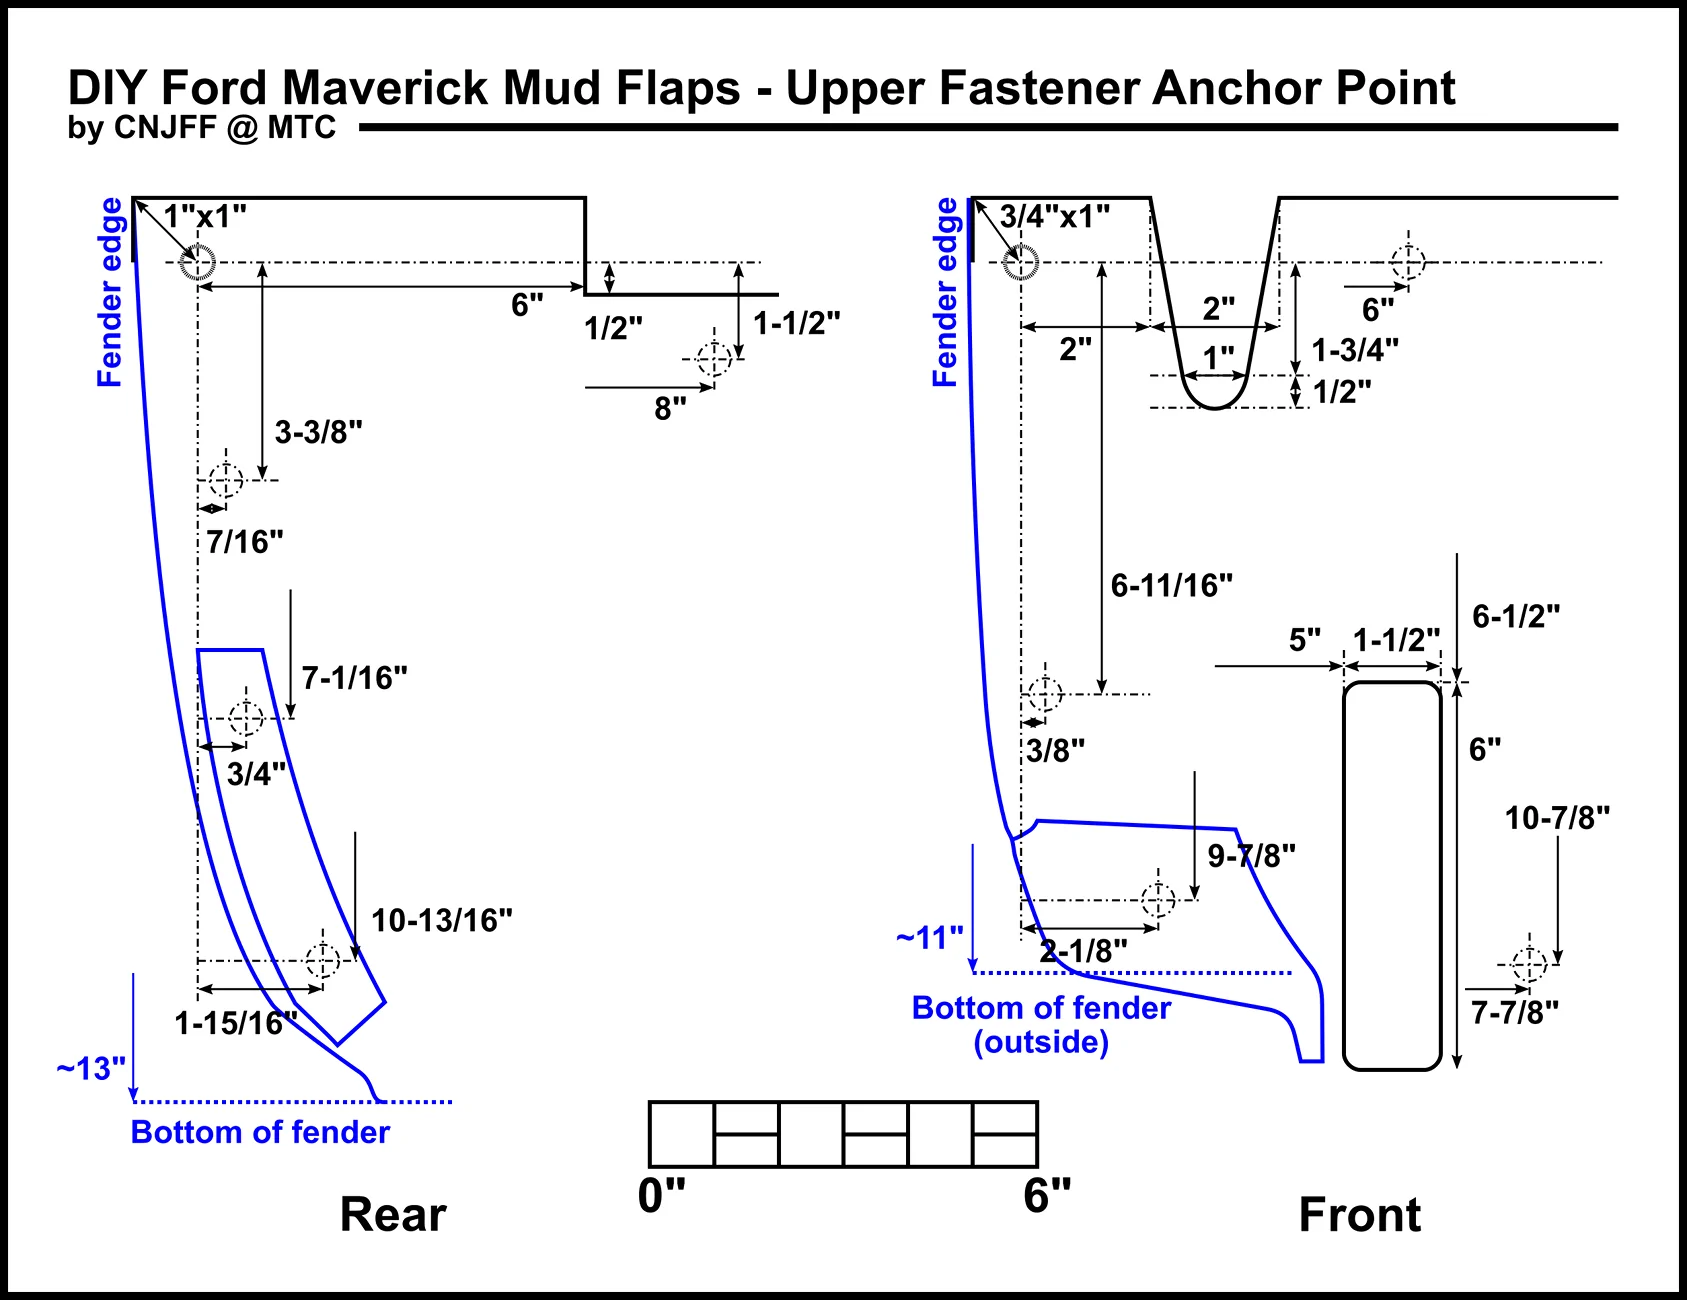
Below are templates based on my build showing the locations of the fasteners and obstacle avoidance. The measurements may be a little off as adjustments were made on the fly during installation. Widening the holes for the fasteners gives some wiggle room. The blue lines depicting the fender edges are approximate.

z plans 1.webp
Wow. Much thought going into mud flaps. But, it's worth it with the unibody to reduce corrosion. Good job.
 

Rileyotta

2.0L EcoBoost
Well-known member
First Name
Riley
Joined
May 17, 2022
Threads
3
Messages
380
Reaction score
204
Location
Edmonton
Vehicle(s)
Waiting for Maverick, driving 2013 Kia Sorento
Engine
2.0L EcoBoost
Clubs
 
Mabett are the best, OEM flaps will rub the fenders and remove paint over time.
Really? That’s very good information; I thought I read that the Mabett ones would cause rubbing and possible paint removal.
Maybe the cheaper option is the better option here.
 

Escapologist

2.5L Hybrid
Well-known member
Joined
May 26, 2025
Threads
28
Messages
1,093
Reaction score
1,518
Location
Niagara Region, ON
Vehicle(s)
2025 Lariat Hyb AWD 4K, '25 Escape PHEV, Versa, T&C
Engine
2.5L Hybrid
Clubs
 
You didn't think the cardboard ones would work very well? Just kidding. Nice job.
I guess it would depend on how much bedliner you had left over and how thorough you were with it :LOL:
 
Sponsored

jonshep

2.0L EcoBoost
Well-known member
First Name
John
Joined
Jul 28, 2024
Threads
4
Messages
296
Reaction score
338
Location
SW Oklahoma
Vehicle(s)
2024 Maverick XLT 2002 F250 7.3 Diesel
Engine
2.0L EcoBoost
I wanted a little more protection underneath from debris being kicked up from the tires so I decided to look at mud flaps/splash guards. However, none of the existing brands appealed to me. The look was "off". I had seen other posts with custom mud flaps so gave it a shot. Here's what I came up with. Part guide and part walkthrough of my build.

00 intro text.webp


Research and Prototyping

First thing was to look at the existing brands to see where and how they mount. Most use the same fastener/bolt locations in the fenders. The plastic fasteners are replaced with bolts and U-nuts. Existing brands then have you install brackets to help support the inner sides where needed.

Version 1
I wasn't entirely sure what I wanted so I cut up a cardboard box and made a basic shape to mess around with. Some initial measurements gave me a piece 10" wide and 14" tall to start. A 1"x1" corner was cut off to designate the top outer edge which most mud flaps have as a transition into the fender. I also made a couple 1/2" vertical lines so I could "step" the piece in and out to see what distance I liked.

01 v0 cardboard.webp


When I found a location that worked, I measured out where to place the top mounting hole. The first iteration had the mounting hole 1" down and 1.5" inward. This created a good border around the mount with the mud flap sticking out 1/2" on the rear. I mounted the cardboard and wedged it flat against the fender to get a better look.

02 v1 cardboard.webp


For anyone that's looked at their front fenders, you know they are not flat. There are ridges that act as support. These are then covered by the fender lining which also has the ridges. These were sketched onto the cardboard to give an idea of where they were and get some basic measurements. I went through many different thoughts on how to get around them. More on that later in Version 2.

Once the location was confirmed and basic measurements were taken, the cardboard was replaced with regular copy paper. The same corner cut and top mounting hole were made. The paper piece was mounted and held as level & flat as possible against the fender. Then I used a finger to push against the other mounting fasteners/bolts to imprint them into the paper. Measurements were taken and transferred to the cardboard to confirm.

03 v1 paper.webp


With the mounting locations chosen, the last dimension to pick is the height or distance from the mud flap to the ground. This is a matter of preference. The clearance under the front fenders (rear side, from the underside of the truck) is ~11" near the outside, the rears are ~14". I initially was going to make the mud flaps hang 3" below the truck but dropped down to 5". This gave 6" clearance for the front and 9" for the rear. Plenty for tall curbs or other objects I may back up to.

Version 2
While I initially made prototypes that mimicked the existing brands with minor changes, it still didn't look right and had some disadvantages. I made a second version that went to the next higher fastener in the fender. First, this let me "blend" the mud flap into the fender while keeping it outward enough to still cover the tire treads. This look had me nodding my head with approval. Second, it covered a more flat portion of the inner front fender which provided a place for a new fastener. Third is similar for the rear fenders. It brought the driver side up over a nice flat spot above the open "gap" on that side.

04 v2 cardboard.webp


As for the ridges in the front fenders, I went back and forth between paper and cardboard sketching where the ridges were and where to cut the mud flap to get around them while still covering as much area as possible. I ended up with a cutout at the top and another in the middle (lower fender). With my goal of coverage I made the lower cut into a "flap" that draped over the ridge. In hindsight this was probably a waste of time. Cutting out the whole piece wouldn't sacrifice much as water/debris is still getting kicked up under it. With better tools the areas over the ridges could be molded around but that's for the future.

05 v2 front paper-cardboard.webp


The paper template was finalized although I will note some minor things changed or were added afterwards for my build. Notably inner fastener locations were drilled out during the last test fit once everything else was finalized. The cutouts for the front ridges also had to be modified to fit better.

Spacers
One final thing to figure out was the gaps at the bottom outside edges of the fenders. The rear fenders have an inset area in the lower plastic where the stock bolts are located. Existing brands give you washers to keep the mud flaps flush or off the paint. The rears are inset 1/8" and the fronts ~1/4". Again, I used paper pressed against the fenders to sketch out the sizes and mounting holes.

06 spacers paper.webp


Building the Mud Flaps

With the design chosen, it was time to start making them a reality. I had some plastic truck mud flaps laying around that were rescued from roadways but they were very stiff and didn't look great. I wanted flexible rubber and some had grooves to move water spray down instead of outward. Shopping around at options, I went with 24"x36"x1/4", grooved, poly-rubber blank mud flaps. Longer fender bolts were ordered since I was adding an extra 1/4" of material.

Items
The following items were bought for the project. Buy as much - or substitute - as needed:
- 1/4" mud flap blanks (https://usaflap.com/product/polyrubber-mud-flap-blanks/)
- 1/8" black ABS plastic sheet (https://www.amazon.com/dp/B0C53GFCMT)
- 1/4" material of your choice
- M4.2x1.41x25 fender bolts and U-nuts (https://www.amazon.com/dp/B0CJ48C16S)

Tools
The following tools are needed or recommended:
- Pry tool or small flathead screwdriver
- 7mm socket
- Drill + 3/16" and 5/16" drill bits
- 1" spade drill bit
- Utility knife or saw blade
- Hot knife/flat edge

Fabrication
I would suggest to start by making the spacers. This way they are ready when you test fit the mud flaps. I made the rears from 1/8" ABS plastic and the fronts from leftover 1/4" mud flap material. The fronts can be thinner, as long as it clears the paint. The front section only has one fastener so by using the mud flap material I could cut grooves that fit the plastic molding inset to help it stay in place. I chose to round-off the spacers for easier fitment. They are hidden from view anyway so do not need to be perfect.

07 spacers.webp


Cut the overall shape of the mud flaps from the blanks. Then use the paper templates to mark out the holes and other cutouts. Drill/cut as necessary. Since I was using the top fastener as the anchor point, I made the lower holes a little wider to allow leveling adjustment later. I suggest leaving the corner cuts until later so it's easier to level everything first.

08 v2 rear mount holes.webp


Installation

Now it's time to put everything together.

Mounting Hardware
Install the U-nuts. The rears are straightforward. Slide the U-nuts onto the sheet metal openings for the upper fasteners. The lowers stay the same.

The front fenders are similar but the lowest mount needed some creativity since I was adding 1/2" of material. The simplest solution I found was to slit the fender liner above the existing hole and slip the U-nut in BUT with a catch. I put it in facing backwards so it stuck out towards the wheel. This ensured there was enough thread for the bolt to safely grab onto. Note the funnel shape of the nut means you need to be a little more precise when threading the bolt but it's not too difficult. The hardest part was pulling the fender liner out from behind the plastic trim. Removing a few of the rocker panel fasteners underneath helped loosen things up.

09 hardware front low.webp


Test Fit
Install the mud flaps without tightening things. Check fitment of the mounting holes and level the mud flaps best you can. I was parked on a concrete floor and measured the inner and outer clearances to compare. Once acceptable, I had to drill the final holes for the inner fasteners. I left this for last primarily because the fronts were going to be mounted onto a flat portion of a ridge so it needed to be fairly precise.

Inner Fasteners
One last time I measured and marked the locations for the inner fasteners and pulled the mud flaps back off. Holes were drilled into the rubber and a 1" diameter of grooves around the holes were removed to make room for the fasteners to sit flush. For my build I used a knife to remove the grooves and a cheap soldering iron to smooth things out. A spade bit on a drill would have made it much cleaner.

The fronts were given an extra fastener location low on the inside to ensure the flaps would stay clear of the wheel when turned.

10 v2 final.webp


With the holes on the mud flaps complete, I reinstalled the them and used the new holes as guides to drill into the fender liners. I managed to squeeze the drill+bit in behind the wheels. Definitely more convenient to pull them off. The fasteners removed from the truck were then reused at these locations. For the fronts, due to the ridge behind the liner, I had to use the shorter ones. The first install was tight but doable. A few casual pulls with no issues. You could use more bolts/U-nuts but the fasteners are much more convenient.

11 installed.webp


Final Install
Uninstall and/or modify as needed until you are happy with the result. Cut the corners if not done so already. I chose 1-1/2" radius for the bottoms and snipped a 1/4" x 1/4" diagonal on the tops. You may wish to give everything a good cleaning before final install and touch up the bolt heads with some paint.

After some winter weather the results were checked. Still plenty of dirt on the sides but again I simply wanted to cut down on some of the debris up into the underside. I liked the "streamlined" look of the flaps coming down from the fenders and not sticking out.

12 installed dirty.webp


Closing

This is a simplified version of the process. I went through a few different styles for the cardboard versions before settling on my final choice. The mud flaps themselves were on and off numerous times as I tweaked things - especially the fronts. The lower cutouts for the front fenders may be removed outright in the future but so far no issues. I may also trim the upper corners a little more or round them off to match the lowers. If I were to build these again I might scale the flaps down another inch just for a little more coverage.

Hopefully you find this useful for your own build!


Below are templates based on my build showing the locations of the fasteners and obstacle avoidance. The measurements may be a little off as adjustments were made on the fly during installation. Widening the holes for the fasteners gives some wiggle room. The blue lines depicting the fender edges are approximate.

z plans 1.webp
Man you put a lot time and effort into this project, but I think you got what you wanter. Since you did all this you will be able to modify and correct any short falls you might discover so be proud of your work. Keep us posted over time. I really like your approach to this problem.
 

bigwyo

2.0L EcoBoost
Member
First Name
Robert
Joined
Dec 19, 2025
Threads
3
Messages
10
Reaction score
10
Location
Wyoming
Vehicle(s)
2025 Maverick Lariat awd 2.0
Engine
2.0L EcoBoost
Nice job! I was going to use the Ford Pass points to buy the Ford splash guards but then I read that they were rubbing the paint off. I ended up going with some other members recommendations of the Maxzina ones from Amazon. They came with tools and hardware but they are butt ugly. I’m going to leave them on until summer and see how well they work.
 

bigwyo

2.0L EcoBoost
Member
First Name
Robert
Joined
Dec 19, 2025
Threads
3
Messages
10
Reaction score
10
Location
Wyoming
Vehicle(s)
2025 Maverick Lariat awd 2.0
Engine
2.0L EcoBoost
That was my issue. I didn't like the look of what was available. For me it ended up being how they stick out from the side of the truck. Functional for most purposes but not needed for mine.
I put some Blizzack winter tires on and they seem to fling a lot of slush halfway up the side of the truck. We haven’t gotten any snow since I installed them. I am interested to see how they work!
Sponsored


Top