
- First Name
- Mike
- Joined
- Jun 22, 2024
- Threads
- 2
- Messages
- 133
- Reaction score
- 103
- Location
- Olympia, WA
- Vehicle(s)
- 2025 Maverick Lariat Hybrid AWD
- Engine
- 2.5L Hybrid
Interesting. I had no issues with the rear sensors. They work just fine.
Sponsored
6,200 miles now. No junk accumulation at all. Still looks just like every other pick up truck fender cavity I’ve ever had. I almost bought this one.I installed this first thing (100 miles) due to everyone's comments about how much junk collects in there.
I might have to take a closer look at what exactly it is.Interesting. I had no issues with the rear sensors. They work just fine.
EDIT: It was my error! The part fits 2025 models!I just installed mine, only took an hour. The hardest part was figuring out the correct location and orientation of the two L brackets. I did need my breaker bar to get the two frame bolts out. Glad I have a '25 so I didn't have to work around the muffler!
Do yourself a favor and use a 1/4" drive rachet with a 10 mm socket, it will save a lot of time. Also, I discovered the bolts that go into the nuts you install are 19 mm instead of the expected 18 mm.
This is a great kit, very well made, and well packaged. A must for anyone in the snow and rust belt.
I am now alarmed at how much bare steel and thin paint I saw under there, I am not a big believer in rustproofing but I might look into it, or find a DIY kit.
I have ordered one of these and it should arrive this weekend. I am looking forward to installing this, but I have one question can you let me know if there is a video of it being installed? If there is can I get a link to said video. thanksHey everyone,
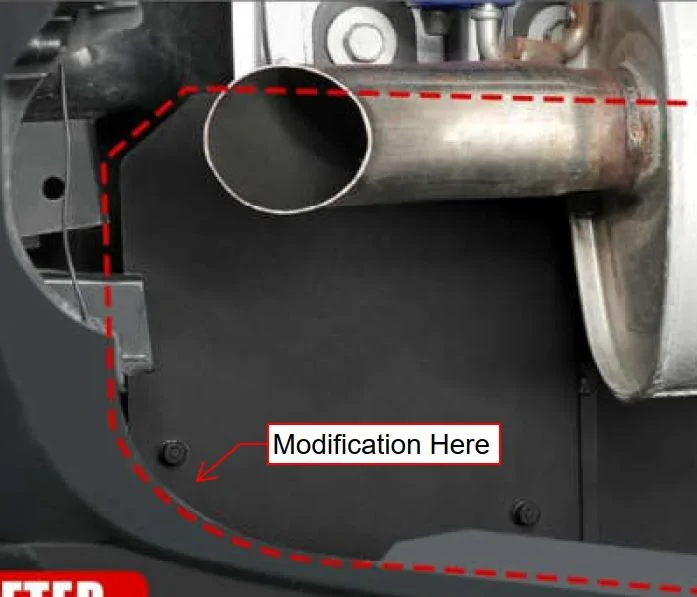
This Underbody Cavity Shield Cover is one of those accessories that every Maverick owner should seriously consider. It helps protect the underbody cavity area from mud, snow, and debris—preventing long-term damage and rust.
EDIT: Limited-Time Offer — Amazon already has a 22% discount on the page, and we're adding an extra 8% off with the link below.
https://www.amazon.com/promocode/A2D5KOSXMVWYEV
If you're open to sharing your feedback, you'll have a chance to receive a small gift. Just send me your order number via message, and I’ll let you know the next steps!
Let me know if you have any questions! I'm happy to help.
Join our community to stay updated with the latest product releases, exclusive promotion discounts and abundant opportunities for free product trials.

There are plenty of other vendors selling on Amazon for a lot less. Keep searching.Hey everyone,
This Underbody Cavity Shield Cover is one of those accessories that every Maverick owner should seriously consider. It helps protect the underbody cavity area from mud, snow, and debris—preventing long-term damage and rust.
EDIT: Limited-Time Offer — Amazon already has a 22% discount on the page, and we're adding an extra 8% off with the link below.
If you're open to sharing your feedback, you'll have a chance to receive a small gift. Just send me your order number via message, and I’ll let you know the next steps!
Let me know if you have any questions! I'm happy to help.
Here you goI have ordered one of these and it should arrive this weekend. I am looking forward to installing this, but I have one question can you let me know if there is a video of it being installed? If there is can I get a link to said video. thanks
Thanks!Here you go
Several of the earlier threads on this product had what appears to show the same issue on some pre-25MY trucks.I see you have the same model as me. One of the brackets doesn't even come close to being long enough to reach the hole. Did you have to make any modifications? Here are some pics. It was a hard spot to snap photos so they aren't great. (The hole has to line up with that black thing above
it.)
I was under my truck at 5 am. You were right. I was in the wrong spot. I am reordering the part right now. Thanks. I feel like an a#$hole!!Several of the earlier threads on this product had what appears to show the same issue on some pre-25MY trucks.
So unless the 25MY really did change something - the solution is likely the same.
You have the piece in the wrong place or orientation.
That is really what it was.
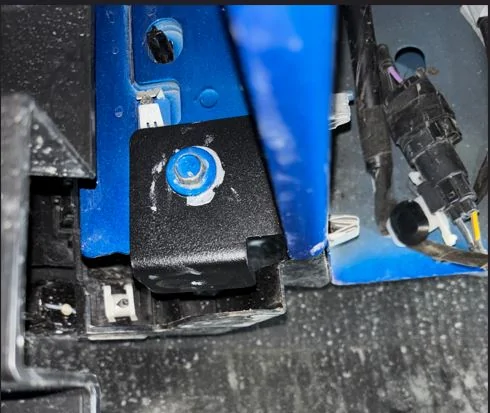
This is the piece you are working on - right? Or the one just after?

Damn it! I have that rear sensor bracket. I guess I have to give up on installing this part.I installed this cover on my 2025 Hybrid Lariat, but it required a modification to fit. The problem is at the rear bracket, I believe Mavericks with rear proximity sensors. The bracket assembly for the sensors hangs down below where the cover rear bracket ends up on mine (see pictures). To remedy this, I took some quick measurements and cut a notch out of the cover with tin snips to fit around the factory bracket. Not pretty but it did the job. I may pull it back out to give it a shot of paint at some point. The rest of the installation was fine.
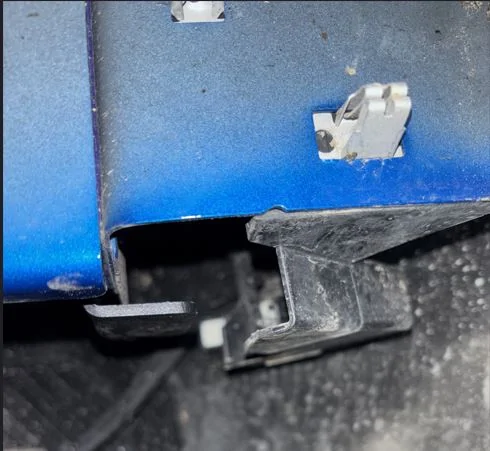

Honestly it wasn't too hard to cut the notch out with aviation snips. A jigsaw or hacksaw would work as well. It was the only modification I had to make. The metal is not that hard. If I find time to pull the pieces out I can take some measurements and post them here.Damn it! I have that rear sensor bracket. I guess I have to give up on installing this part.
Thanks for your very detailed feedback, sir. I am sure it will help many people.I started to install this yesterday and just wanted to share some observations from my experience.
I watched the install video on Youtube before I started. I watched a couple of others as well from others who posted. Take note that you should just leave everything as loose as possible when you are doing this install as getting stuff lined up is a bit of a pain. Fred's Garage said this was easy and it would take 30 minutes... ROFL... Yeah 30 minutes all right...
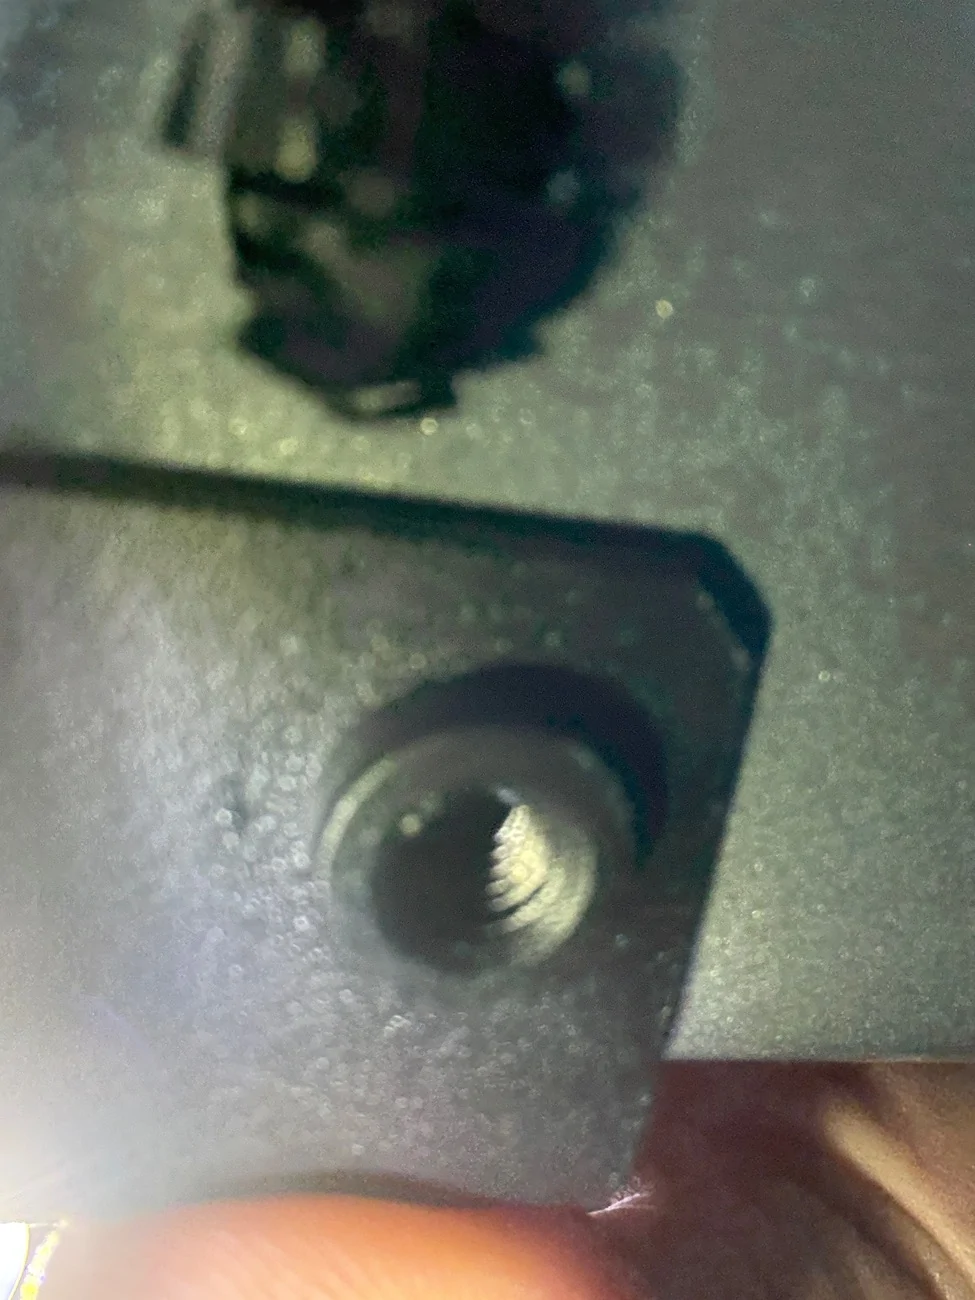
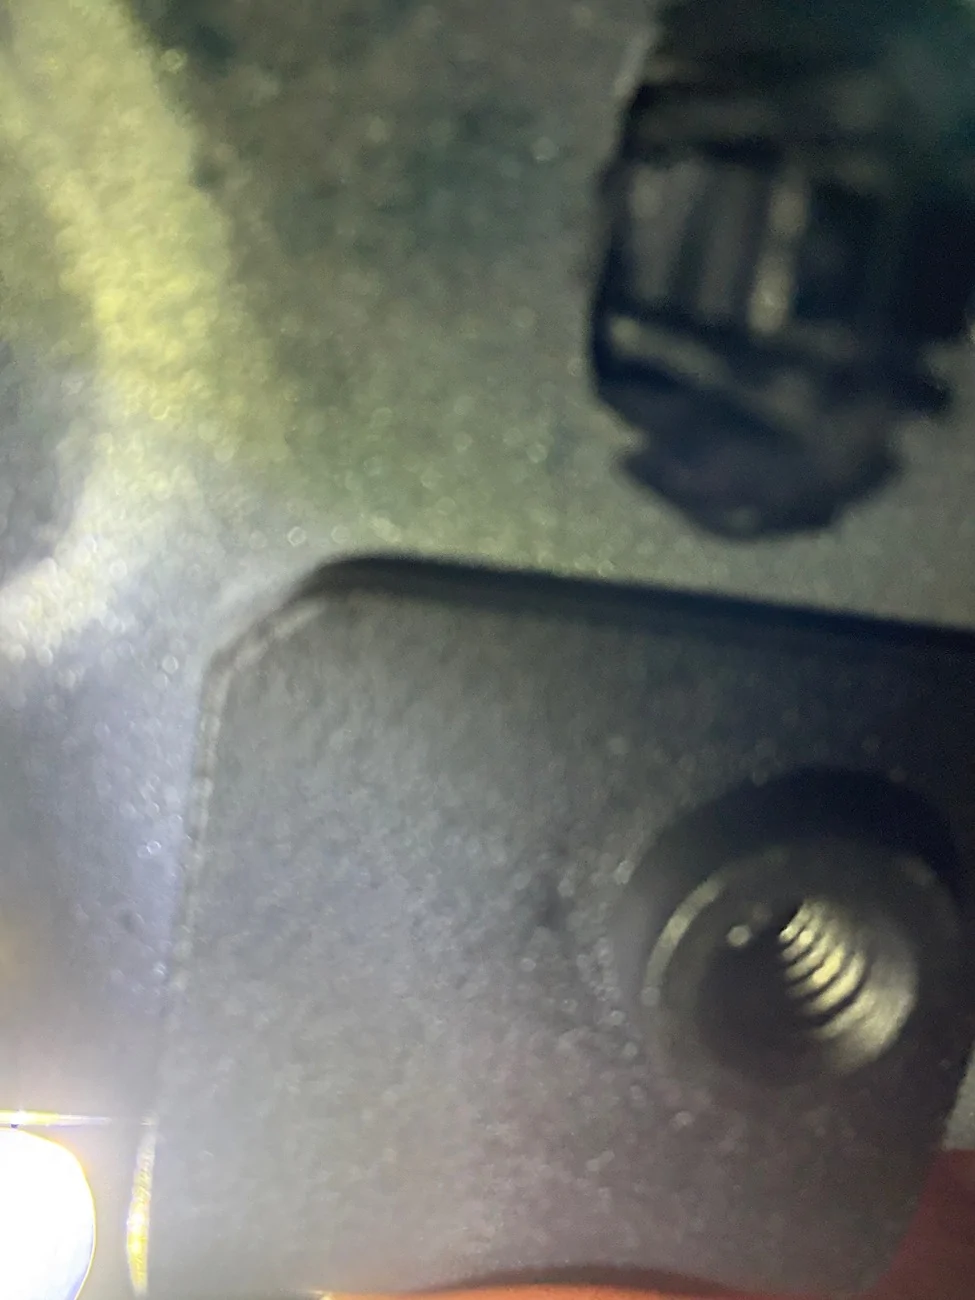
There are 2 brackets. It wasn't obvious to me which way that the small bracket went on there. So I put it on, took it off thinking it was wrong because the curve of the bracket does not keep the bracket snug up against the metal so that the bracket cannot turn or be at an angle. After a couple of tries with that I finally settled that I must have it on there correctly, but it isn't that conforming of a fit. As it turns out the second larger bracket really didn't fit that snugly into place so that it couldn't turn either. So I was preparing mentally for a battle when it was time to bolt the covers onto the brackets. As it turned out that was a worry that didn't materialize. Those bolts turned out to be the easier ones to get started and tightened down.
Next issue. The large 18mm bolts that are on the Maverick are IN THERE. It was obvious I was not getting them out without some advantage. Thankfully I have an impact wrench that I just had to take the time to hunt down because the last person who used it didn't put it back... IE me... I got a good butt chewing over that... Once I had the impact and found a short extension and 18mm socket those big bolts came out pretty easy.
Next observation, if you got in a hurry like I did and installed the bed cubby's in the Maverick on that side of the bed over the cavity you now have a space problem getting your hands in the space needed to put the 2 clips with the nuts in them. I managed to get to one side and get enough pressure to squeeze the first one into place, but the second one I needed to find a tool to see if I could apply enough pressure while ensuring the nut wasn't far enough down in the clip to prevent the squeezing. I guess I could have gone and pulled the cubby back out, but that seemed like it would take more time. In the end it probably worked out to about the same quota of cussing. But after messing with it for a while I finally got that clip into place.
Now when you put the black cover plates into place the challenge I ran into is getting the alignment so that I could get the 3 small 10mm bolts to thread that hold the 2 cover pieces together. As luck would have it the first one I tried clearly was not going to start to thread. At that point I knew it was time to just walk away. So I left it there for the night and came back today. Tried again and that first one was just not going to thread. Finally took the hint and worked on the other two which with a little fiddling around with them got them to start to thread. Make sure to leave them loose until you get all 3 started so that any alignment adjustments can be done. Eventually as I was about to give up and take a break the 3rd bolt finally threaded. Those 3 bolts are a bit of a problem.
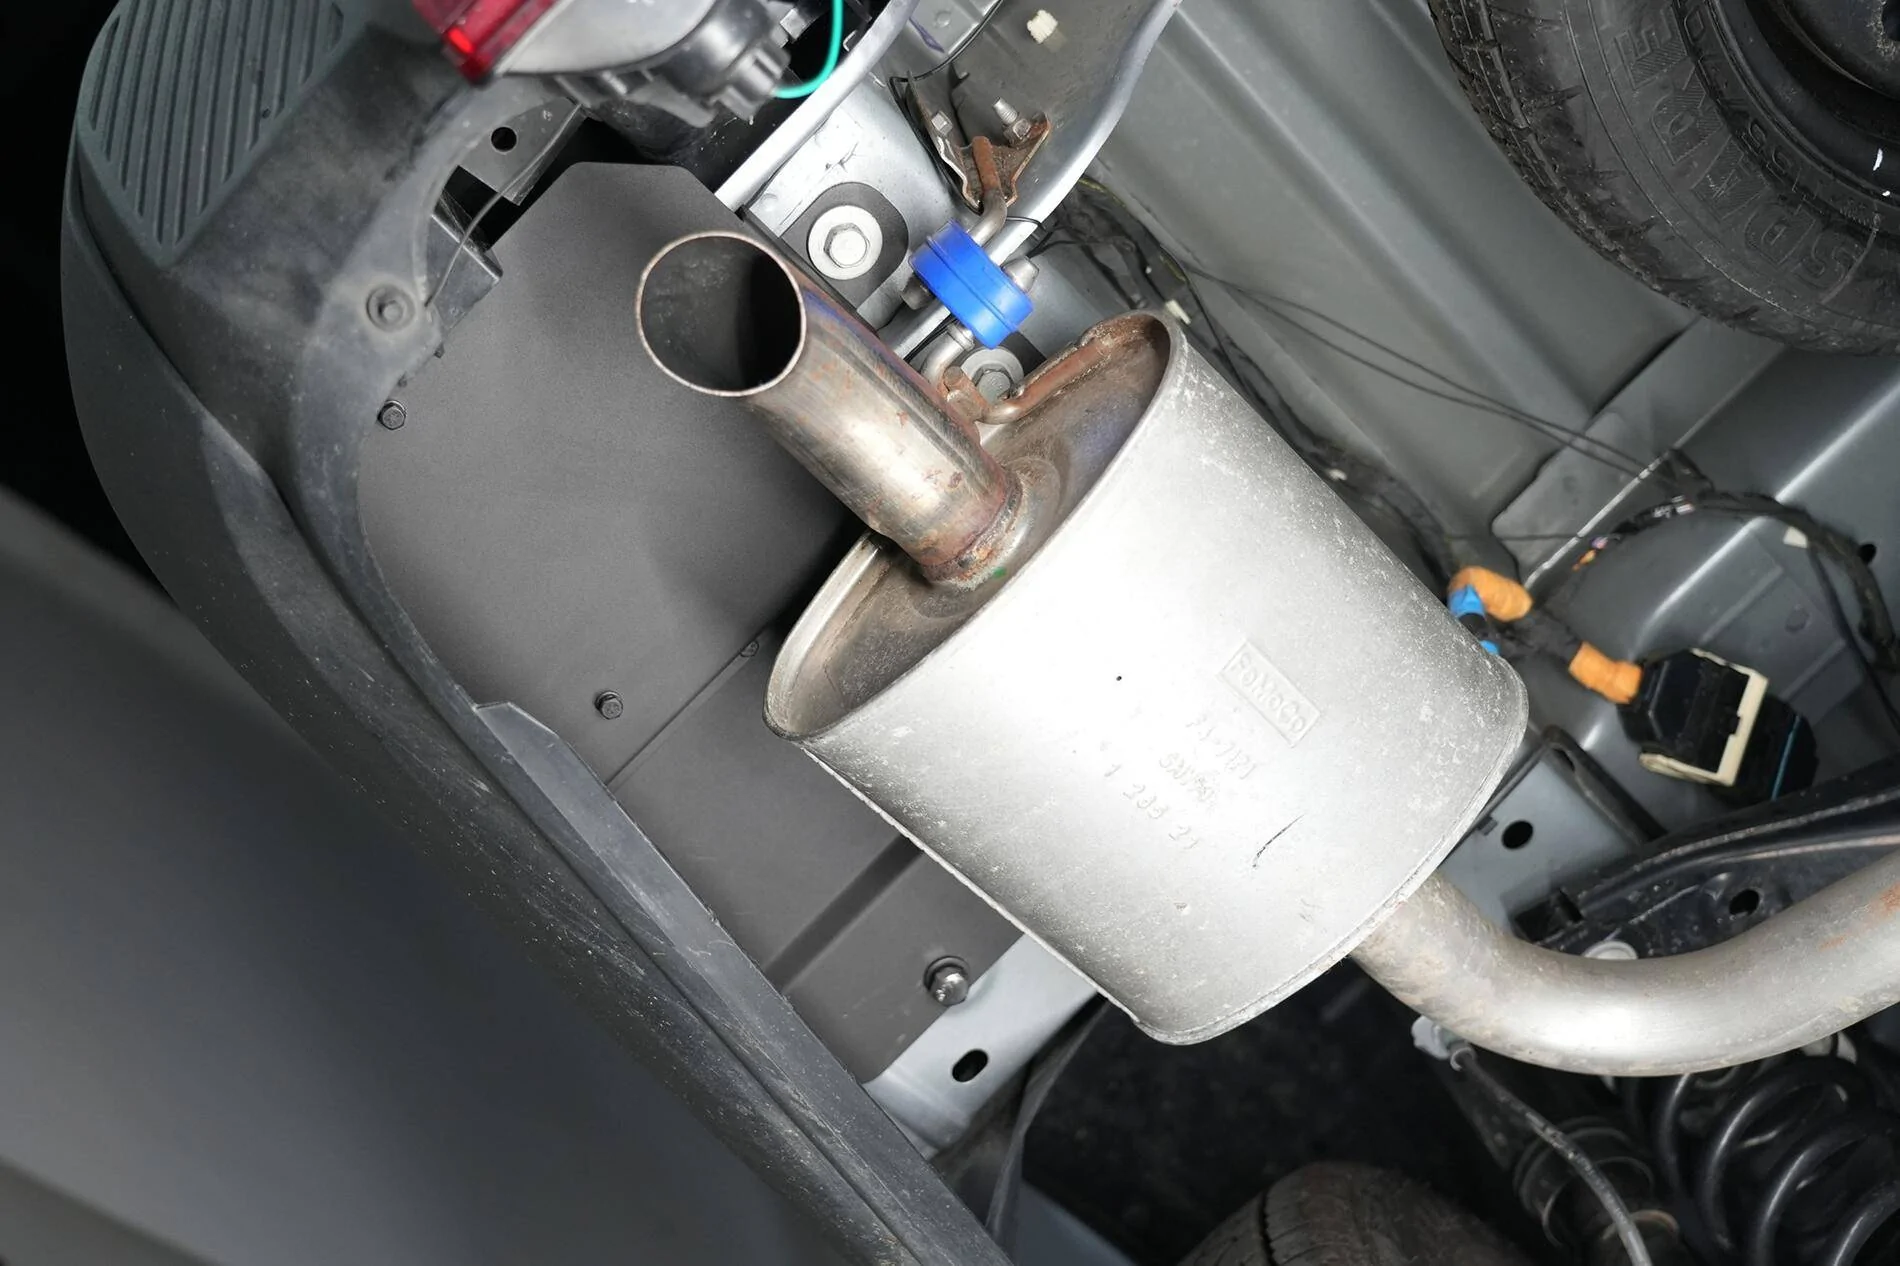
I have the Hybrid so I didn't have a muffler in the way, so for those that have the Eco I think this is a bit more of a challenge with that muffler in the way. I was bumping and clanking against the pipe as it was.
Note to Mabett. Now as I was buttoning up this install I grabbed the impact wrench and tightened up the two large bolts that came on the Maverick. I ASSUMED that the 2 new large bolts that go in the clipped nuts would be 18mm also... NOPE. They weren't. They were 19mm. It would be nice if they were 18mm also so that the included wrench would work on them. So for those installing this get a 19mm socket before you get started to save some time. Maybe this can be corrected or is already corrected in the current kits shipping.
Now that it is in place it seems solid and well built. I have to assume the reason there isn't a molded plastic part there is because of the tailpipe, but seems like a heat shield would have addressed that. Just glad to have this mod installed and done.

