
Good info, thank you. Forgive my ignorance, but can the factory tweeters be disabled and just left in? Most replacement speakers will be two or three way with tweeters unless I’m missing something.
Sponsored
Tweeters will stop working if you just cut the wires going to them. They can be disabled and left in.Good info, thank you. Forgive my ignorance, but can the factory tweeters be disabled and just left in? Most replacement speakers will be two or three way with tweeters unless I’m missing something.
I just finished working on the audio of my Maverick, it's an XLT so the basic audio, I wanted specifically this one to be able to make the upgrades more easily, I had a few cars with B&O sound system including a 5K system on my last Audi and I always thought it was good but missing something.
Full disclosure, I have no idea what I'm doing, just following stuff other people did in other cars and trying to not screw up anything.
My plan is to add a Kicker Key 200.4 running active for a component system in the front doors and dash, I'll use the crossover and adjustments from the amp. I decided it's not worth messing with the c pillar speakers as I mostly drive alone and when my kids are in the back they will not want anything too loud on their ears.
This is what I'm installing:
- Kicker Key 200.4- 4ga power wire (future upgrades) and speed wire 9 way cable- ferrule kit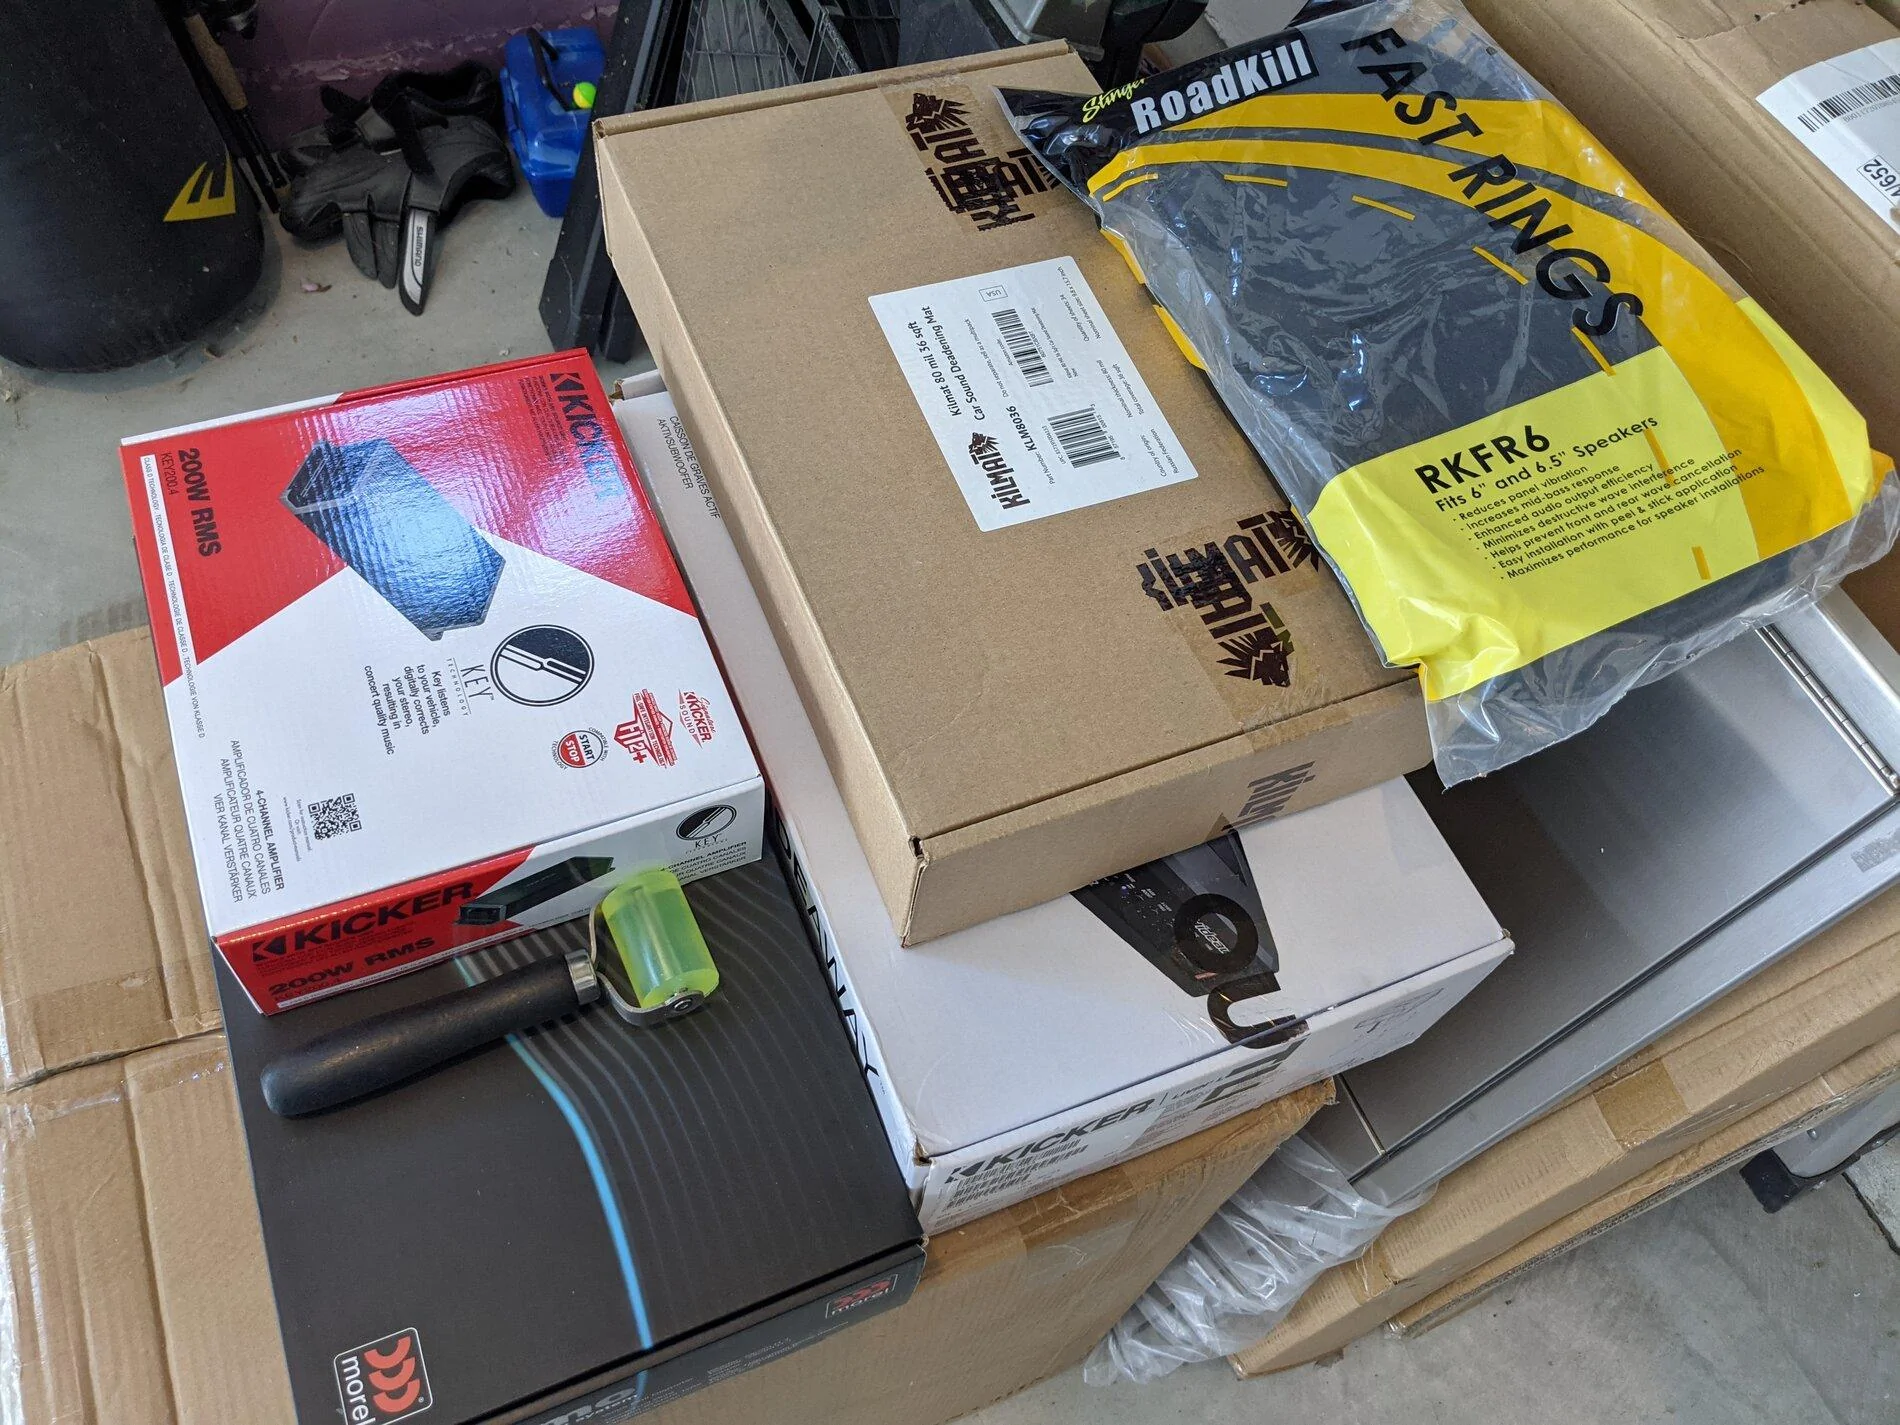
The 4ga wire is overkill, but I might want to upgrade the sub down the road, so I want to be able to reuse the wiring possibly with a Kicker Key 500w mono.
Woofers:
I started with the door speakers, removed the junk oem speaker and started applying deadening material on the inside of the door skin. I added as much as I could the space is very tight, about 1.5 sheets of the Killmat.
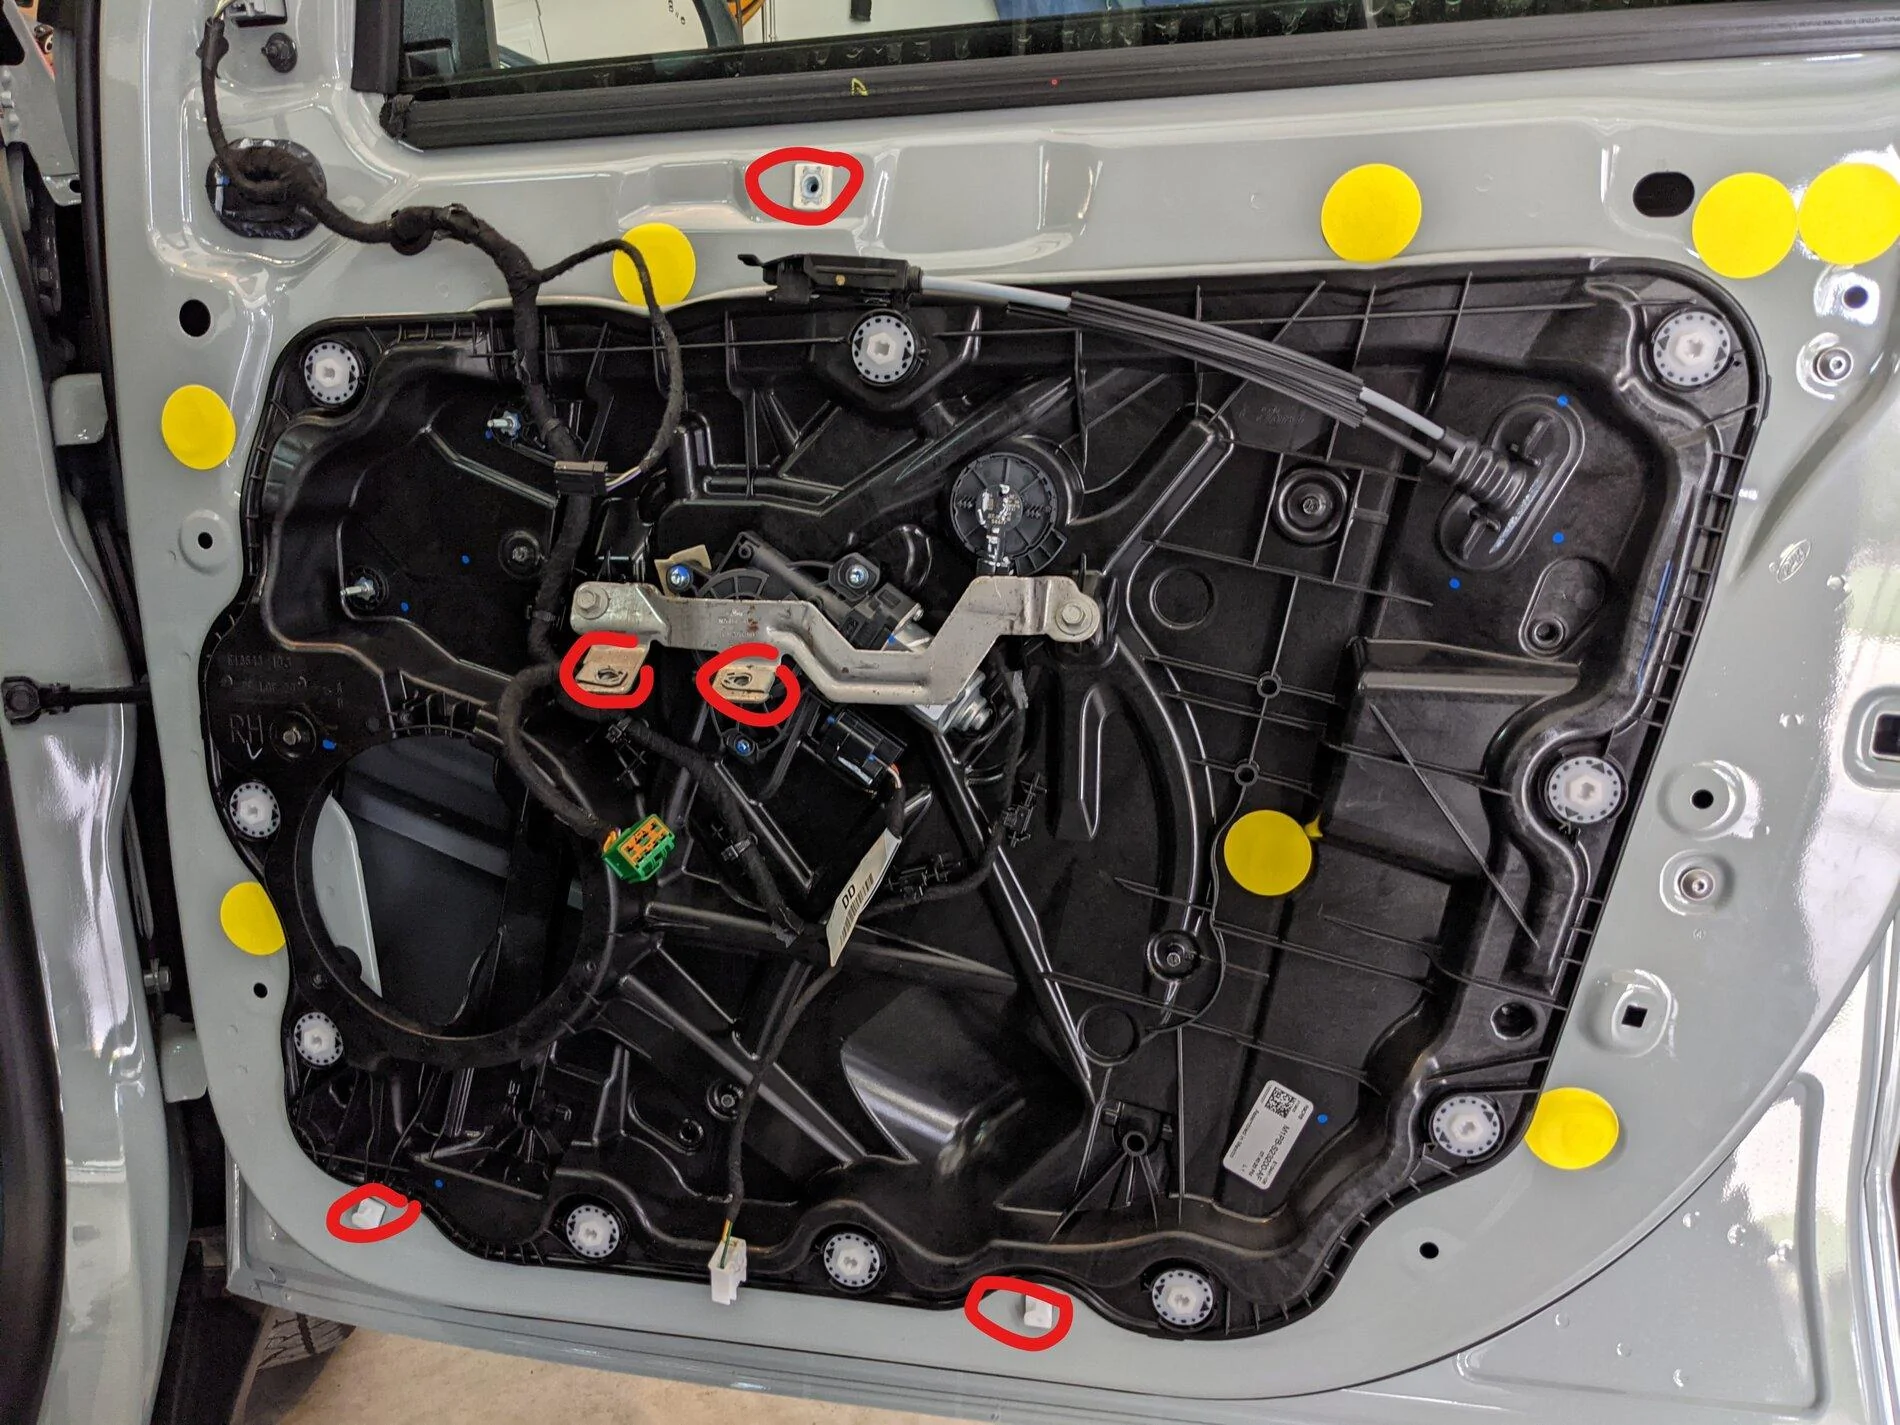
There are 5 bolts, one behind the latch release, two under the window control that needs to be removed and another two on the bottom. Take your time and be careful, the blue textured plastic scratches very easily.

Screws location:
The door has a plastic shell that acts like a speaker enclosure, which is good, but being a thin plastic shell it adds a lot resonance. Added more Killmat as much as I could. I used the adapters and fast ring to mount the new speakers in the locations, everything worked perfectly no issues at all. All factory looking in the end and the fast ring matched the door and speaker location perfectly as well. I just cut the middle one inside the door in half to accommodate for a metal bracing.
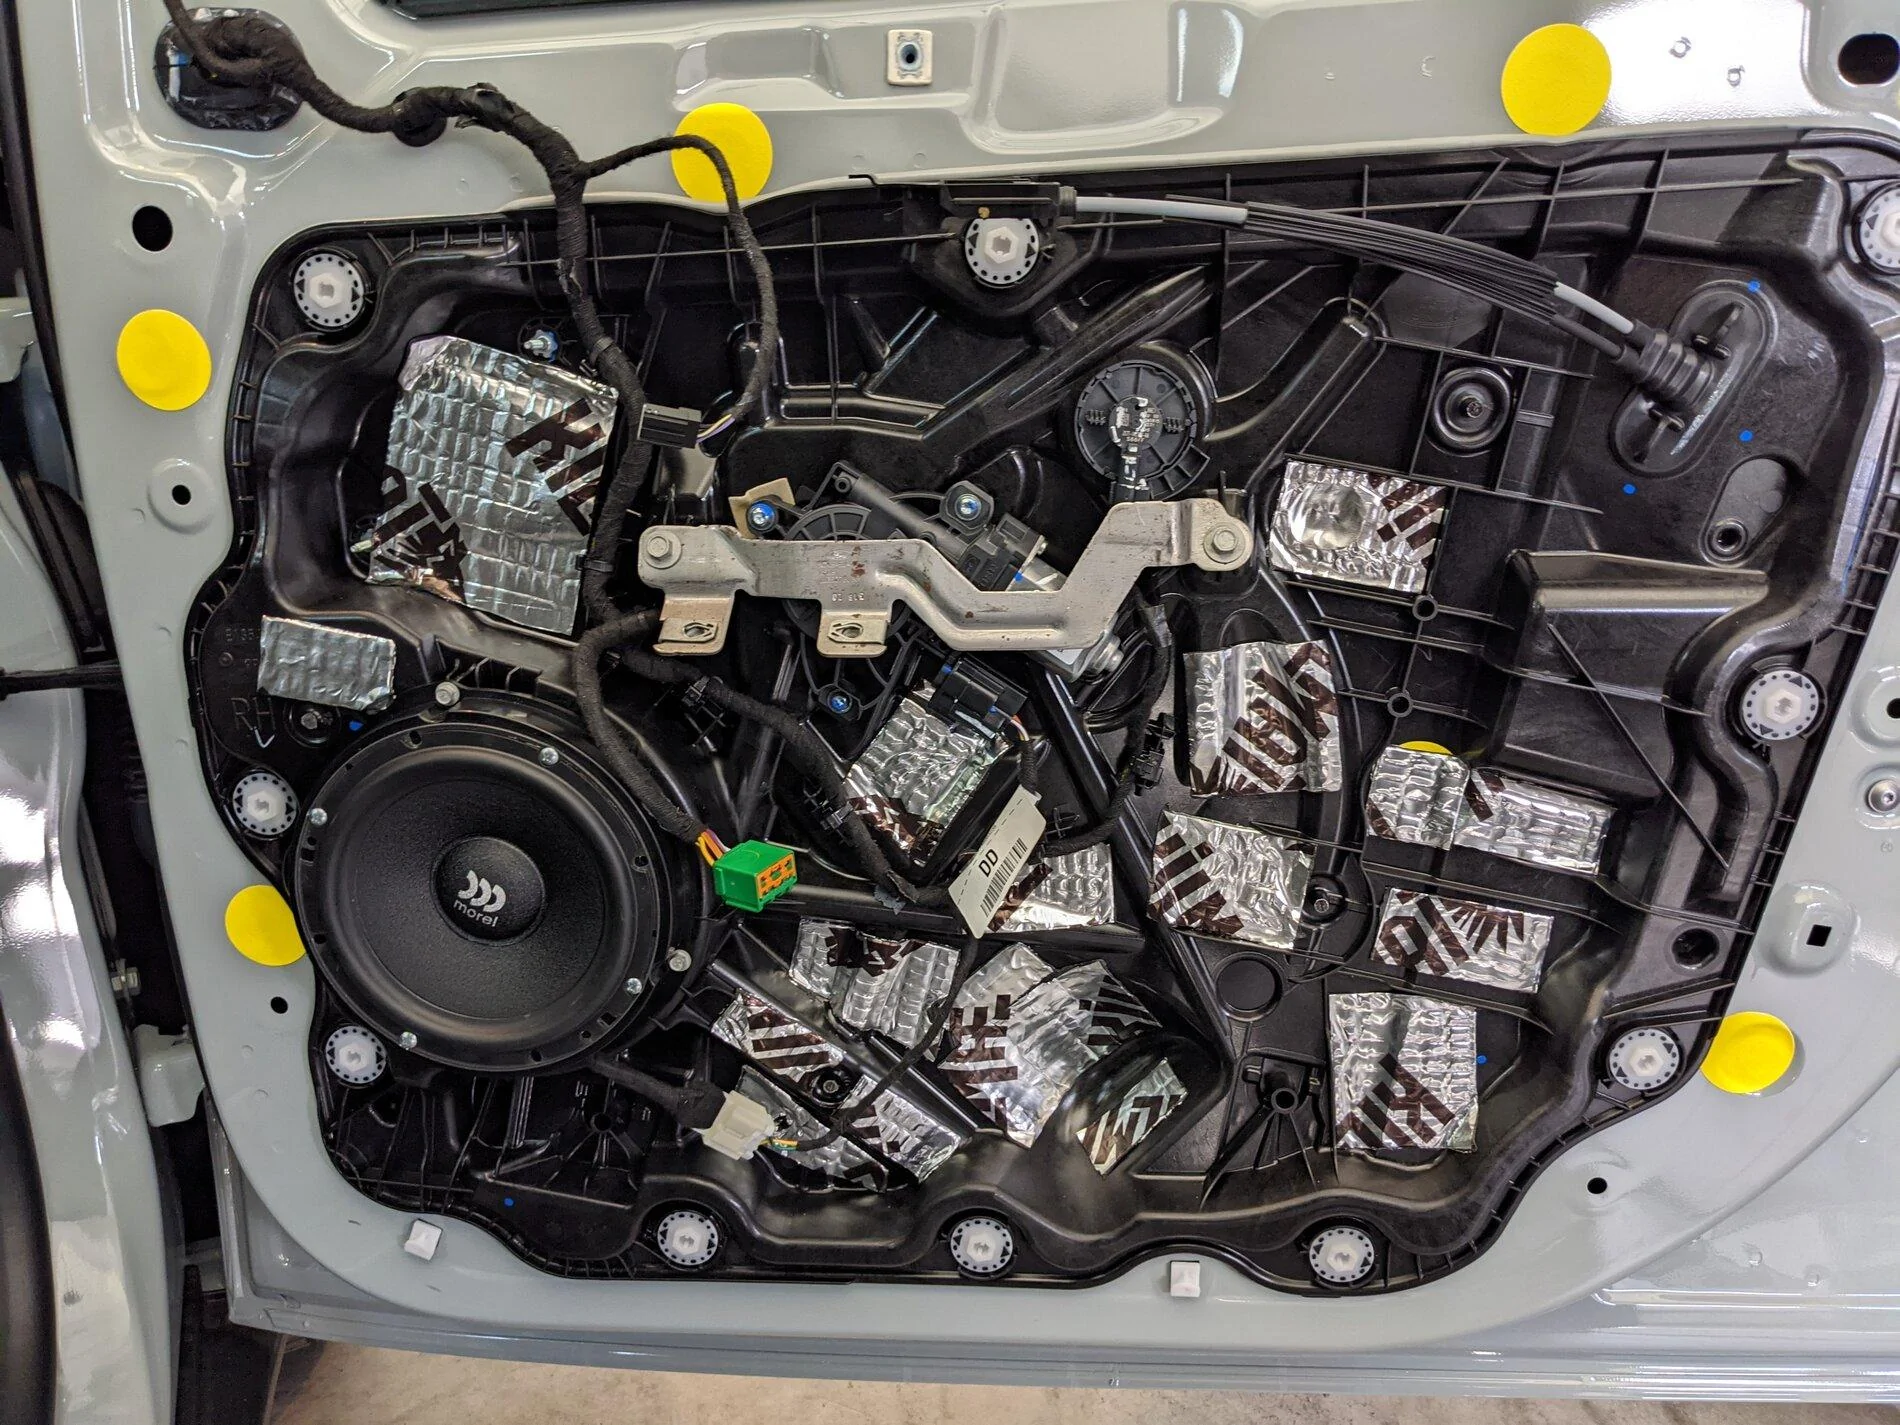
Most of the deadening material was added on the inside, on both metal skin and plastic where I could, this was a pain because of the small opening on the speaker and all the ribs to reinforce the plastic, Tap in different places and if it makes a lot of noise add deadening material.
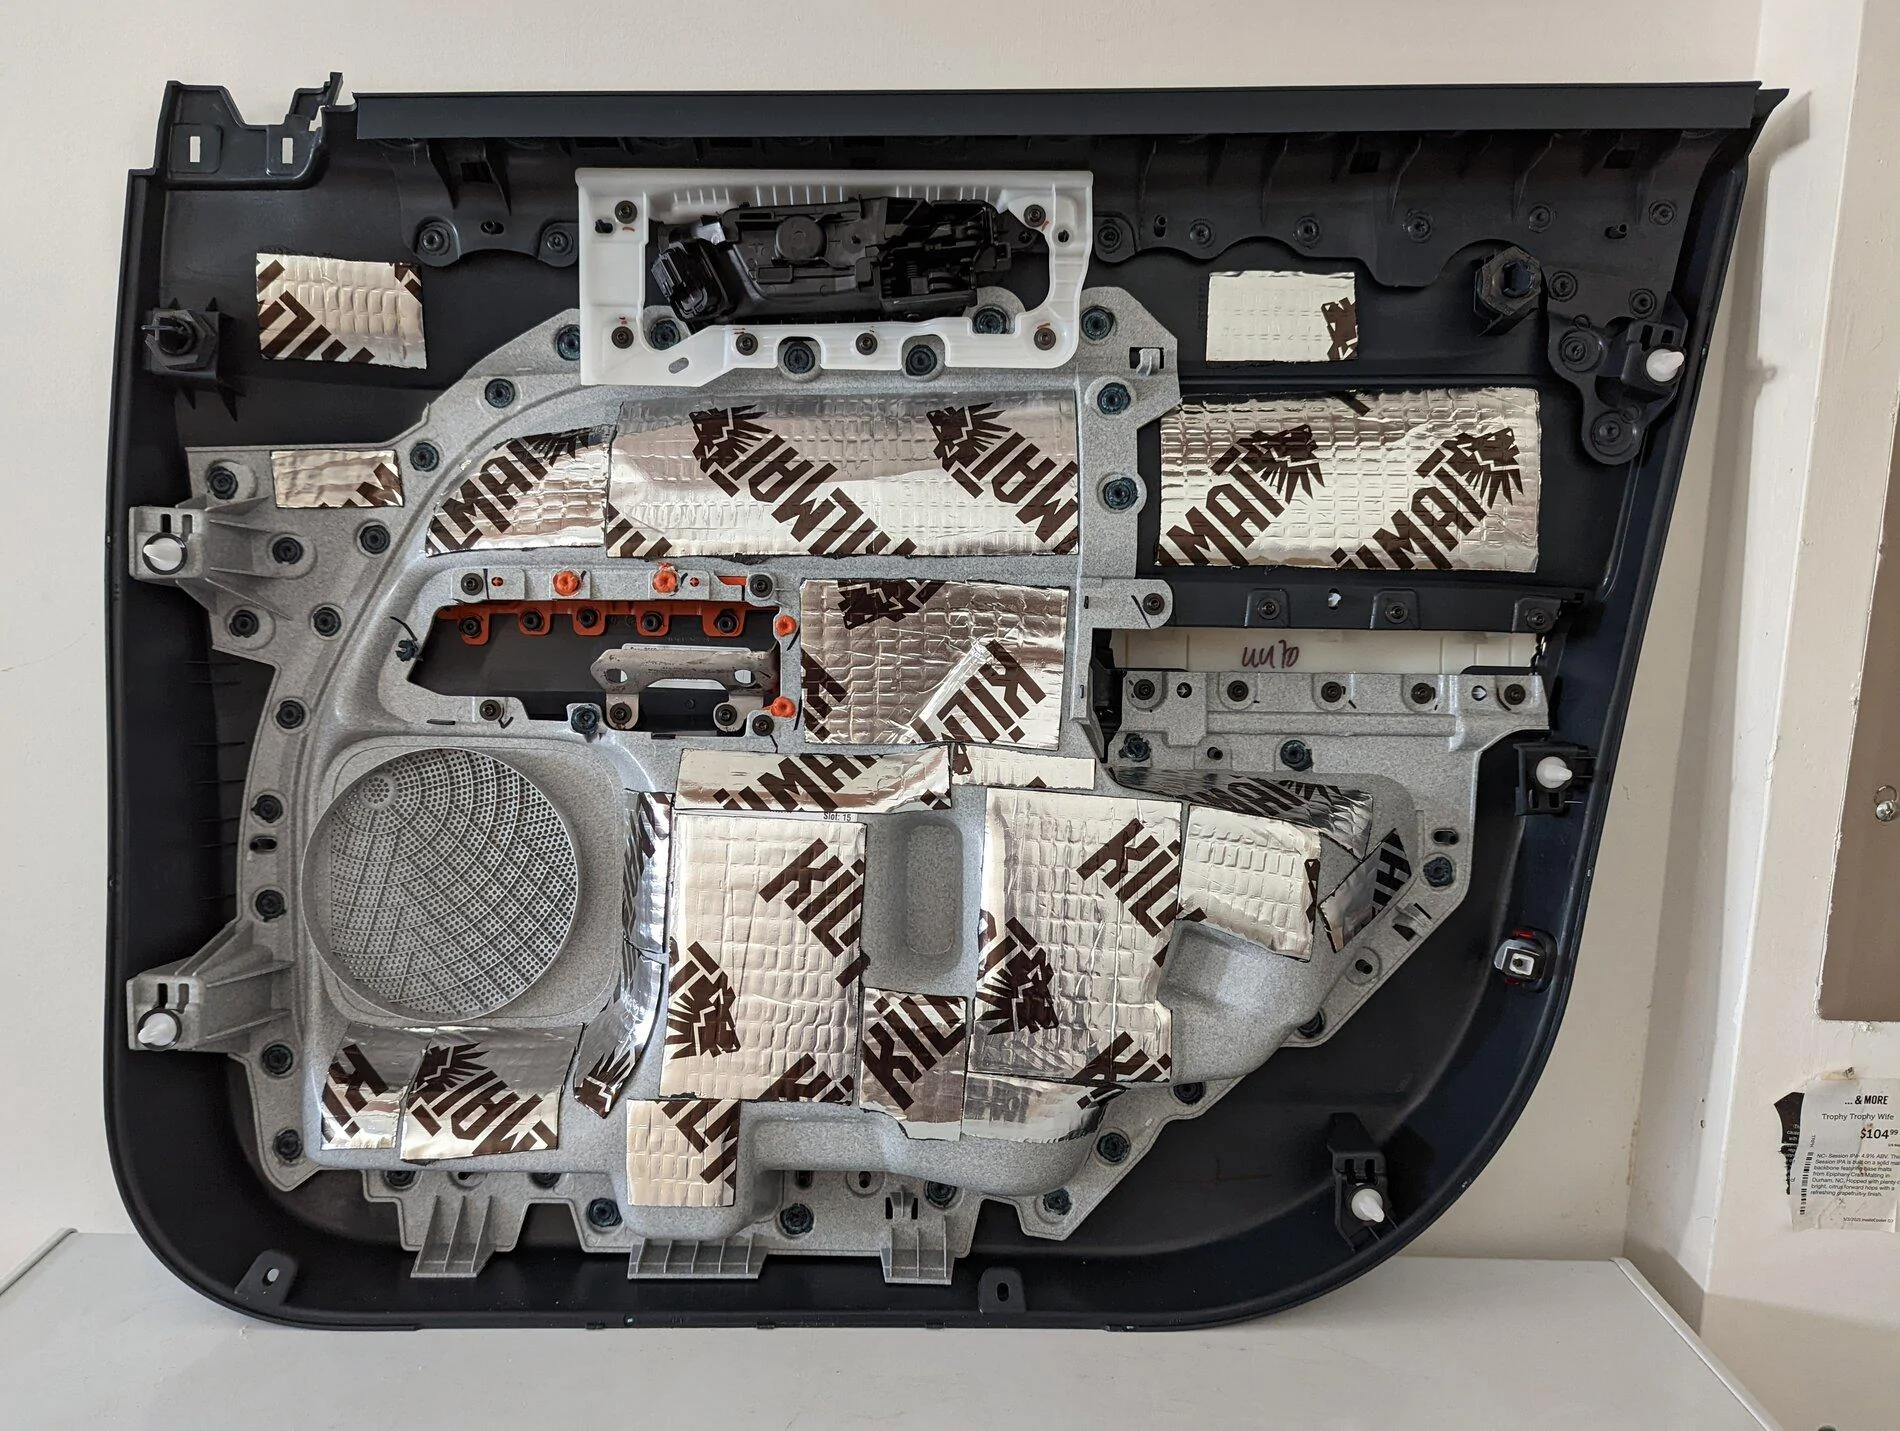
I added deadening material to the inside of the door as well as the plastic makes a lot of noise. I ended up adding a lot more after the picture, almost 2 full sheets. Once I figured out all the clamps and connectors I put everything back together and just by tapping and opening and closing the door is a huge difference.
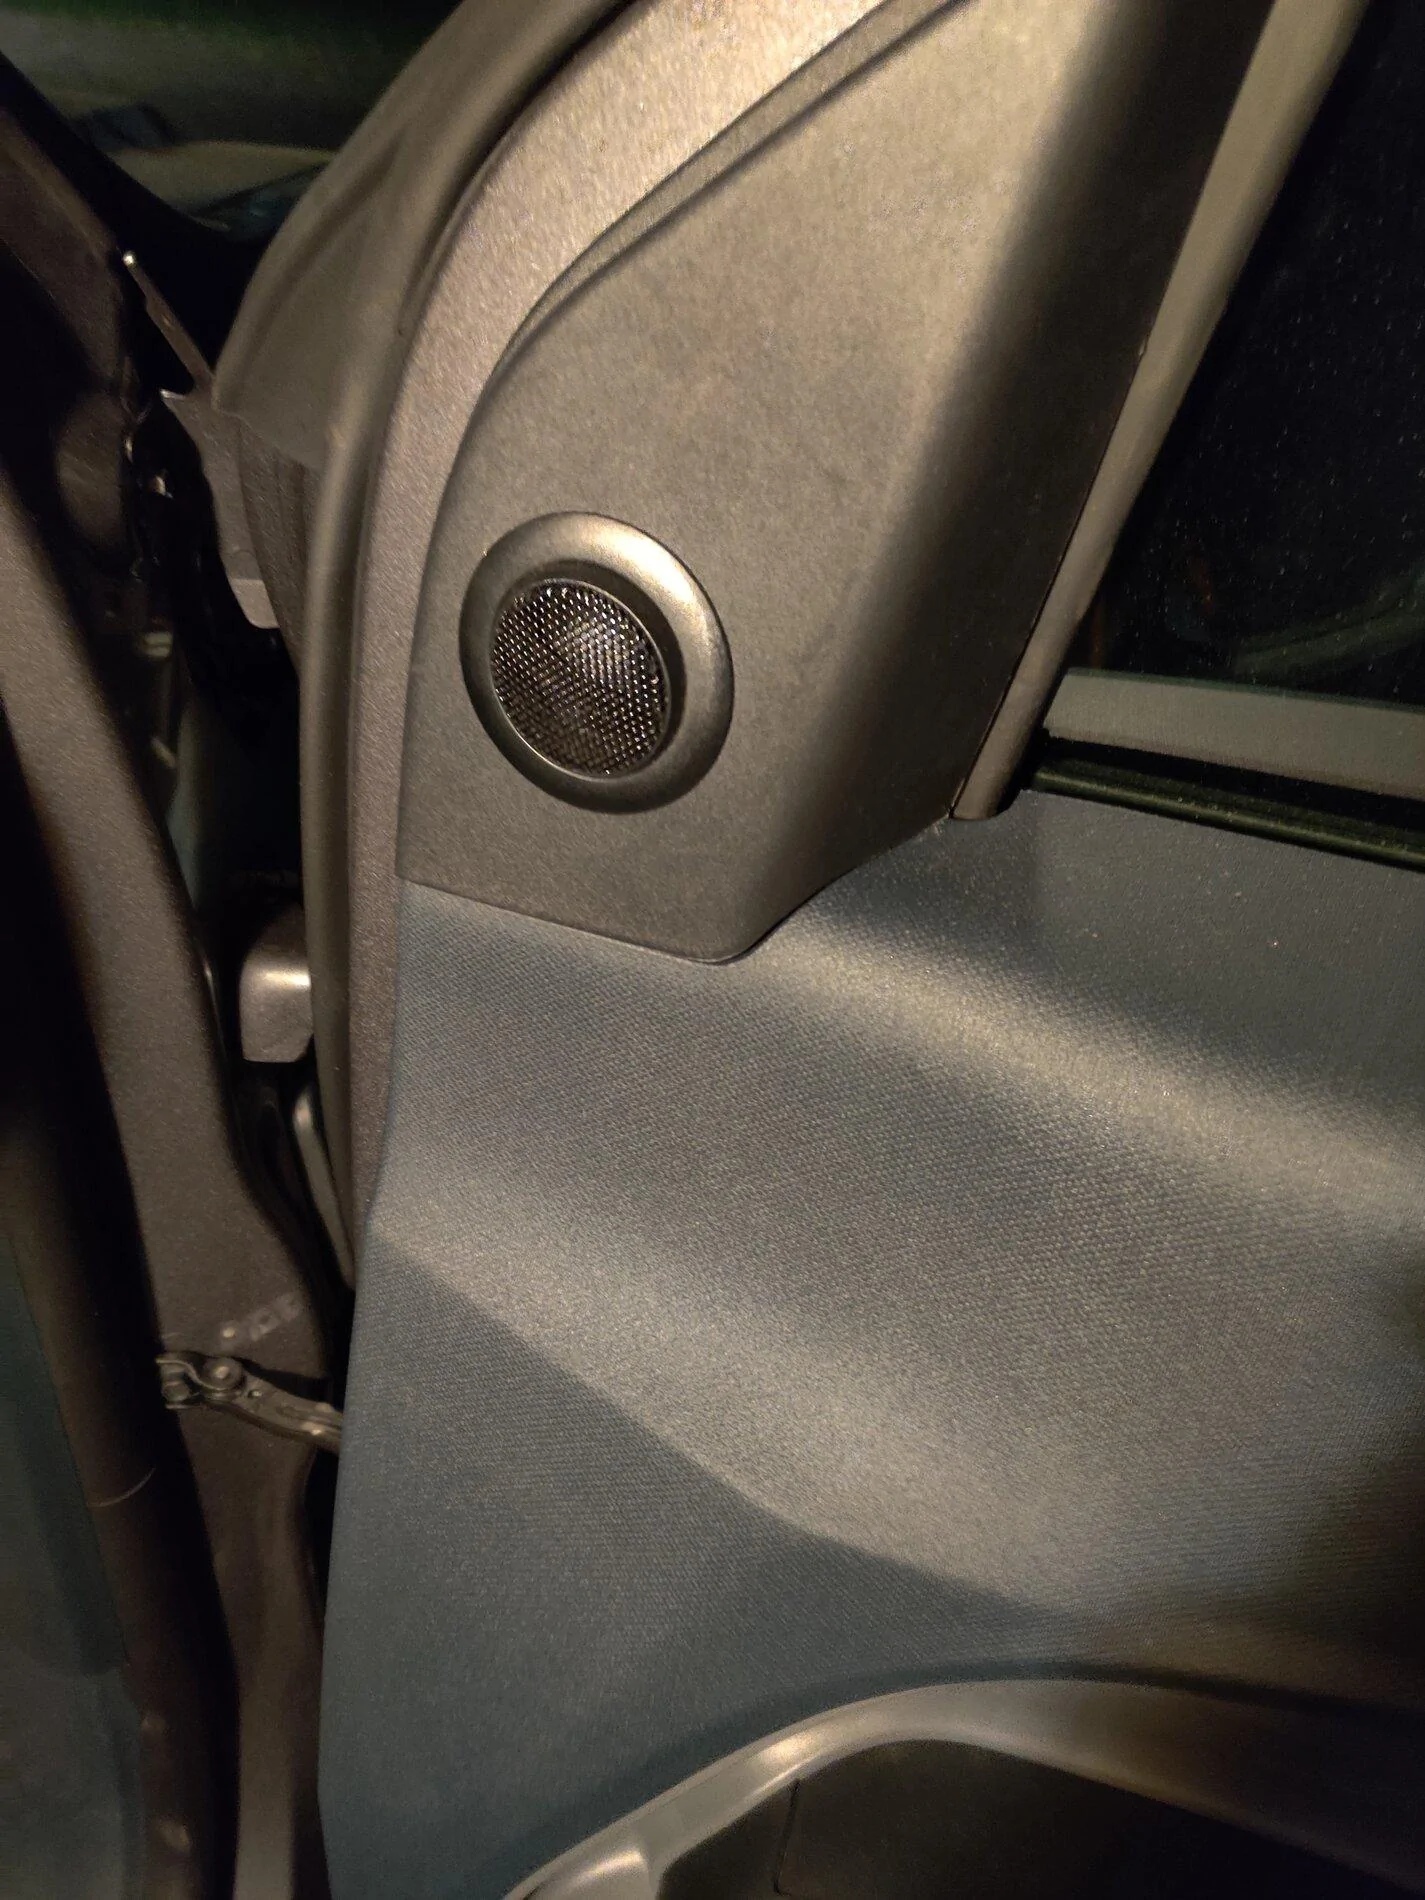
Tweeters:
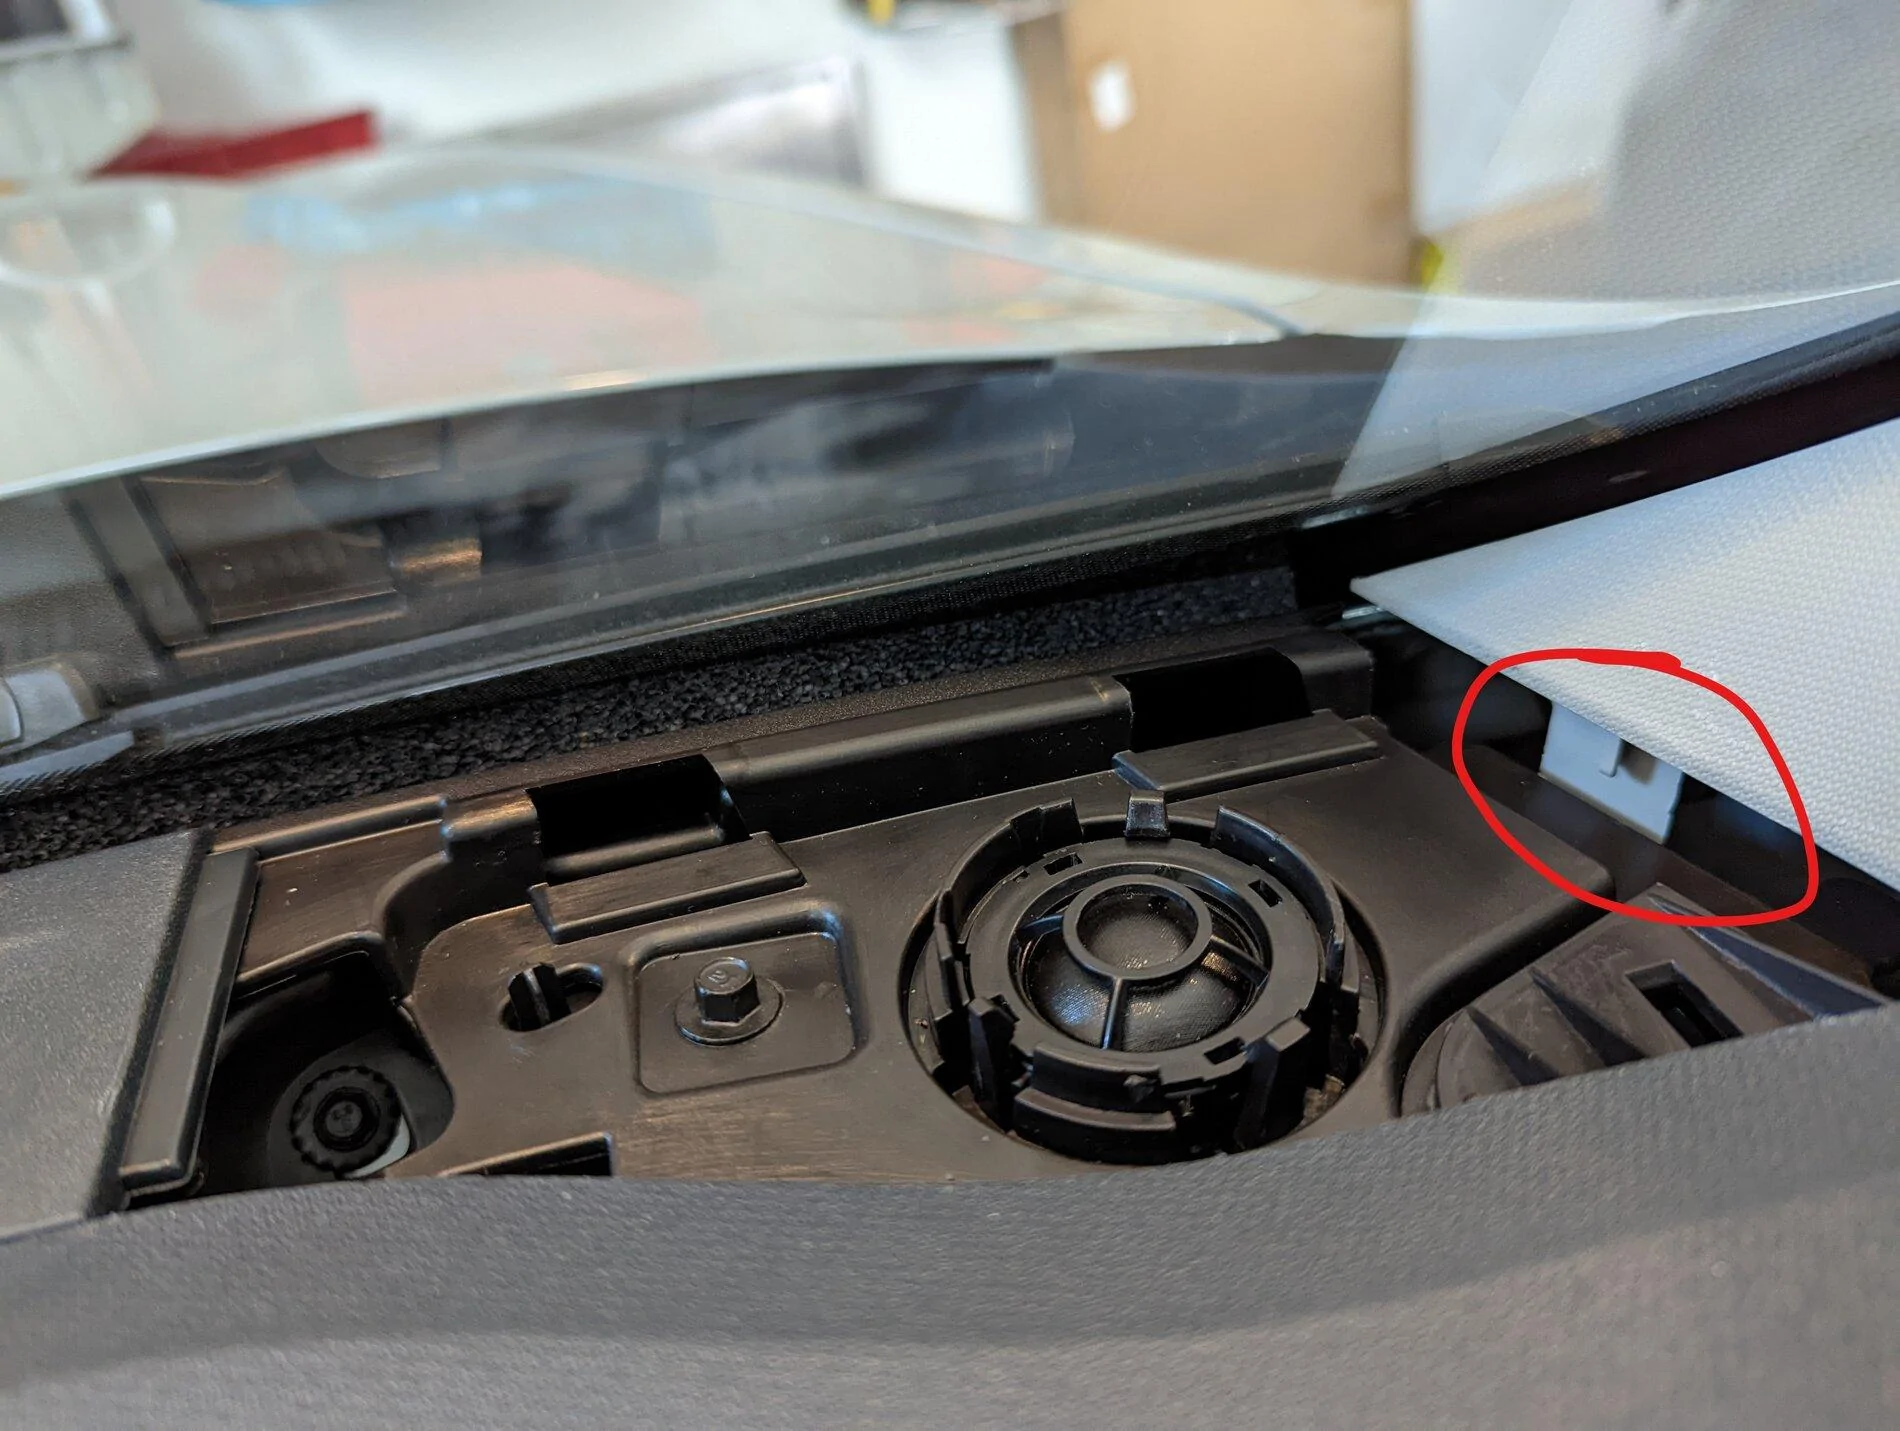
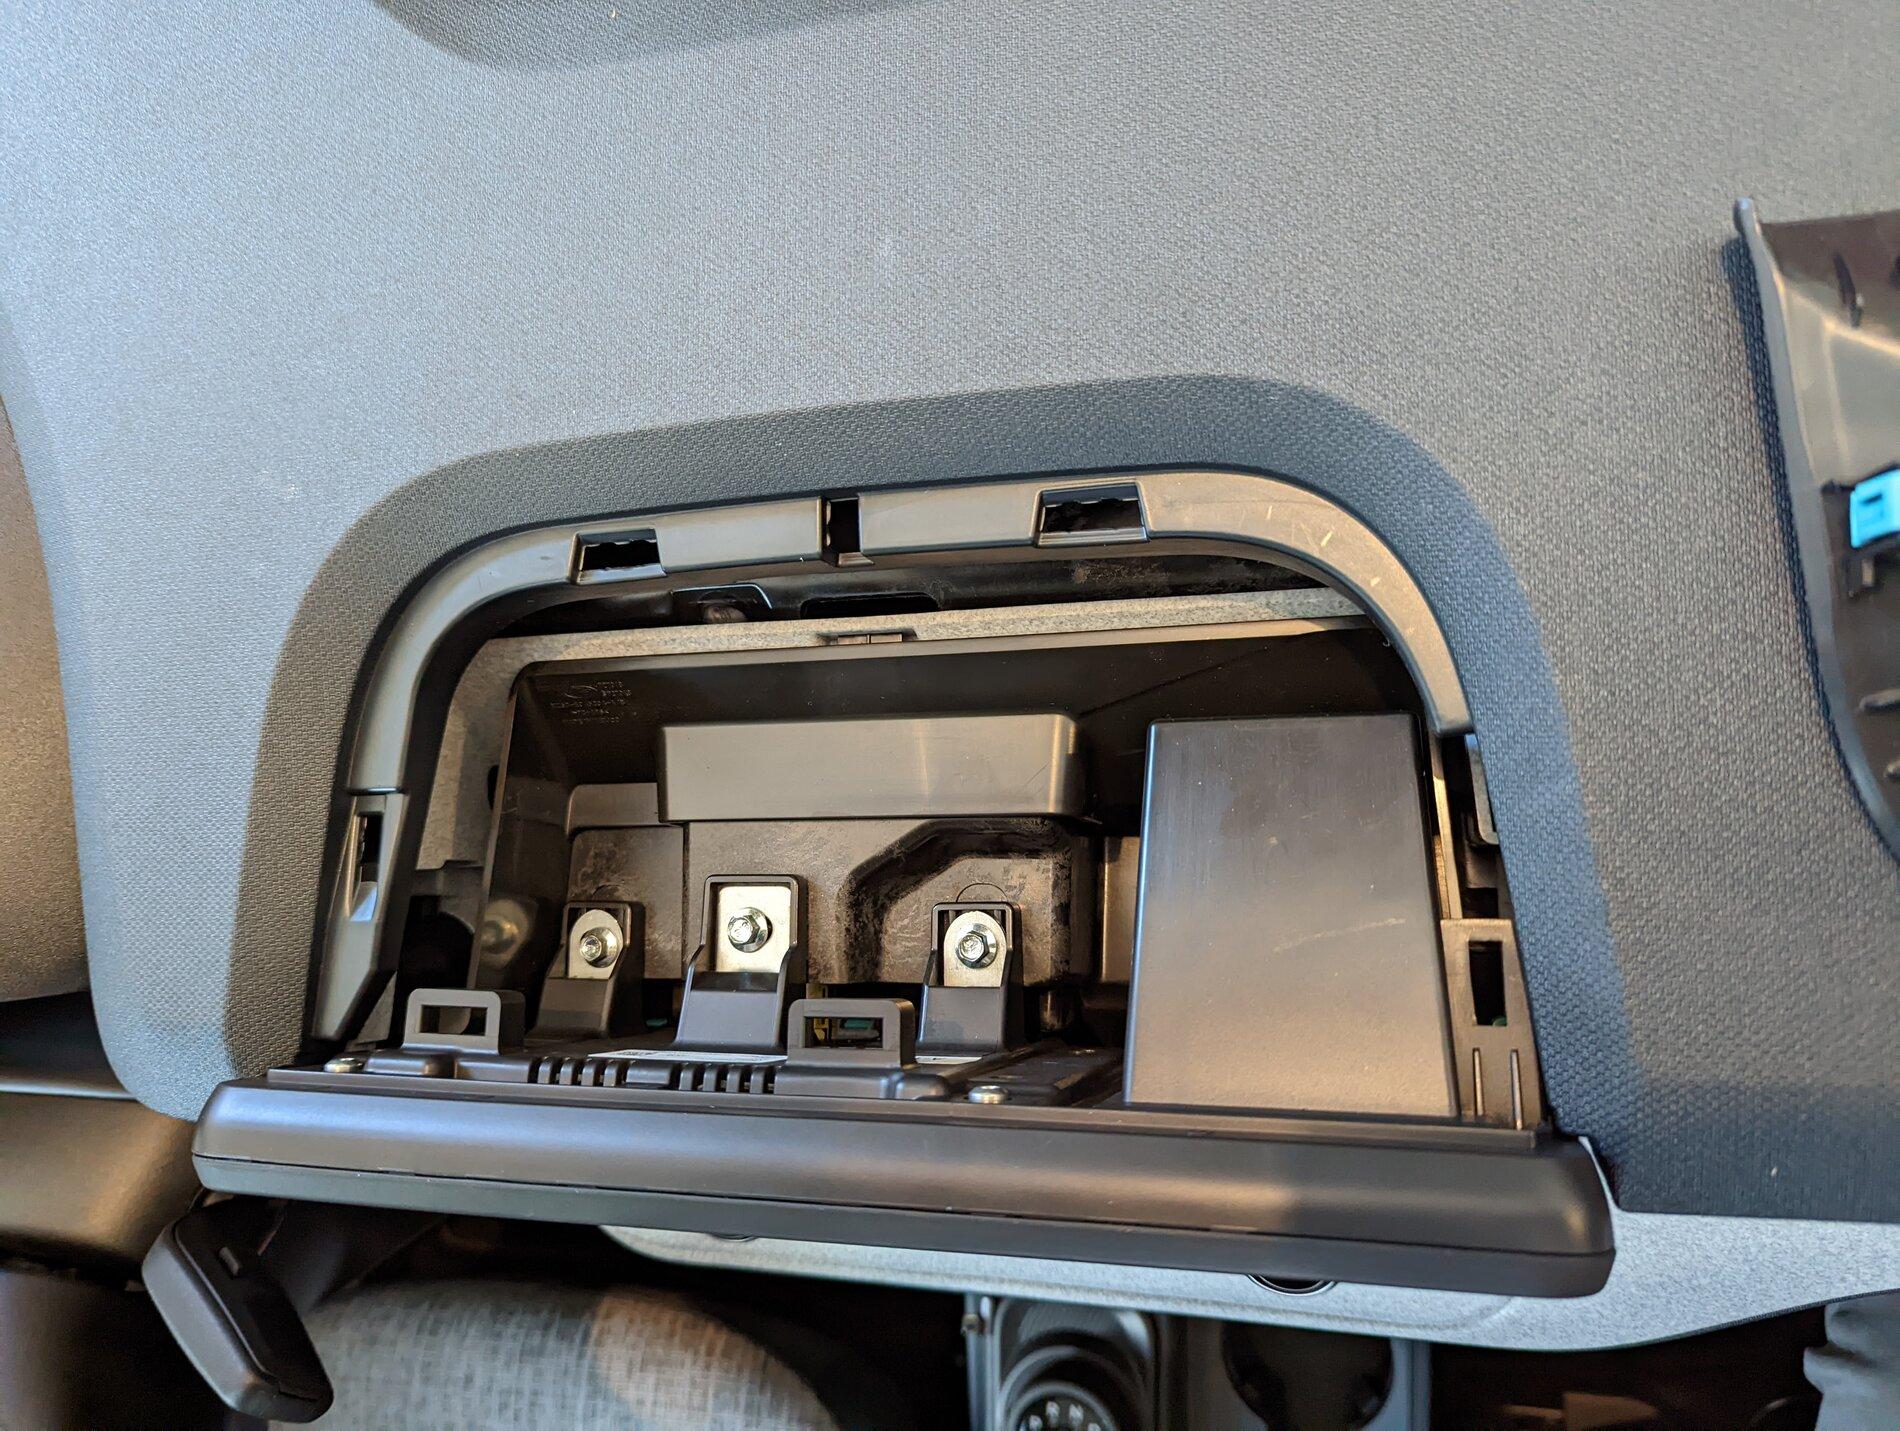
removing the top grill on the dash. First you need to pull the A pillar cover just enough that you can lift the panel up, the grill is connected to the A pillar at the bottom. See picture.
The tweeter is help in place by 3 little clamps easy to undo and it will lift up. Removing the glove box is easy and it will give you plenty of space to work and run cables. That's where the cabin air filter is as well. Plenty of space to tuck the Kicker key here as well.
I tested the Morel tweeters and they sounded great and are the same size as the hole in the dash, but I could not figure out a way to mount them without hacking the dash significantly and there's no panel to remove from the car, so it's a high risk job, if you mess up you can damage the car's dash.
Since I'm bi amp-ing I can make fine adjustments for crossover and levels, I kept the original tweeters and bypassed the capacitor and re wired the tweeters, the kicker key will fine tune and I can even set separate gain for this channel, I'm sure the Morels are way better, if I figure out a way to install them I will.
Power cables:
I wanted to have everything looking clean and factory, so I hidden all the cables and used Tesa tape or nylon sleeve, you can't even tell it's not factory.
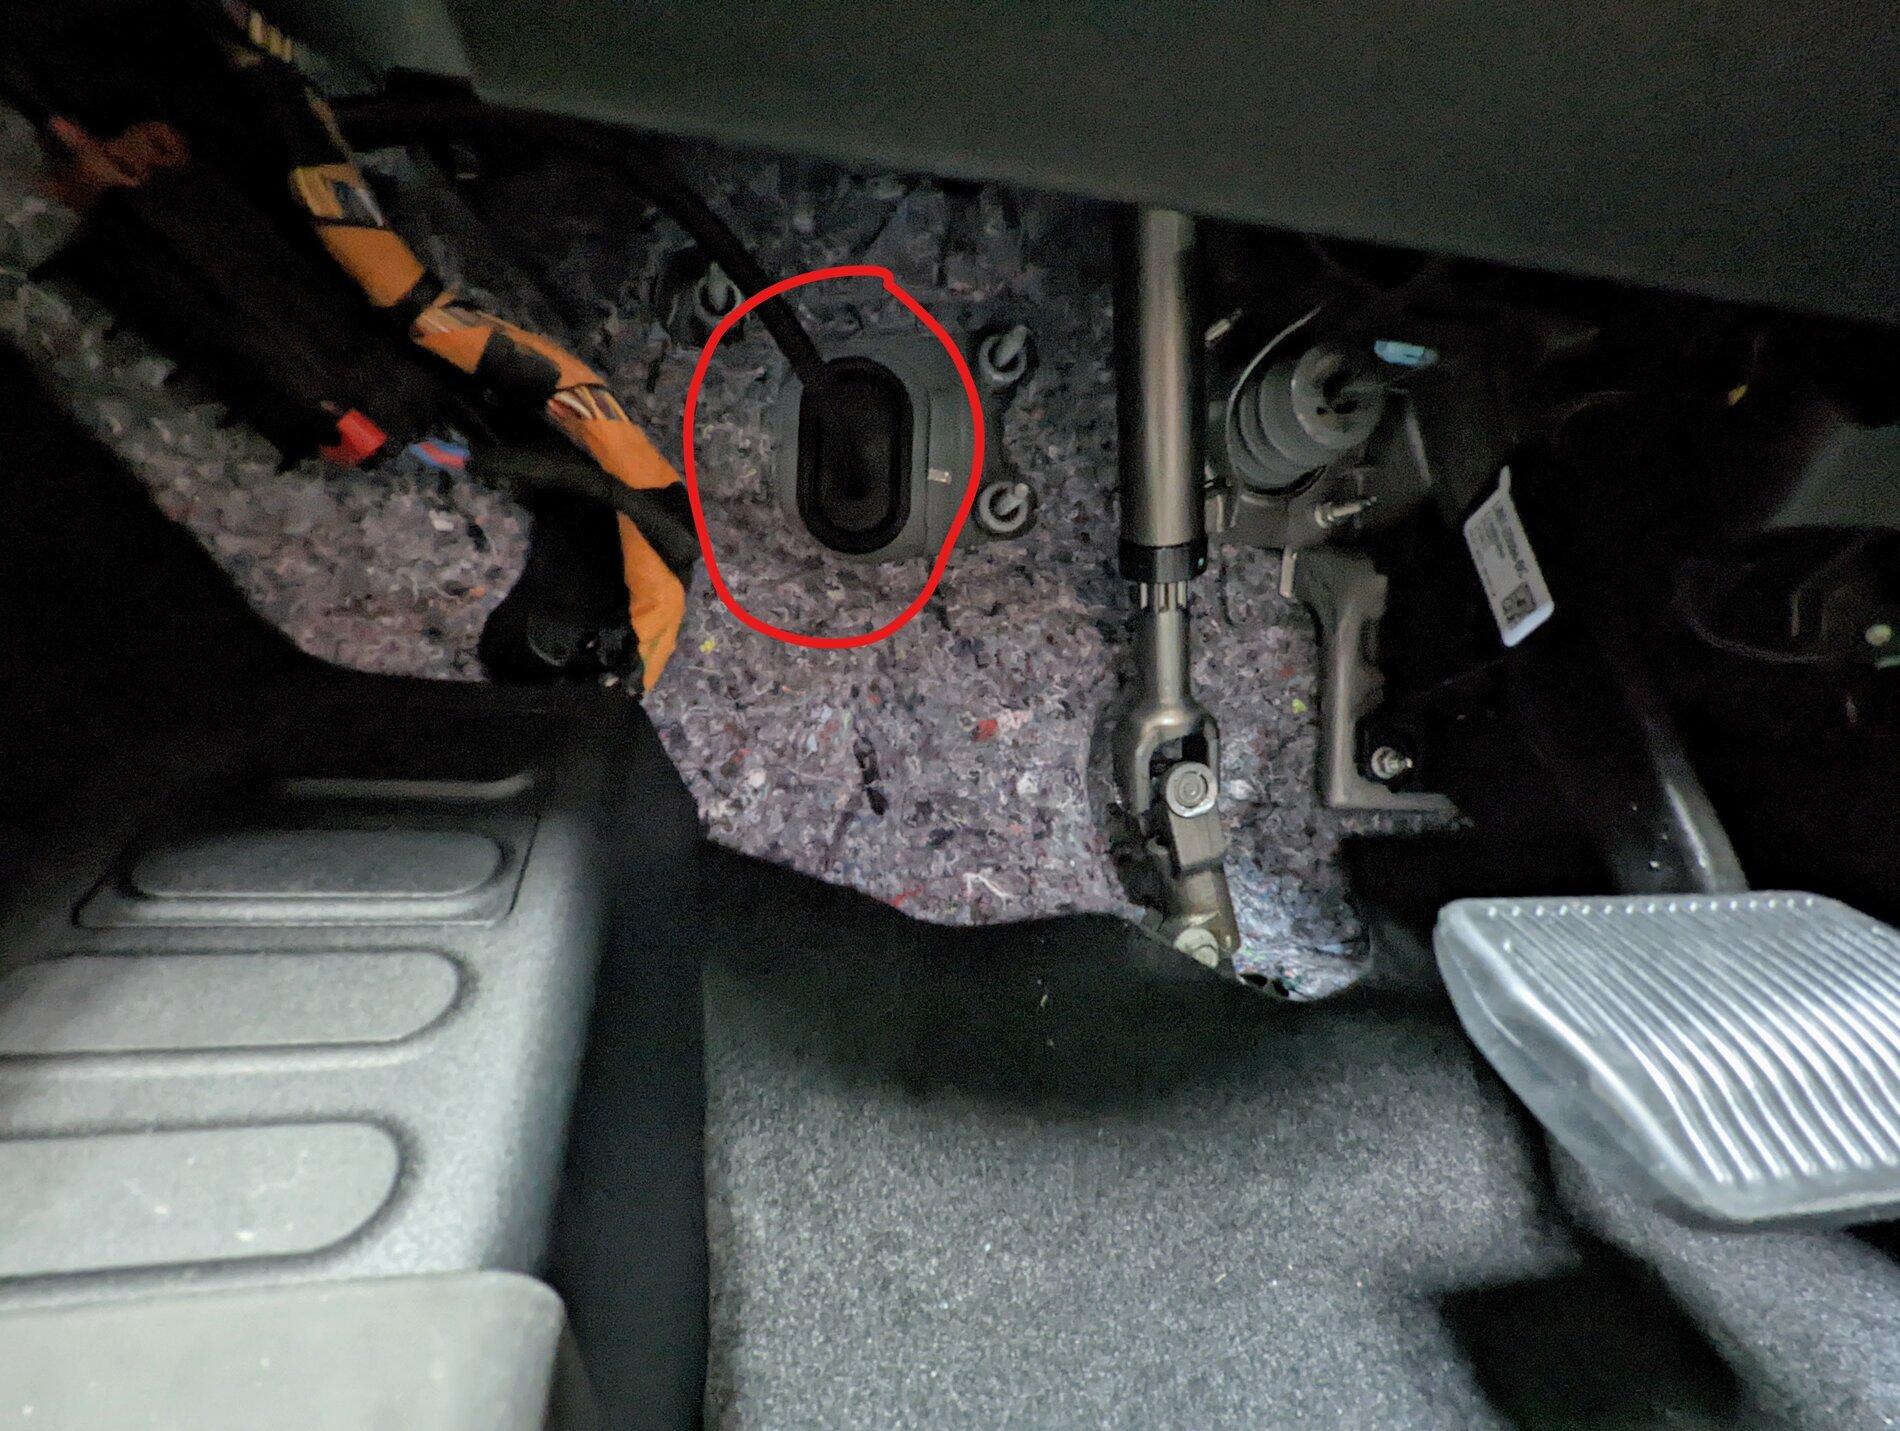
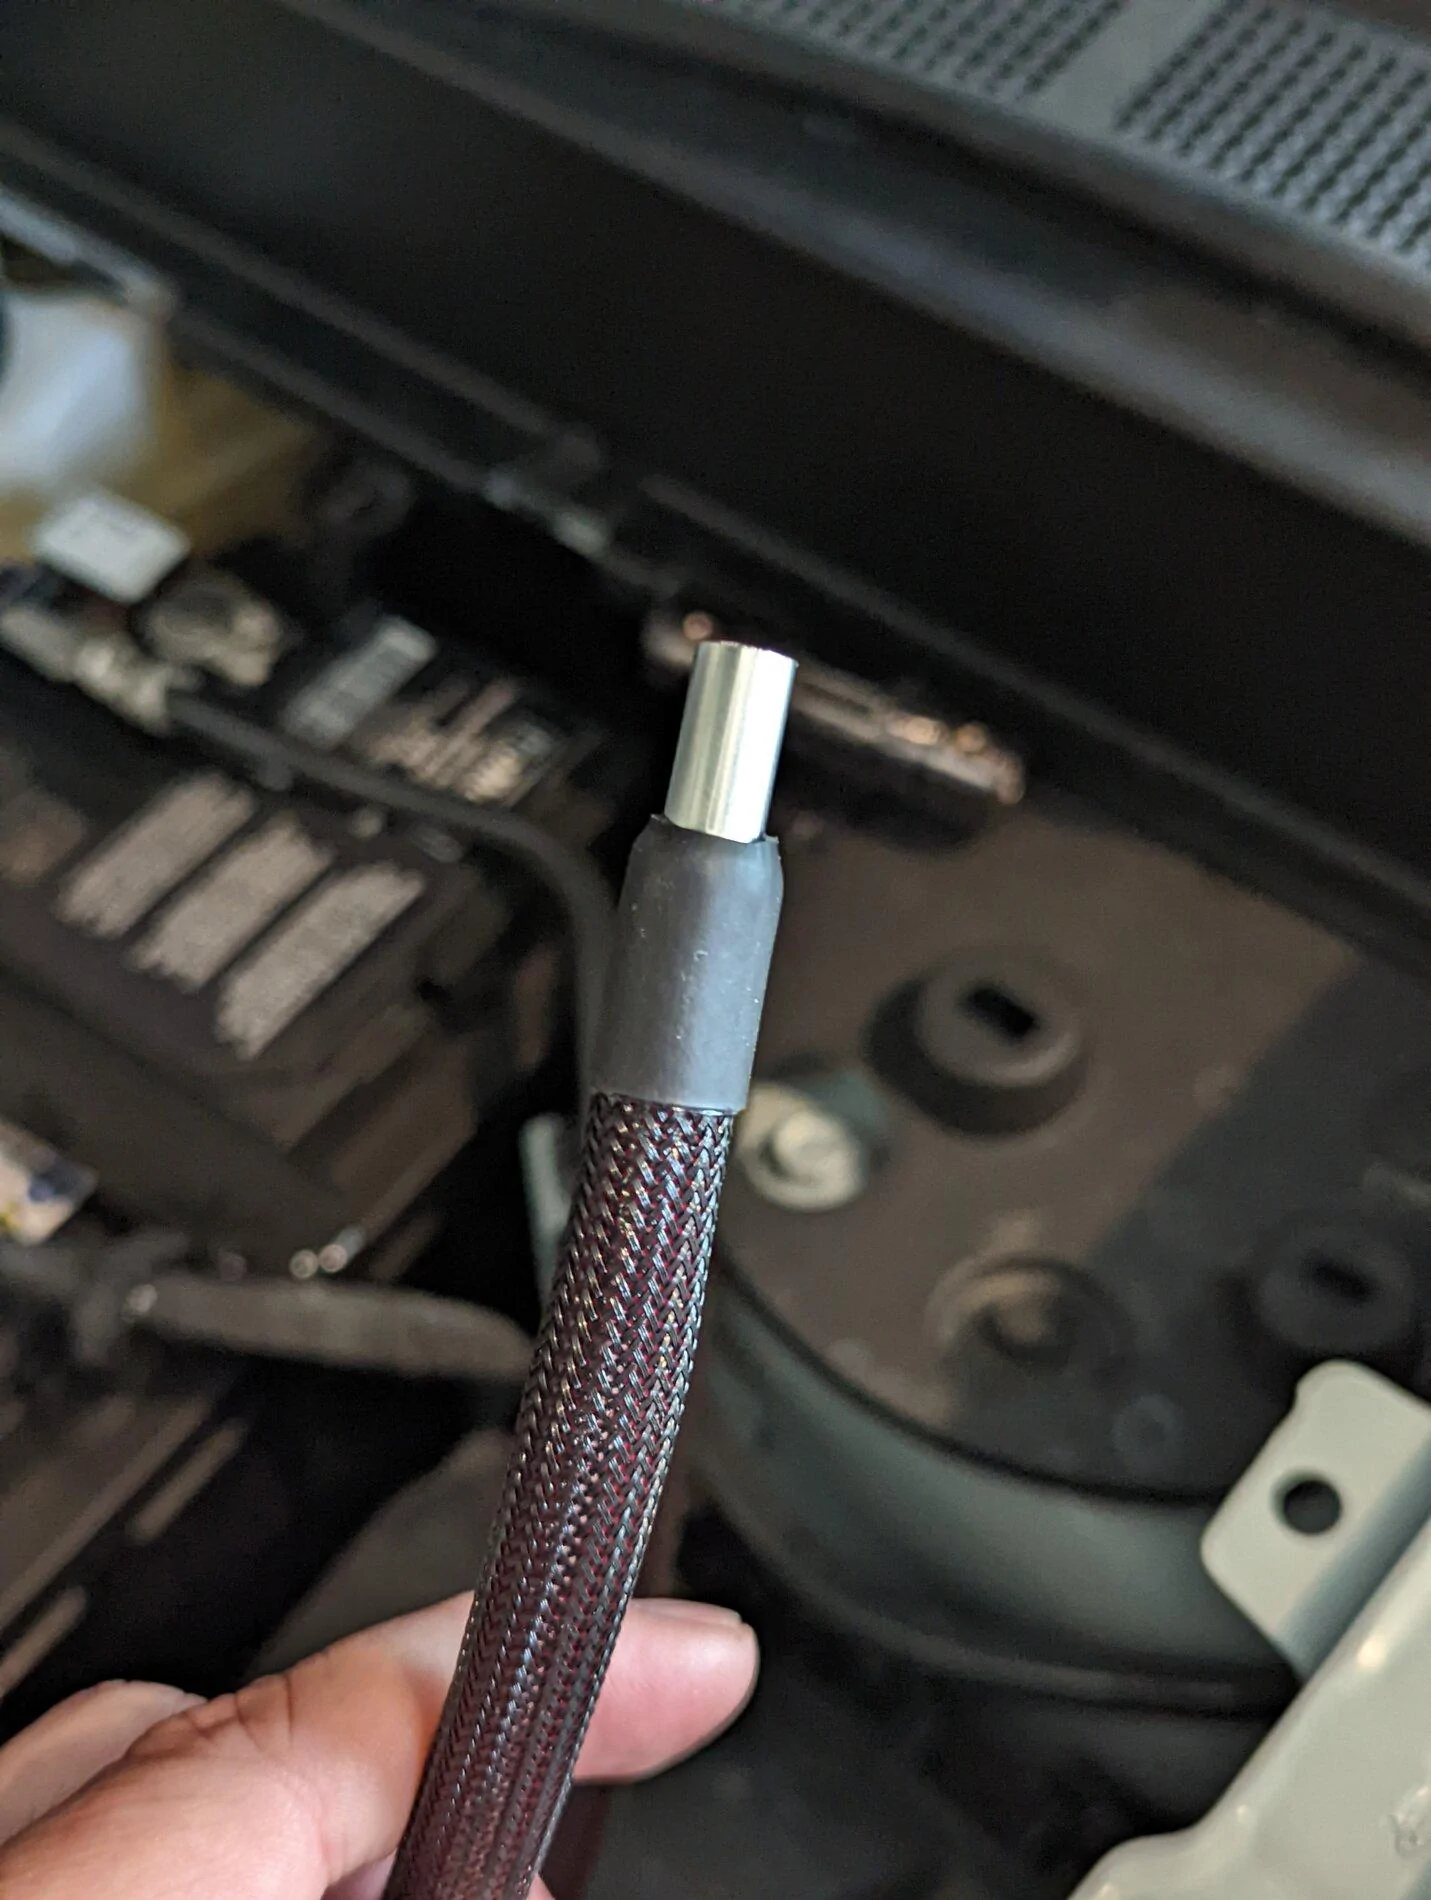
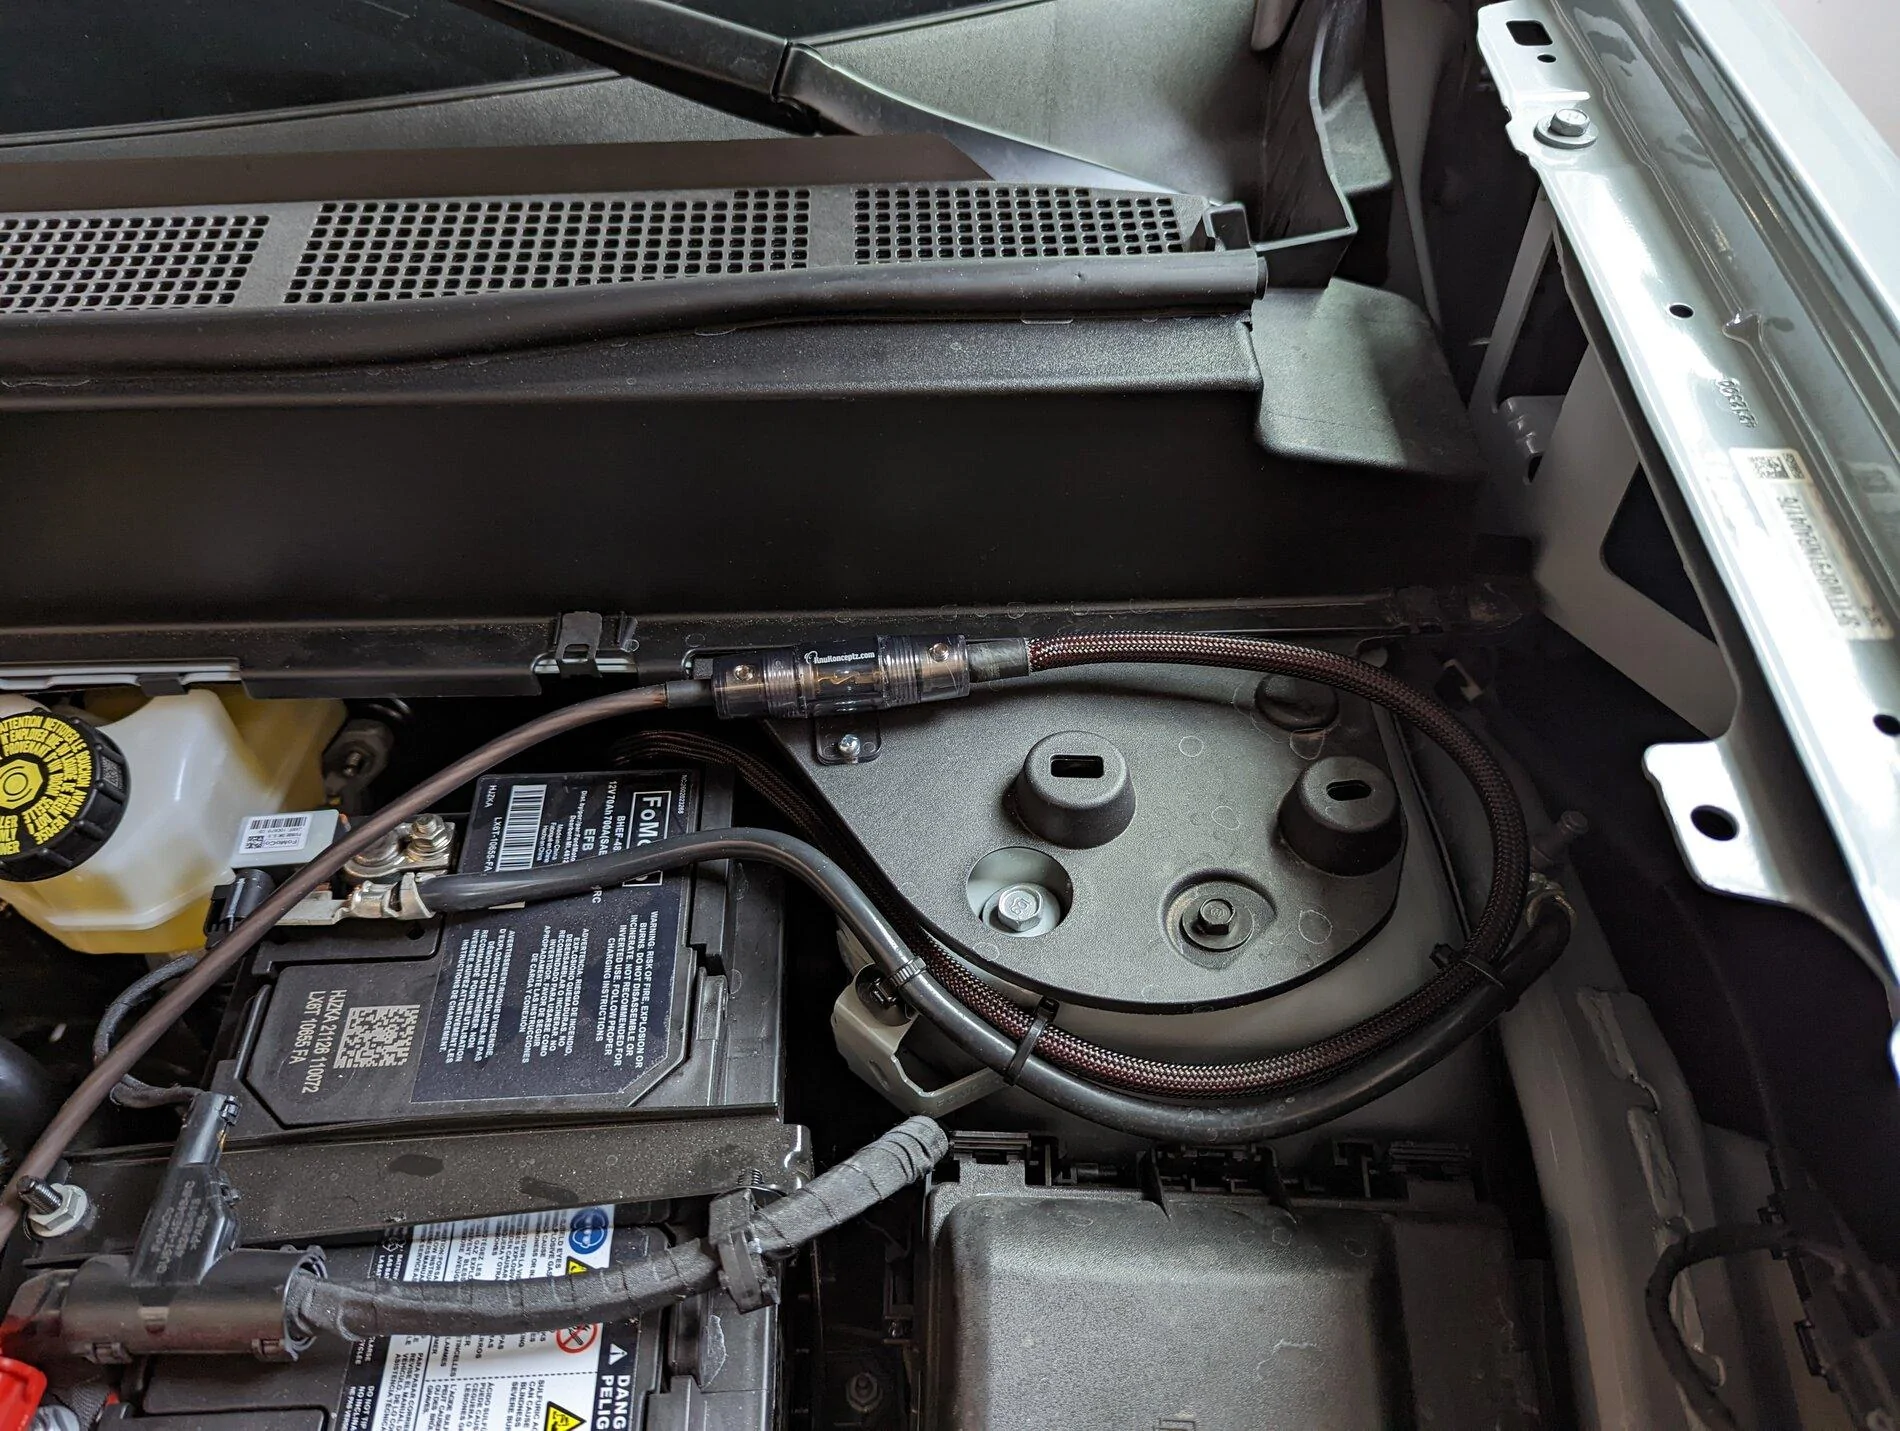
First finding a way into the battery, that was very easy, Ford put a nice big grommet that is just behind the battery, thanks Ford. I drilled a hole slightly smaller than the power cable and got it nice and easy connected to the battery.
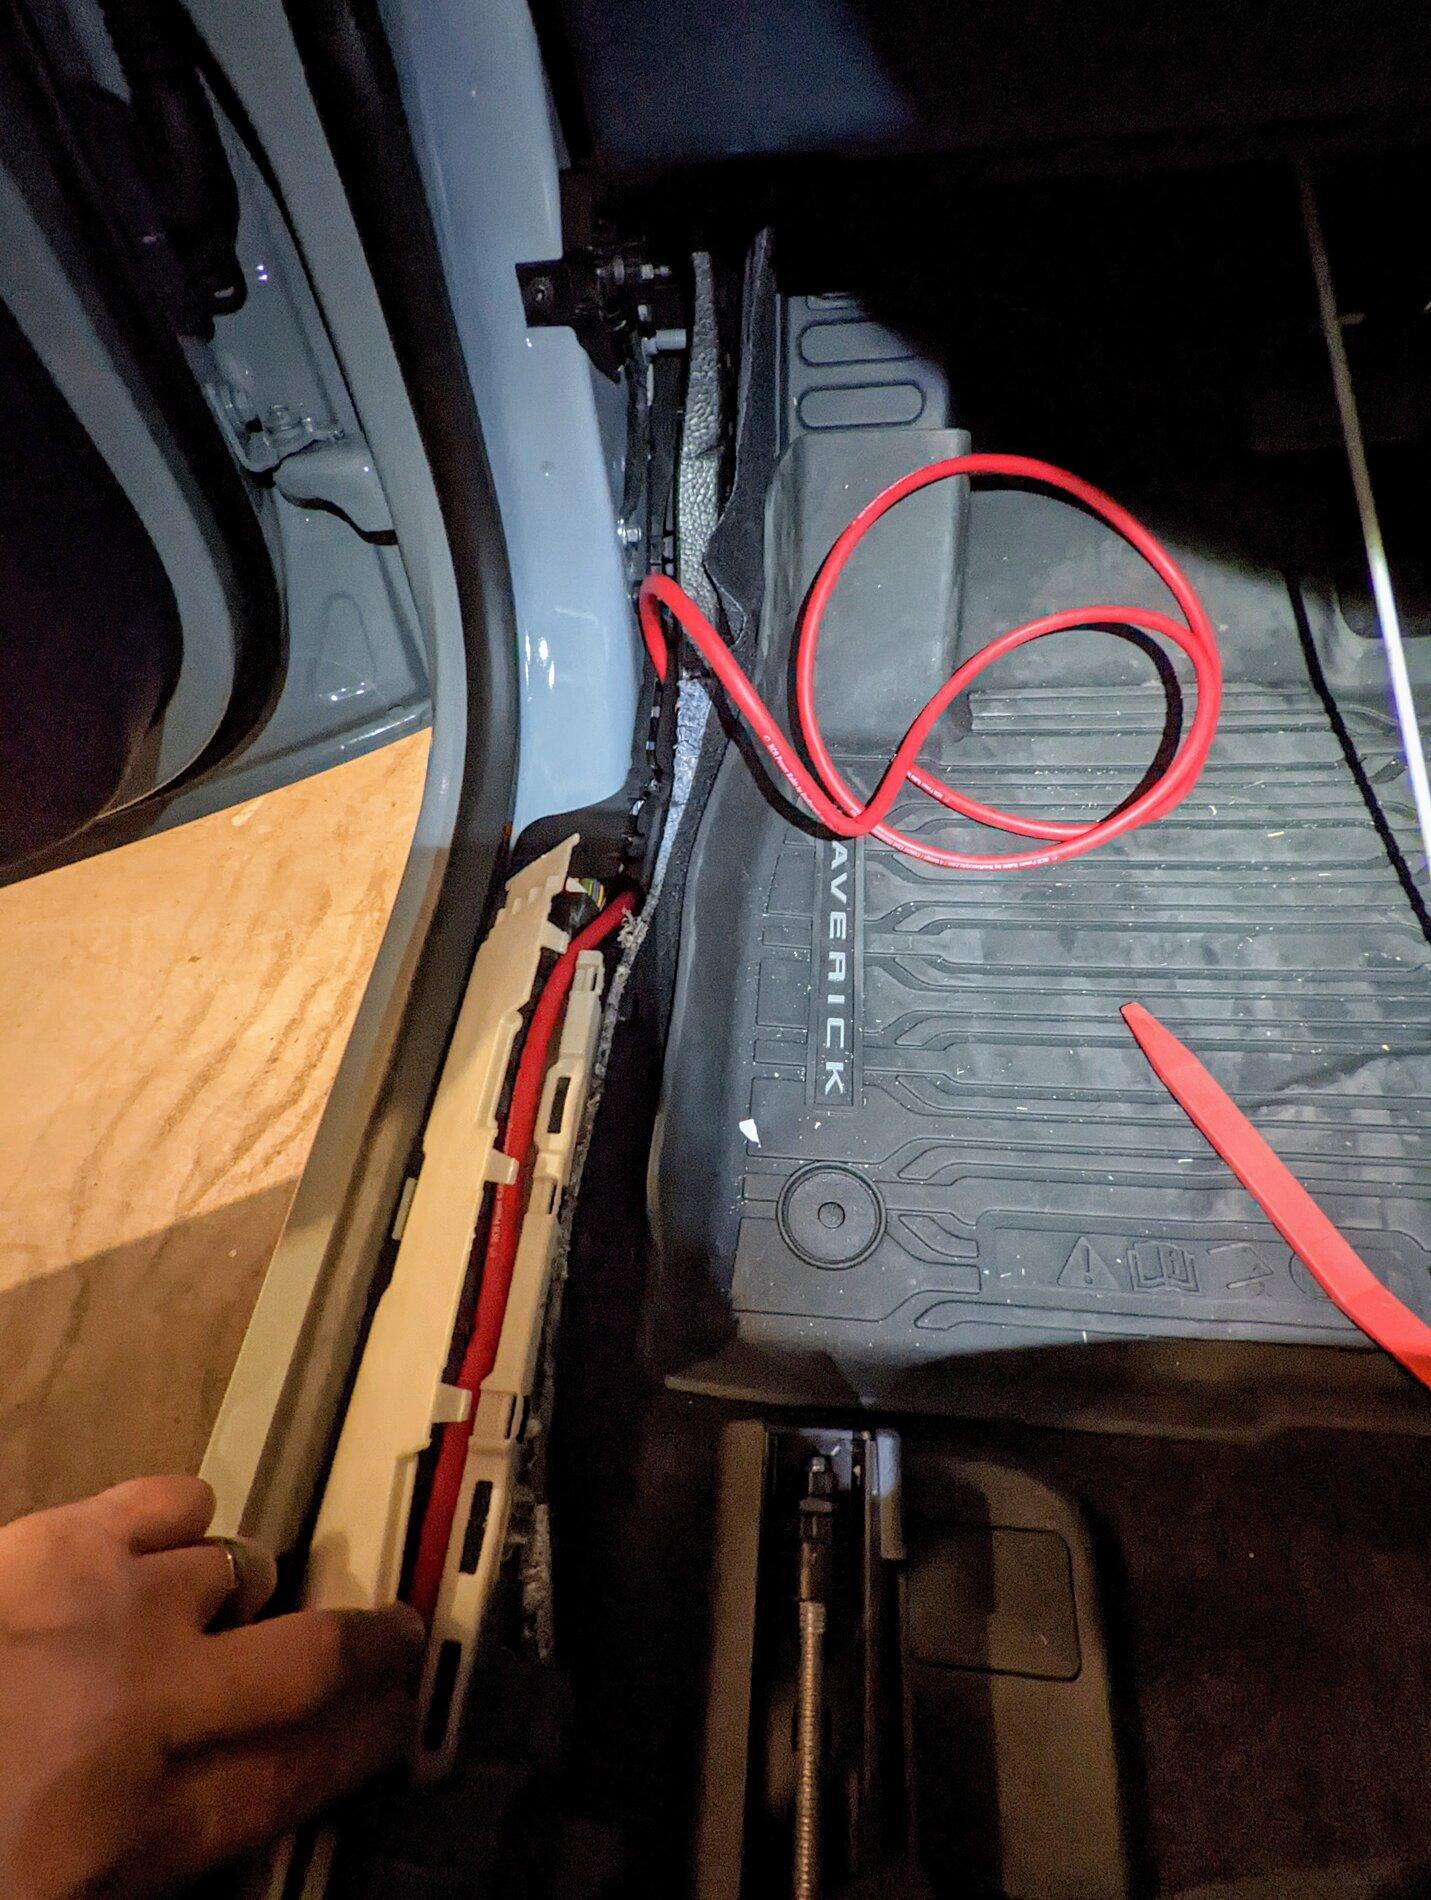
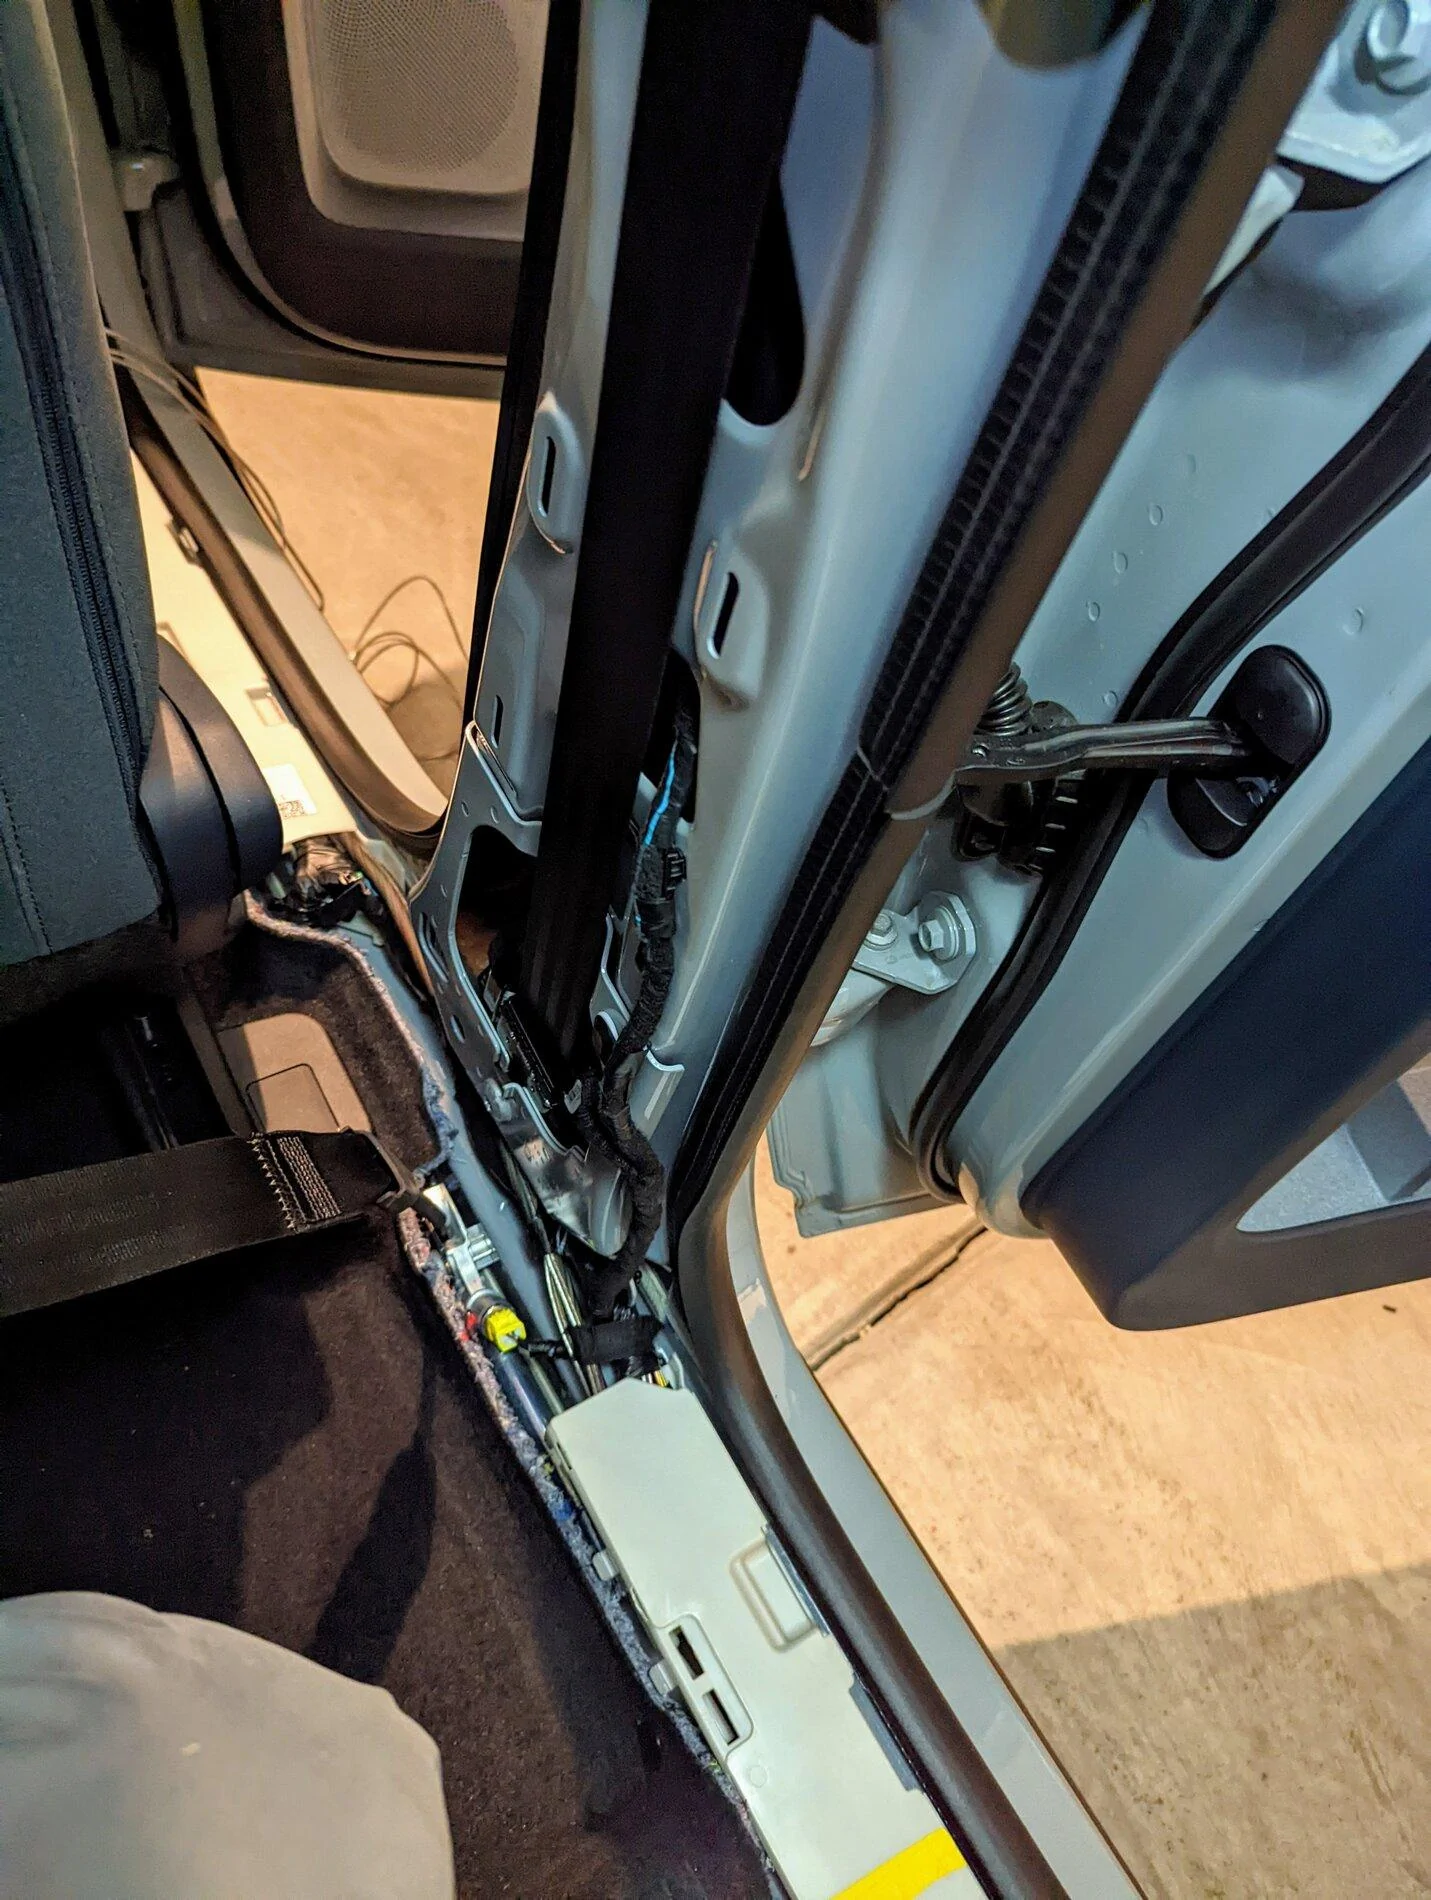
Running the power on the driver's side into the sill conduit, enough space to tuck everything nicely. You will need to remove 4 plastic panels, take your time and remove then nicely figuring out where the clamps are and the direction to pull. The plastic is not very high quality and will scratch very easily, be extra careful.
The panel with the hood latch was the most difficult one for me - I had to figure out how to remove the handle and that alone took me a good 5-10 minutes. On the top of the handle there's a little piece to lock it in place, use a trim tool or a flat head screw driver and pull it up, it will release the handle and and allow you to finish removing the panel. If you want to run the wires like this, remove all the panels it will make your life easier, believe me.
I used ferrules on all the cables, makes everything easier and cleaner, worth the extra few bucks.
And finally the fuse holder close to the battery, there's a nice little "shelf" that is the perfect location, away from everything else and with enough space and room underneath to secure with screws.
Ignore the 8 awg cable to the battery as I run out of cable and had to order a couple extra feet for the battery, I get it finished once I receive the cable. Everything braided and sip tied out of the way.
Speaker and signal cables:
Did the same as the power on the opposite side, again lots of nice space to run everything nicely and organized. There's a 9 way speed wire and 2 signal cables I took from the front speakers in the dash.
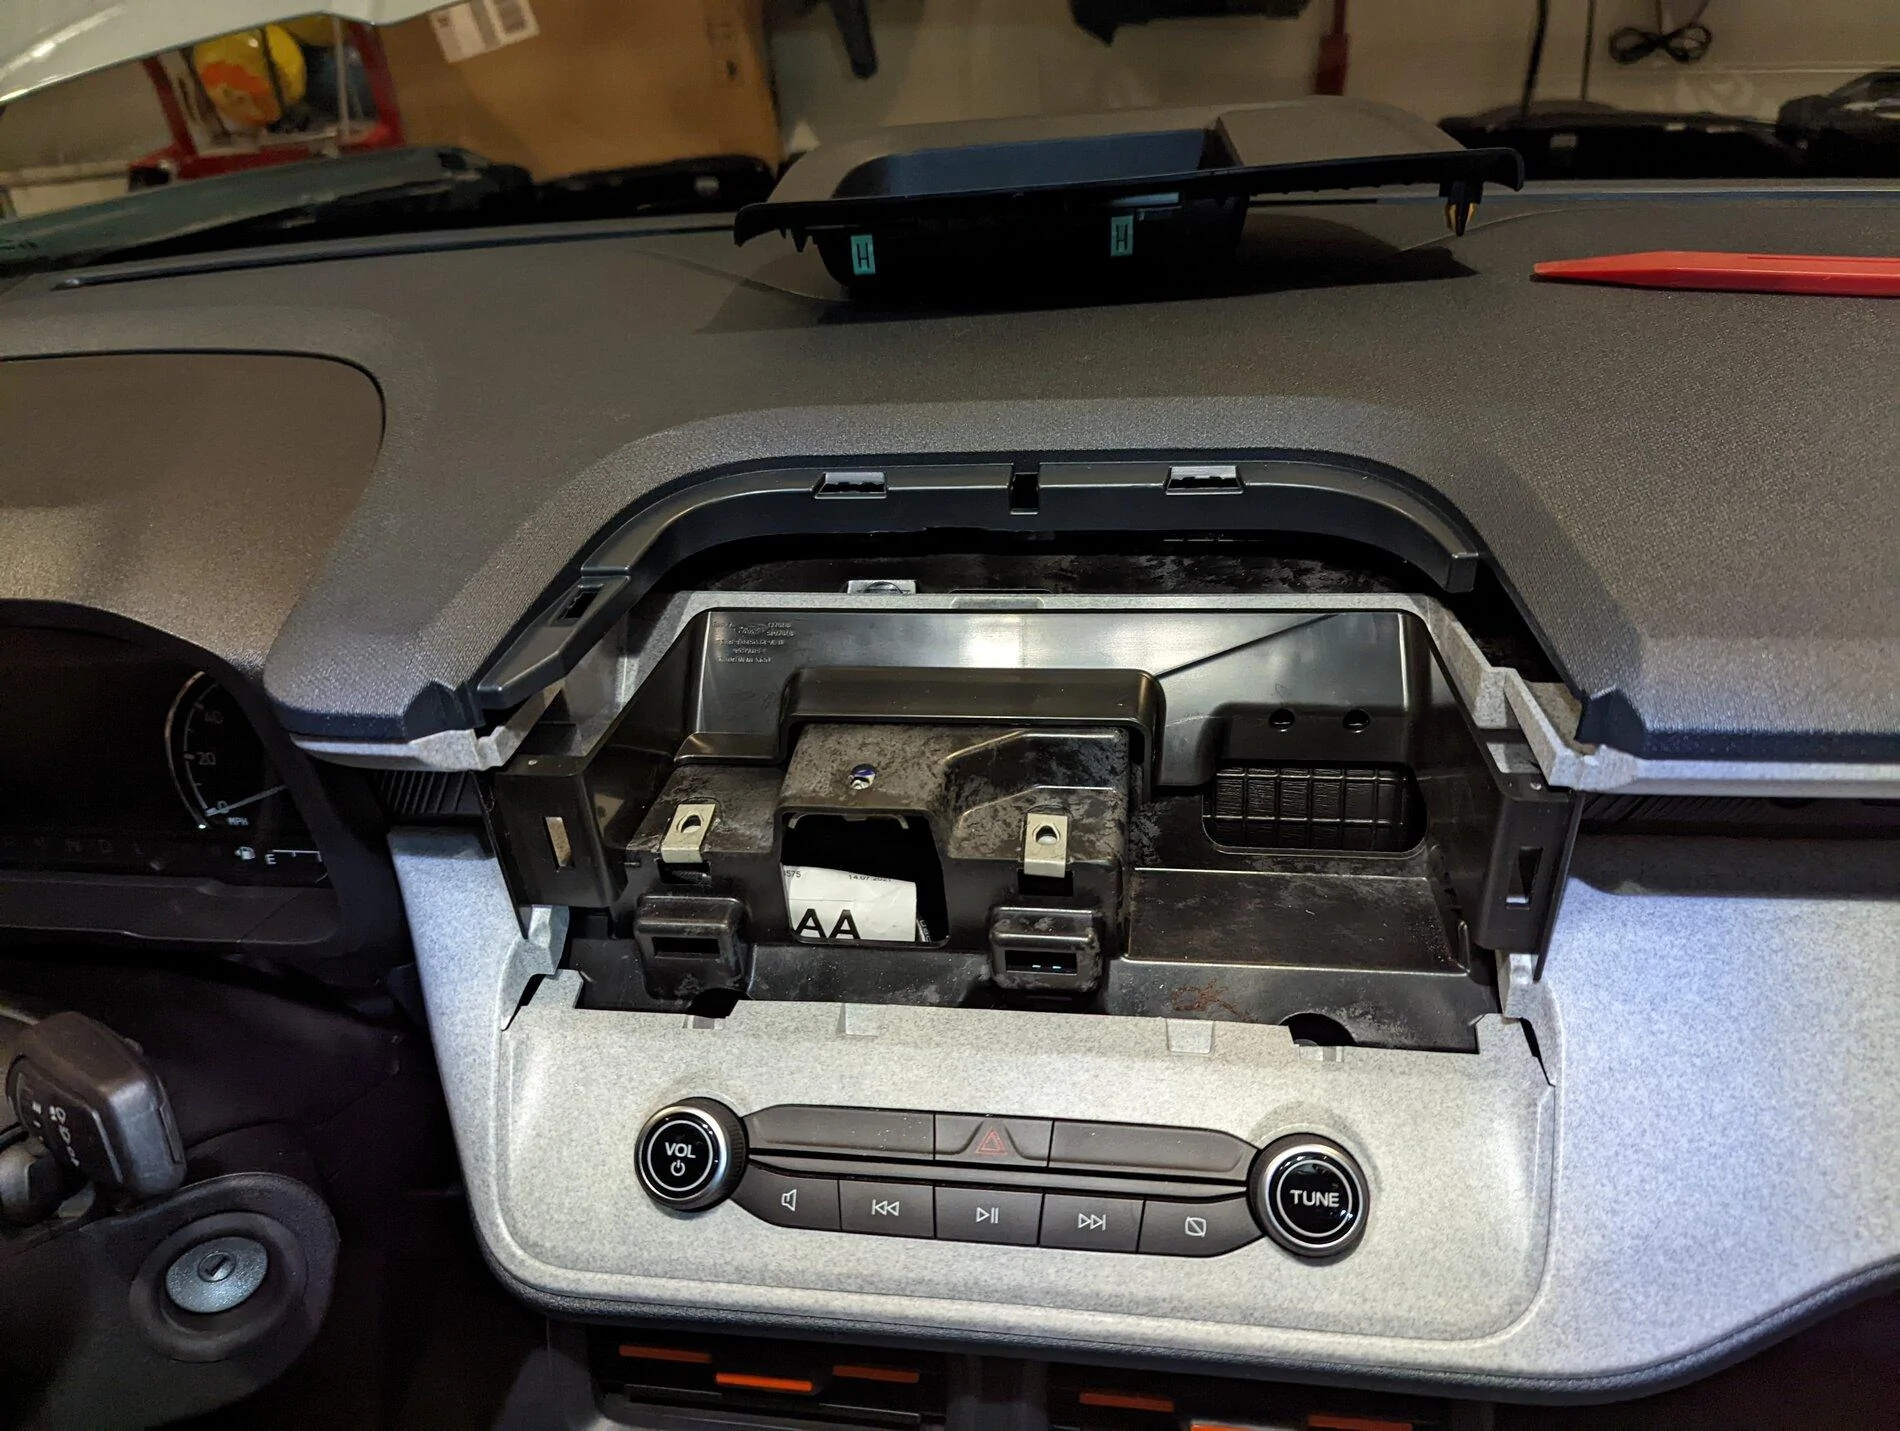
Head unit and dash:
You don't even need to mess with the screen if you don't want to. I removed everything to see how it's all connected. First you remove the top tray panel on top of the screen to expose 3 bolts holding it. after you remove the 3 7mm bolts you can pull it forward, there's a few clamps as well. The gray plastic with the buttons are easily removed after that. In the process I messed up one of the green plastic clamps and had to spend a lot of time trying to find a replacement, I got them from Amazon, they are orange but fit perfectly. It's on the list on top.
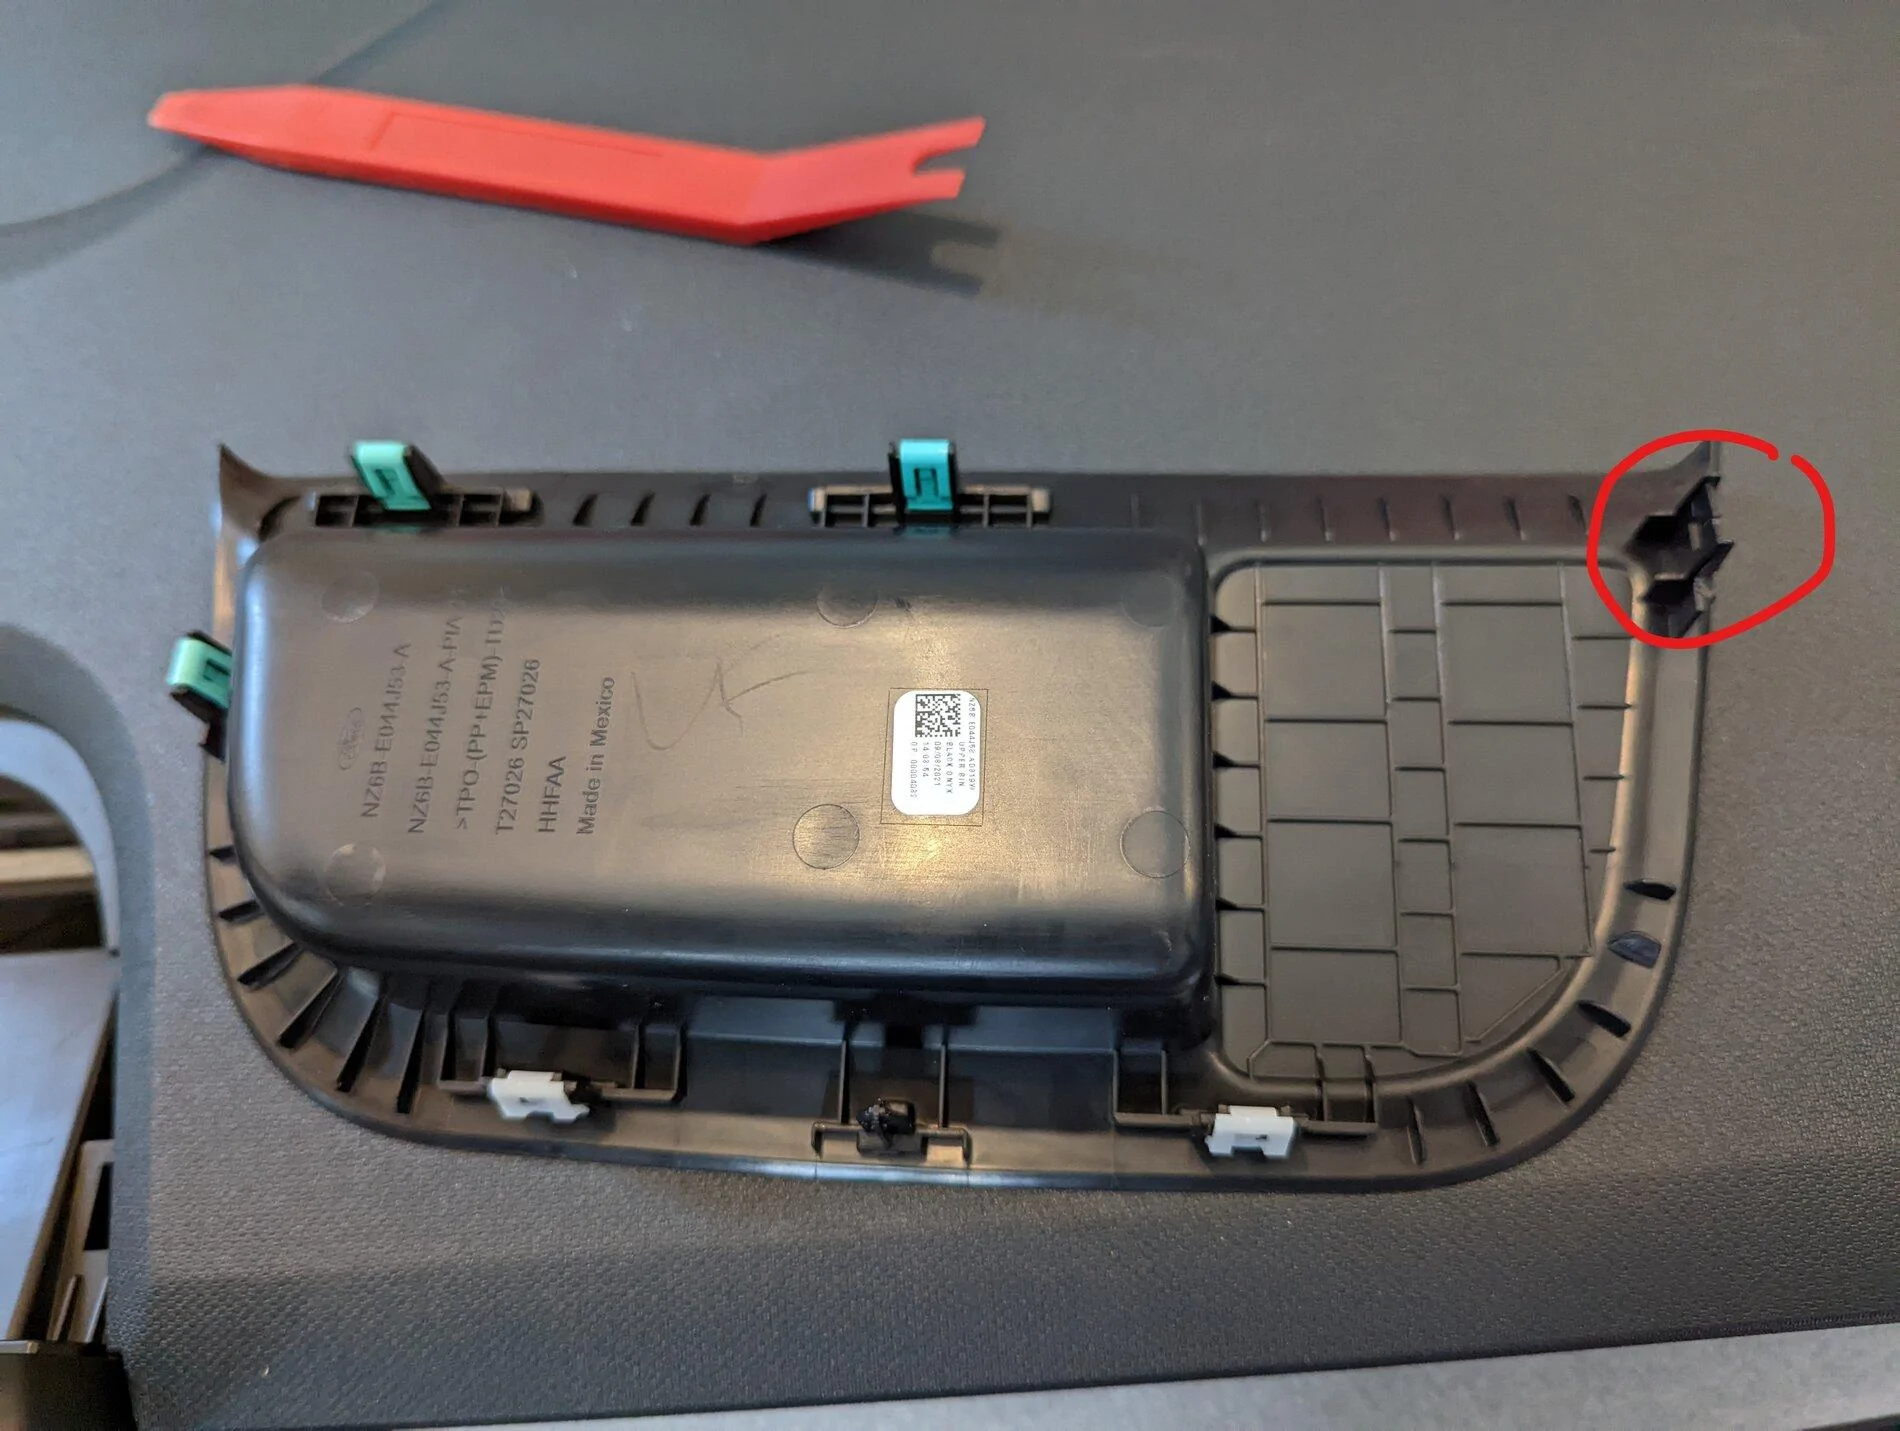
The bottom console with the climate controls is the only piece you need to remove to access the stock radio and tap the wires to feed the Kicker Key and sub, it's help only by clamps and you can just pull towards you, super easy to remove.
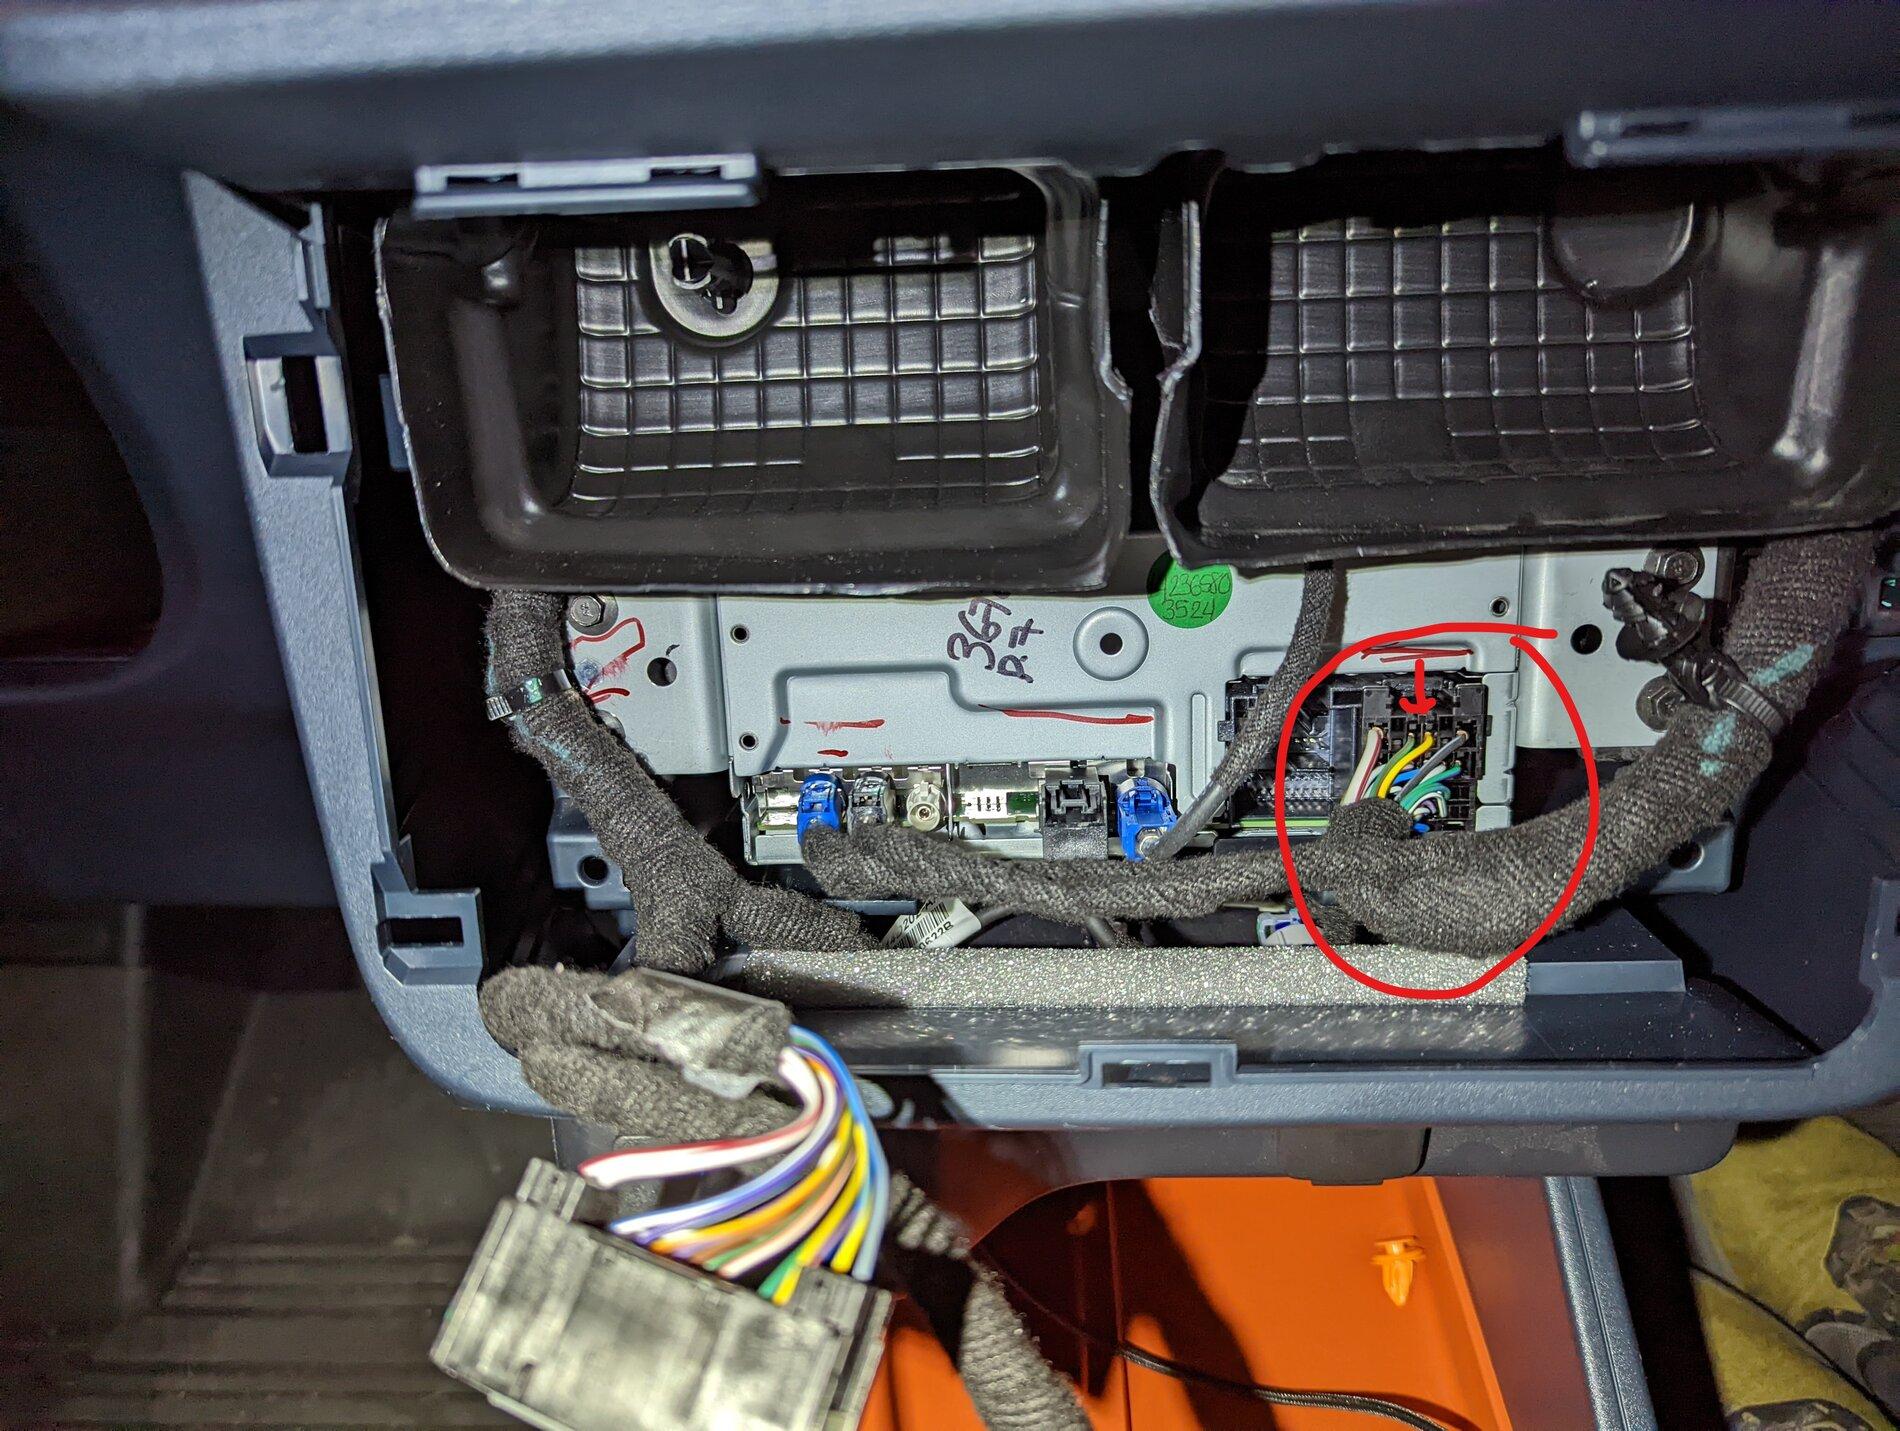
I marked up the harness that feeds the speakers, there's also I nice 12+ and ground, in case you want to tap that and do an easy in-dash install for the Key it is doable. In the middle of the connector there's a green and yellow wires, those are the right passenger side, right below it it's the driver's front speakers. I did not do anything with the rear speakers, but they are on the sides of the driver's front speaker. I used a multimeter to check polarity.
- Front right - green/brown + and yellow/red -
- Front left - grey/brown + and blue -
That's what I used as signal for both kicker key and the sub. I did not want to use the back speakers as the signal as that can have bass trimmed and I might need to adjust fader and remove sound from the back.
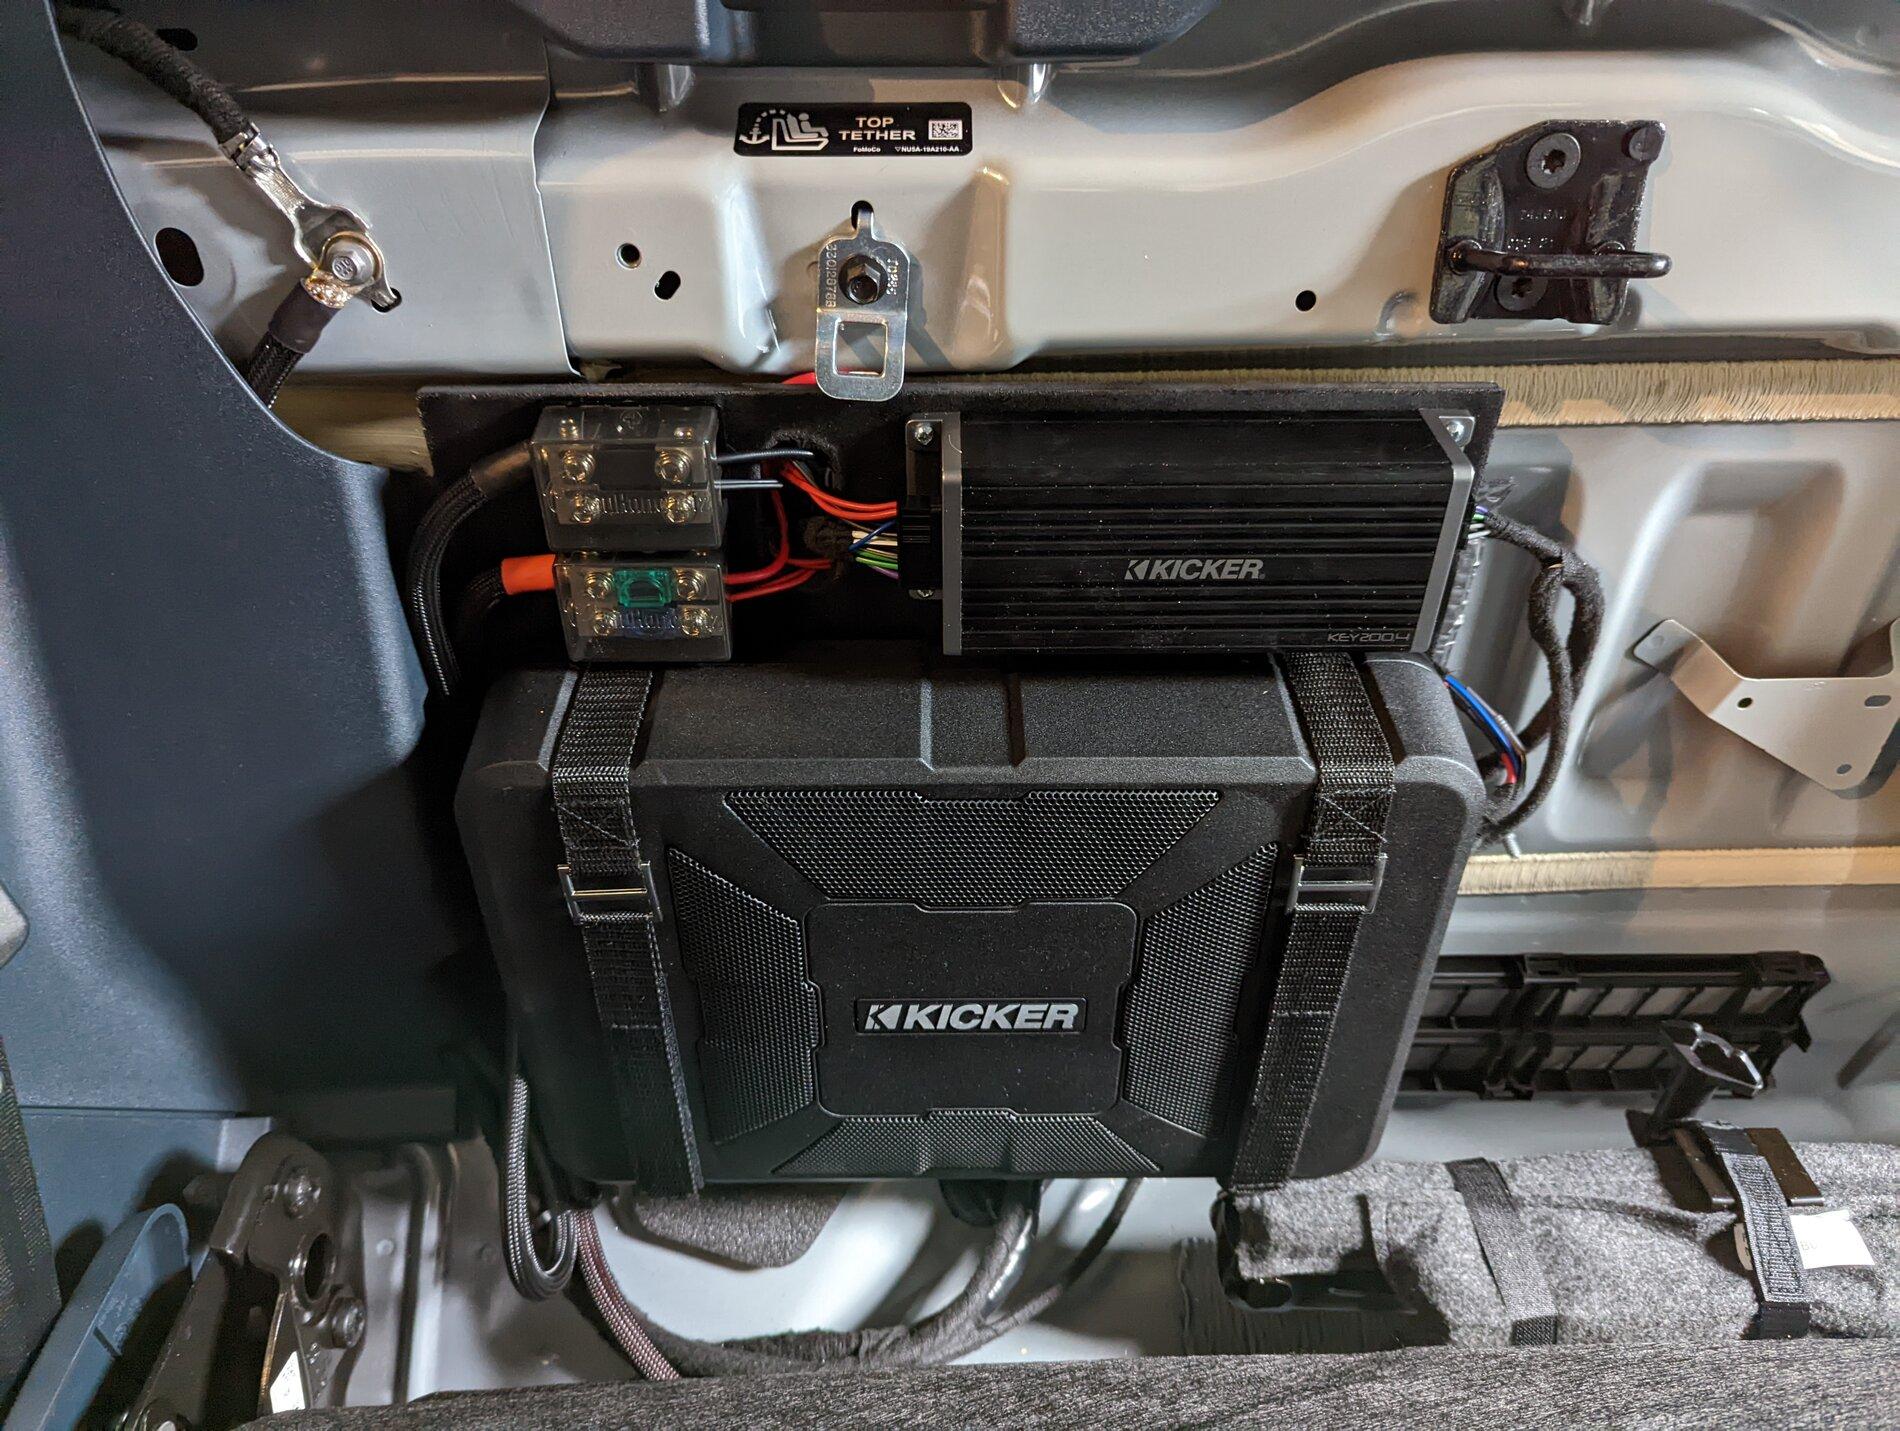
Final Assembly:
I cut a 13" x 13" piece of 1/4" MDF as a base and painted black, I know plastic would be better but did not want to order that only for this purpose and I had the MDF laying around, I made a hole a the top and run part of the wires behind the base.
I used the original Bose amp bracket to mount my base, the bracket is thin and may need reinforcement in the future, I also added a lot of deadening material behind the seat to avoid any sheet metal vibrating with the sub.
The holes on the bracket are not threaded, so I had to create the threads I used #12 bolts with 3/4" on the holes after treading them, it was a PITA, but at this point I had committed to the location. I think it would be a lot better to remove the amp bracket altogether and just create a better base for everything, there's plenty of space and even bolts that are good securing locations, you can even fit larger subs there. I wanted something compact, so that worked for me.
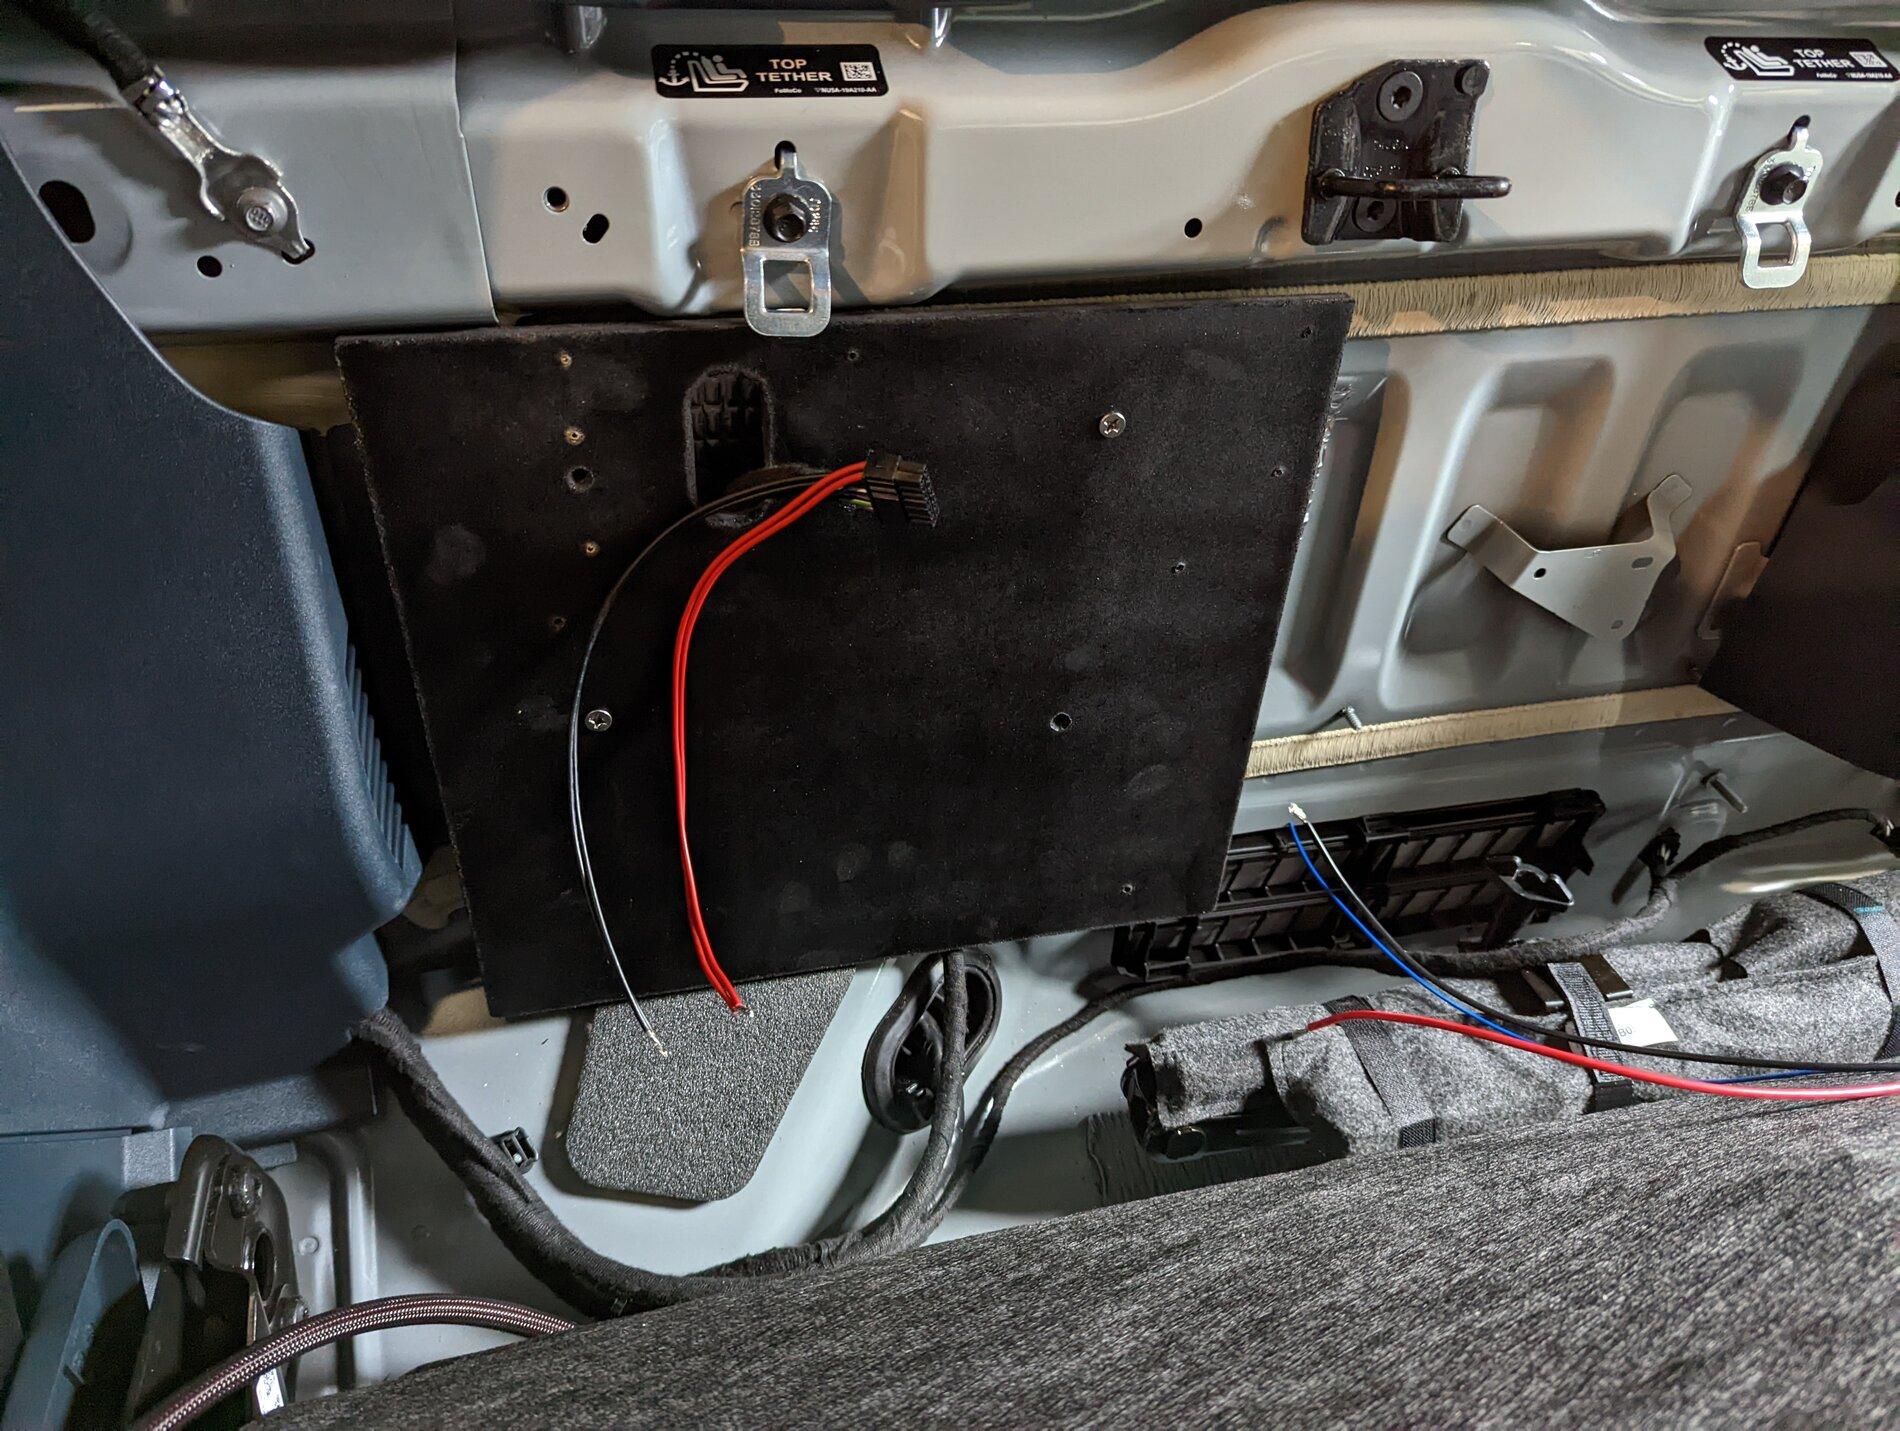
There's even a perfect factory ground location for everything at the top. Everything assembled and good to go. All adjustments are easily accessible as well.
Tunning and listening:
I set the sound to only front speakers and turned of the sub, connected the mic for the Key and run the tunning process with pink noise, I'll do that again later with a better source and high quality pink noise. But everything went well, tunning was completed first time with no issues, I have the kicker set to bi-amp and fader off I'm also using DC offset for turning everything on and off and it's working perfectly. The woofers are playing from 80hz to 3.2 khz and the tweeter everything above that. The Sub is cut at about 90hz with very little gain and no bass boost, so far everything seems to be matching perfectly and working well.
Now to the listening, I don't like booming bass and listen to mostly rock and some times some electronic music, for me this combo was perfect, it's amazing how well integrated the sub is now, you don't notice there's a sub until you turn it off and them you realized you are missing something, exactly what I wanted.
The sound is very clear and detailed, I can't even compare to the factory system. I have much better detail, clarity and definition specially at the low end where the sub is playing, the soundstage is great and I can hear instruments placement and vocals coming from the center without placing where the speakers are thanks to the DSP and time corrections. I think this is the perfect bang for the buck upgrade. It was a lot more work than I anticipated but worth it, this is the most enjoyable car system I've heard, including some fancy German ones from previous car's.
Is-would there be a way to to add cruise control with the module? Say you bought the factory wheel with the switches and could this module have the cruise turn on? I know the computer on my MINI could be programmed to do all sorts of different things. Just wondering outloud...Thanks for the detail post with the photos. Good info with an idea of mod difficulty to the radio system. I have one question. Did you happen to find any auxiliary inputs into the radio module?
By the way, Amazon has a dealer that is selling Ford compatible Radio modules with upgraded Sync 3 features. No information on SiriusXM yet with the module. Although, the dealer wants the vin to program the module. I don't see how this would help since the XL and XLT radio features are set. But they say their modules w/ Sync 3 will work with the XL. Without navigation it is $299, with nav it is $399.
Here is the link.
About this item
I still want to find out if they will program the Lariat features into the module.
- Sync 3 APIM Module: 8G Non-navigation module is only used for Sync 3, Support Carplay and Android Auto, VIN pre-programming is sent at the time of purchase, no need to go to the dealer, Shipped from The U.S
- Keep original functions:can realize carplay and Android auto. Compatible with all functions of the original car, including seat ventilation and heating, steering wheel heating, seat adjustment, climate adjustment, active parking assist, reversing image, intelligent voice control , Sirius and other functions.
- Plug and play:Sync 3 APIM Module 8G Non-Navigation, plug and play, on-site printing instructions
- Compatibility: Applicable to Ford and Lincoln vehicles equipped with 8" SYNC 3 system. This does not apply to MyFord Touch (SYNC 2) screen components. 8" Sync2 MyFord Touch
- After-sales service: If you have any questions, please send an email to us. In case of emergency, you can contact us by phone. We have a professional technical and after-sales team to serve you.
The more info I find out, the more unanswered questions I have.
Right now I can't say for sure. However, infotainment.com seems to be able to provide such solutions but it will be a while before the Maverick is available. A warning, they are expensive.Is-would there be a way to to add cruise control with the module? Say you bought the factory wheel with the switches and could this module have the cruise turn on? I know the computer on my MINI could be programmed to do all sorts of different things. Just wondering outloud...
I'd love to see a couple of pictures of the tweeters and the sub box. I'm still not 100% happy with my sub.I dead headed the tweeters in the dash and put new better ones on the a pillar. I replaced the rear speakers with 4x6s, I actually used an MDF ring I cut out and hot glue to accomplish that. Not textbook I guess but it works lol.
I'd love to see a couple of pictures of the tweeters and the sub box. I'm still not 100% happy with my sub.
There's no harness available for the Mav that I could find. I had to cut the front speaker wires from the head unit to feed the amp. I have 4 wires going to the amp and 8 from the amp to the 2 mids and 2 tweeters.Inexperienced with this. Can you please clarify the connection made for the Key to power the front speakers and tweeters?
Based on an earlier comment, is it simply a wiring harness installed between the speaker harness and the radio socket, which bridges it all to the Key?
I'm using DC offset for both the Key and the sub, working fine every time, didn't even try to find a 12v source in the head unit, but should be easy to find one with a multimeter it's a pretty simple harness in the XLT.Which color wire in the head unit did you tap for the remote turn-on wire?
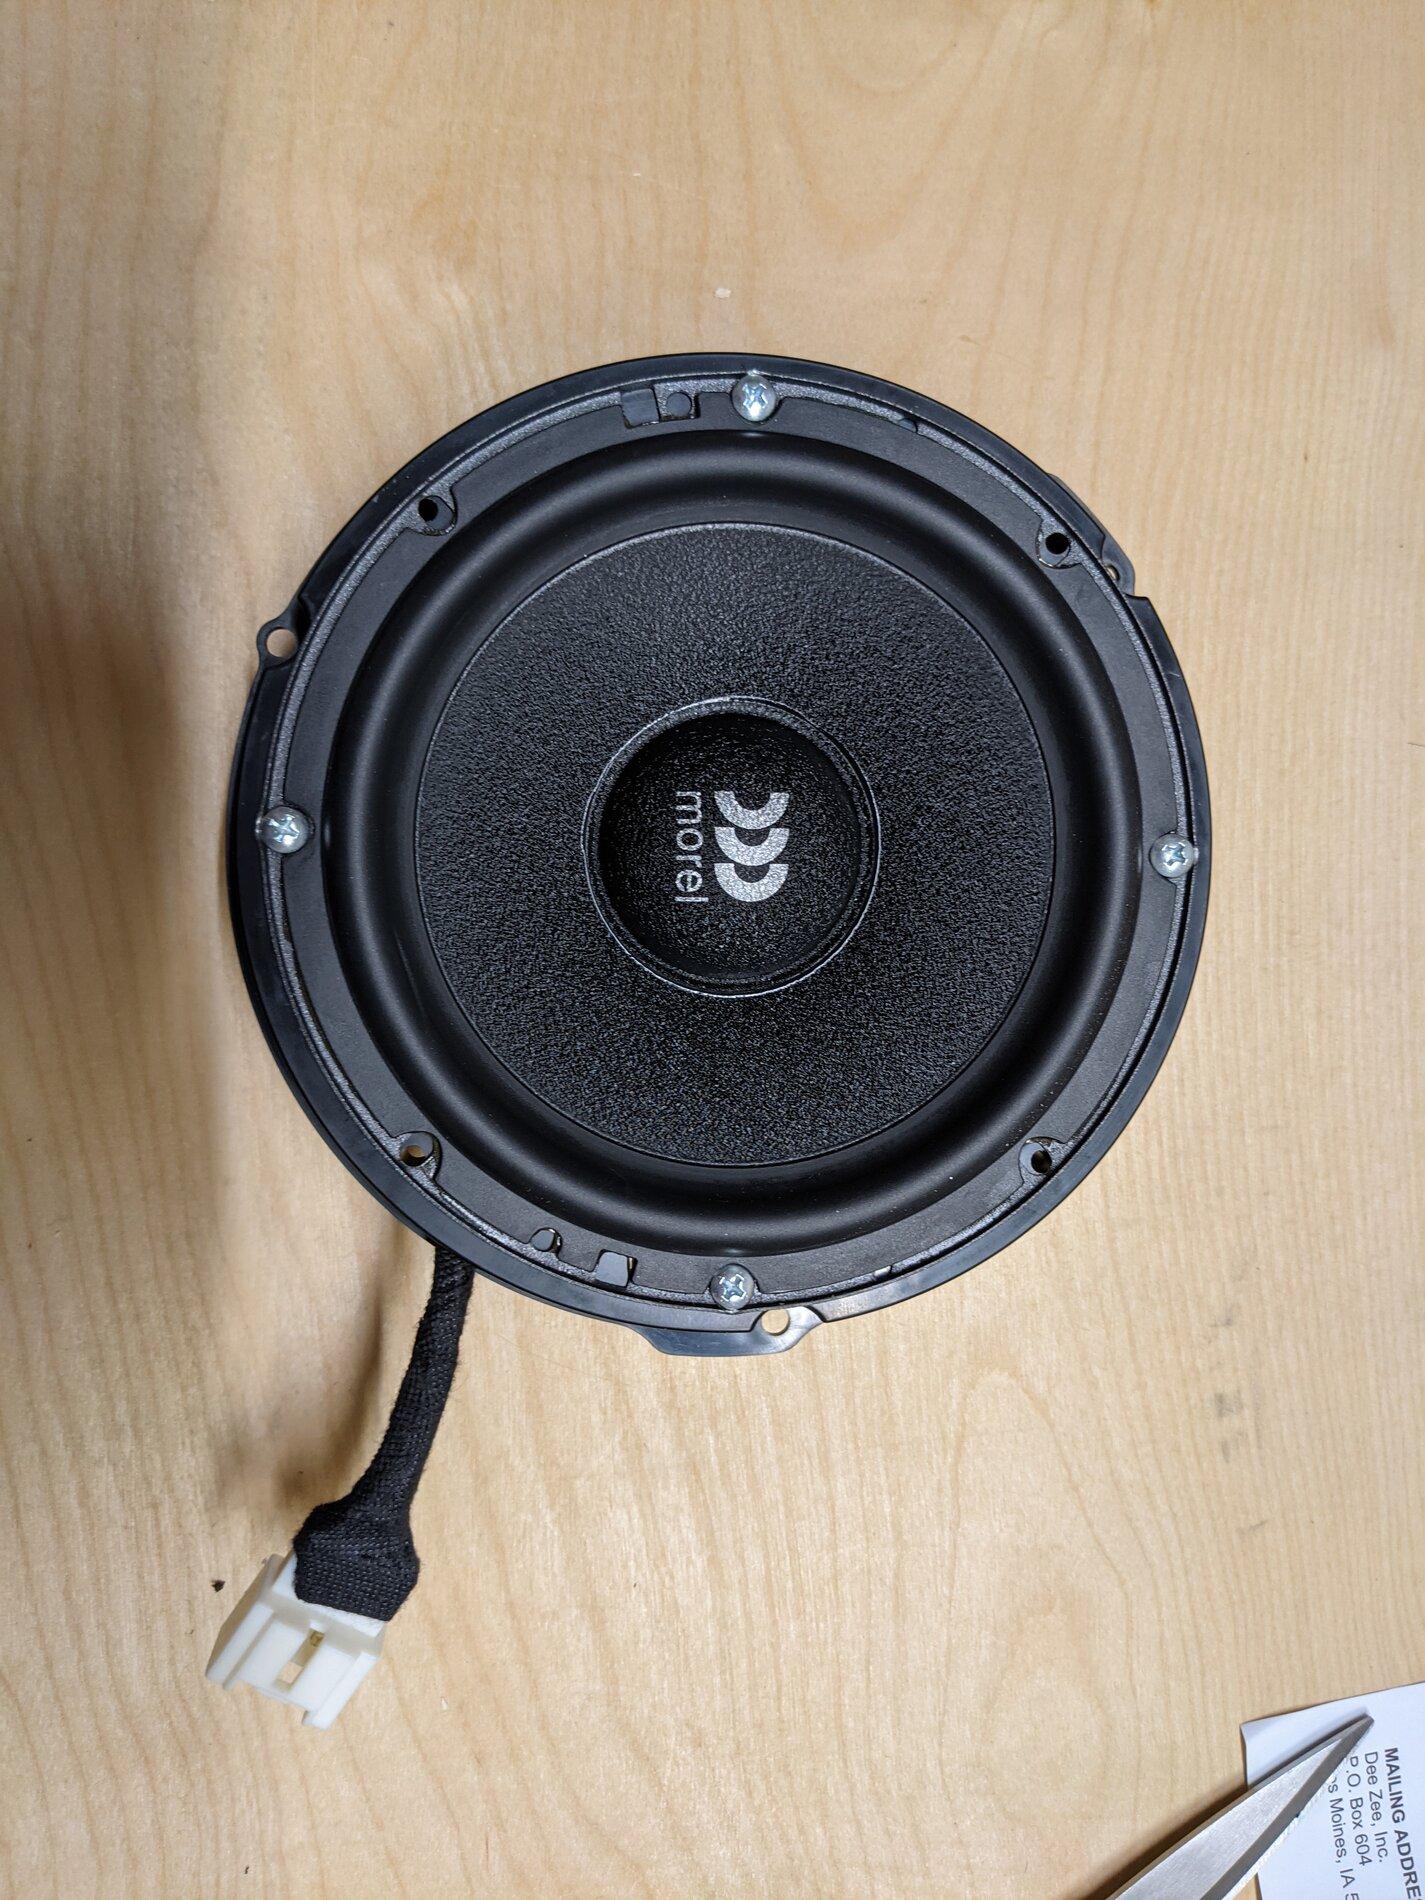
You mentioned some "good space" between the woofer and plastic grill. Is this more space than the factory speaker had? And do you think it would benefit by adding a spacer and projecting the Morel woofer further into the cabin space (reducing the distance between grill and woofer)? Otherwise, the foam rings will suffice.It's glued, I did not want to mess with that.
Not a lot, the morel fit just perfect, the glass track is pretty close, right behind the woofer, you do have some good space between the speaker and the plastic grill to add a thicker spacer and make more space for a bigger woofer/magnet.
Just opened the link and shows as not availableThanks for the detail post with the photos. Good info with an idea of mod difficulty to the radio system. I have one question. Did you happen to find any auxiliary inputs into the radio module?
By the way, Amazon has a dealer that is selling Ford compatible Radio modules with upgraded Sync 3 features. No information on SiriusXM yet with the module. Although, the dealer wants the vin to program the module. I don't see how this would help since the XL and XLT radio features are set. But they say their modules w/ Sync 3 will work with the XL. Without navigation it is $299, with nav it is $399.
Here is the link.
About this item
I still want to find out if they will program the Lariat features into the module.
- Sync 3 APIM Module: 8G Non-navigation module is only used for Sync 3, Support Carplay and Android Auto, VIN pre-programming is sent at the time of purchase, no need to go to the dealer, Shipped from The U.S
- Keep original functions:can realize carplay and Android auto. Compatible with all functions of the original car, including seat ventilation and heating, steering wheel heating, seat adjustment, climate adjustment, active parking assist, reversing image, intelligent voice control , Sirius and other functions.
- Plug and play:Sync 3 APIM Module 8G Non-Navigation, plug and play, on-site printing instructions
- Compatibility: Applicable to Ford and Lincoln vehicles equipped with 8" SYNC 3 system. This does not apply to MyFord Touch (SYNC 2) screen components. 8" Sync2 MyFord Touch
- After-sales service: If you have any questions, please send an email to us. In case of emergency, you can contact us by phone. We have a professional technical and after-sales team to serve you.
The more info I find out, the more unanswered questions I have.

hmmm, this was not the only vendor that sold the module on Amazon. The reason I didn't pull the trigger was because of the answer by the vendor without details. Made me suspect that they would say yes to any compatibility question. So, I'm still looking and want to confirm compatibility before spending $300 to $500 on an upgrade.Just opened the link and shows as not available
