- Thread starter
- #241
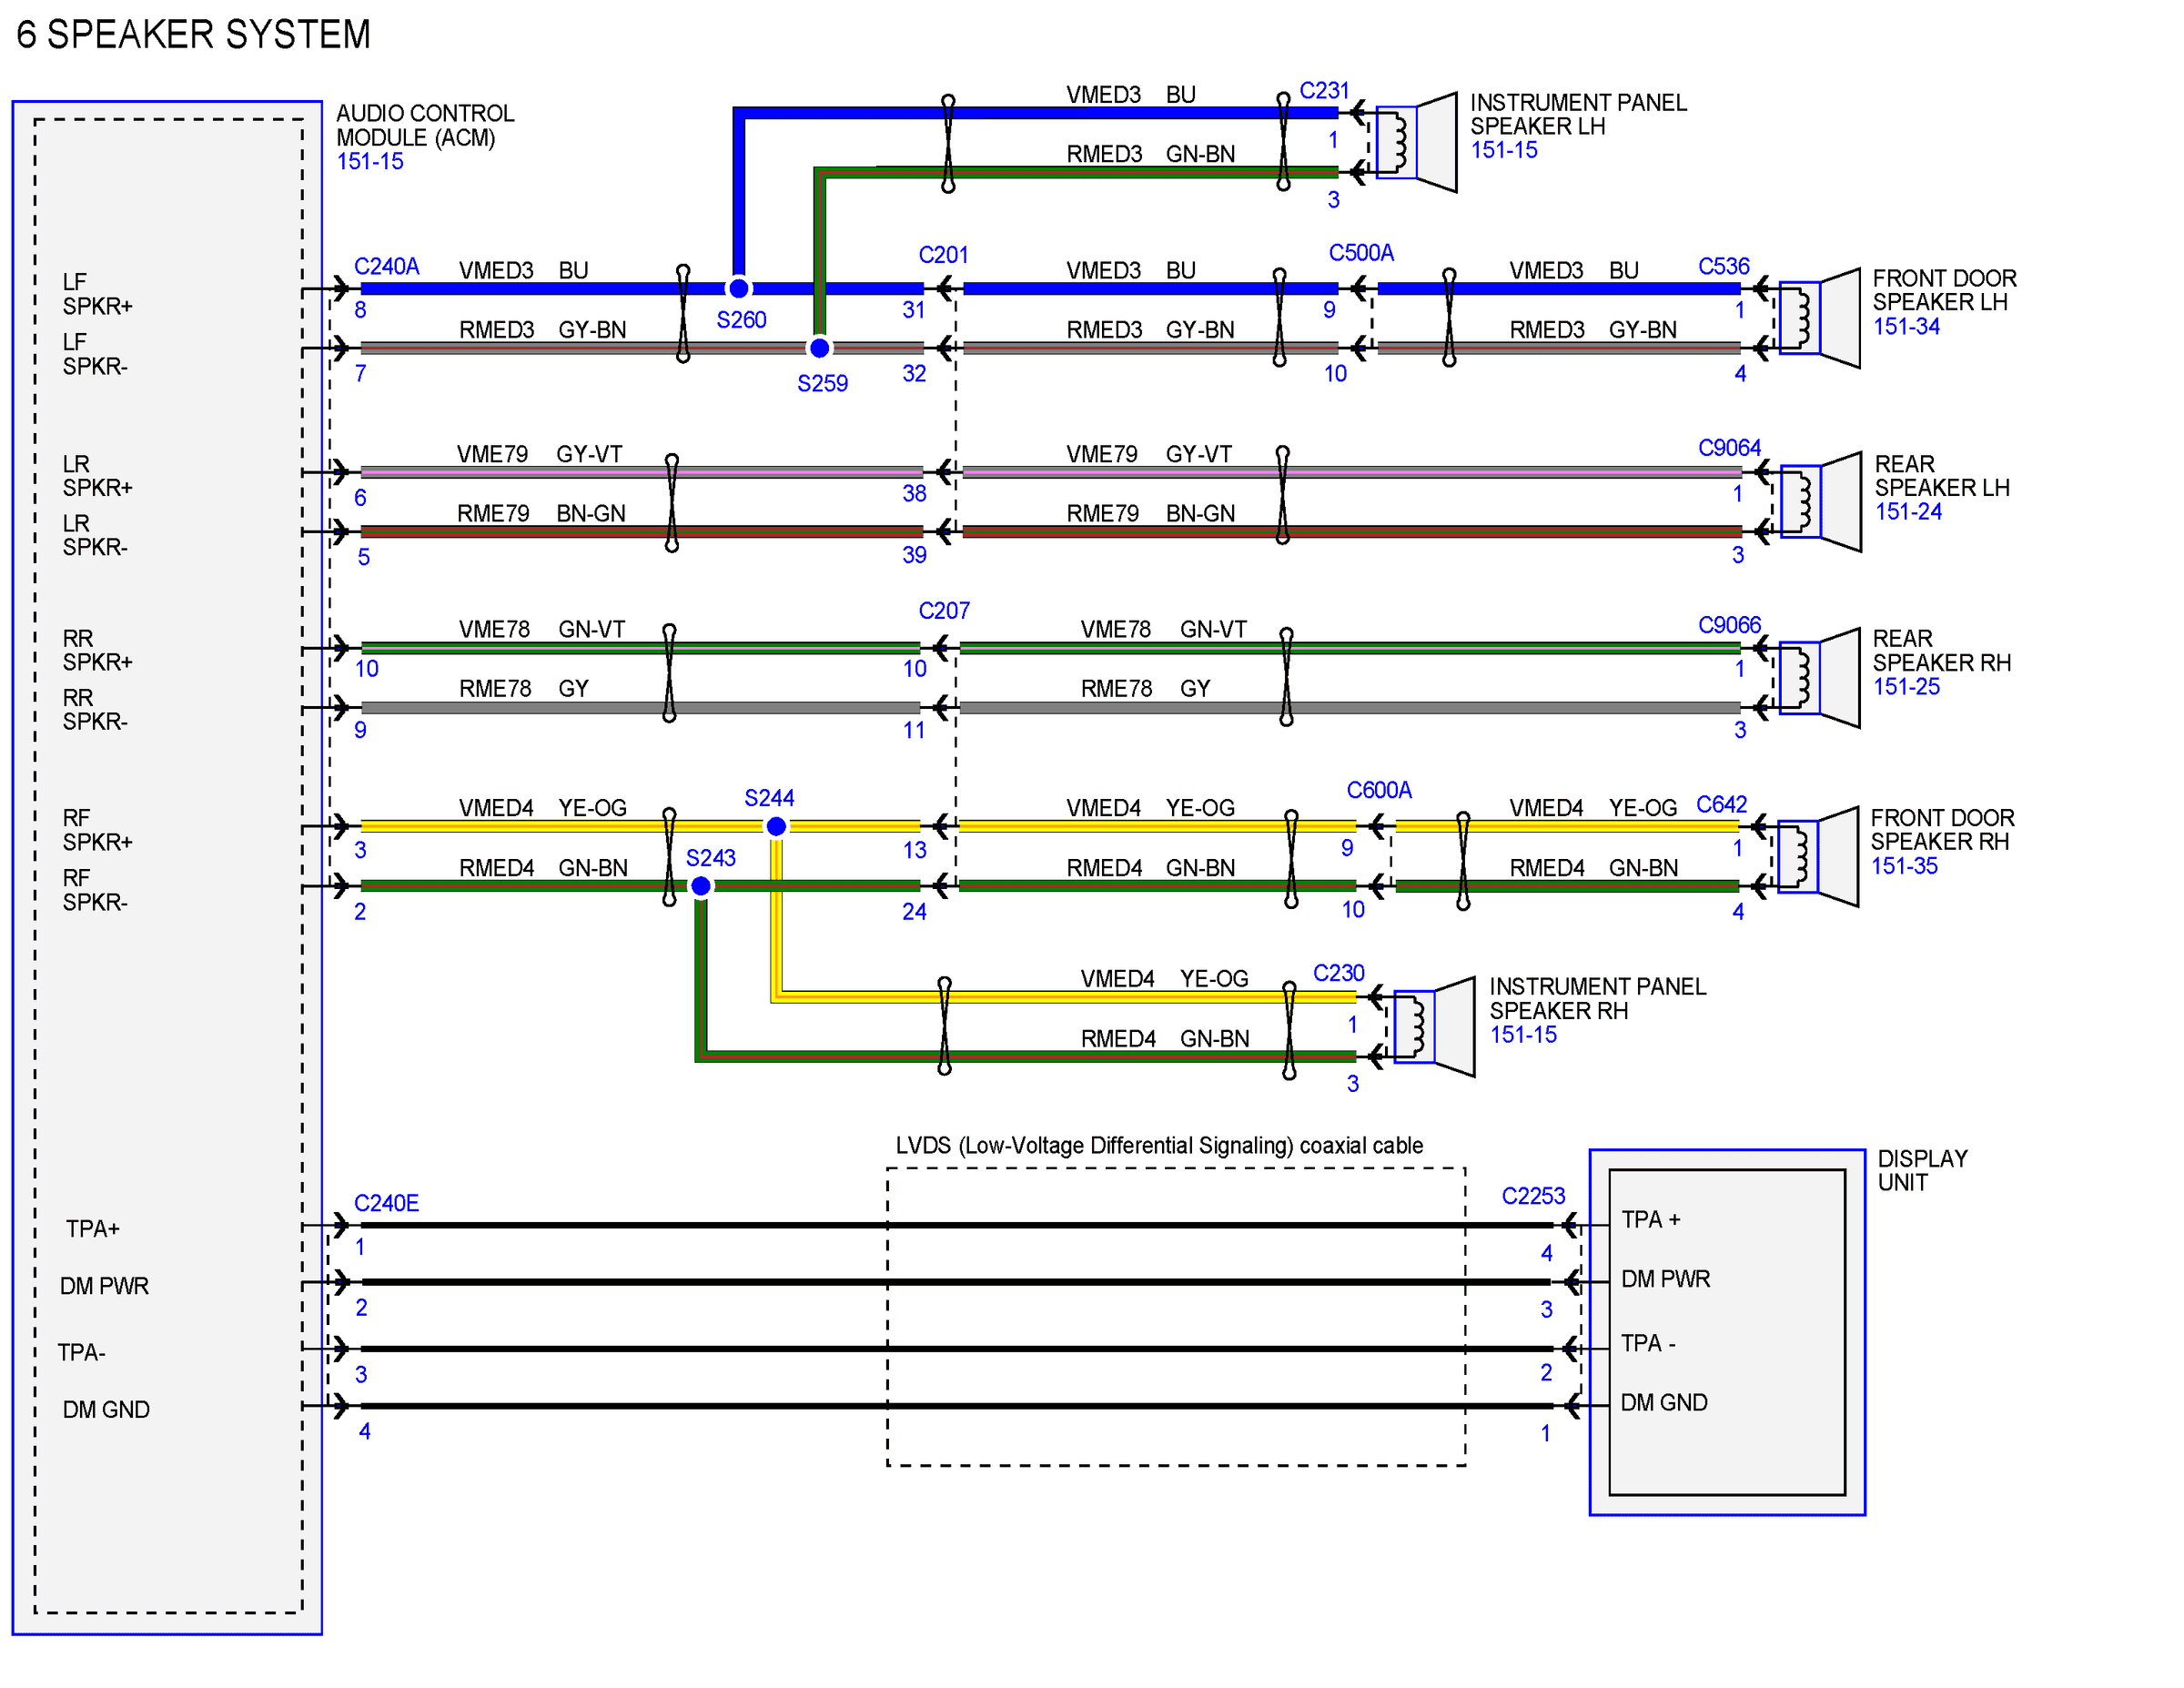
Stealing this from another poster in another thread, but here’s the speaker wiring diagram (posting here so it’s in this thread):
Sponsored
Thanks for the detailed write up. Every bit of information helps. I've managed to break one tab on the front dash left side trim piece, so maybe with all the information here and YouTube, I'll be spared any more tabs breaking off. Thanks again.I just finished installing new rear speakers today in my XLT. I went with the Kicker 43DSC404 4-Inch 4 Ohm Coaxial Car Speakers (currently $54). I had ordered the Crutchfield Bass Blockers but decided not to use them, didn't notice any difference with an A/B test.
Some observations:
I removed and installed everything without breaking any tabs - that was my biggest worry going in...
Removing the large trim pieces was the hardest part. The YouTube video was a very helpful guide (search YouTube "Ford Maverick rear speaker removal") - although I didn't yank on the pieces wildly like the guy in the video (!). I just took my time and used a flashlight to look behind as I was removing them, I used a very large flathead screwdriver to help pry away clips that were the farthest from me.
Regarding the trim pieces that hold the speakers - after removing the 7mm bolt at the bottom (no need for a power drill, a small socket wrench worked perfectly), I was not able to release the upper clips by trying to lift them upward, nor was I able to reach in by hand to lift them up the 1/2" or so they needed to go up.
So I found this "tool" laying in my garage:
![]()
A backscratcher about 20" in length. A similar size piece of wood would probably work just as well. The wide end fit nicely underneath the tabs. I first aligned the scratcher under the tab closest to me, and from the bottom I tapped it upward a few times with a rubber mallet. Viola! The clip popped up and outward. This allowed me more room to access the 2nd clip across from the first. Same method, fed the tool behind and under the tab, and tapped it with the hammer and it popped right off, releasing the entire trim piece/speaker.
Note that the speaker wire harness is attached to the vehicle body with a plastic clip that plugs into a round hole. Mine had popped out when I released the trim piece but was easy to re-insert when reassembling.
The new speakers easily installed with the existing screws, although I had to carefully center the speaker as its tabs were a little wider than the factory hole locations. In hindsight I could have added a washer, but they still installed securely.
Re-installing the trim piece/speaker was much easier than the removal. I aligned the trim via the upper tabs, pushed inward, and then downward a little and it snapped right in place at the top and bottom. Installed and tightened the lower 7mm nut and all was done for that portion.
Re-installing the large trim piece (the large one below the white speaker trim piece) was somewhat challenging to get everything lined up, but I just took my time and eventually was able to position it in place. The passenger side equivalent piece was much easier. Note - no need to completely remove these pieces when disassembling them, just move them out far enough away so that you can access the upper speaker trim pieces.
When finishing installing all the trim pieces, make sure that the rubber seal is brought out in front of the trim - this is easily done by hand.
RESULT: I am extremely pleased with the difference in sound, a very noticeable improvement and worth all the hassle of the installation. For now, I am going to leave the stock door speakers as is, I'm very pleased with the overall sound.
One more tip: Get the Ford Bronco speaker adaptors (!!). They fit perfectly into the factory harness and take any guesswork out of getting the +/- terminals reversed. I did have to crimp the ends that attach to the speakers a little tighter to make them fit more snugly. I did this while they were attached to the speaker.
Thanks for the detailed procedure, this one had me concerned a bit.I just finished installing new rear speakers today in my XLT. I went with the Kicker 43DSC404 4-Inch 4 Ohm Coaxial Car Speakers (currently $54). I had ordered the Crutchfield Bass Blockers but decided not to use them, didn't notice any difference with an A/B test.
Are you making your own harnesses?Today was supposed to be productive but my solder gun broke after 1 set of wires.
I got the diy harness and will be running all new wire for speakers from the amps.Are you making your own harnesses?
I emailed Gus, thanks!I can confirm the guy on the bronco forum ,his name is Gus [email protected] HoelAuto ,he builds harnesses he has all the diagrams I bought it for $15 thru pay pal delivered ,Really nice guy ,his harness is a plug and play (also works for the front tweeters I believe ) He confirmed polarity also : I checked the diagrams and (+) and (-) are the same as they are on the bronco. So white is (+), black is (-)
Ah, I see that from the other thread! I think I’ll go that route as well. Both places told me about a month for the full harnesses. Any luck with the solder gun?I got the diy harness and will be running all new wire for speakers from the amps.
Ordered a new one but going to see Jeff Dunham tomorrow so my time will be limited. Hoping most of it will be done by next weekend. I will drive another vehicle while its in pieces.Ah, I see that from the other thread! I think I’ll go that route as well. Both places told me about a month for the full harnesses. Any luck with the solder gun?
I'm working on my harness now, and before I tesa tape everything up, I thought I'd ask if anyone else on the forum has bi-amped the fronts and later thought they needed to add an amp to the rears.I have some speakers on the way (Polk dB 402's) and will do this soon. I debated on adding a small 2-channel amp for rear fill, but I decided to try a speaker with high sensitivity (Polks are 90 dB). The Polks also have really nice soft-dome tweeters, which I'm a fan.
I had the Bronco adapters in my cart the other day, but I decided to splice, solder, and shrink-wrap as I doubt I'll ever have these panels off again.
I certainly get that. And if I were using an aftermarket headunit, I would certainly do it as I've done traditionally. One of the test I did when playing around with the bare harness was to play the rear speaker output to the front just to check out the output range (by ear as I don't have an RTA). It seems the output is pretty EQ-limited and would benefit greatly from summing the channels and optimizing for the installed speaker. You may be planning this with the amps you're installing, but I've started down this Key path already.Its all about what your ears like. I want everything balanced so i am amping mine.