- Thread starter
- #1
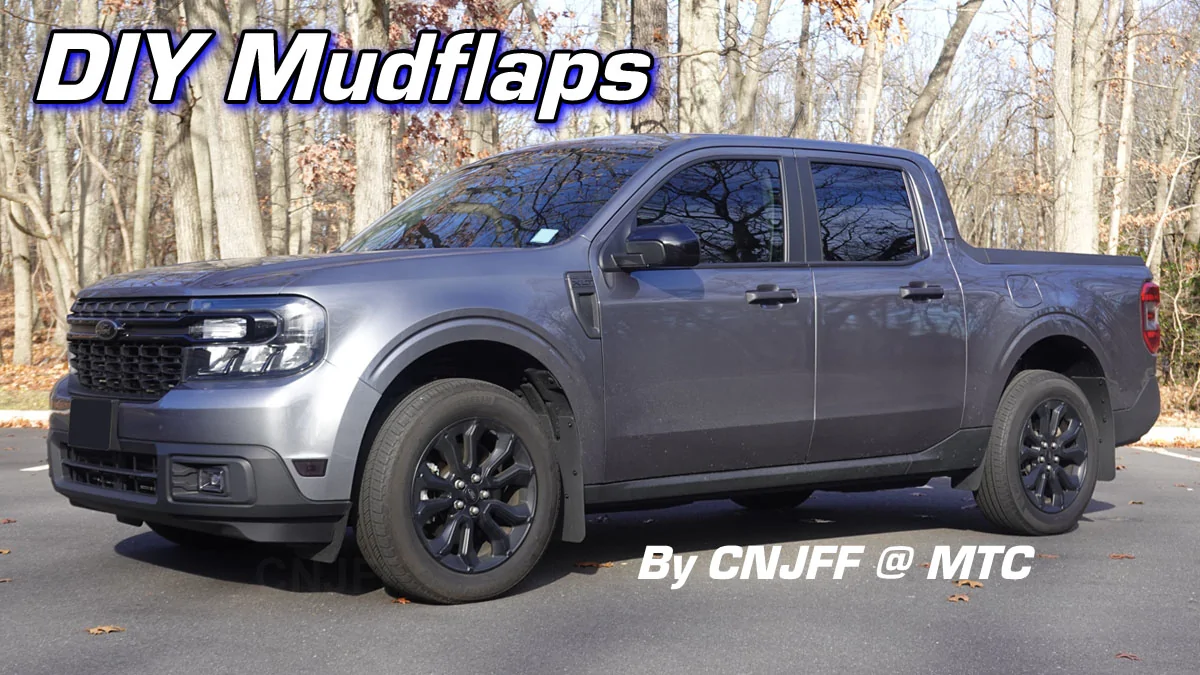
I wanted a little more protection underneath from debris being kicked up from the tires so I decided to look at mud flaps/splash guards. However, none of the existing brands appealed to me. The look was "off". I had seen other posts with custom mud flaps so gave it a shot. Here's what I came up with. Part guide and part walkthrough of my build.
Research and Prototyping
First thing was to look at the existing brands to see where and how they mount. Most use the same fastener/bolt locations in the fenders. The plastic fasteners are replaced with bolts and U-nuts. Existing brands then have you install brackets to help support the inner sides where needed.
Version 1
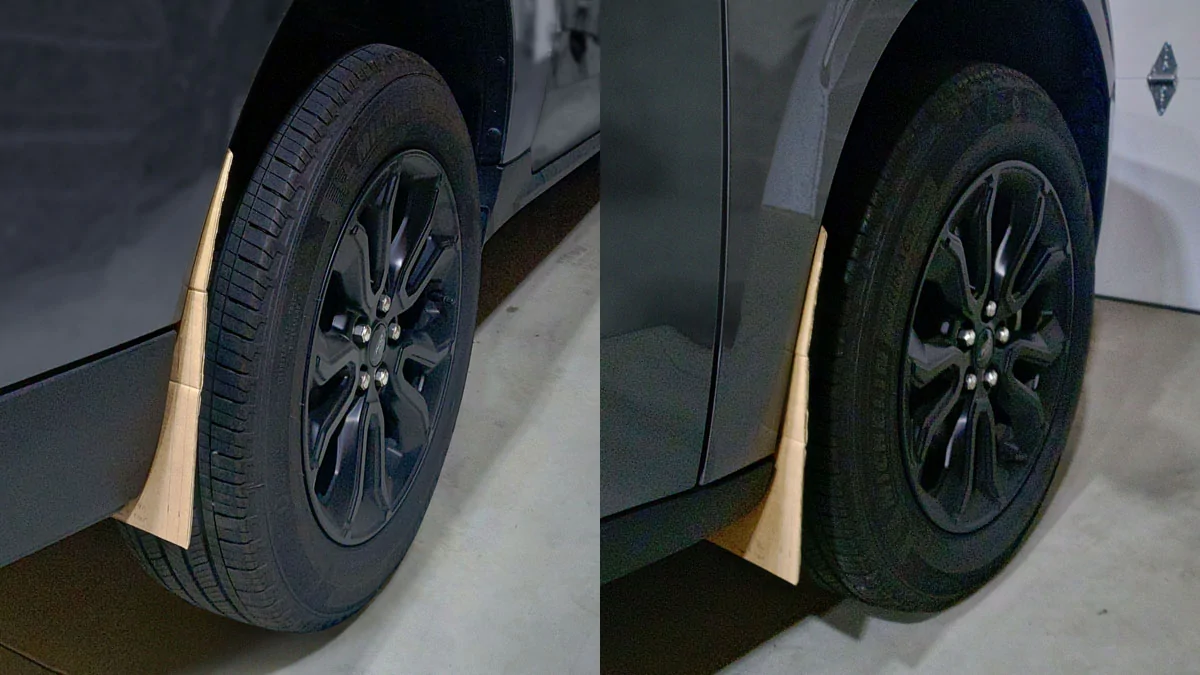
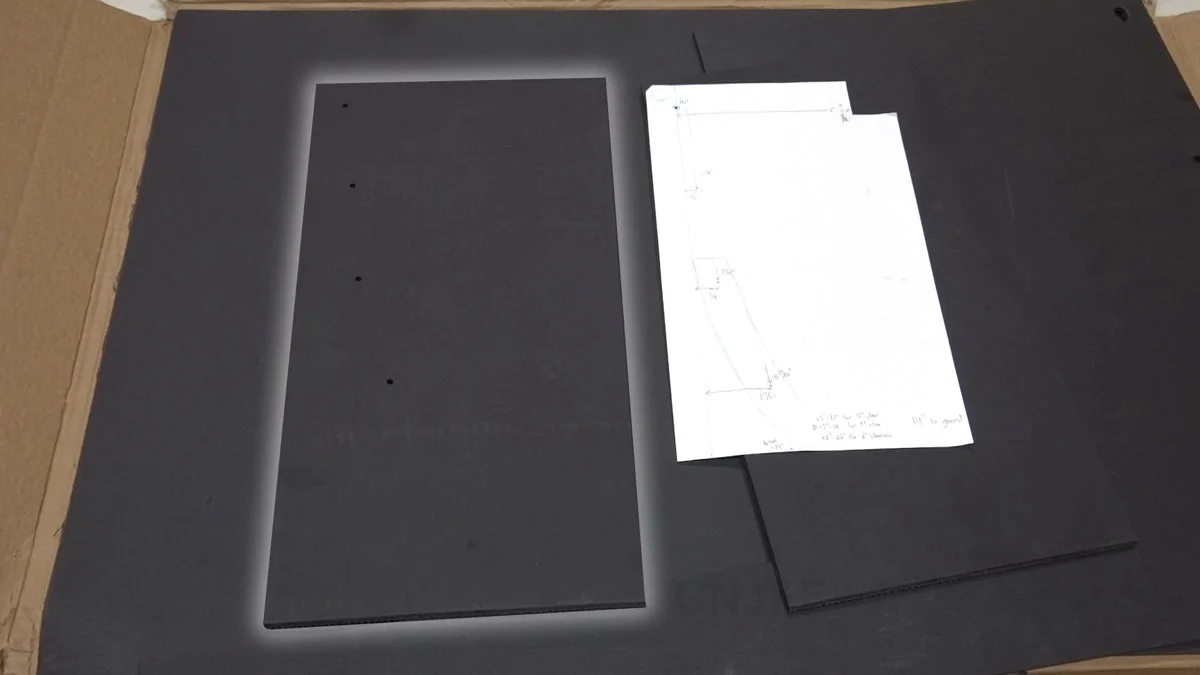
I wasn't entirely sure what I wanted so I cut up a cardboard box and made a basic shape to mess around with. Some initial measurements gave me a piece 10" wide and 14" tall to start. A 1"x1" corner was cut off to designate the top outer edge which most mud flaps have as a transition into the fender. I also made a couple 1/2" vertical lines so I could "step" the piece in and out to see what distance I liked.
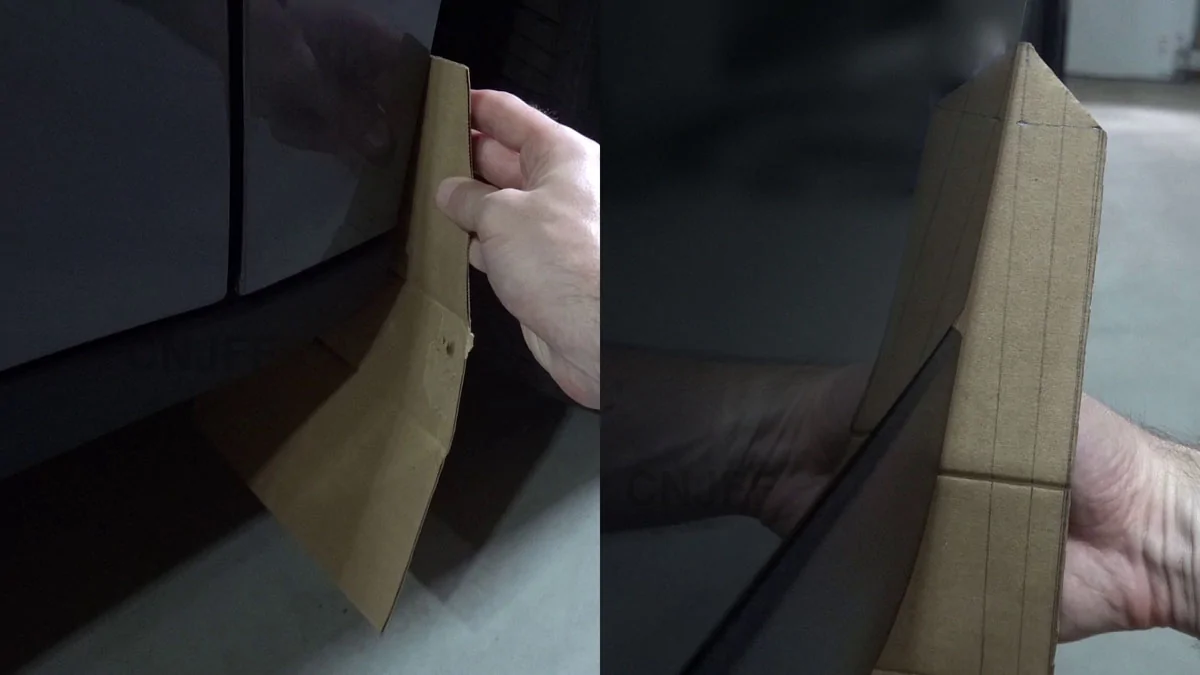
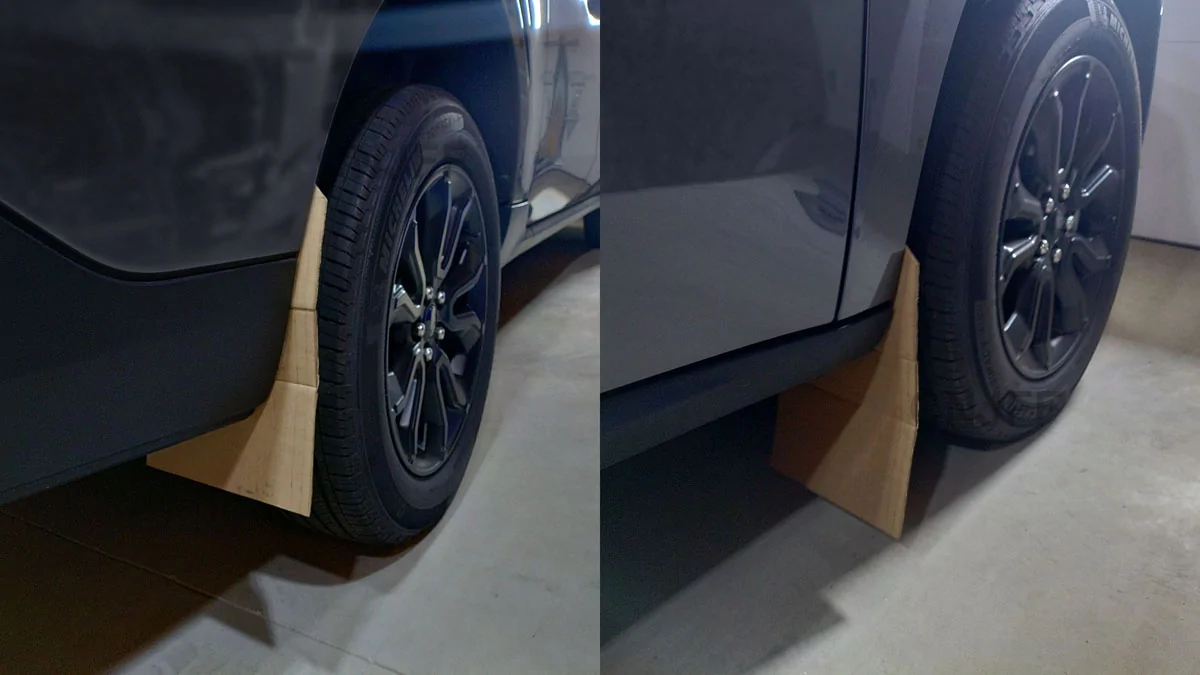
When I found a location that worked, I measured out where to place the top mounting hole. The first iteration had the mounting hole 1" down and 1.5" inward. This created a good border around the mount with the mud flap sticking out 1/2" on the rear. I mounted the cardboard and wedged it flat against the fender to get a better look.
For anyone that's looked at their front fenders, you know they are not flat. There are ridges that act as support. These are then covered by the fender lining which also has the ridges. These were sketched onto the cardboard to give an idea of where they were and get some basic measurements. I went through many different thoughts on how to get around them. More on that later in Version 2.
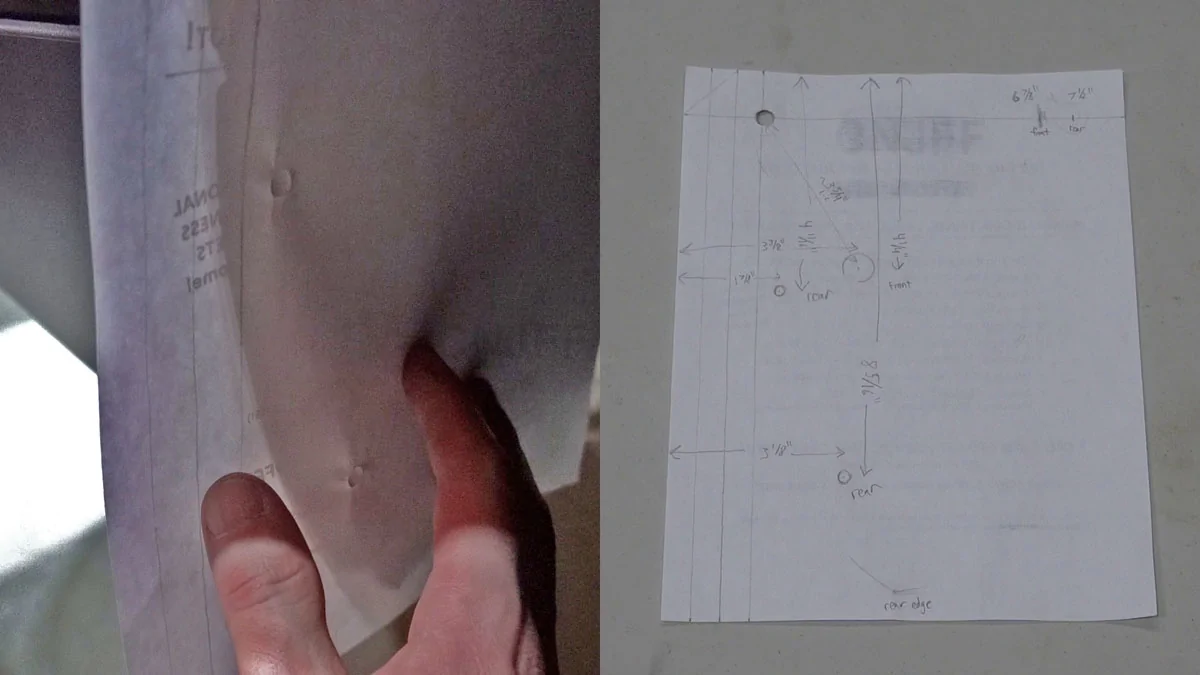
Once the location was confirmed and basic measurements were taken, the cardboard was replaced with regular copy paper. The same corner cut and top mounting hole were made. The paper piece was mounted and held as level & flat as possible against the fender. Then I used a finger to push against the other mounting fasteners/bolts to imprint them into the paper. Measurements were taken and transferred to the cardboard to confirm.
With the mounting locations chosen, the last dimension to pick is the height or distance from the mud flap to the ground. This is a matter of preference. The clearance under the front fenders (rear side, from the underside of the truck) is ~11" near the outside, the rears are ~14". I initially was going to make the mud flaps hang 3" below the truck but dropped down to 5". This gave 6" clearance for the front and 9" for the rear. Plenty for tall curbs or other objects I may back up to.
Version 2
While I initially made prototypes that mimicked the existing brands with minor changes, it still didn't look right and had some disadvantages. I made a second version that went to the next higher fastener in the fender. First, this let me "blend" the mud flap into the fender while keeping it outward enough to still cover the tire treads. This look had me nodding my head with approval. Second, it covered a more flat portion of the inner front fender which provided a place for a new fastener. Third is similar for the rear fenders. It brought the driver side up over a nice flat spot above the open "gap" on that side.
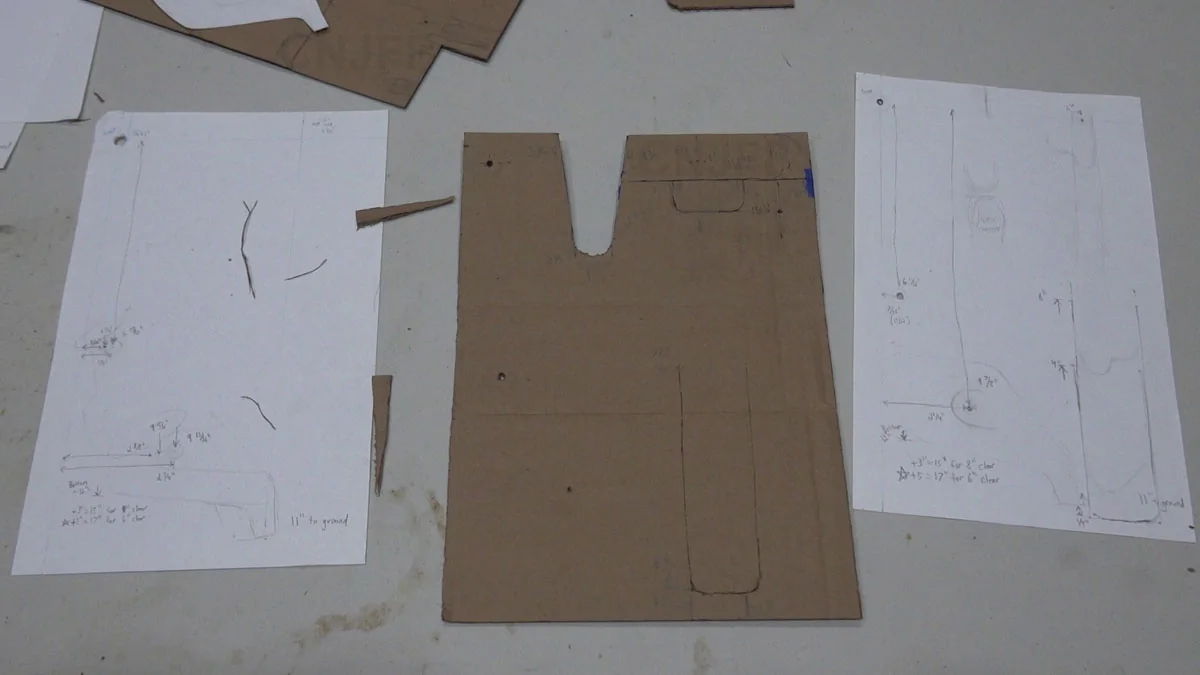
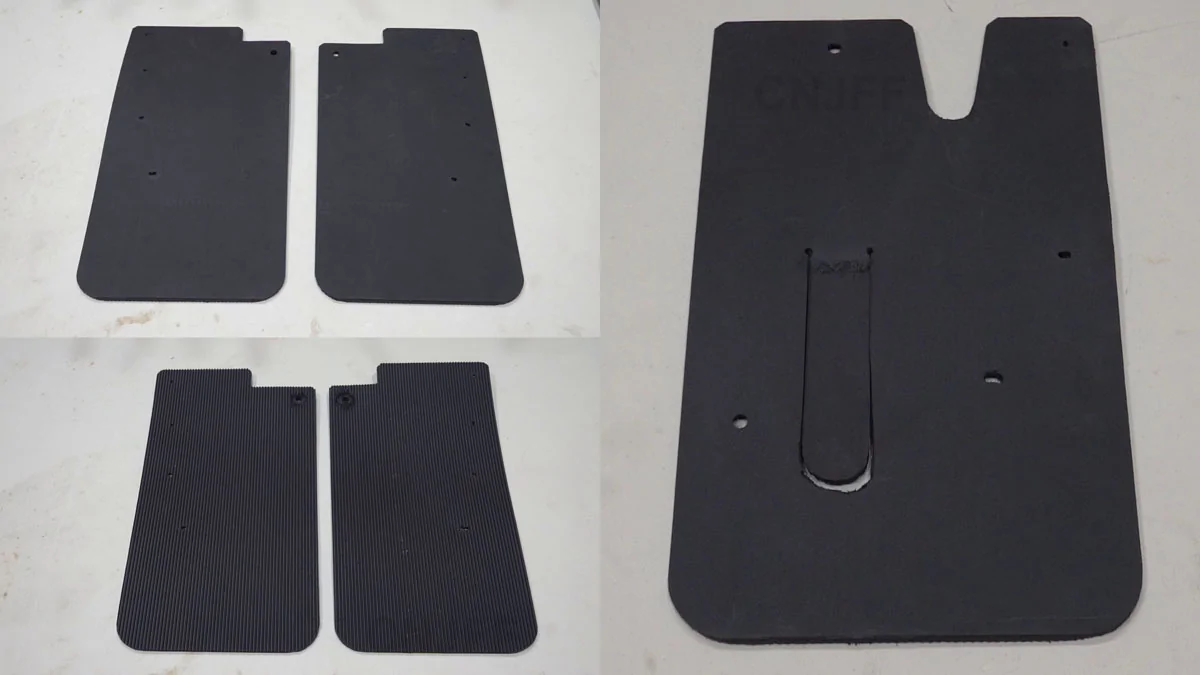
As for the ridges in the front fenders, I went back and forth between paper and cardboard sketching where the ridges were and where to cut the mud flap to get around them while still covering as much area as possible. I ended up with a cutout at the top and another in the middle (lower fender). With my goal of coverage I made the lower cut into a "flap" that draped over the ridge. In hindsight this was probably a waste of time. Cutting out the whole piece wouldn't sacrifice much as water/debris is still getting kicked up under it. With better tools the areas over the ridges could be molded around but that's for the future.
The paper template was finalized although I will note some minor things changed or were added afterwards for my build. Notably inner fastener locations were drilled out during the last test fit once everything else was finalized. The cutouts for the front ridges also had to be modified to fit better.
Spacers
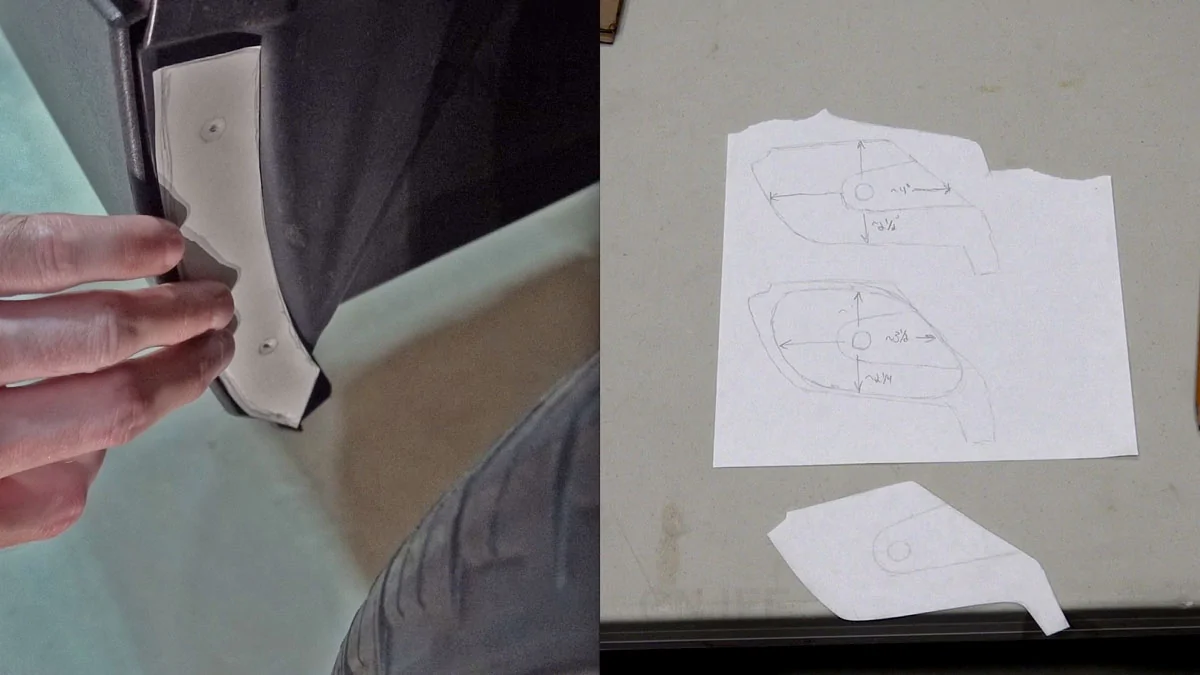
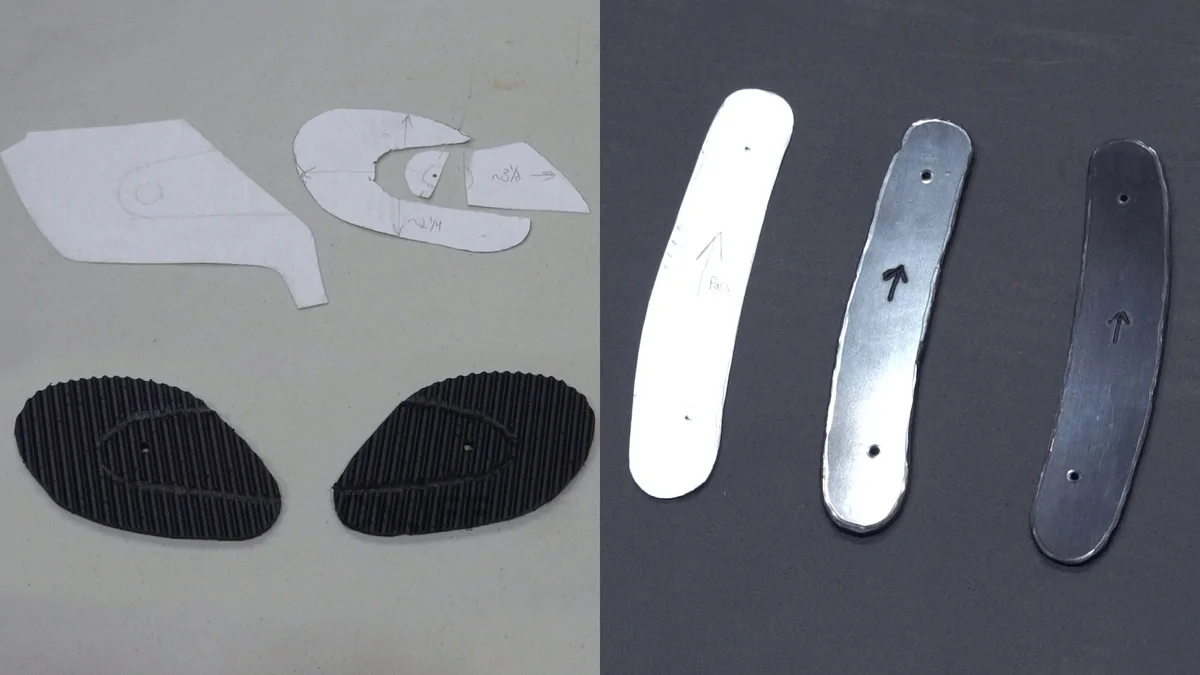
One final thing to figure out was the gaps at the bottom outside edges of the fenders. The rear fenders have an inset area in the lower plastic where the stock bolts are located. Existing brands give you washers to keep the mud flaps flush or off the paint. The rears are inset 1/8" and the fronts ~1/4". Again, I used paper pressed against the fenders to sketch out the sizes and mounting holes.
Building the Mud Flaps
With the design chosen, it was time to start making them a reality. I had some plastic truck mud flaps laying around that were rescued from roadways but they were very stiff and didn't look great. I wanted flexible rubber and some had grooves to move water spray down instead of outward. Shopping around at options, I went with 24"x36"x1/4", grooved, poly-rubber blank mud flaps. Longer fender bolts were ordered since I was adding an extra 1/4" of material.
Items
The following items were bought for the project. Buy as much - or substitute - as needed:
- 1/4" mud flap blanks (https://usaflap.com/product/polyrubber-mud-flap-blanks/)
- 1/8" black ABS plastic sheet (https://www.amazon.com/dp/B0C53GFCMT)
- 1/4" material of your choice
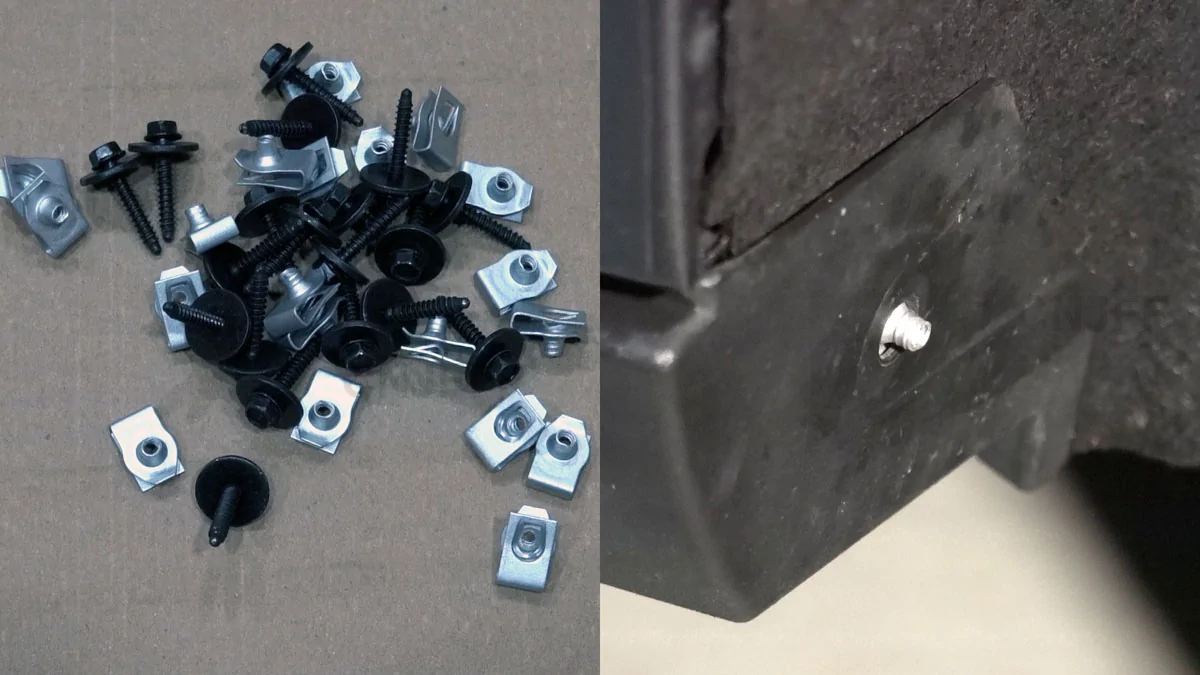
- M4.2x1.41x25 fender bolts and U-nuts (https://www.amazon.com/dp/B0CJ48C16S)
Tools
The following tools are needed or recommended:
- Pry tool or small flathead screwdriver
- 7mm socket
- Drill + 3/16" and 5/16" drill bits
- 1" spade drill bit
- Utility knife or saw blade
- Hot knife/flat edge
Fabrication
I would suggest to start by making the spacers. This way they are ready when you test fit the mud flaps. I made the rears from 1/8" ABS plastic and the fronts from leftover 1/4" mud flap material. The fronts can be thinner, as long as it clears the paint. The front section only has one fastener so by using the mud flap material I could cut grooves that fit the plastic molding inset to help it stay in place. I chose to round-off the spacers for easier fitment. They are hidden from view anyway so do not need to be perfect.
Cut the overall shape of the mud flaps from the blanks. Then use the paper templates to mark out the holes and other cutouts. Drill/cut as necessary. Since I was using the top fastener as the anchor point, I made the lower holes a little wider to allow leveling adjustment later. I suggest leaving the corner cuts until later so it's easier to level everything first.
Installation
Now it's time to put everything together.
Mounting Hardware
Install the U-nuts. The rears are straightforward. Slide the U-nuts onto the sheet metal openings for the upper fasteners. The lowers stay the same.
The front fenders are similar but the lowest mount needed some creativity since I was adding 1/2" of material. The simplest solution I found was to slit the fender liner above the existing hole and slip the U-nut in BUT with a catch. I put it in facing backwards so it stuck out towards the wheel. This ensured there was enough thread for the bolt to safely grab onto. Note the funnel shape of the nut means you need to be a little more precise when threading the bolt but it's not too difficult. The hardest part was pulling the fender liner out from behind the plastic trim. Removing a few of the rocker panel fasteners underneath helped loosen things up.
Test Fit
Install the mud flaps without tightening things. Check fitment of the mounting holes and level the mud flaps best you can. I was parked on a concrete floor and measured the inner and outer clearances to compare. Once acceptable, I had to drill the final holes for the inner fasteners. I left this for last primarily because the fronts were going to be mounted onto a flat portion of a ridge so it needed to be fairly precise.
Inner Fasteners
One last time I measured and marked the locations for the inner fasteners and pulled the mud flaps back off. Holes were drilled into the rubber and a 1" diameter of grooves around the holes were removed to make room for the fasteners to sit flush. For my build I used a knife to remove the grooves and a cheap soldering iron to smooth things out. A spade bit on a drill would have made it much cleaner.
The fronts were given an extra fastener location low on the inside to ensure the flaps would stay clear of the wheel when turned.
With the holes on the mud flaps complete, I reinstalled the them and used the new holes as guides to drill into the fender liners. I managed to squeeze the drill+bit in behind the wheels. Definitely more convenient to pull them off. The fasteners removed from the truck were then reused at these locations. For the fronts, due to the ridge behind the liner, I had to use the shorter ones. The first install was tight but doable. A few casual pulls with no issues. You could use more bolts/U-nuts but the fasteners are much more convenient.
Final Install
Uninstall and/or modify as needed until you are happy with the result. Cut the corners if not done so already. I chose 1-1/2" radius for the bottoms and snipped a 1/4" x 1/4" diagonal on the tops. You may wish to give everything a good cleaning before final install and touch up the bolt heads with some paint.
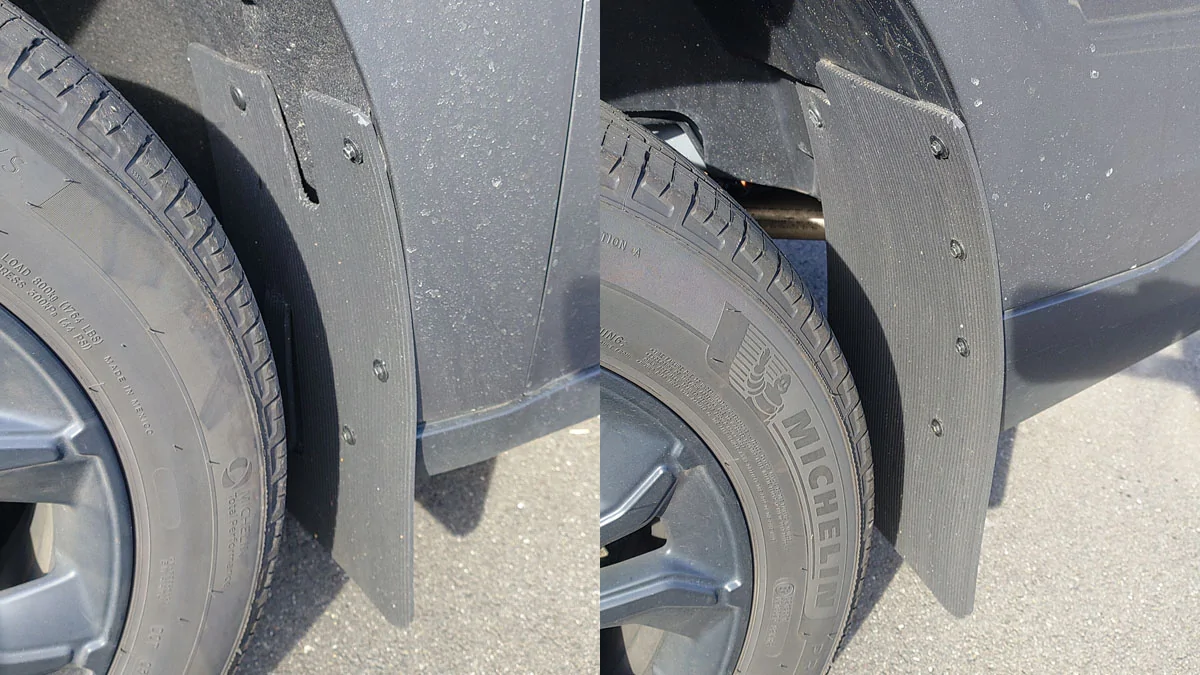
After some winter weather the results were checked. Still plenty of dirt on the sides but again I simply wanted to cut down on some of the debris up into the underside. I liked the "streamlined" look of the flaps coming down from the fenders and not sticking out.
Closing
This is a simplified version of the process. I went through a few different styles for the cardboard versions before settling on my final choice. The mud flaps themselves were on and off numerous times as I tweaked things - especially the fronts. The lower cutouts for the front fenders may be removed outright in the future but so far no issues. I may also trim the upper corners a little more or round them off to match the lowers. If I were to build these again I might scale the flaps down another inch just for a little more coverage.
Hopefully you find this useful for your own build!
Research and Prototyping
First thing was to look at the existing brands to see where and how they mount. Most use the same fastener/bolt locations in the fenders. The plastic fasteners are replaced with bolts and U-nuts. Existing brands then have you install brackets to help support the inner sides where needed.
Version 1
I wasn't entirely sure what I wanted so I cut up a cardboard box and made a basic shape to mess around with. Some initial measurements gave me a piece 10" wide and 14" tall to start. A 1"x1" corner was cut off to designate the top outer edge which most mud flaps have as a transition into the fender. I also made a couple 1/2" vertical lines so I could "step" the piece in and out to see what distance I liked.
When I found a location that worked, I measured out where to place the top mounting hole. The first iteration had the mounting hole 1" down and 1.5" inward. This created a good border around the mount with the mud flap sticking out 1/2" on the rear. I mounted the cardboard and wedged it flat against the fender to get a better look.
For anyone that's looked at their front fenders, you know they are not flat. There are ridges that act as support. These are then covered by the fender lining which also has the ridges. These were sketched onto the cardboard to give an idea of where they were and get some basic measurements. I went through many different thoughts on how to get around them. More on that later in Version 2.
Once the location was confirmed and basic measurements were taken, the cardboard was replaced with regular copy paper. The same corner cut and top mounting hole were made. The paper piece was mounted and held as level & flat as possible against the fender. Then I used a finger to push against the other mounting fasteners/bolts to imprint them into the paper. Measurements were taken and transferred to the cardboard to confirm.
With the mounting locations chosen, the last dimension to pick is the height or distance from the mud flap to the ground. This is a matter of preference. The clearance under the front fenders (rear side, from the underside of the truck) is ~11" near the outside, the rears are ~14". I initially was going to make the mud flaps hang 3" below the truck but dropped down to 5". This gave 6" clearance for the front and 9" for the rear. Plenty for tall curbs or other objects I may back up to.
Version 2
While I initially made prototypes that mimicked the existing brands with minor changes, it still didn't look right and had some disadvantages. I made a second version that went to the next higher fastener in the fender. First, this let me "blend" the mud flap into the fender while keeping it outward enough to still cover the tire treads. This look had me nodding my head with approval. Second, it covered a more flat portion of the inner front fender which provided a place for a new fastener. Third is similar for the rear fenders. It brought the driver side up over a nice flat spot above the open "gap" on that side.
As for the ridges in the front fenders, I went back and forth between paper and cardboard sketching where the ridges were and where to cut the mud flap to get around them while still covering as much area as possible. I ended up with a cutout at the top and another in the middle (lower fender). With my goal of coverage I made the lower cut into a "flap" that draped over the ridge. In hindsight this was probably a waste of time. Cutting out the whole piece wouldn't sacrifice much as water/debris is still getting kicked up under it. With better tools the areas over the ridges could be molded around but that's for the future.
The paper template was finalized although I will note some minor things changed or were added afterwards for my build. Notably inner fastener locations were drilled out during the last test fit once everything else was finalized. The cutouts for the front ridges also had to be modified to fit better.
Spacers
One final thing to figure out was the gaps at the bottom outside edges of the fenders. The rear fenders have an inset area in the lower plastic where the stock bolts are located. Existing brands give you washers to keep the mud flaps flush or off the paint. The rears are inset 1/8" and the fronts ~1/4". Again, I used paper pressed against the fenders to sketch out the sizes and mounting holes.
Building the Mud Flaps
With the design chosen, it was time to start making them a reality. I had some plastic truck mud flaps laying around that were rescued from roadways but they were very stiff and didn't look great. I wanted flexible rubber and some had grooves to move water spray down instead of outward. Shopping around at options, I went with 24"x36"x1/4", grooved, poly-rubber blank mud flaps. Longer fender bolts were ordered since I was adding an extra 1/4" of material.
Items
The following items were bought for the project. Buy as much - or substitute - as needed:
- 1/4" mud flap blanks (https://usaflap.com/product/polyrubber-mud-flap-blanks/)
- 1/8" black ABS plastic sheet (https://www.amazon.com/dp/B0C53GFCMT)
- 1/4" material of your choice
- M4.2x1.41x25 fender bolts and U-nuts (https://www.amazon.com/dp/B0CJ48C16S)
Tools
The following tools are needed or recommended:
- Pry tool or small flathead screwdriver
- 7mm socket
- Drill + 3/16" and 5/16" drill bits
- 1" spade drill bit
- Utility knife or saw blade
- Hot knife/flat edge
Fabrication
I would suggest to start by making the spacers. This way they are ready when you test fit the mud flaps. I made the rears from 1/8" ABS plastic and the fronts from leftover 1/4" mud flap material. The fronts can be thinner, as long as it clears the paint. The front section only has one fastener so by using the mud flap material I could cut grooves that fit the plastic molding inset to help it stay in place. I chose to round-off the spacers for easier fitment. They are hidden from view anyway so do not need to be perfect.
Cut the overall shape of the mud flaps from the blanks. Then use the paper templates to mark out the holes and other cutouts. Drill/cut as necessary. Since I was using the top fastener as the anchor point, I made the lower holes a little wider to allow leveling adjustment later. I suggest leaving the corner cuts until later so it's easier to level everything first.
Installation
Now it's time to put everything together.
Mounting Hardware
Install the U-nuts. The rears are straightforward. Slide the U-nuts onto the sheet metal openings for the upper fasteners. The lowers stay the same.
The front fenders are similar but the lowest mount needed some creativity since I was adding 1/2" of material. The simplest solution I found was to slit the fender liner above the existing hole and slip the U-nut in BUT with a catch. I put it in facing backwards so it stuck out towards the wheel. This ensured there was enough thread for the bolt to safely grab onto. Note the funnel shape of the nut means you need to be a little more precise when threading the bolt but it's not too difficult. The hardest part was pulling the fender liner out from behind the plastic trim. Removing a few of the rocker panel fasteners underneath helped loosen things up.
Test Fit
Install the mud flaps without tightening things. Check fitment of the mounting holes and level the mud flaps best you can. I was parked on a concrete floor and measured the inner and outer clearances to compare. Once acceptable, I had to drill the final holes for the inner fasteners. I left this for last primarily because the fronts were going to be mounted onto a flat portion of a ridge so it needed to be fairly precise.
Inner Fasteners
One last time I measured and marked the locations for the inner fasteners and pulled the mud flaps back off. Holes were drilled into the rubber and a 1" diameter of grooves around the holes were removed to make room for the fasteners to sit flush. For my build I used a knife to remove the grooves and a cheap soldering iron to smooth things out. A spade bit on a drill would have made it much cleaner.
The fronts were given an extra fastener location low on the inside to ensure the flaps would stay clear of the wheel when turned.
With the holes on the mud flaps complete, I reinstalled the them and used the new holes as guides to drill into the fender liners. I managed to squeeze the drill+bit in behind the wheels. Definitely more convenient to pull them off. The fasteners removed from the truck were then reused at these locations. For the fronts, due to the ridge behind the liner, I had to use the shorter ones. The first install was tight but doable. A few casual pulls with no issues. You could use more bolts/U-nuts but the fasteners are much more convenient.
Final Install
Uninstall and/or modify as needed until you are happy with the result. Cut the corners if not done so already. I chose 1-1/2" radius for the bottoms and snipped a 1/4" x 1/4" diagonal on the tops. You may wish to give everything a good cleaning before final install and touch up the bolt heads with some paint.
After some winter weather the results were checked. Still plenty of dirt on the sides but again I simply wanted to cut down on some of the debris up into the underside. I liked the "streamlined" look of the flaps coming down from the fenders and not sticking out.
Closing
This is a simplified version of the process. I went through a few different styles for the cardboard versions before settling on my final choice. The mud flaps themselves were on and off numerous times as I tweaked things - especially the fronts. The lower cutouts for the front fenders may be removed outright in the future but so far no issues. I may also trim the upper corners a little more or round them off to match the lowers. If I were to build these again I might scale the flaps down another inch just for a little more coverage.
Hopefully you find this useful for your own build!
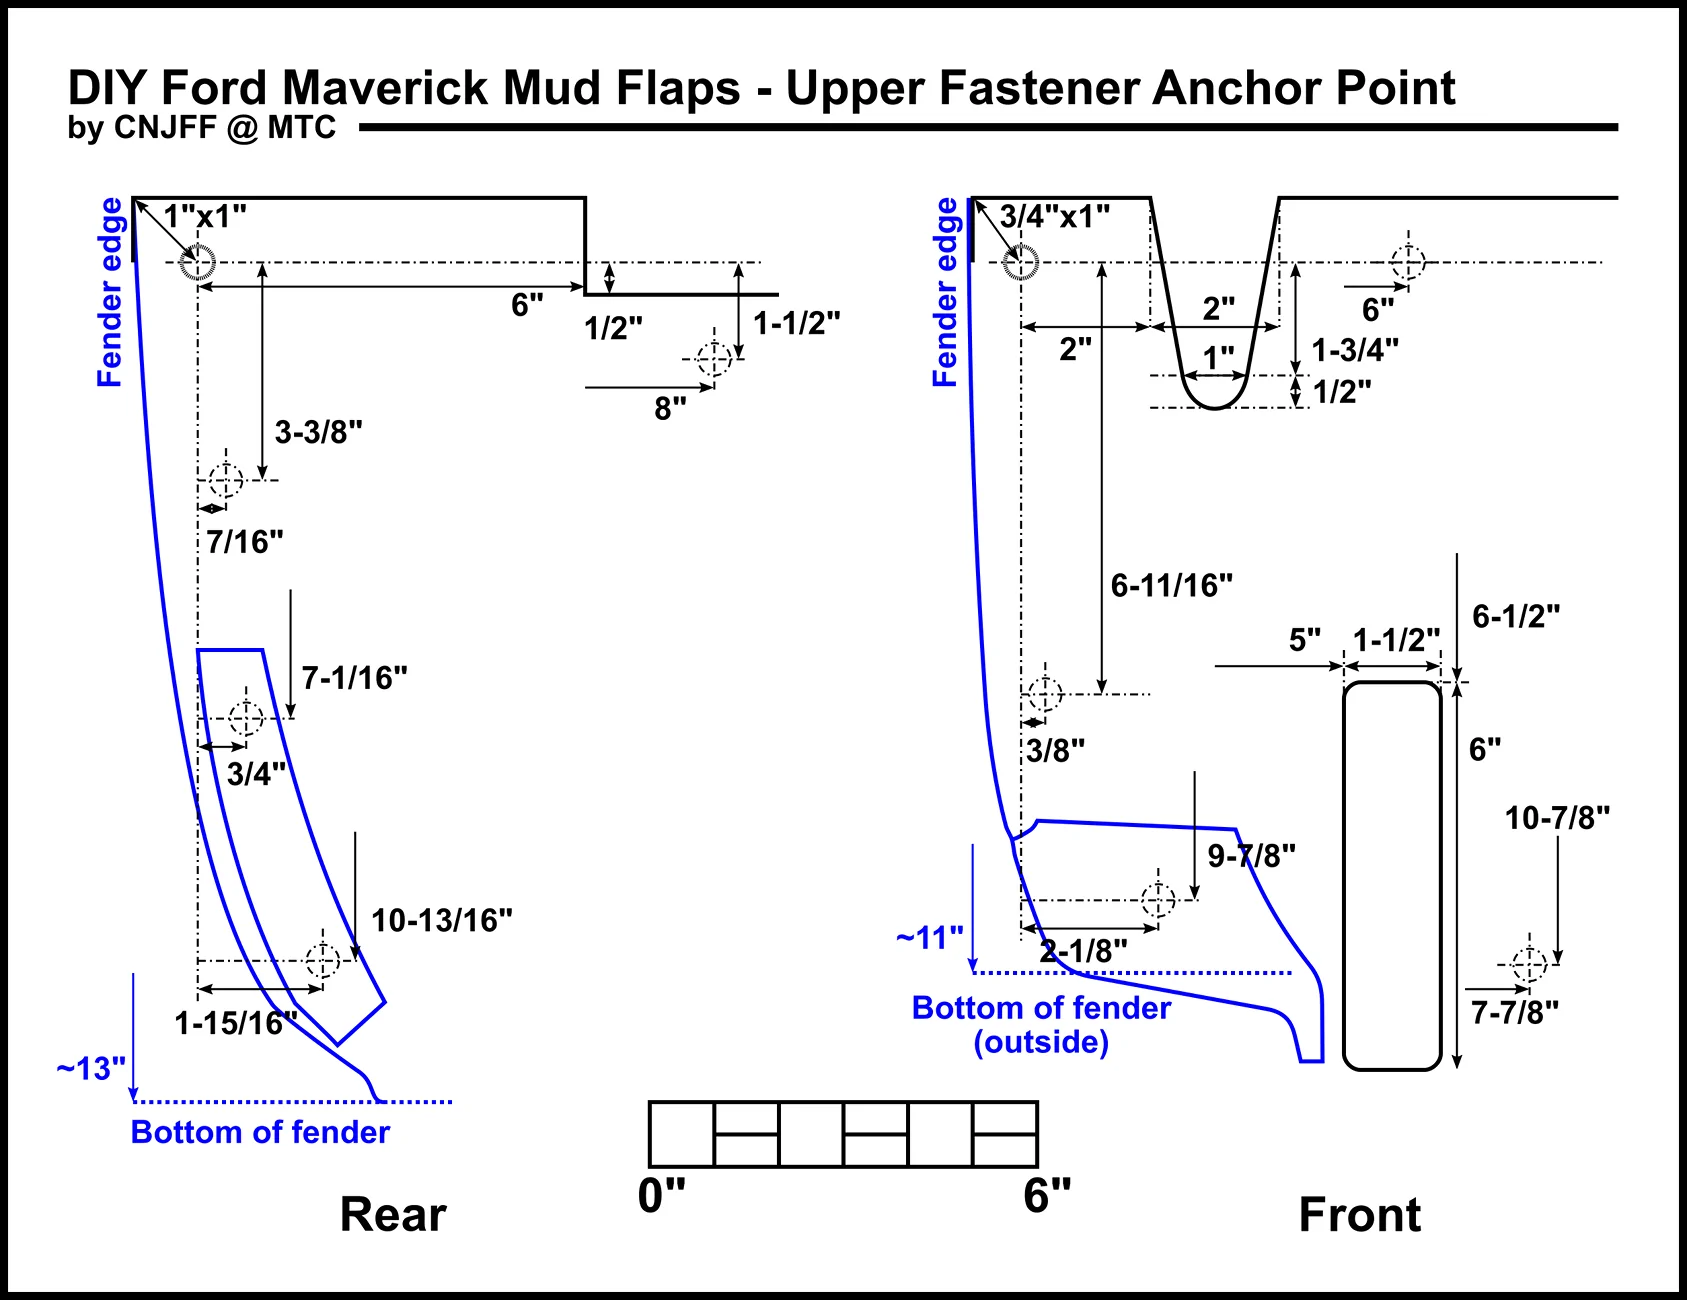
Below are templates based on my build showing the locations of the fasteners and obstacle avoidance. The measurements may be a little off as adjustments were made on the fly during installation. Widening the holes for the fasteners gives some wiggle room. The blue lines depicting the fender edges are approximate.
Sponsored


 ... well I am not, it's just I am overplanning so I don't cause more rust than I am stopping.