
- Thread starter
- #1
This guide provides the definitive step-by-step instructions for installing a dual battery and inverter system in your 2022 Ford Maverick XL (2.0L AWD). This post focuses exclusively on the base setup, covering the battery, inverter, and wiring. Separate posts will detail appliances and accessories.
Accessory Guide: https://www.mavericktruckclub.com/f...-dual-battery-inverter-accessory-guide.60801/
Introduction
Installing an auxiliary battery and inverter system in your Ford Maverick transforms it into a utility powerhouse, perfect for camping, work, or off-grid adventures. Follow this guide to replicate my proven setup, using exact components and wiring methods for reliable, efficient performance.
Components and Costs
Here’s the exact list of components I used for this setup, with links for purchase. Prices reflect what I paid and typical sale prices.
Components
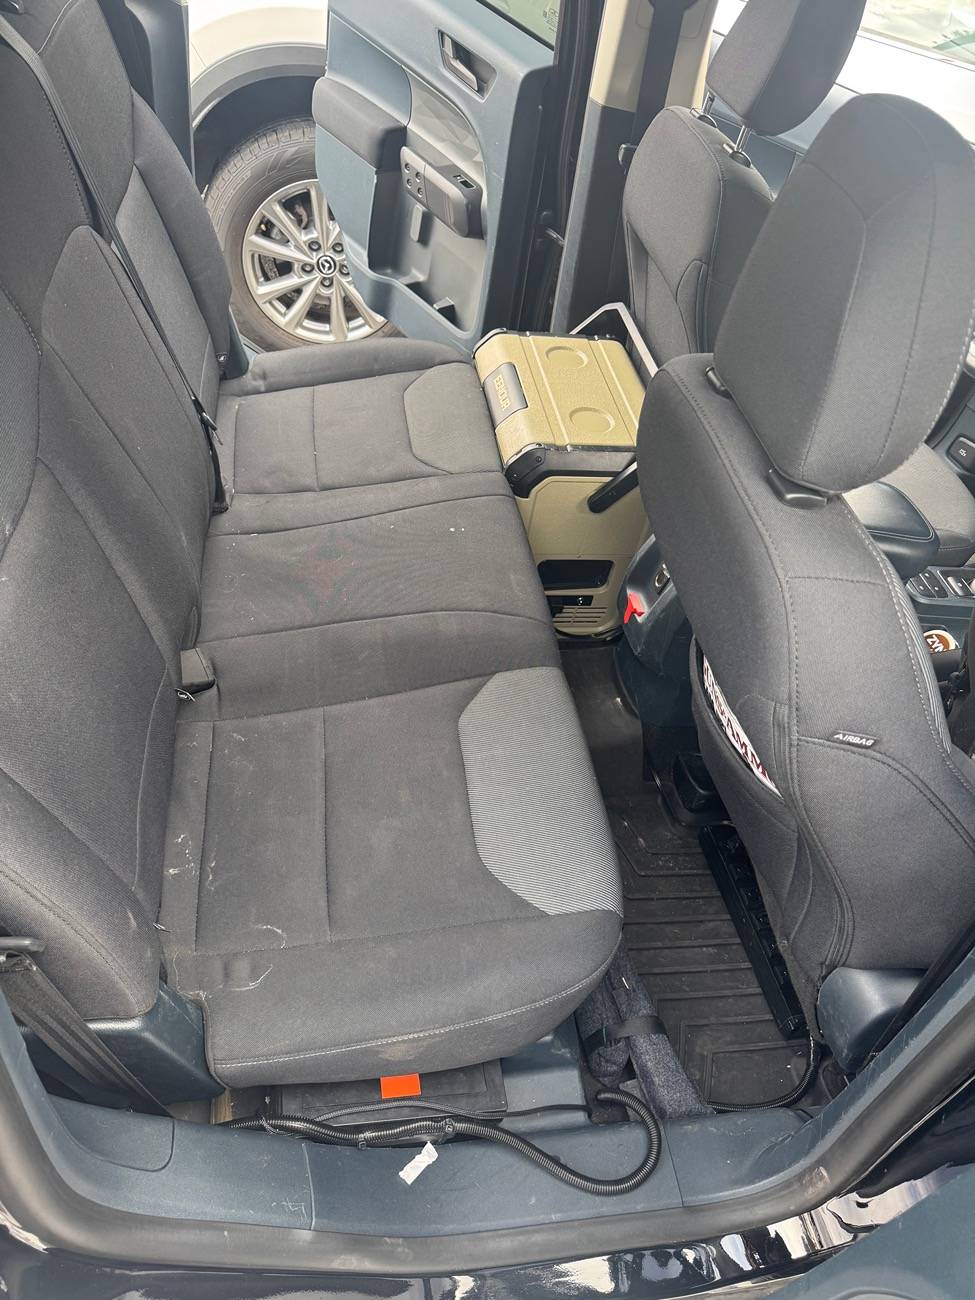
Step 1: Component Placement
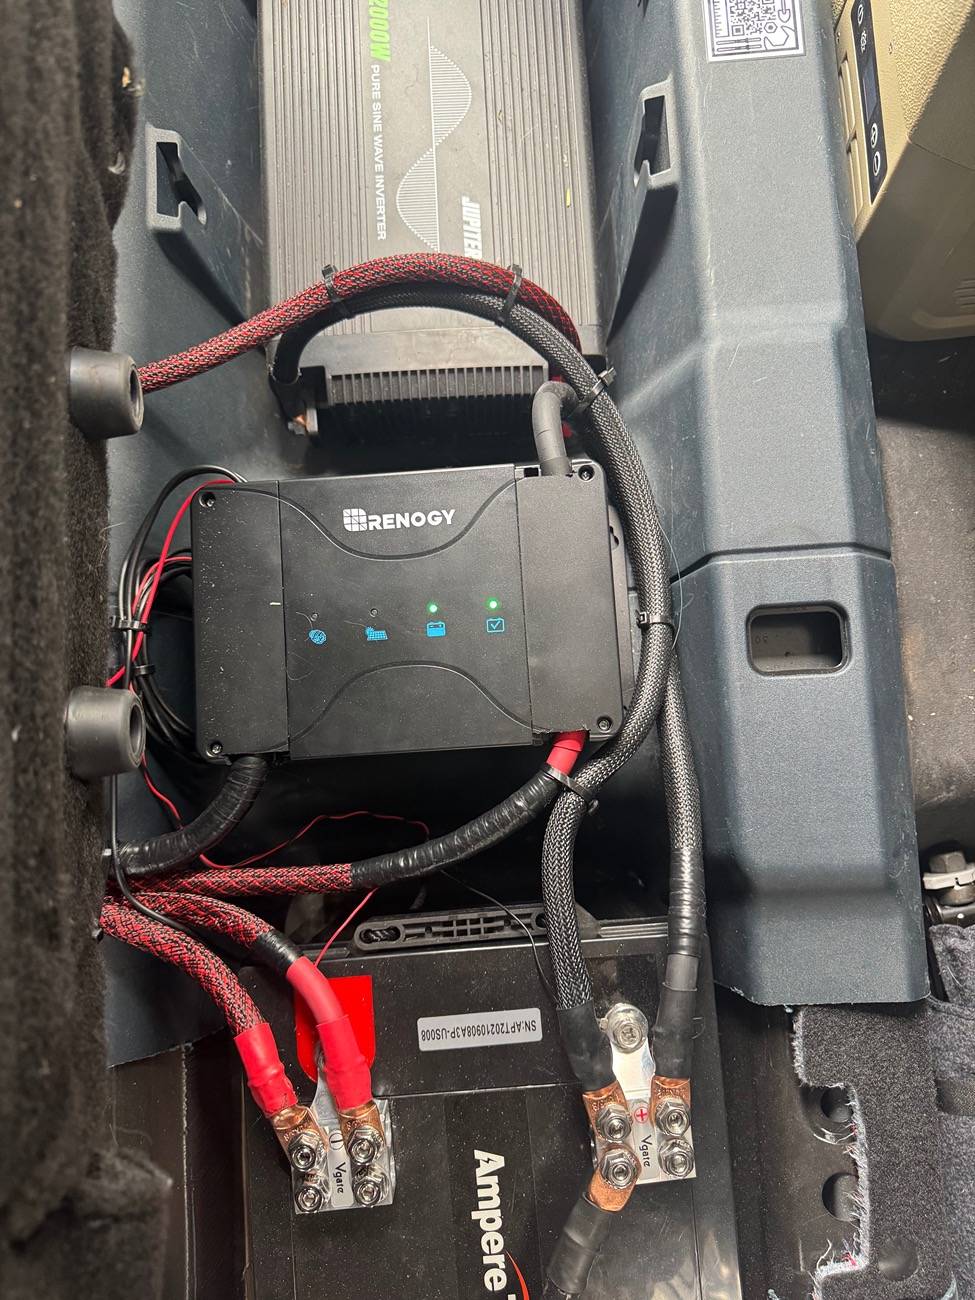
I placed all the components under the rear seat for a compact, clean setup:
Step 2: Mount the DC-to-DC Charger
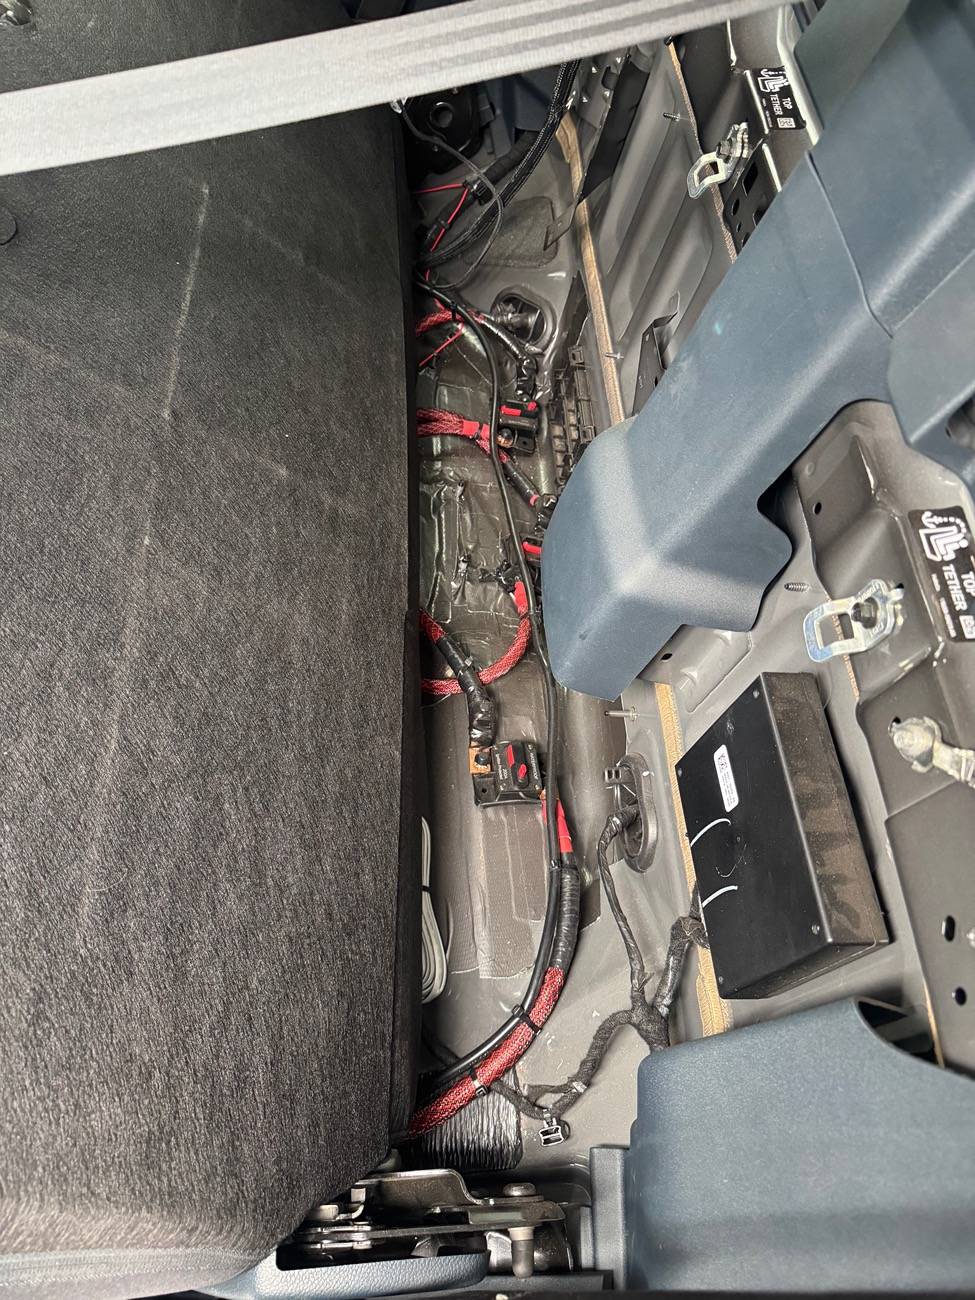
Step 3: Wire the System
Your wiring ensures all positive connections pass through a circuit breaker before continuing to the next component, and all negative connections connect in sequence, ultimately grounding to the frame via the auxiliary battery.
Starter Battery to DC-to-DC Charger
DC-to-DC Charger to Auxiliary Battery
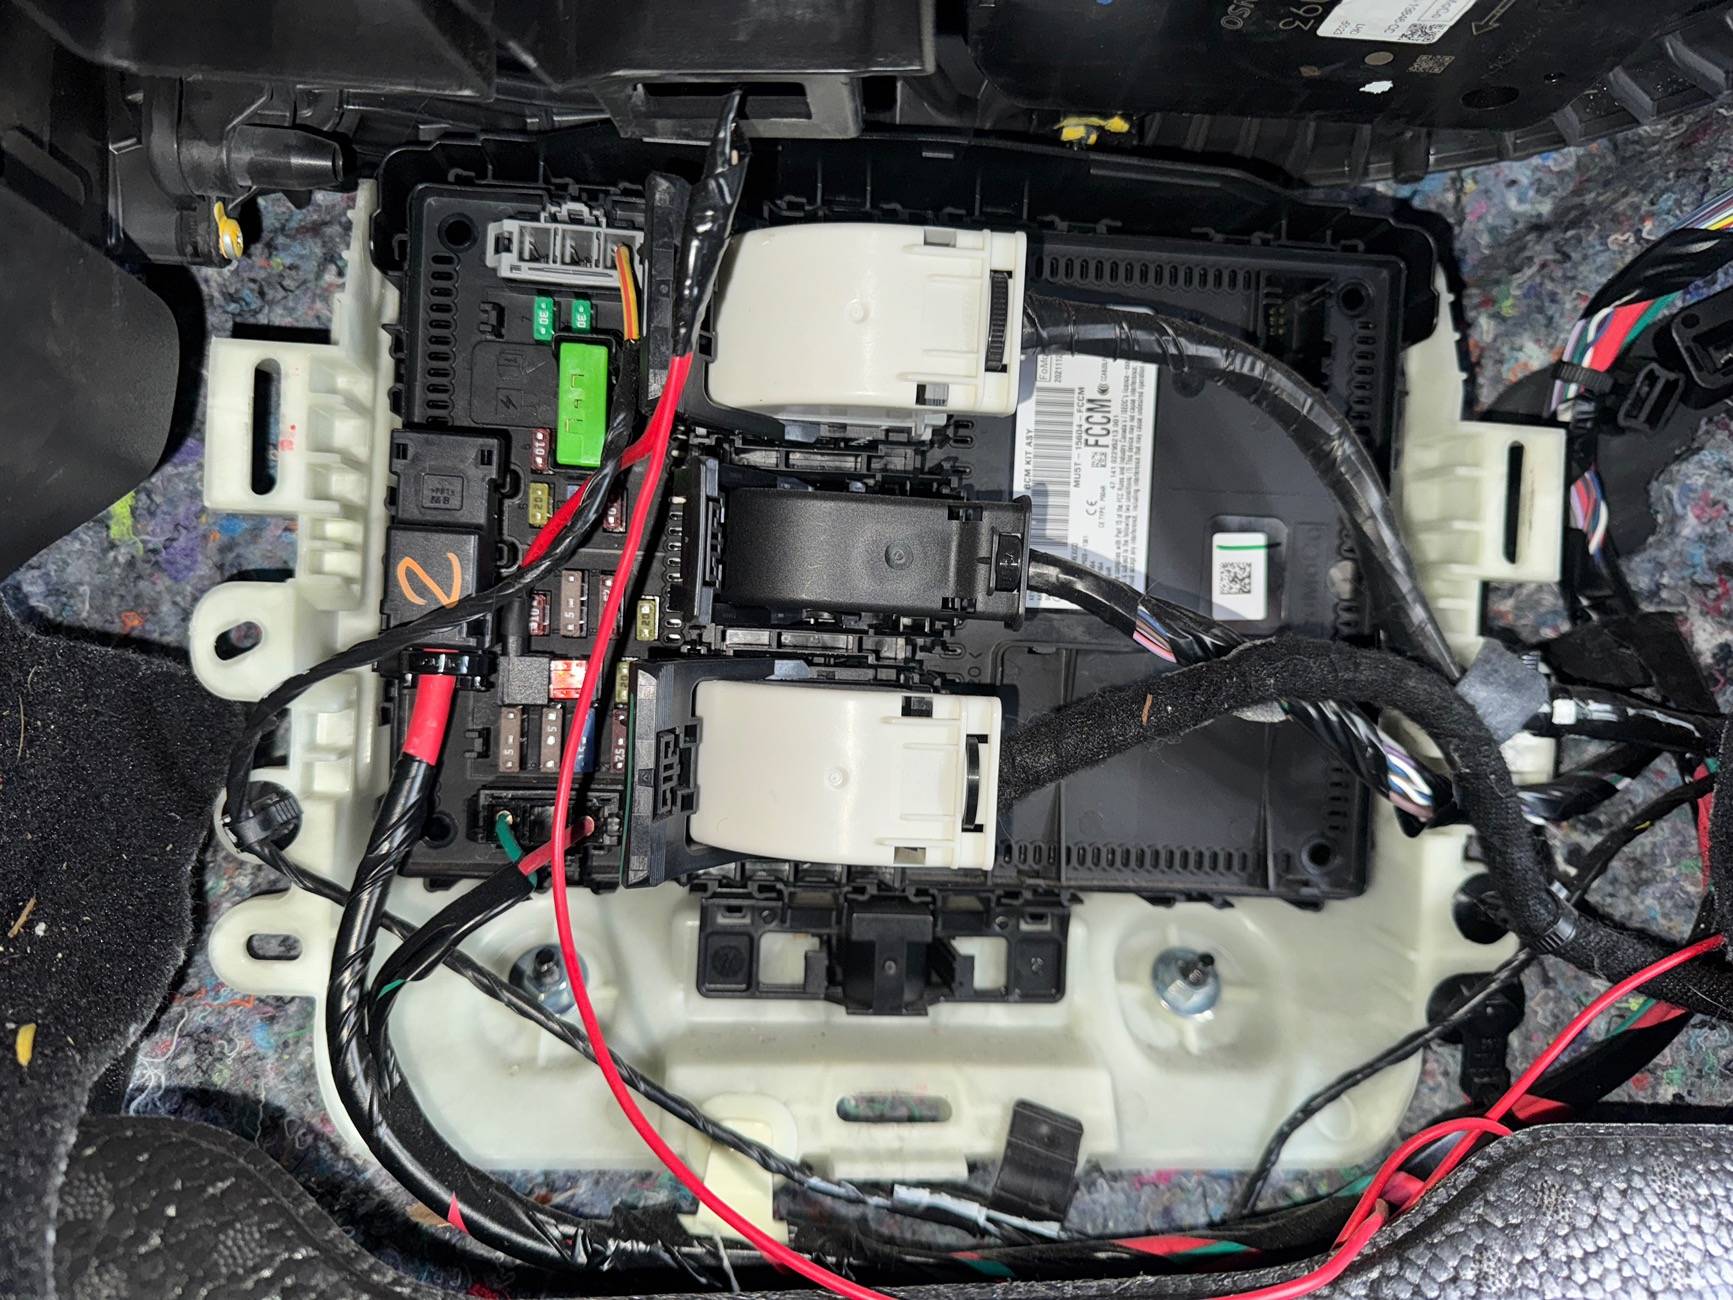
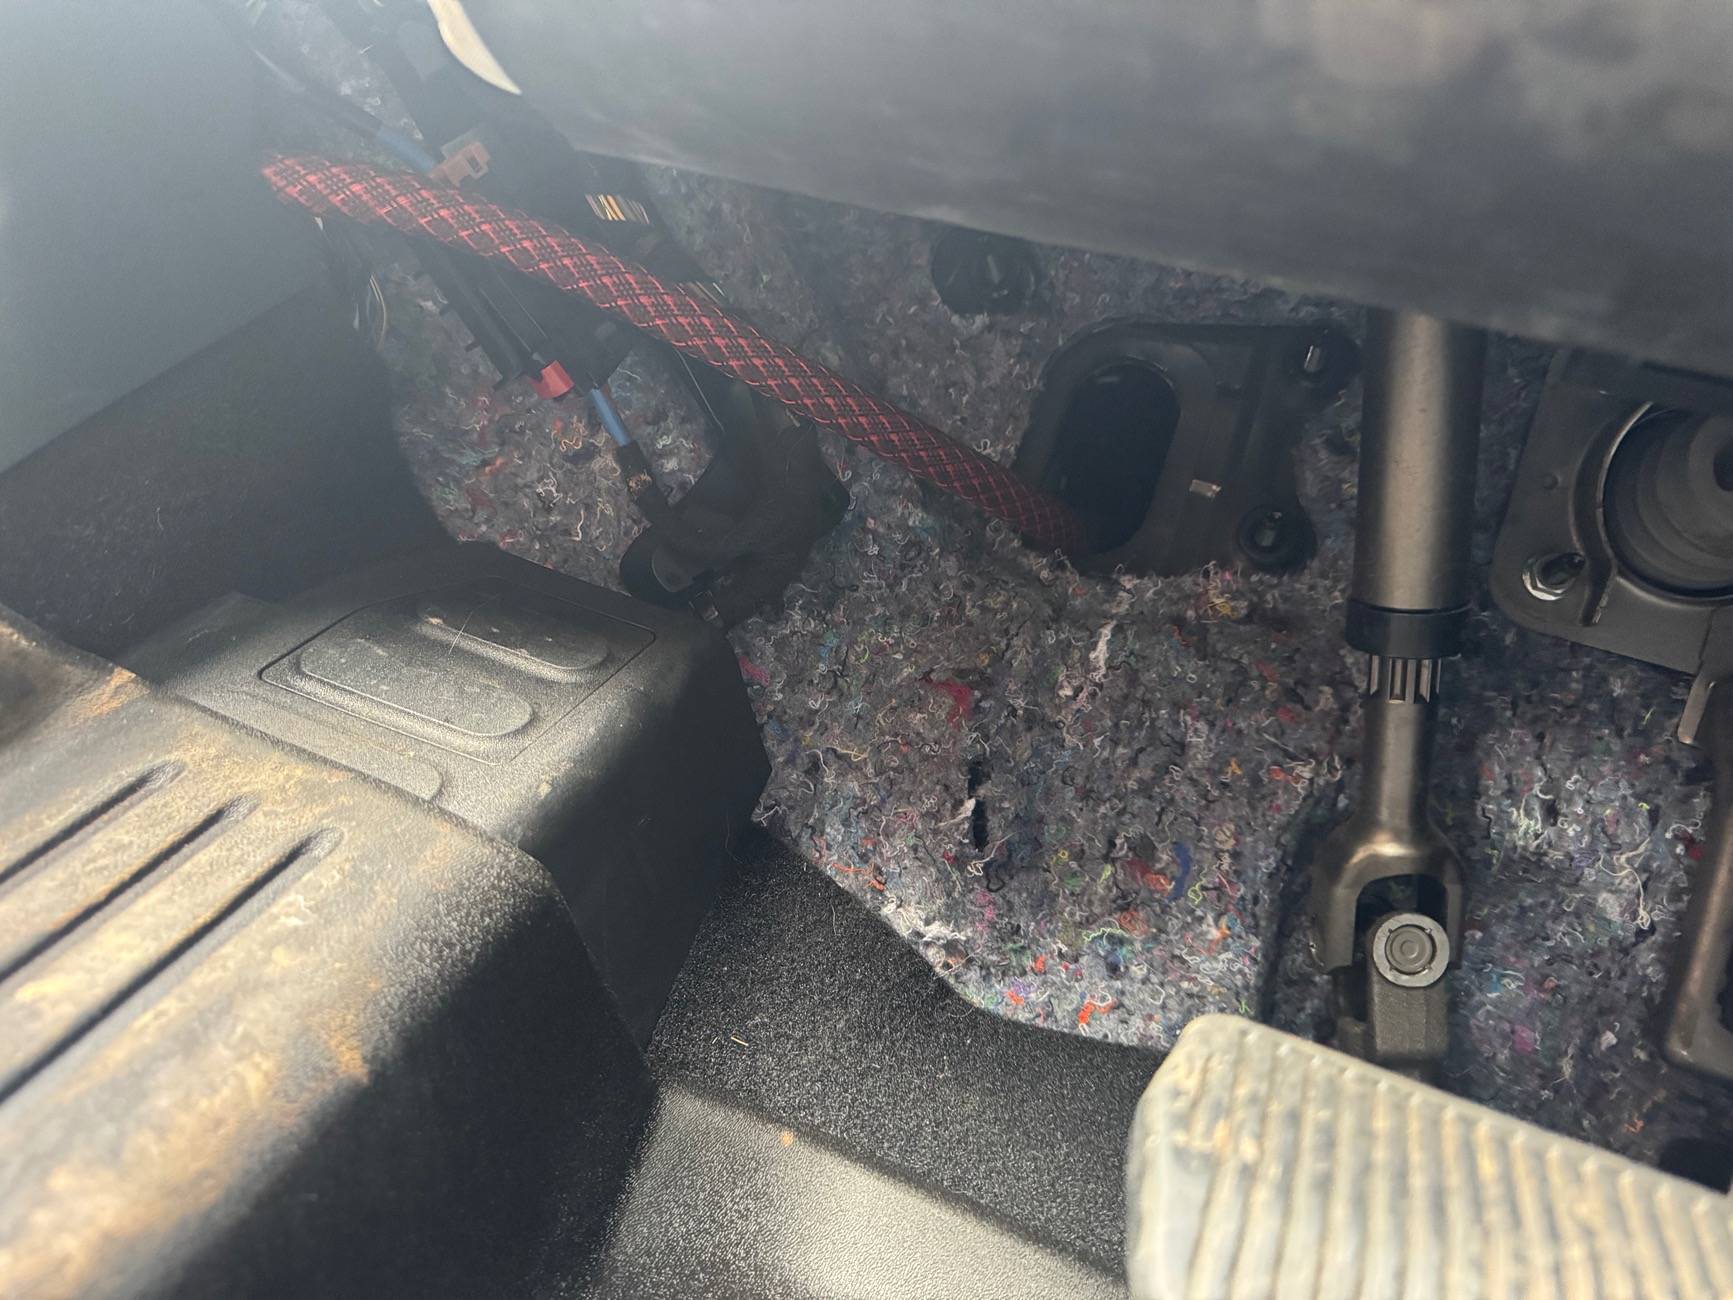
this is where you put the dc to dc alternator cable thing… not sure what to call it at this point but it is required to let the dc to dc charger know when the car is on and alternator is running. You can look in the dc to dc charger to see which fuse type they recommend as I forgot to document this piece. But with that information you google ford maverick internal fuse box diagram and pick the relevant fuse. If I remember correctly you can use pretty much any of them just make sure it isn’t one that is constantly on like even when the truck is off. And don’t use the driving sensor ones pick something like heated seats or low importance. I then went on line and got a fuse tap from Amazon they are $5. Highly recommend so it has an OEM fitment and doesn’t come loose.
Auxiliary Battery to Inverter
Final Grounding
Summary of Wiring Flow
Step 5: Secure and Clean Up
Maintenance Tips
I’ve been using this setup in my Ford Maverick for the past six months, and it has performed flawlessly. This system has been tested in extreme conditions, including the 120°F heat of Phoenix, AZ, and the -2°F cold of Flagstaff, AZ, with no issues whatsoever.
Additionally, my truck was involved in a hit-and-run accident, and despite significant vehicle damage, my auxiliary power system remained intact. The service center inspected the truck and confirmed that my installations caused no issues with repairs. I also inquired about warranty concerns, and they assured me that the auxiliary system is completely separate from the truck’s systems, so warranty coverage should never be affected.
This setup is truly built like a tank and has supported multiple appliances I’ve installed, all of which function perfectly. I’ll detail these appliances and their installations in future posts, which I’ll link here once published.
Disclaimer
The information provided in this guide is based on my personal experience and the specific setup I have tested in my Ford Maverick. While I have thoroughly tested this system and ensured its reliability in my truck, these instructions are provided as-is and may not work for every vehicle or situation.
By following this guide, you acknowledge that:
Accessory Guide: https://www.mavericktruckclub.com/f...-dual-battery-inverter-accessory-guide.60801/
Introduction
Installing an auxiliary battery and inverter system in your Ford Maverick transforms it into a utility powerhouse, perfect for camping, work, or off-grid adventures. Follow this guide to replicate my proven setup, using exact components and wiring methods for reliable, efficient performance.
Components and Costs
Here’s the exact list of components I used for this setup, with links for purchase. Prices reflect what I paid and typical sale prices.
Components
- Battery:
- DC-to-DC Charger:
- Inverter:
- Harbor Freight 2000-Watt Pure Sine Wave Inverter
- Cost: $279 (Frequently on sale for $150 at Harbor Freight)
- Circuit Breakers:
- 3x 200A Circuit Breakers (Waterproof)
- Cost: $36 (3-pack)
- Wiring:
- Wire Terminals:
- 2 packs of TKDMR 1/0 AWG Copper Ring Terminals
- Cost: $22 (2 packs)
- Total cost (without tools): $1,505
- With the inverter on sale for $150, the total cost drops to $1,376.
- Hydraulic Wire Crimper
- Multimeter (Optional but recommended)
- Heat Gun
- Wire Stripper
- Socket Wrench Set
- Drill (If mounting components)
- Zip Ties
Step 1: Component Placement
I placed all the components under the rear seat for a compact, clean setup:
- Battery: Under the passenger-side rear seat.
- Inverter: Under the driver-side rear seat.
- DC-to-DC Charger: In the middle under the rear seat between the battery and inverter.
- Circuit Breakers: Mounted behind the rear seat backrest for easy access.
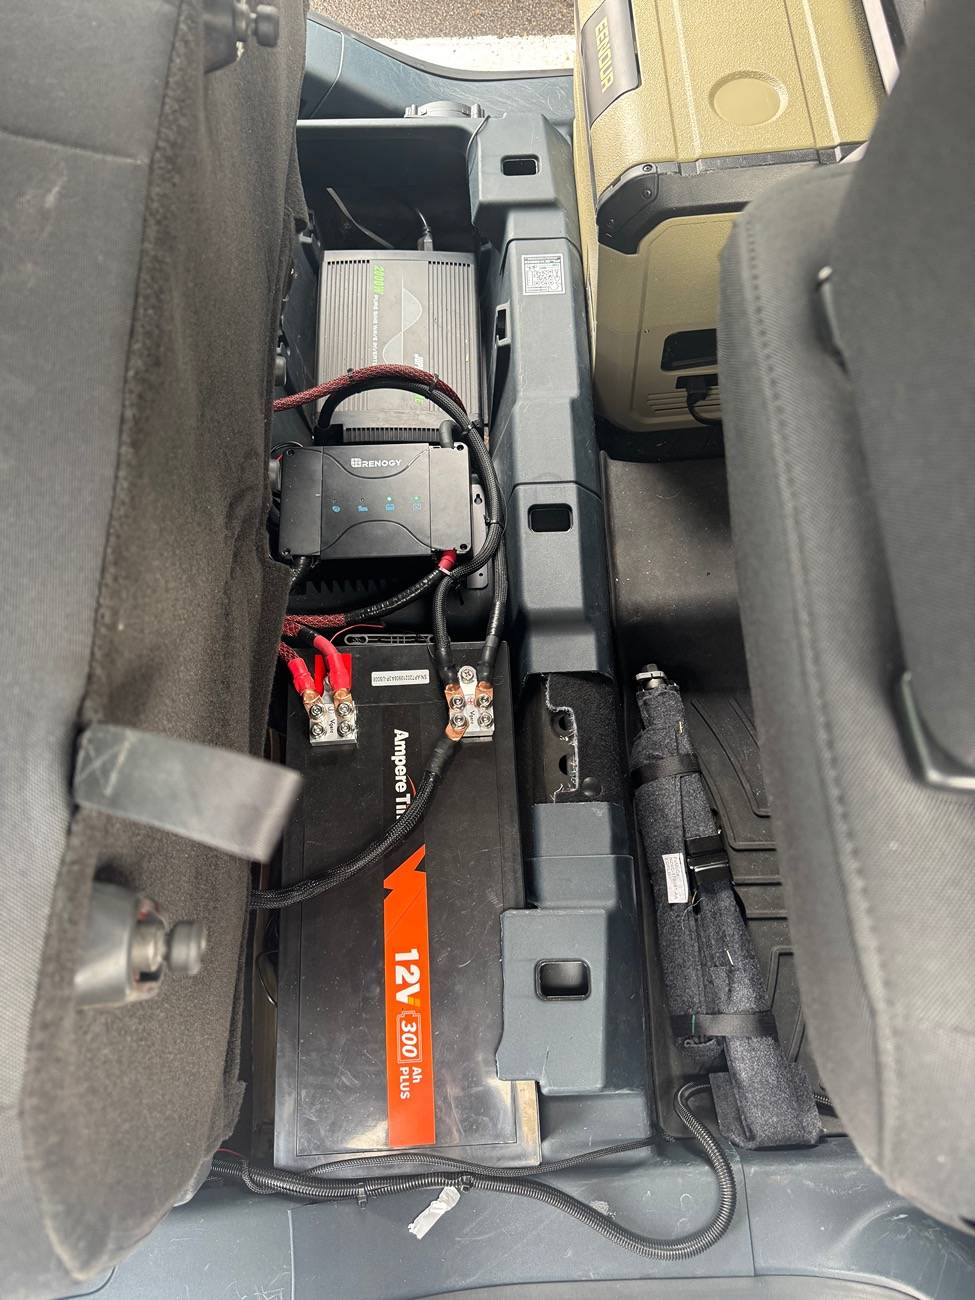
Step 2: Mount the DC-to-DC Charger
- Mount the Renogy 50A DC-to-DC Charger in the middle under the rear seat.
- Leave clearance for wiring and airflow.
Step 3: Wire the System
Your wiring ensures all positive connections pass through a circuit breaker before continuing to the next component, and all negative connections connect in sequence, ultimately grounding to the frame via the auxiliary battery.
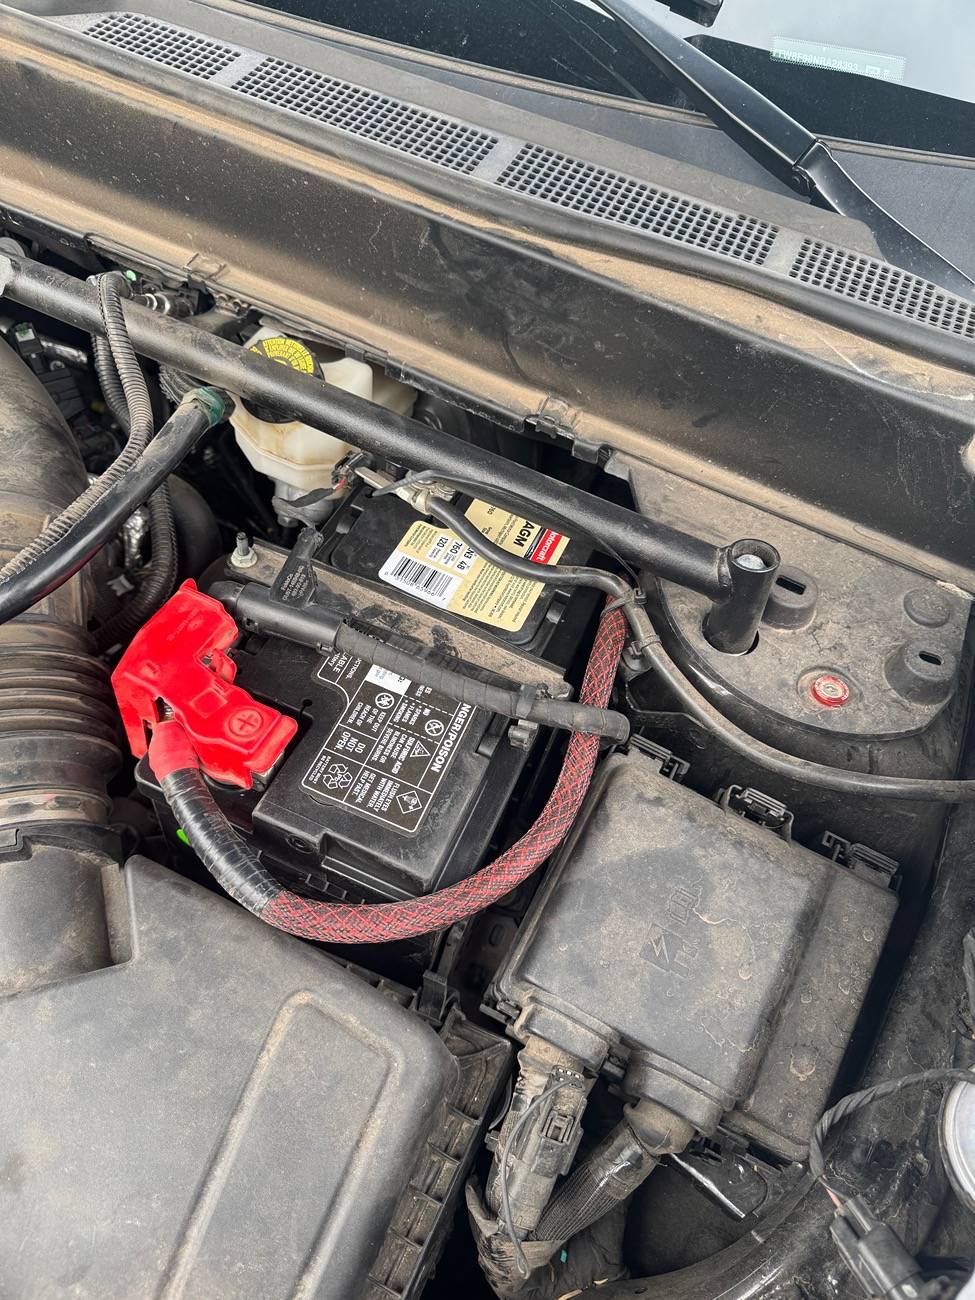
Starter Battery to DC-to-DC Charger
- Positive Connection:
- Connect 1/0 AWG wire from the starter battery positive terminal to the input terminal of the first circuit breaker.
- From the output terminal of this circuit breaker, connect 1/0 AWG wire to the input terminal of the DC-to-DC charger.
- Negative Connection:
- The starter battery's negative terminal remains grounded to the truck frame (already factory-grounded).
DC-to-DC Charger to Auxiliary Battery
- Positive Connection:
- Connect 1/0 AWG wire from the output terminal of the DC-to-DC charger to the input terminal of the second circuit breaker.
- From the output terminal of this circuit breaker, connect 1/0 AWG wire to the auxiliary battery's positive terminal.
- Negative Connection:
- Connect the negative terminal of the DC-to-DC charger to the auxiliary battery’s negative terminal.
this is where you put the dc to dc alternator cable thing… not sure what to call it at this point but it is required to let the dc to dc charger know when the car is on and alternator is running. You can look in the dc to dc charger to see which fuse type they recommend as I forgot to document this piece. But with that information you google ford maverick internal fuse box diagram and pick the relevant fuse. If I remember correctly you can use pretty much any of them just make sure it isn’t one that is constantly on like even when the truck is off. And don’t use the driving sensor ones pick something like heated seats or low importance. I then went on line and got a fuse tap from Amazon they are $5. Highly recommend so it has an OEM fitment and doesn’t come loose.
Auxiliary Battery to Inverter
- Positive Connection:
- Connect 1/0 AWG wire from the auxiliary battery’s positive terminal to the input terminal of the third circuit breaker.
- From the output terminal of this circuit breaker, connect 1/0 AWG wire to the positive input terminal of the inverter.
- Negative Connection:
- Connect the negative terminal of the inverter to the auxiliary battery’s negative terminal.
Final Grounding
- Connect the auxiliary battery’s negative terminal to the truck framefor grounding.
- Sand down the paint at the grounding point to ensure proper contact with the metal.
- The truck frame serves as the common ground for the entire system.
Summary of Wiring Flow
- Positive Path:
- Starter Battery → Circuit Breaker → DC-to-DC Charger → Circuit Breaker → Auxiliary Battery → Circuit Breaker → Inverter.
- Negative Path:
- All negative terminals connect in sequence: DC-to-DC Charger → Auxiliary Battery → Inverter → Frame Ground.
- Verify all connections with a multimeter to ensure proper voltage and continuity.
- Flip all circuit breakers to the ON position.
- Test the inverter by plugging in a small device, such as a phone charger or appliance.
Step 5: Secure and Clean Up
- Organize wires using zip ties.
- Double-check that all components are secure and protected.
Maintenance Tips
- Check Connections: Inspect for corrosion or looseness every 3-6 months.
- Monitor Battery Voltage: Keep the battery within the recommended range to extend its lifespan.
I’ve been using this setup in my Ford Maverick for the past six months, and it has performed flawlessly. This system has been tested in extreme conditions, including the 120°F heat of Phoenix, AZ, and the -2°F cold of Flagstaff, AZ, with no issues whatsoever.
Additionally, my truck was involved in a hit-and-run accident, and despite significant vehicle damage, my auxiliary power system remained intact. The service center inspected the truck and confirmed that my installations caused no issues with repairs. I also inquired about warranty concerns, and they assured me that the auxiliary system is completely separate from the truck’s systems, so warranty coverage should never be affected.
This setup is truly built like a tank and has supported multiple appliances I’ve installed, all of which function perfectly. I’ll detail these appliances and their installations in future posts, which I’ll link here once published.
Disclaimer
The information provided in this guide is based on my personal experience and the specific setup I have tested in my Ford Maverick. While I have thoroughly tested this system and ensured its reliability in my truck, these instructions are provided as-is and may not work for every vehicle or situation.
By following this guide, you acknowledge that:
- I am not a certified electrician or mechanic, and this is not professional advice.
- You are solely responsible for any modifications you make to your vehicle, including any damages, malfunctions, or warranty issues that may arise.
- Any actions taken based on this guide are done at your own risk.
Sponsored
Attachments
-
31.2 KB Views: 134
Last edited:


