
- Thread starter
- #1
Thought I'd show what I did in my Mav (EB XLT). I combined a number of different ideas I'd seen on here; I apologize to those that I borrowed from that I didn't take notes on who originally posted what. Goals were to improve sound quality, while keeping everything in a state where I could easily go back to stock.
I started with a set of Rockford Fosgate Punch P165-SI seperates for the front. These have the crossovers for the tweeters built into the woofers, so I ended up using the factory wiring to power the woofer, then running new speaker wire from the woofers through the door jams and up to the dash. Removing the doors, while intimidating on a truck with less than 500 miles, is actually pretty easy. Have a floor jack with a rubber saddle and a second set of hands handy. Takes all of five minutes to unbolt it and another few minutes to unplug the wiring connector.
I used some XTC speaker baffles behind the woofers to try and keep water off the woofers. I cut them with a utility knife to create a "ledge" that leaves the bottom halves exposed so the sound wasn't compromised, but would (hopefully) force water to run off the baffles and drip down past the woofer.
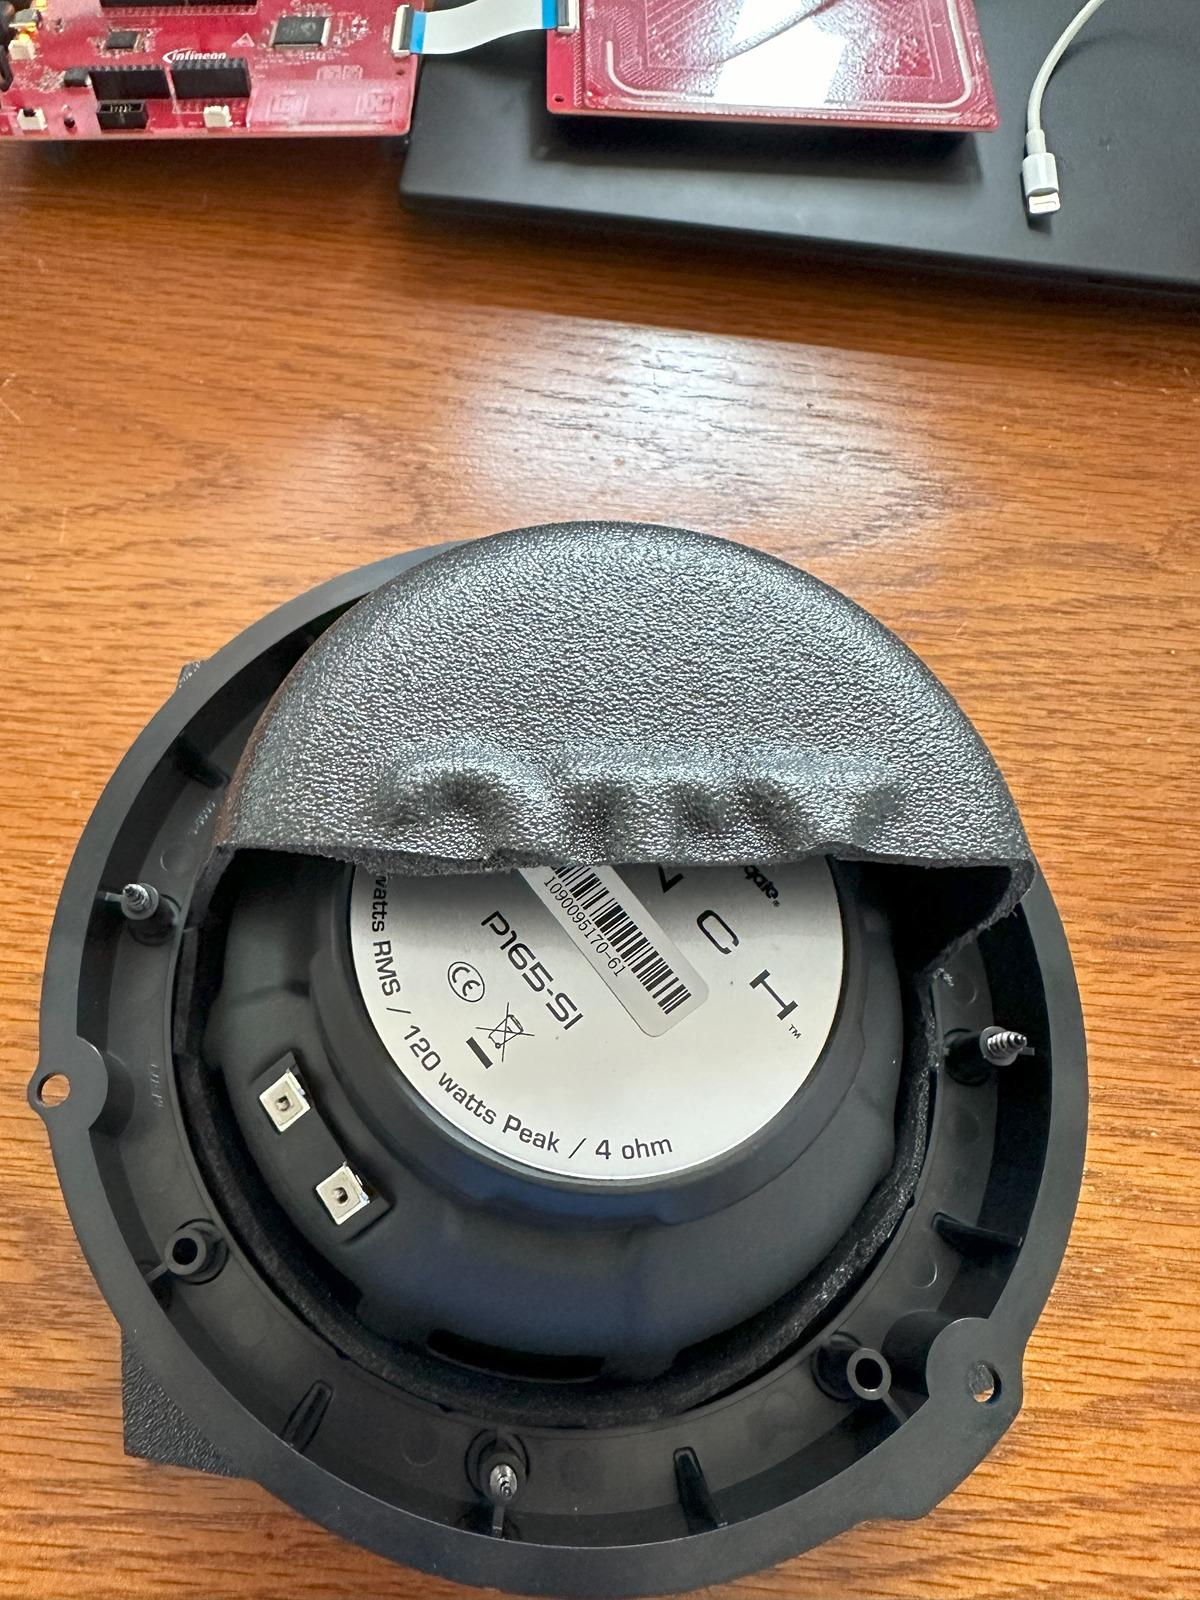
Used some foam rings on the top of the woofers before installing. These woofers fit the Metra 82-5605 speaker mounting brackets perfectly. The 72-5602 speaker wire adapters also fit correctly.
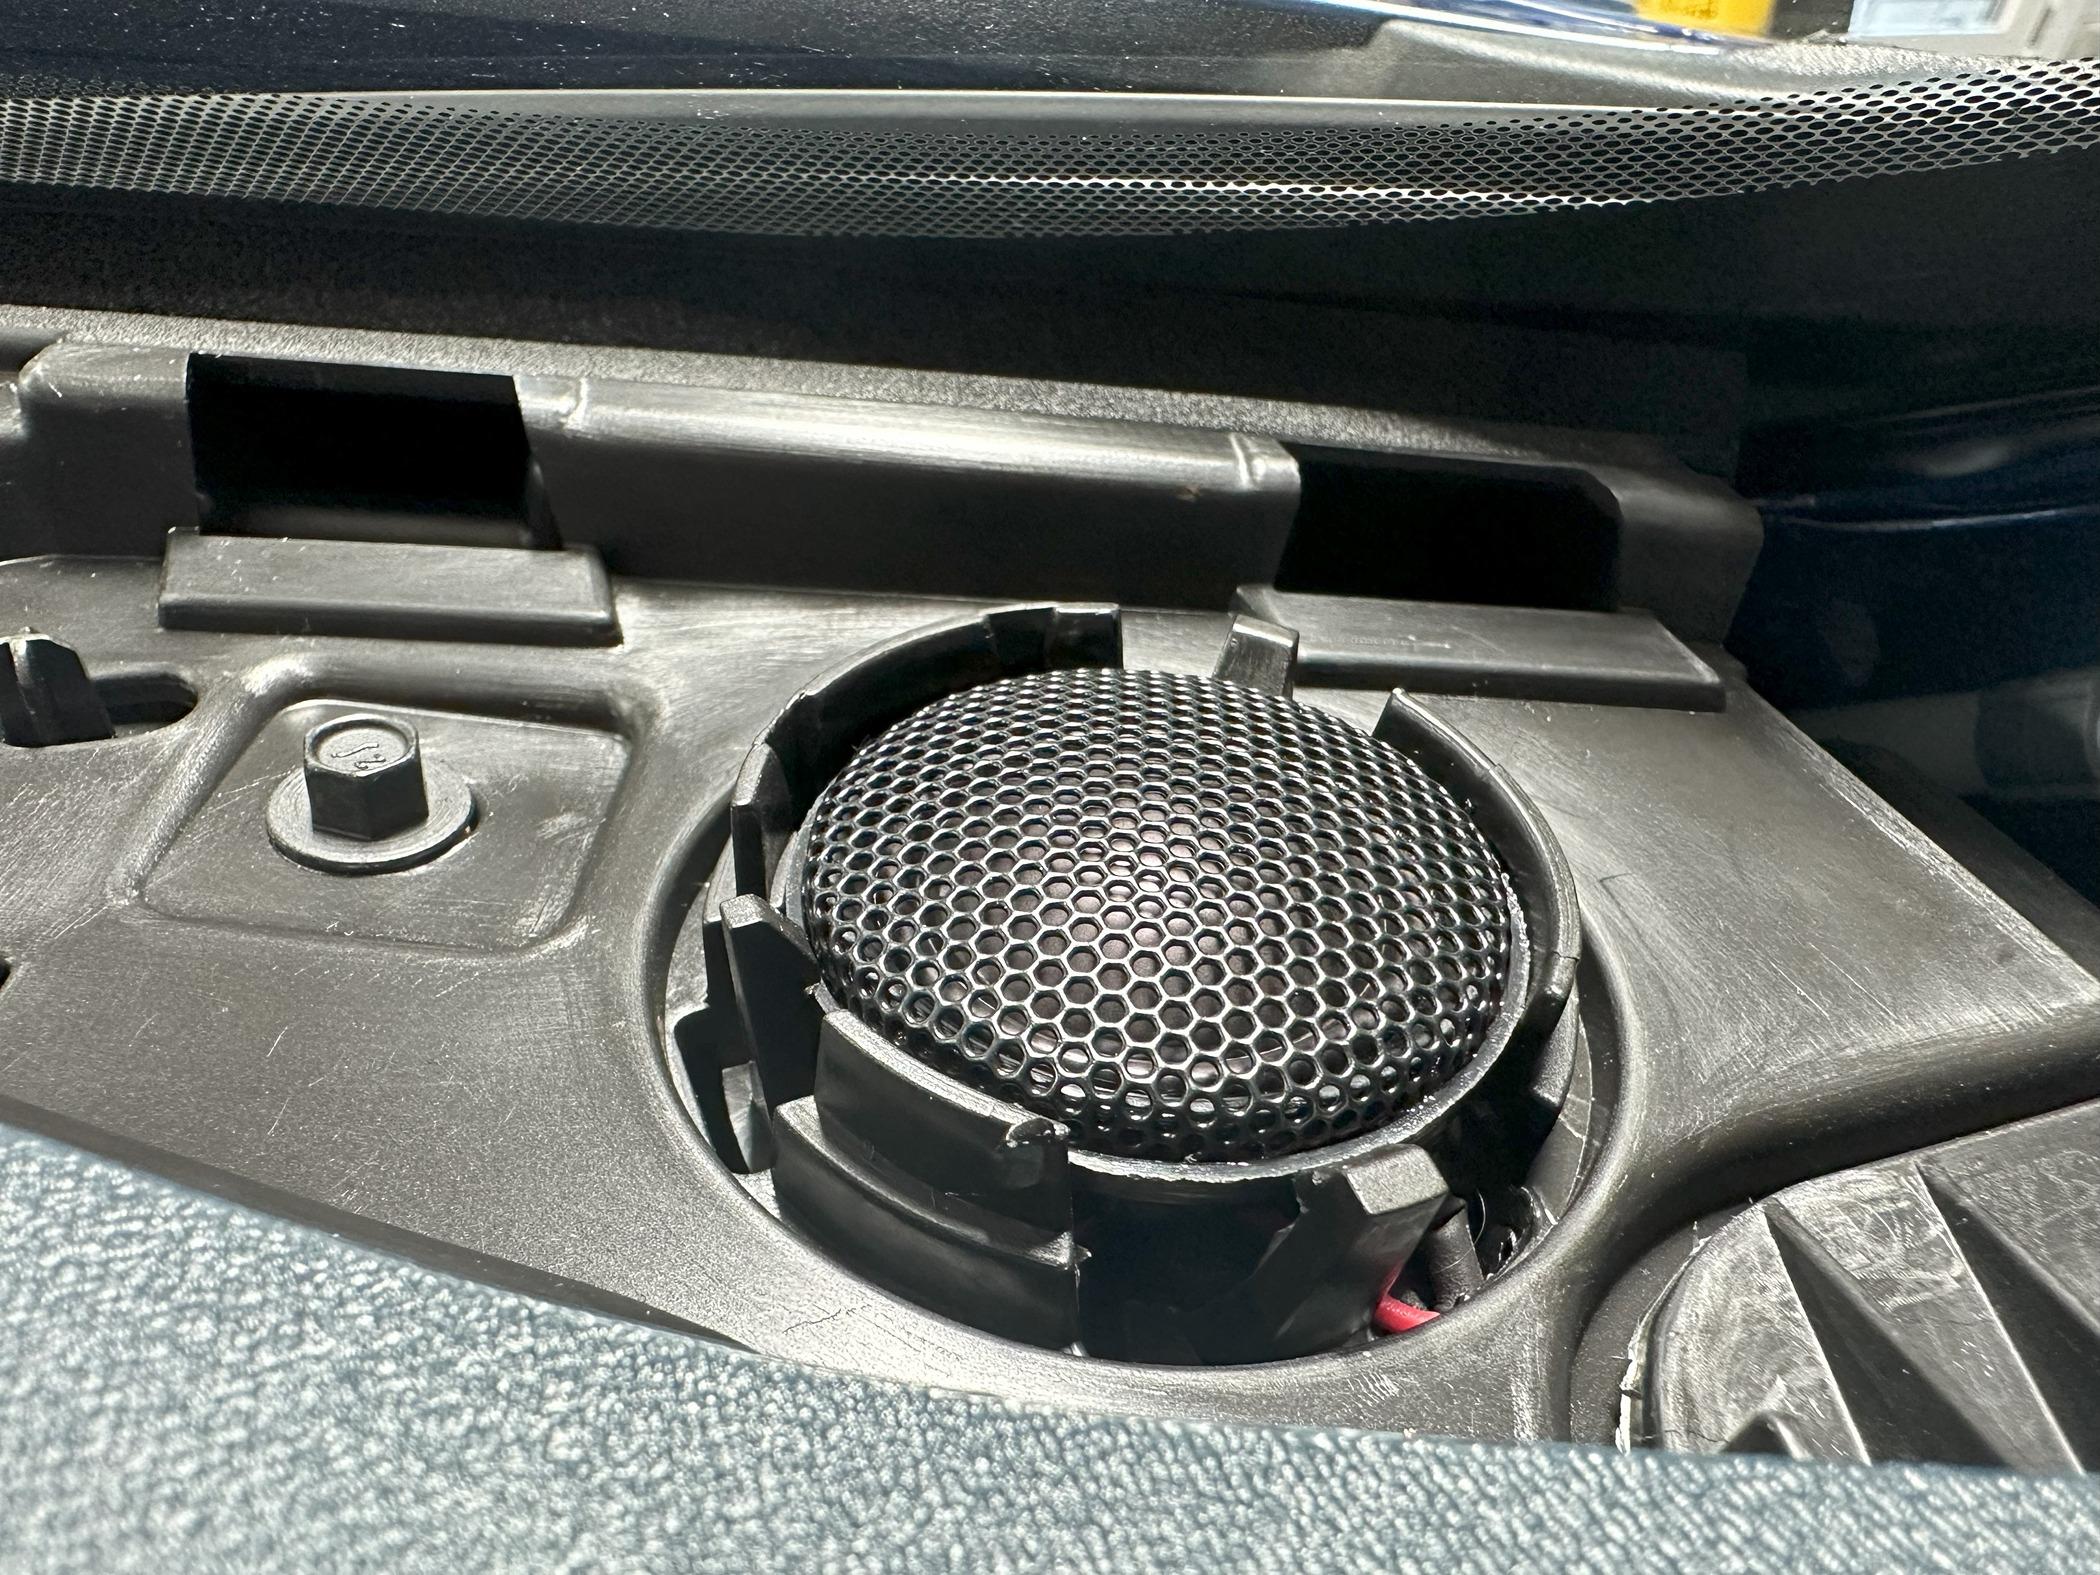
The tweeters were a direct drop-in as far as mounting (but obviously using the new wires I ran); they clipped into place using the original mounting clips perfectly with no rattle or looseness.
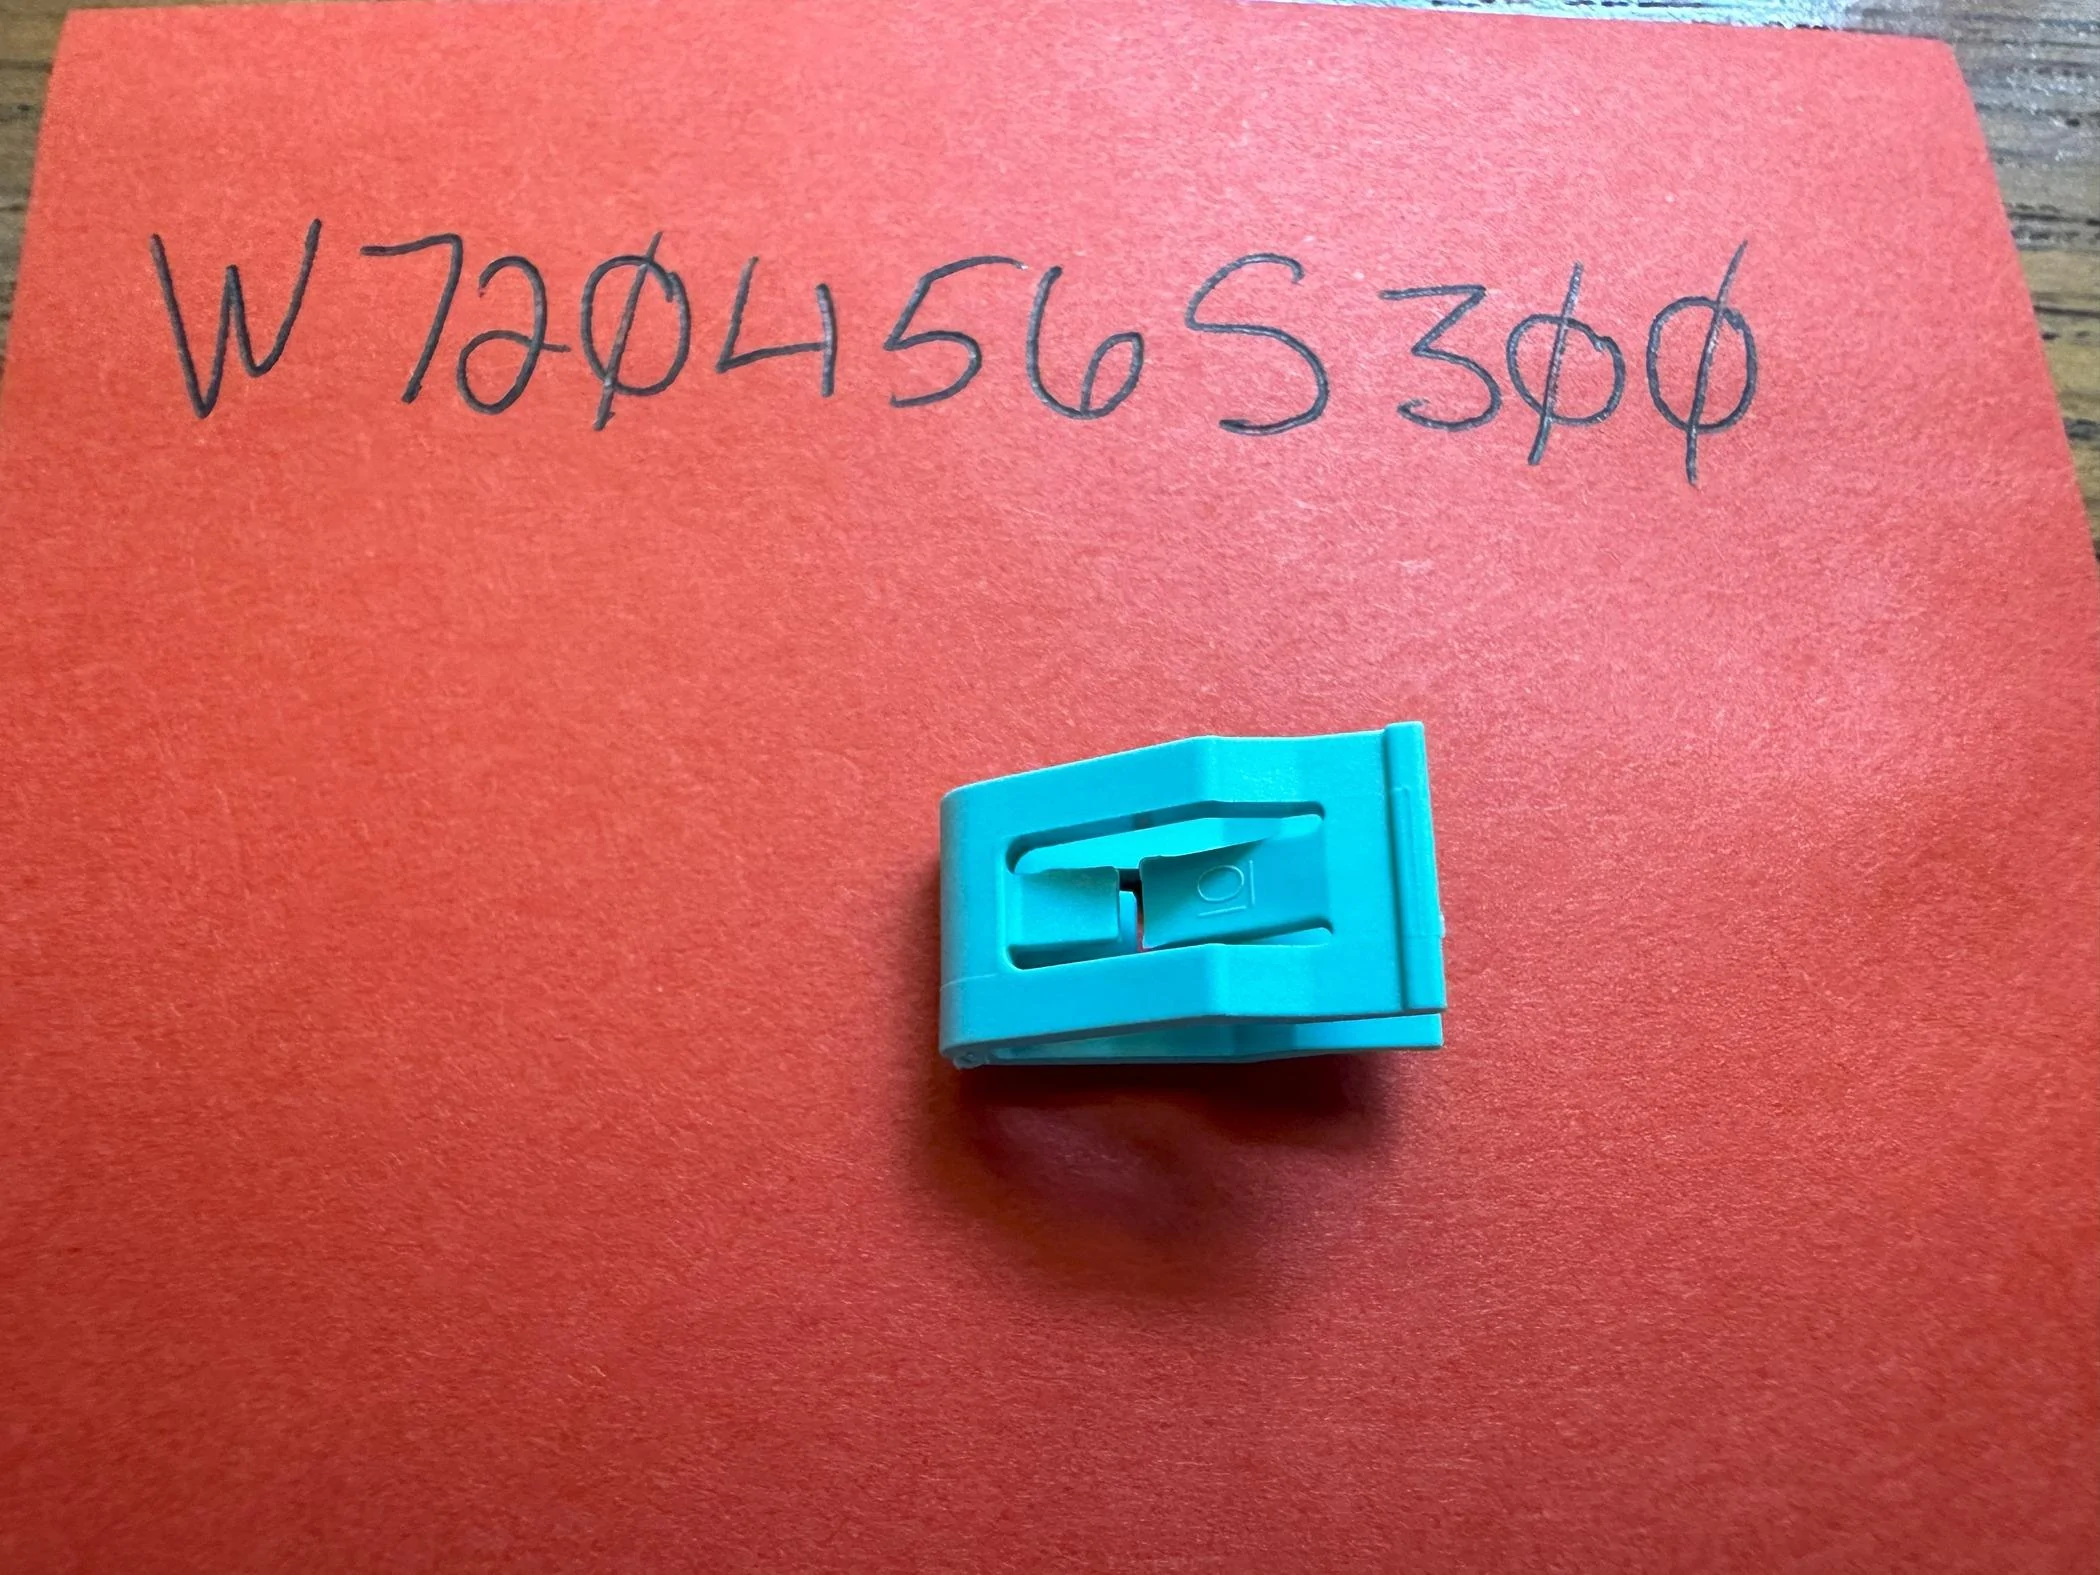
One note: when removing the tweeter speaker grills, I dropped several of these blue clips that hold them on into the dash. They eventually worked their way out, but in the meantime I bought a bag of them from Ford (I also broke one). They were like $6 for five of them. The part number is W720456S300. They also hold on some other dash pieces like the climate control panel. You may want to consider proactively ordering a bag of them; they are easy to break/lose.
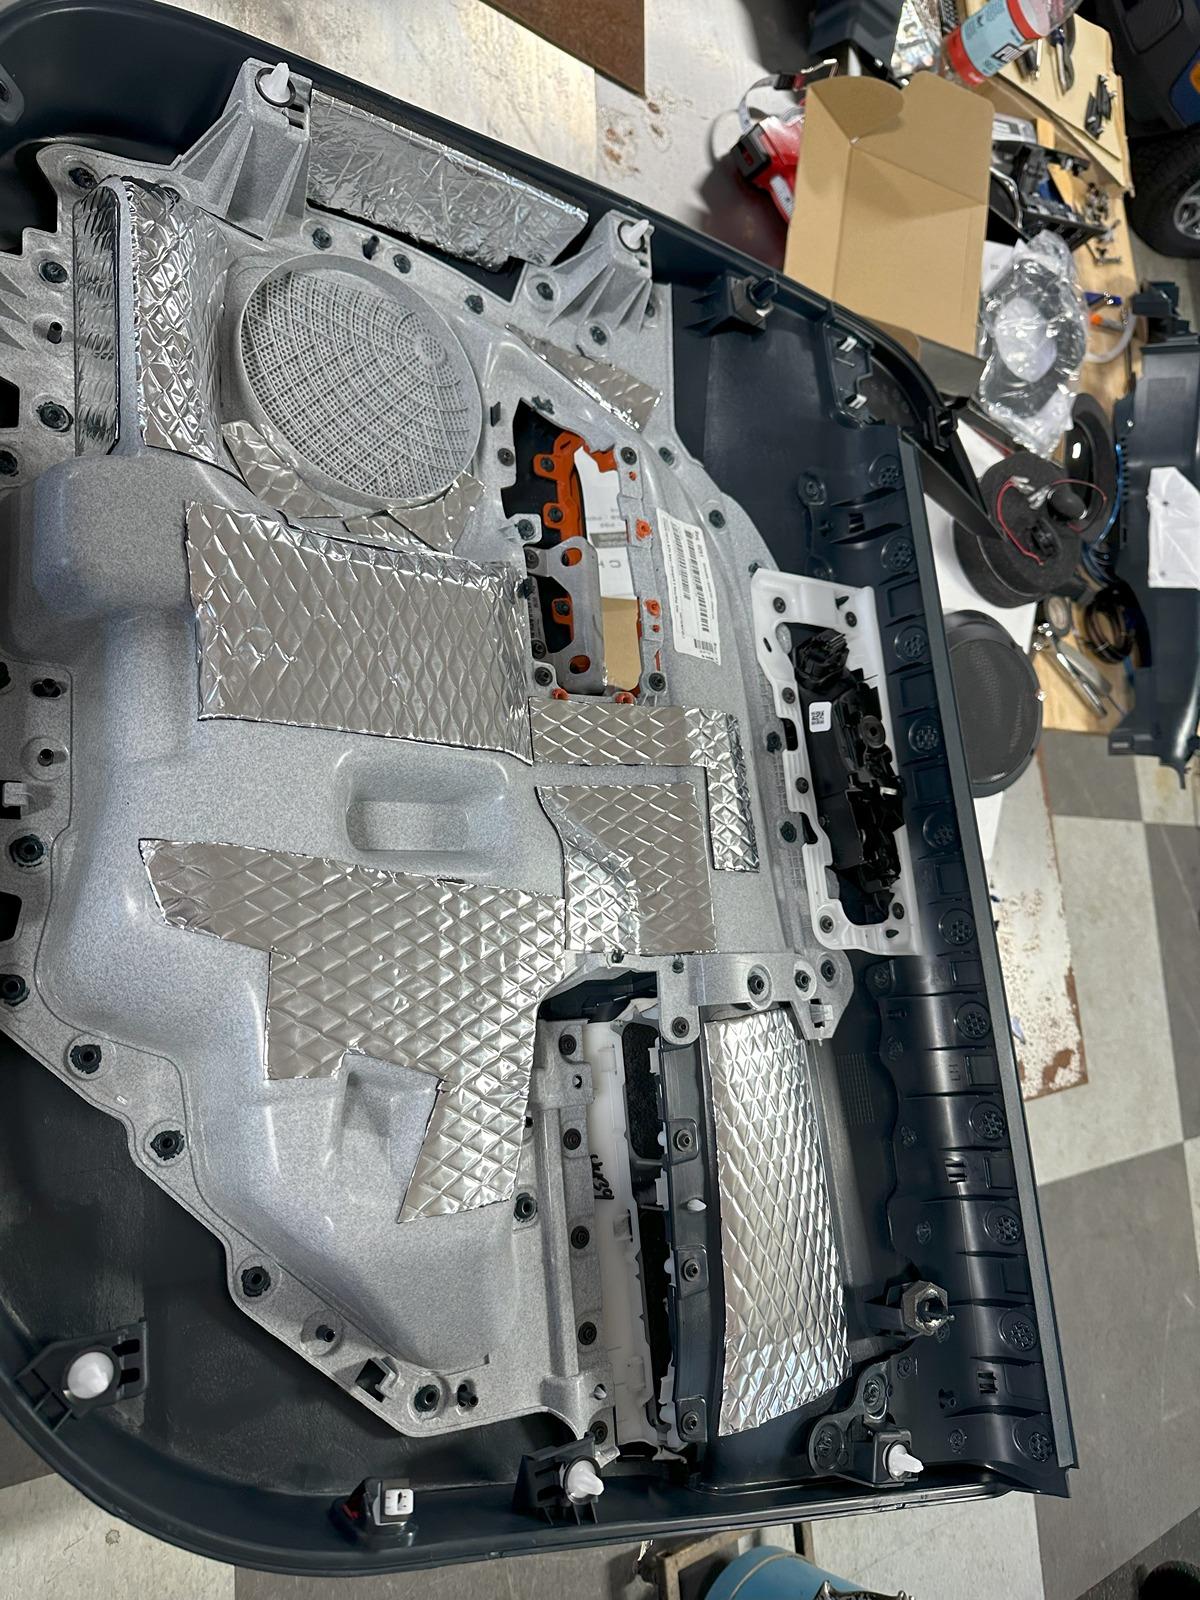
I did sound deadening on both the backside of the door panels and the interior door skins (work in progress pic; I added more than this overall).
After getting this done and putting everything back together, I've gotta say I was actually pretty impressed with how much better things sounded with just a speaker upgrade and no amp. Bass was MUCH tighter and louder, and extended noticably deeper. Would powering these with an external amp play louder? Sure. But I personally think they sound great even running off the factory head unit/amp.
I then moved on to the rear speakers. I consider these "fill" only; I have the head unit panned almost full forward on the fader, so I could have just left them stock, but decided to upgrade them anyway. I originally bought some Rockford Punch P1462 4x6" speakers, but I could not get these to fit the factory bolt holes using the included mounting adapters, so ended up returning those and using some Punch P142s 4" 2-ways. These fit fine. I've seen it mentioned, but wanted to stress that the Red Wolf (or Metra equivalent) rear speaker adapters seemed like they were not the correct part when I first tried to install them. They don't "fit" in the conventional sense of easily sliding right in to the OEM connectors. But the contacts do line up, you just need to fidget with them a bit.
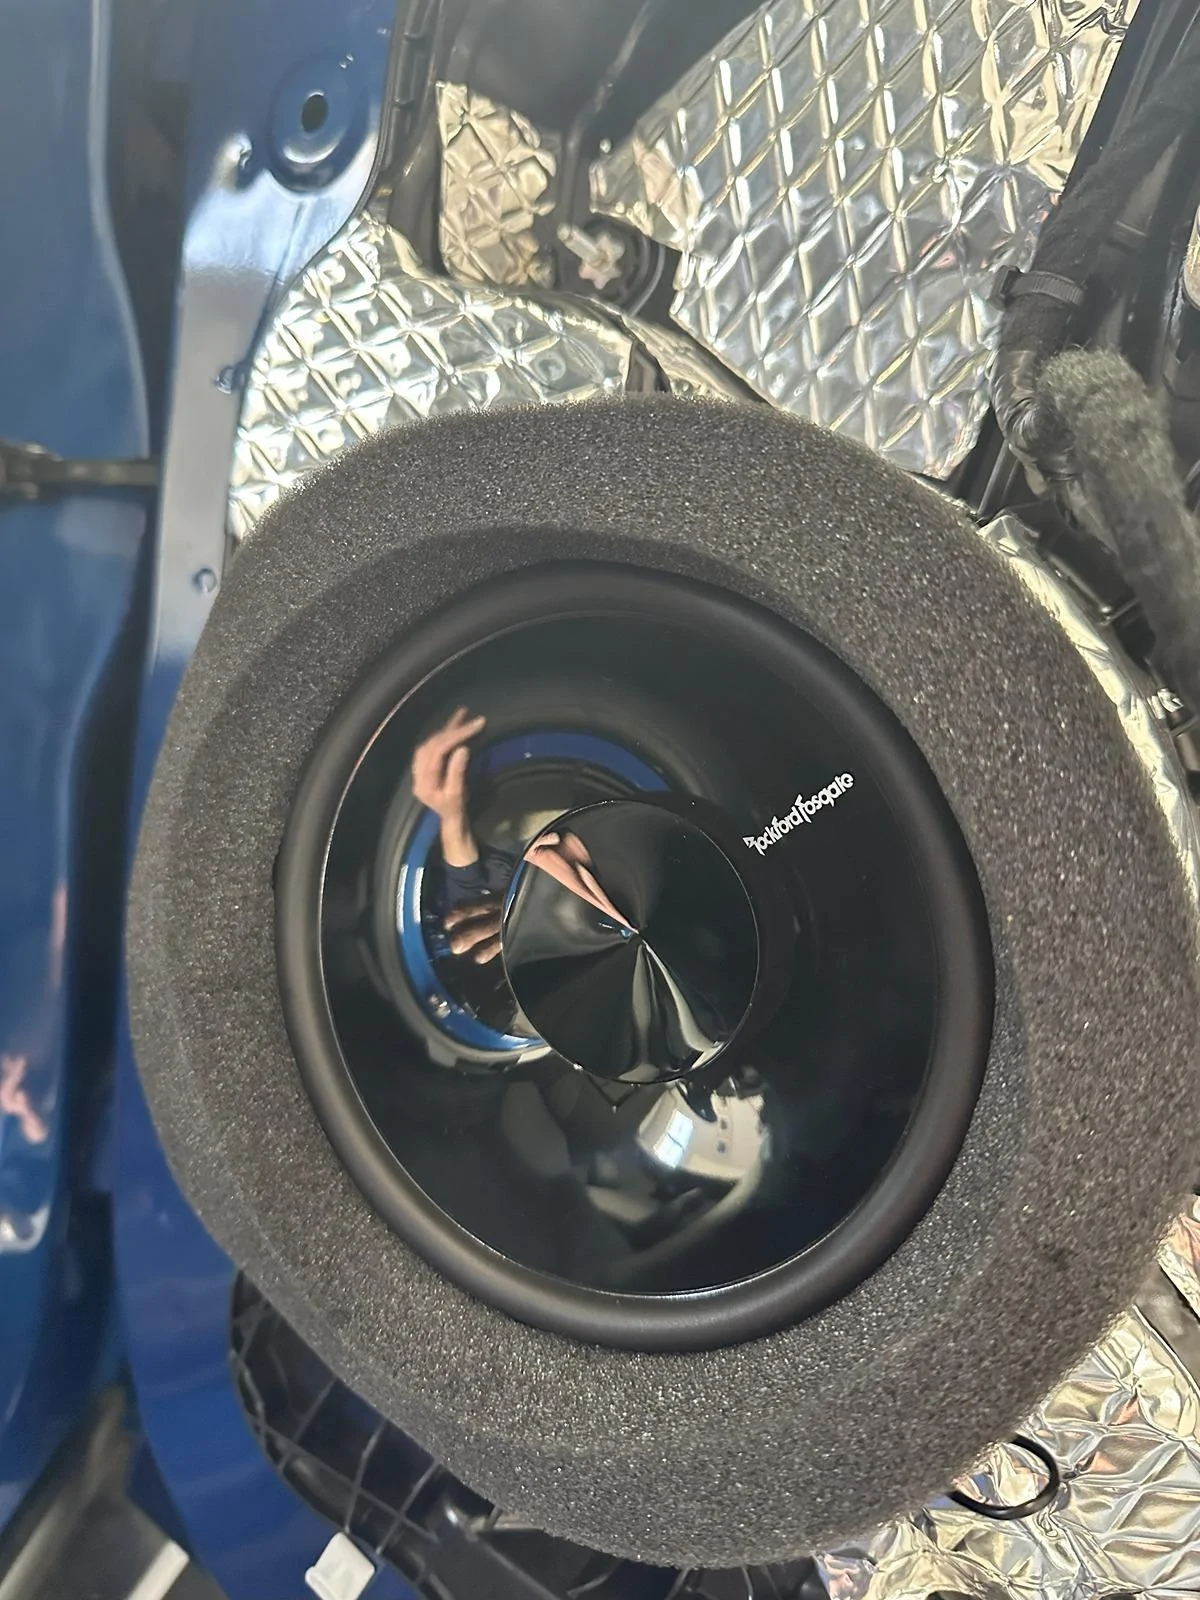
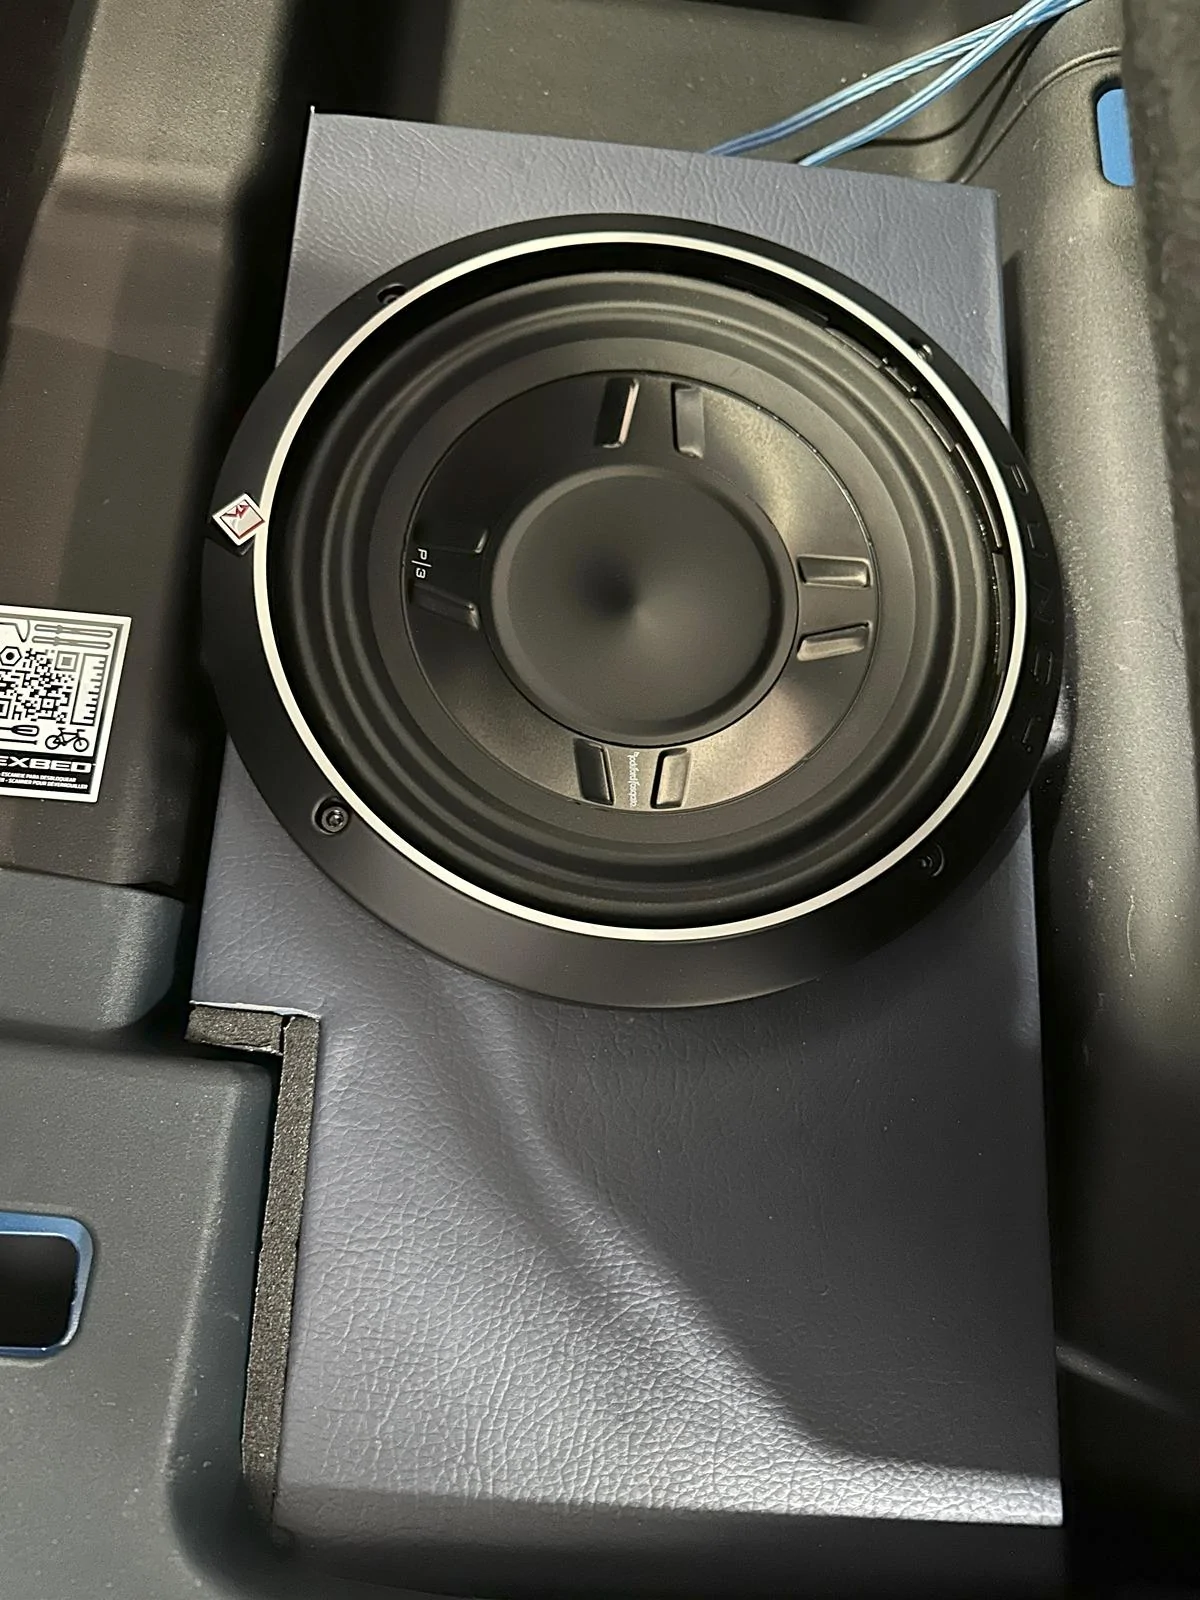
Next I moved on to the subwoofer. I used a Punch P3SD2-10 DVC shallow subwoofer. I built my own box, basically copying the Ground Shaker design for under the rear seat. I used 1/2" MDF (they use 5/8"), but doubled up the front baffle. I also made it just a bit taller and wider to squeeze out some more cubic feet (inches), and added an internal cross brace (probably unnecessary). I then used this blue vinyl from Amazon to wrap it : Amazon
This was perhaps to hardest part, and the wrapping job I did was not good. However, a lot of it isn't even visible when the box is in the truck, and the top looked pretty good, so a win overall (I know it looks like there's a big wrinkle in this pic but it's a trick of the light).
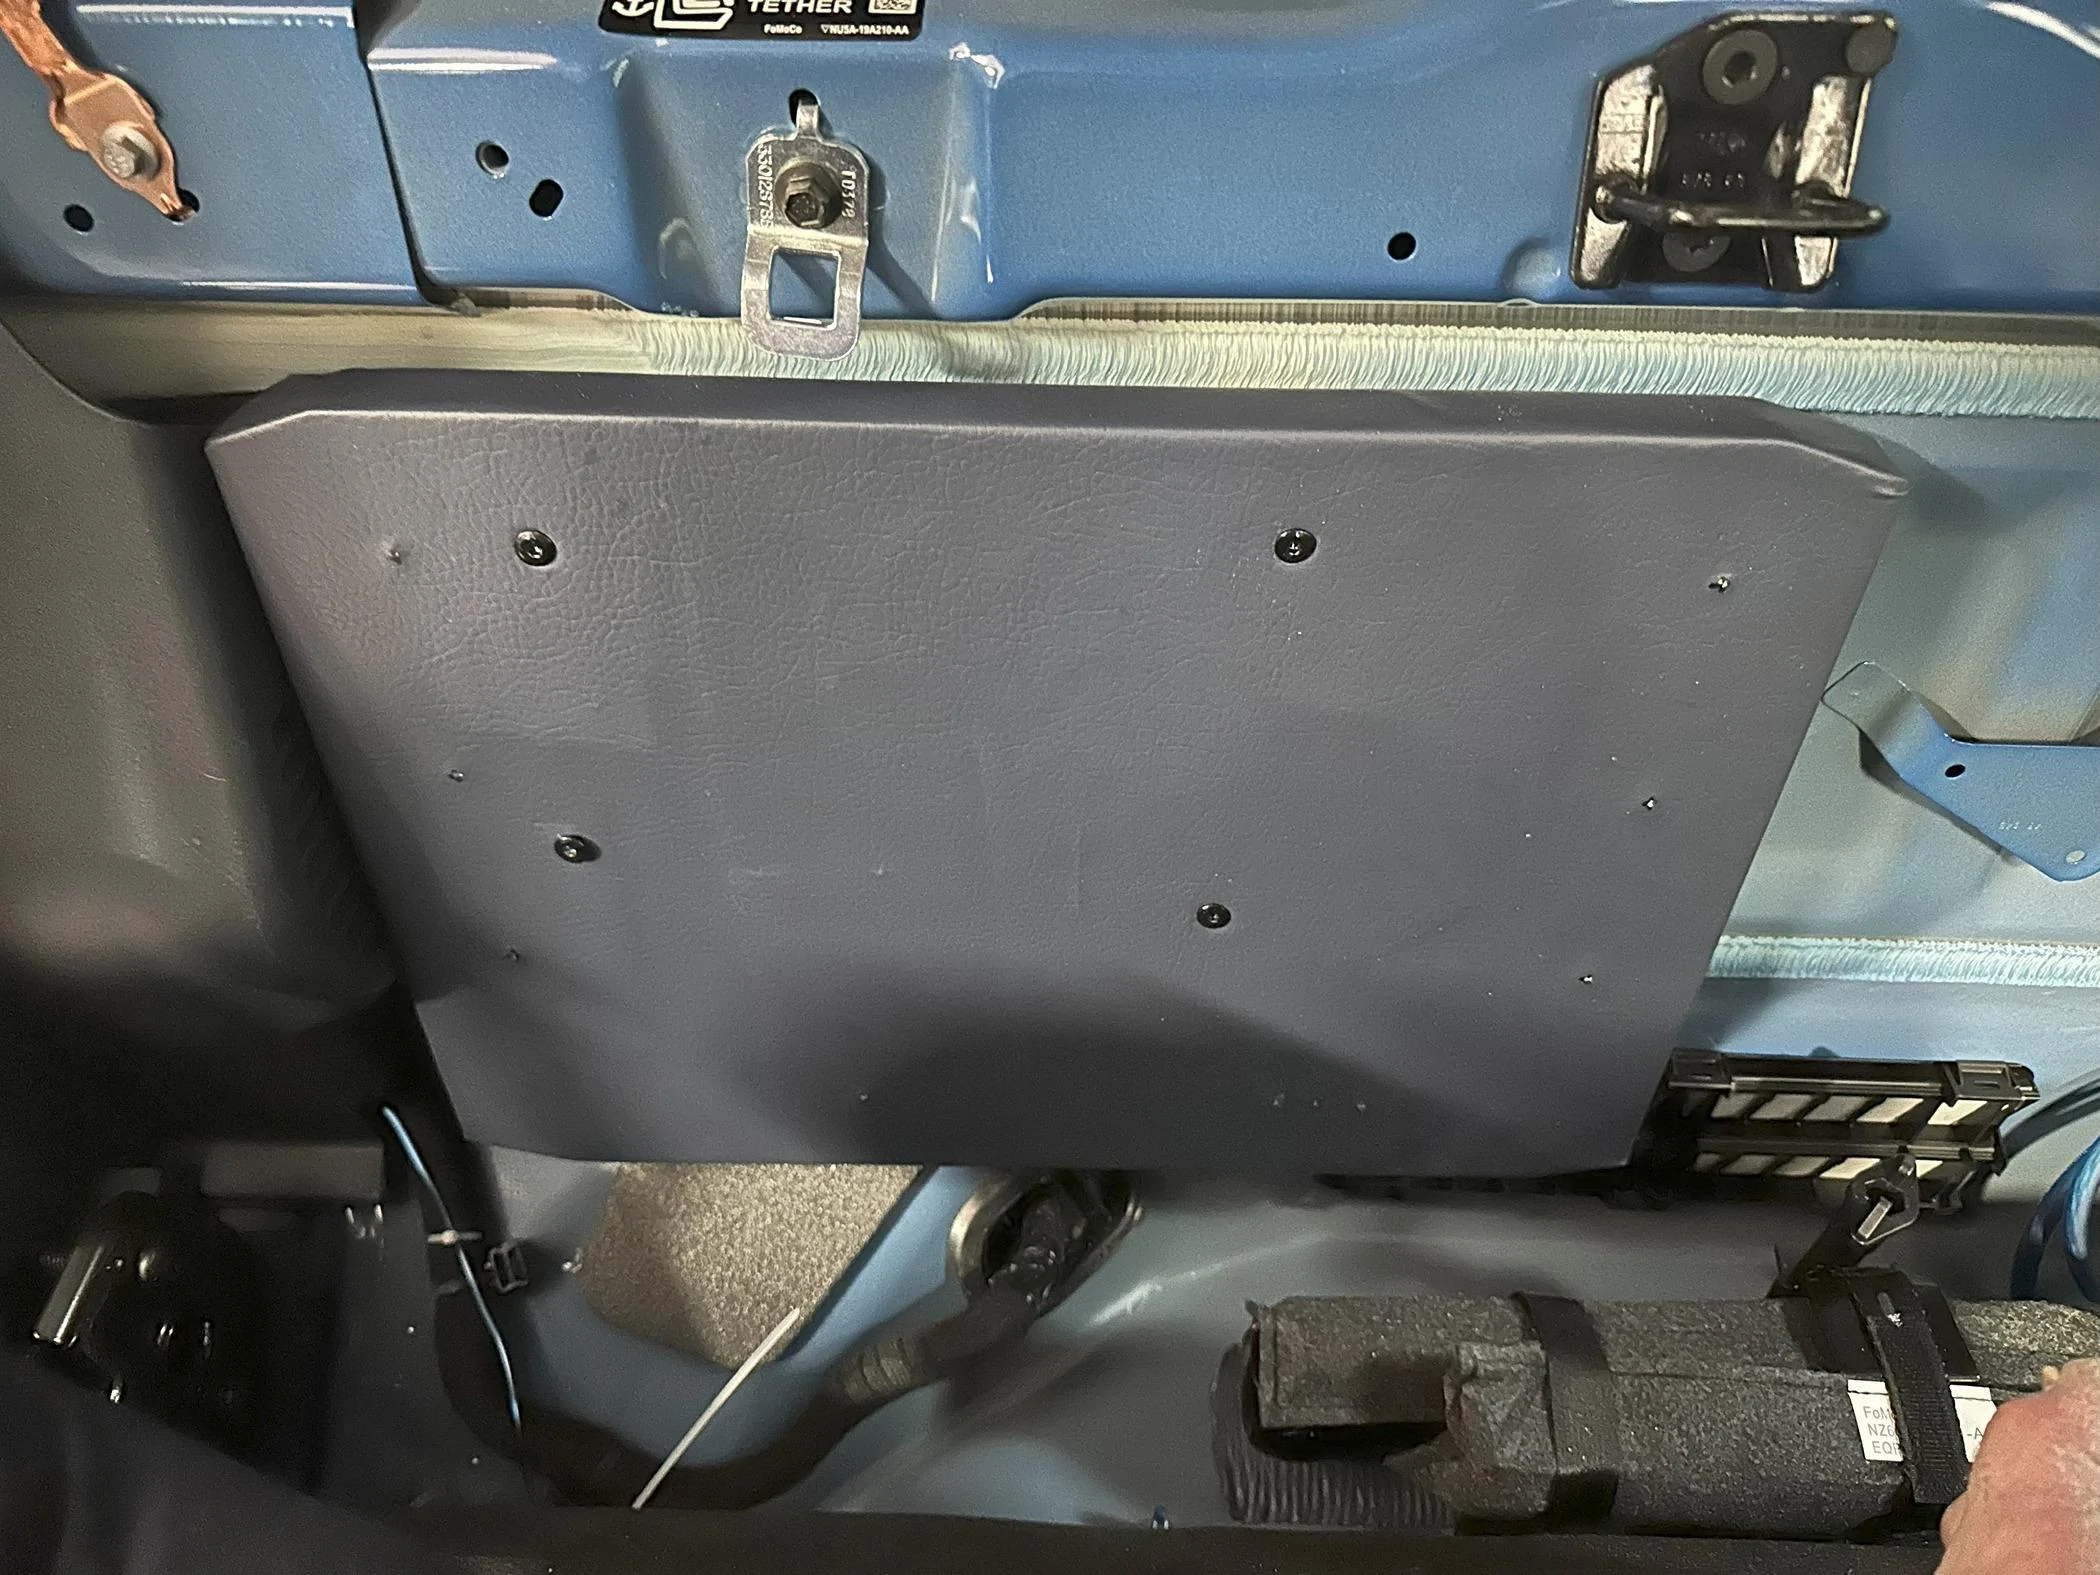
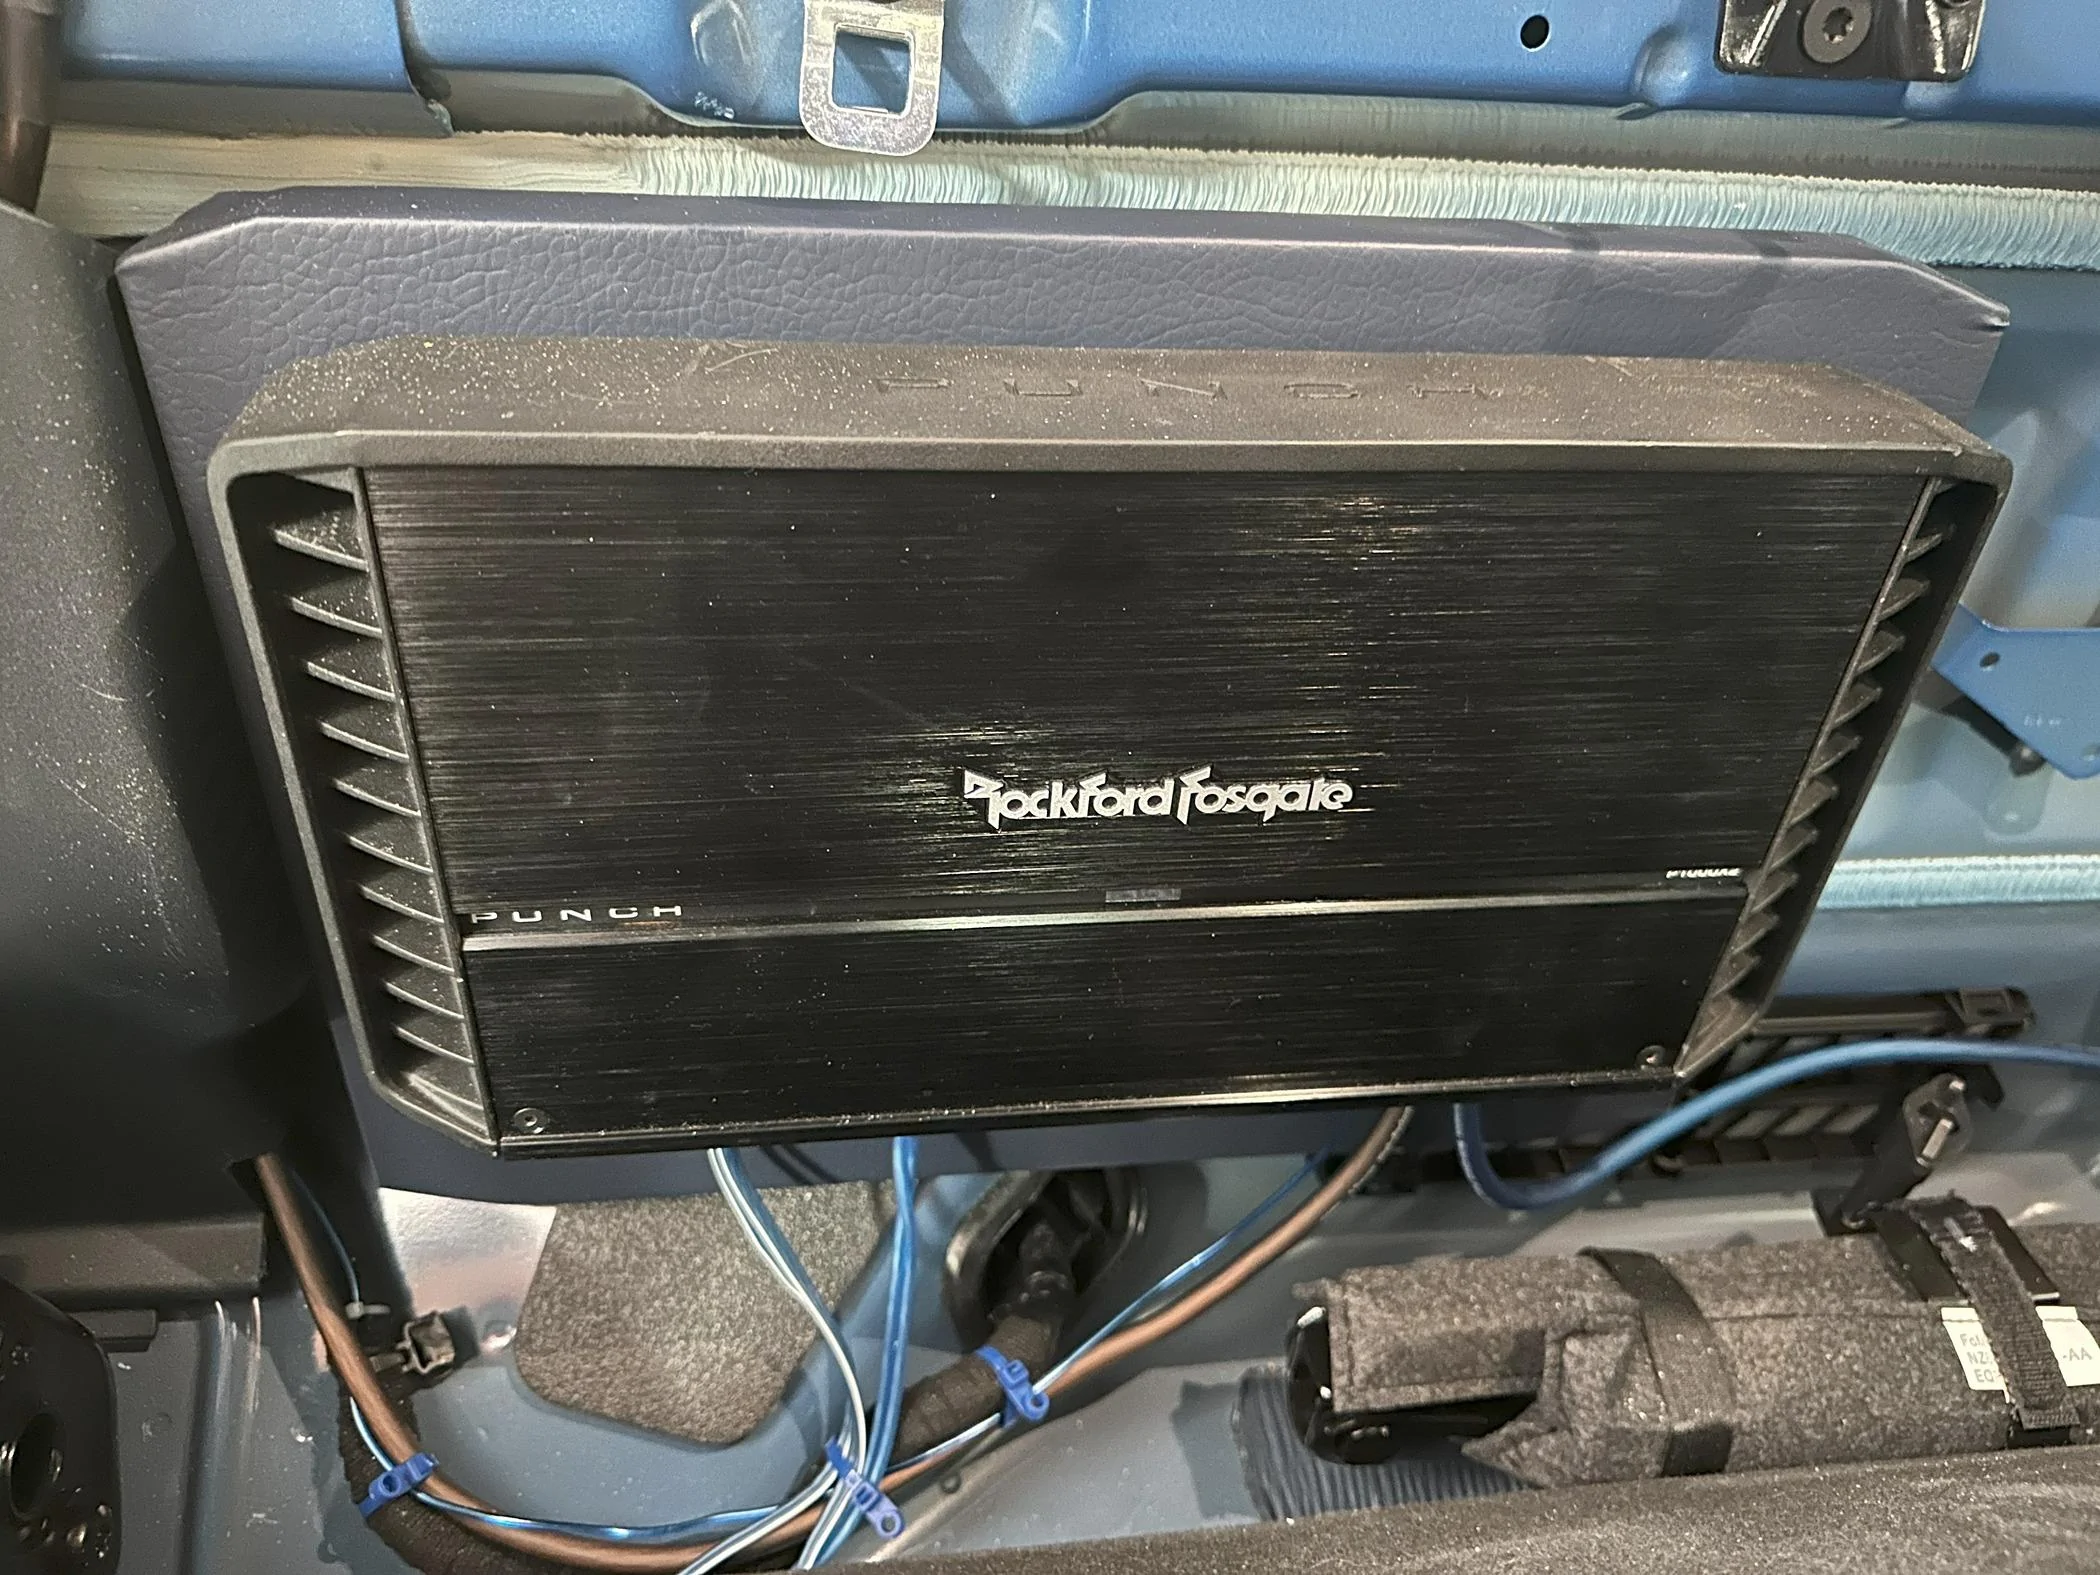
Next, I had to mount the amp, which is a Punch P1000X2. I'm running it with each of the two channels powering one 2 Ohm voicecoil on the sub. It isn't necessary to use the subwoofer in "stereo" as I am, but I got a great deal on this two-channel amp off Craigslist and this was the best way to wire it. I built a mounting plate for it using more MDF, and wrapped it using the same vinyl. I used the factory nutserts that hold the B&O amp on the Lariat trims (note: these are NOT actually threaded on the non-Lariat, so I threaded them using an M5 tap). I predrilled for the amp mounting screws and some mounting screws for some screw-mount zip ties to secure the wires to the amp mounting plate.
I then mounted the amp and ran the wiring. I used this amp wiring kit from Skar. Had everything I needed (except some extra zip ties).
I pulled the inputs for the amp by tapping the front speaker outputs of the ACM using some Posi-taps. I used these speaker-to-RCA adapters from the Posi-taps, and ran an RCA cable to the amp out back. Used this fuse tap and fuse #3 to get switched power for the remote turn-on.
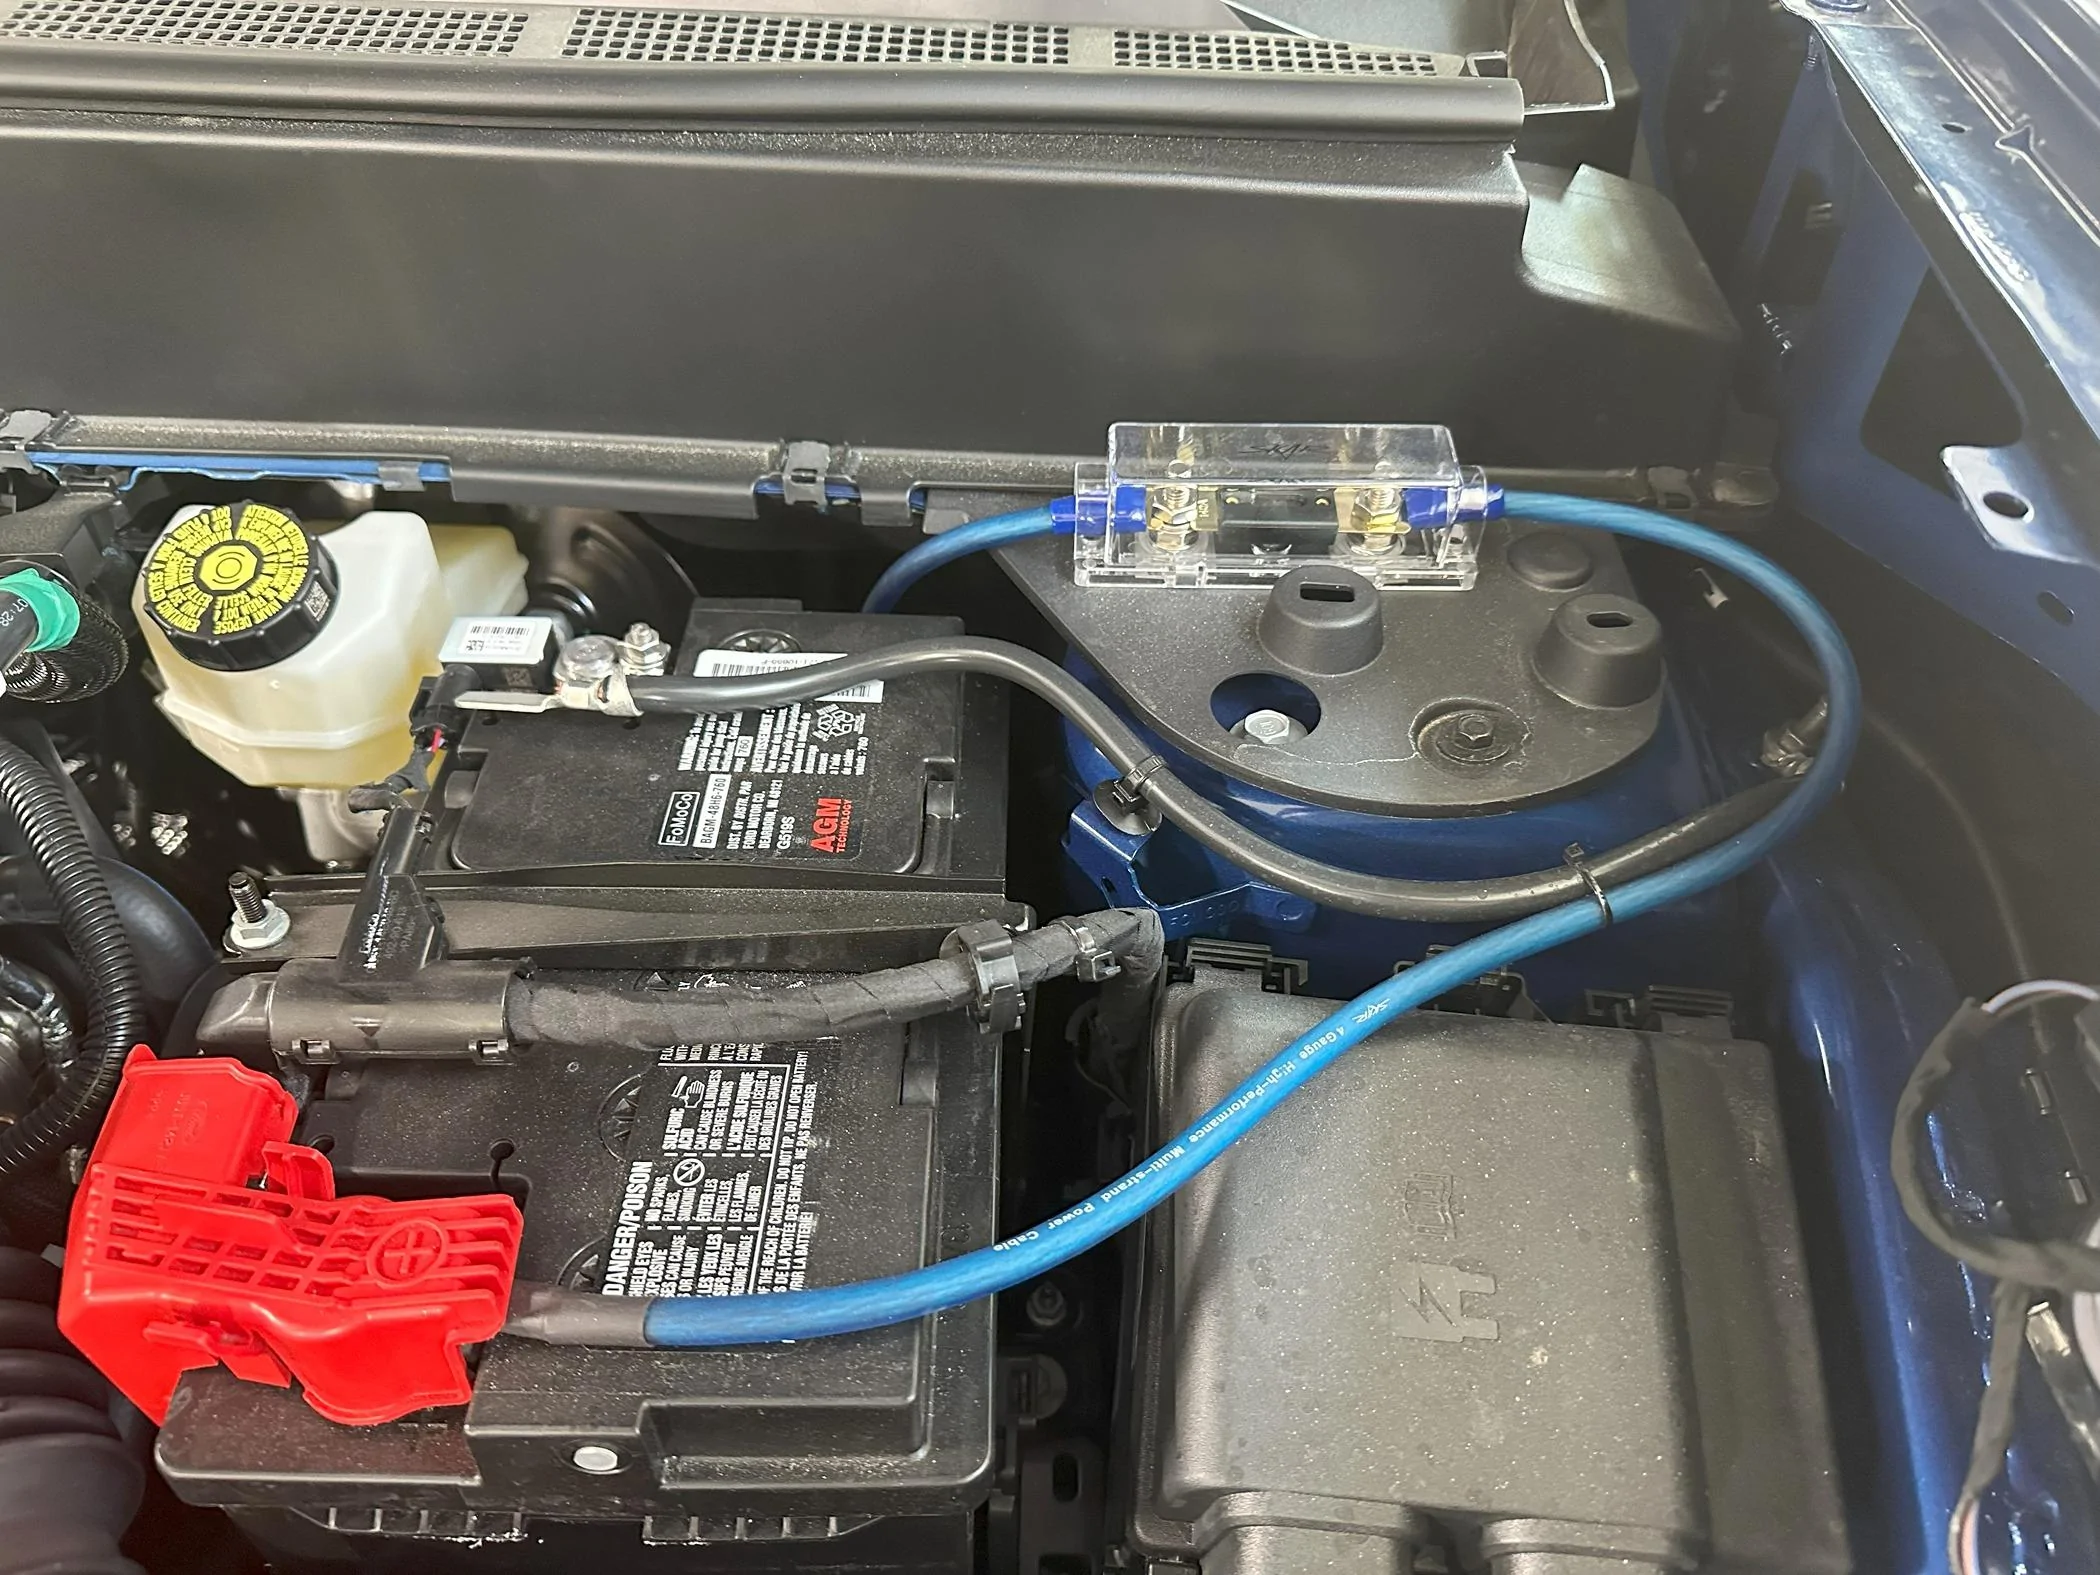
Finally, I added a fuse under the hood near the battery for the amp power. Marked and drilled two small pilot holes, then used two black sheetmetal screws to mount the fuseholder as seen below. I ran the power wire down the driver's side and through the factory grommet under the dash like most people did. Applied some black RTV after cutting it and running the wire to keep moisture out.
I also used my ForScan to set the EQ to "Flat". I need to do some more comparison between the factory settings and flat, but at least initially think it sounds correct. I get nervous when unknown manipulation is being done, so would prefer to have a clean/flat signal to start from. But I will go back to the factory setting and listen for a bit now that I know what it sounds like on different source material in the flat setting.
To do: sound deaden the back wall of the cab and possibly a few other spots that rattle from the bass.
FYI: I still have five more of the Red Wolf rear speaker (and I think front tweeter?) adapters. If anyone wants them, I'll ship them if you cover the postage cost (I think they'd be fine in a padded envelope via USPS, so maybe $3-4).
I started with a set of Rockford Fosgate Punch P165-SI seperates for the front. These have the crossovers for the tweeters built into the woofers, so I ended up using the factory wiring to power the woofer, then running new speaker wire from the woofers through the door jams and up to the dash. Removing the doors, while intimidating on a truck with less than 500 miles, is actually pretty easy. Have a floor jack with a rubber saddle and a second set of hands handy. Takes all of five minutes to unbolt it and another few minutes to unplug the wiring connector.
I used some XTC speaker baffles behind the woofers to try and keep water off the woofers. I cut them with a utility knife to create a "ledge" that leaves the bottom halves exposed so the sound wasn't compromised, but would (hopefully) force water to run off the baffles and drip down past the woofer.
Used some foam rings on the top of the woofers before installing. These woofers fit the Metra 82-5605 speaker mounting brackets perfectly. The 72-5602 speaker wire adapters also fit correctly.
The tweeters were a direct drop-in as far as mounting (but obviously using the new wires I ran); they clipped into place using the original mounting clips perfectly with no rattle or looseness.
One note: when removing the tweeter speaker grills, I dropped several of these blue clips that hold them on into the dash. They eventually worked their way out, but in the meantime I bought a bag of them from Ford (I also broke one). They were like $6 for five of them. The part number is W720456S300. They also hold on some other dash pieces like the climate control panel. You may want to consider proactively ordering a bag of them; they are easy to break/lose.
I did sound deadening on both the backside of the door panels and the interior door skins (work in progress pic; I added more than this overall).
After getting this done and putting everything back together, I've gotta say I was actually pretty impressed with how much better things sounded with just a speaker upgrade and no amp. Bass was MUCH tighter and louder, and extended noticably deeper. Would powering these with an external amp play louder? Sure. But I personally think they sound great even running off the factory head unit/amp.
I then moved on to the rear speakers. I consider these "fill" only; I have the head unit panned almost full forward on the fader, so I could have just left them stock, but decided to upgrade them anyway. I originally bought some Rockford Punch P1462 4x6" speakers, but I could not get these to fit the factory bolt holes using the included mounting adapters, so ended up returning those and using some Punch P142s 4" 2-ways. These fit fine. I've seen it mentioned, but wanted to stress that the Red Wolf (or Metra equivalent) rear speaker adapters seemed like they were not the correct part when I first tried to install them. They don't "fit" in the conventional sense of easily sliding right in to the OEM connectors. But the contacts do line up, you just need to fidget with them a bit.
Next I moved on to the subwoofer. I used a Punch P3SD2-10 DVC shallow subwoofer. I built my own box, basically copying the Ground Shaker design for under the rear seat. I used 1/2" MDF (they use 5/8"), but doubled up the front baffle. I also made it just a bit taller and wider to squeeze out some more cubic feet (inches), and added an internal cross brace (probably unnecessary). I then used this blue vinyl from Amazon to wrap it : Amazon
This was perhaps to hardest part, and the wrapping job I did was not good. However, a lot of it isn't even visible when the box is in the truck, and the top looked pretty good, so a win overall (I know it looks like there's a big wrinkle in this pic but it's a trick of the light).
Next, I had to mount the amp, which is a Punch P1000X2. I'm running it with each of the two channels powering one 2 Ohm voicecoil on the sub. It isn't necessary to use the subwoofer in "stereo" as I am, but I got a great deal on this two-channel amp off Craigslist and this was the best way to wire it. I built a mounting plate for it using more MDF, and wrapped it using the same vinyl. I used the factory nutserts that hold the B&O amp on the Lariat trims (note: these are NOT actually threaded on the non-Lariat, so I threaded them using an M5 tap). I predrilled for the amp mounting screws and some mounting screws for some screw-mount zip ties to secure the wires to the amp mounting plate.
I then mounted the amp and ran the wiring. I used this amp wiring kit from Skar. Had everything I needed (except some extra zip ties).
I pulled the inputs for the amp by tapping the front speaker outputs of the ACM using some Posi-taps. I used these speaker-to-RCA adapters from the Posi-taps, and ran an RCA cable to the amp out back. Used this fuse tap and fuse #3 to get switched power for the remote turn-on.
Finally, I added a fuse under the hood near the battery for the amp power. Marked and drilled two small pilot holes, then used two black sheetmetal screws to mount the fuseholder as seen below. I ran the power wire down the driver's side and through the factory grommet under the dash like most people did. Applied some black RTV after cutting it and running the wire to keep moisture out.
I also used my ForScan to set the EQ to "Flat". I need to do some more comparison between the factory settings and flat, but at least initially think it sounds correct. I get nervous when unknown manipulation is being done, so would prefer to have a clean/flat signal to start from. But I will go back to the factory setting and listen for a bit now that I know what it sounds like on different source material in the flat setting.
To do: sound deaden the back wall of the cab and possibly a few other spots that rattle from the bass.
FYI: I still have five more of the Red Wolf rear speaker (and I think front tweeter?) adapters. If anyone wants them, I'll ship them if you cover the postage cost (I think they'd be fine in a padded envelope via USPS, so maybe $3-4).
Sponsored
Last edited:
