
- First Name
- Sam
- Joined
- Jul 3, 2021
- Threads
- 49
- Messages
- 865
- Reaction score
- 3,669
- Location
- Phoenix, AZ
- Website
- www.youtube.com
- Vehicle(s)
- 2022 Ford Maverick XL Hybrid (sold)
- Engine
- 2.5L Hybrid
- Thread starter
- #1
The Ford Accessories Fender Flares for the 2022-2024 Maverick are made by supplier Air Design and are at current only available through Ford approved dealerships and online through the official Ford Accessories website.
They retail for a pretty spendy $669 but at some dealerships that price can include installation. You can also search around online and even at local dealerships and find good deals on them down into the $450-500 range. I purchased mine online from a Ford dealership in the mid-west advertising them for just under $500 and with shipping they came in around $540.
They arrived in a large box measuring about 30 x 60 inches and in decent shape. Upon opening it I found immediately an instruction booklet that was very complete and detailed. I was surprised though that the packaging allowed the parts to loosely slide around in the box without much to secure them. The good news is that the flares themselves were well protected in foam sleeves to assure that they weren't scratched or damaged.
There was also a box marked “hardware” that included a tube of high strength industrial adhesive, but no other clips, screws or other parts that might be used to secure the flares to the truck.
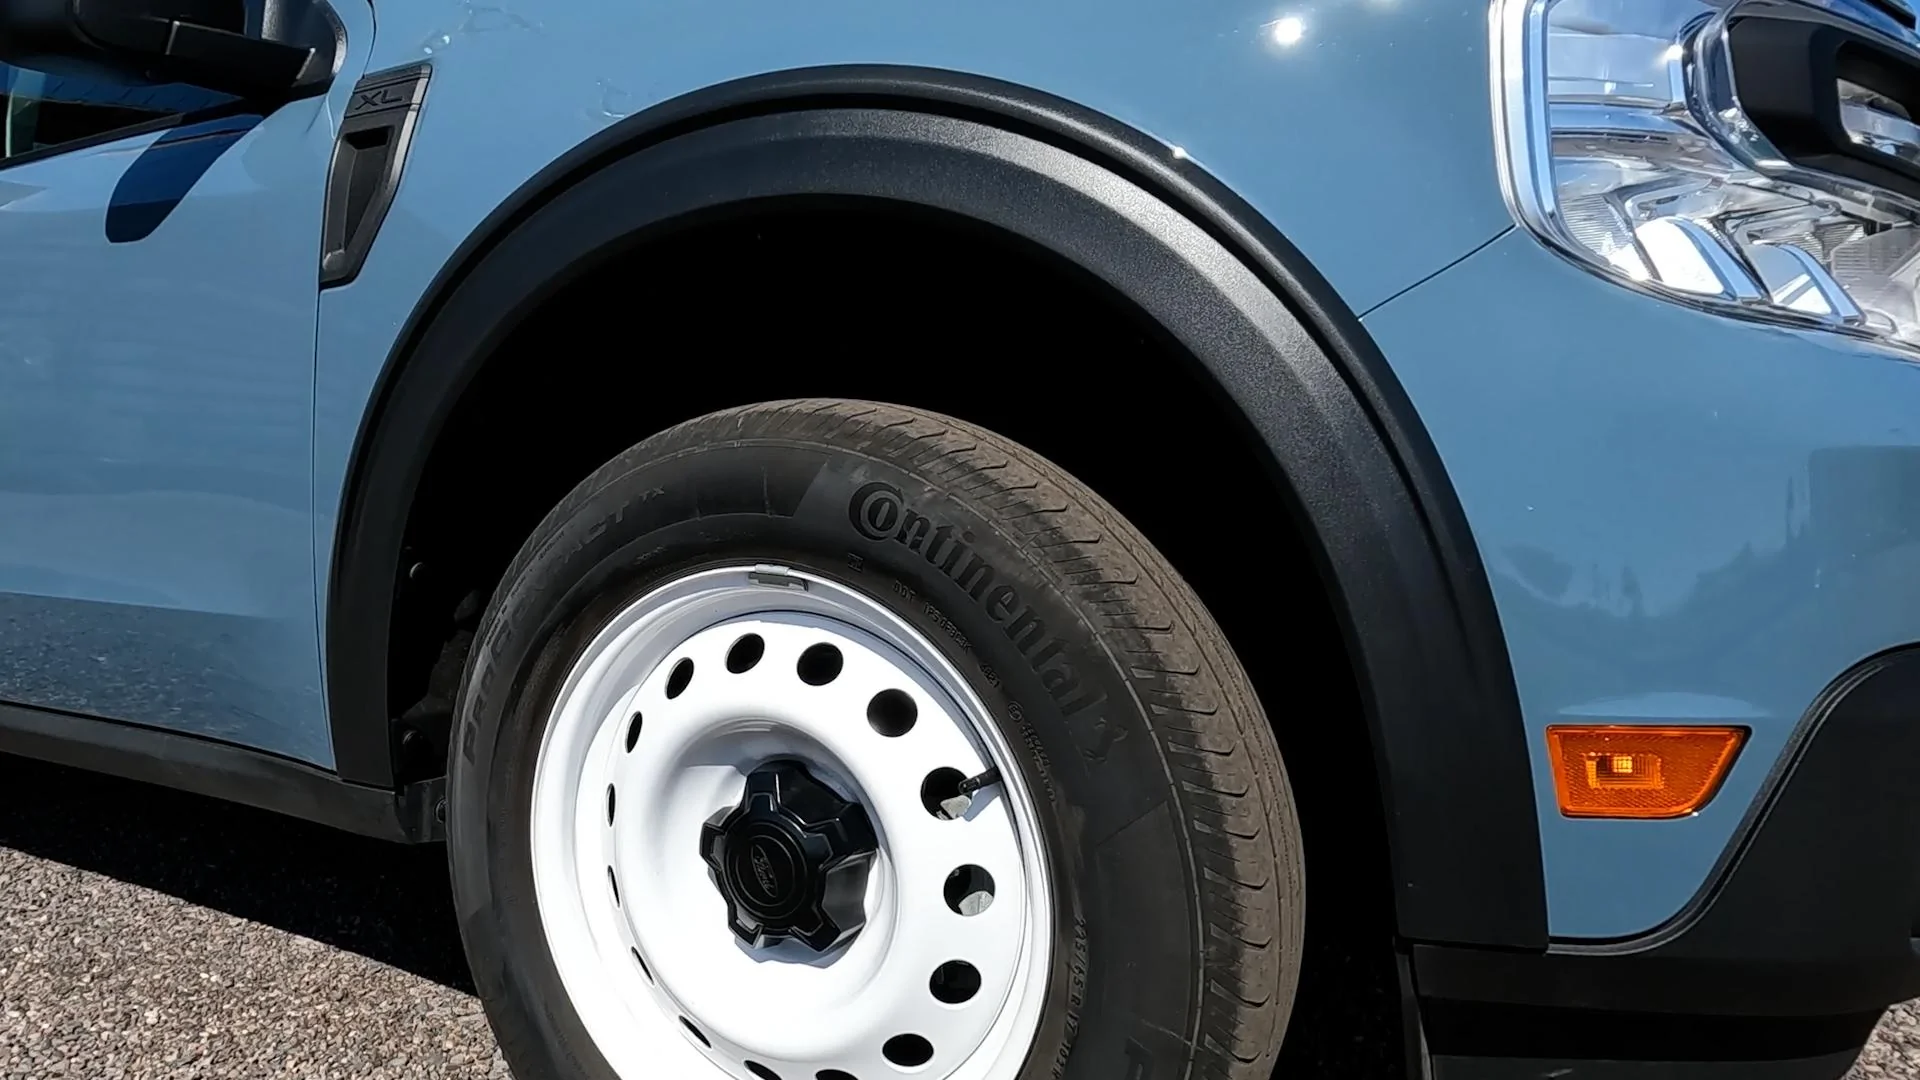
Unwrapping the flares I found that the foam sleeves did a good job of protecting them during shipment and that each one of them is individually marked with a label that tells you front, rear, left and right. Upon inspection I was surprised they are actually molded in white plastic which is painted to match and not color through like the factory trims.
The process of installation for all four flares is well documented in the instructions with good detail and should be the basis for your own installation, but I will summarize here.
The first thing you must do is remove a selected number of the body clip push pins from the inner fender liners. You should use a tool made for this, easily found at your local auto parts store and cheap. It's good insurance not to destroy them or damage your vehicle.
I will point out here that I purchased new body clip push pins to use on my installation because reusing the old clips didn't work out to well. Some of them break coming out. More important though is that there are two different sizes, at least on my truck. The shorter ones do not reinstall very well with the fender flares due to the extra material thickness, they are just too short. So I purchased longer ones that did the trick. You can get these at most auto parts stores or cheapest online.
Next step is to test fit the flare in place by pressing it and snapping it up tightly into position, assuring top and bottom are where they should be. It's locked in place temporarily with a couple pins so you can mark its location precisely. The instructions call for you to use a grease pencil which is provided in the hardware box, but I chose to use masking tape as it was quicker for me and required less cleanup. Once positioning was set, I pulled the flare back off for preparation.
Laying the flare on a soft protected surface so I don't scratch or scuff it I flipped it over face down. It adheres to the truck with a combination of high-tack self adhesive tape and also liquid adhesive glue which is provided. There is a channel molded into the back of the flare for the adhesive which has to be applied with a 1/4” bead.
The tape itself needs to be pulled back slightly here and there in a way well detailed in the instructions so that it can be pulled off strategically during installation. The order and strategy of removing the backing here is slightly different from how the instructions call for but the point is that it's important you don't let the tape touch the metal until you're absolutely certain the flare is in the right spot. You only get one chance.
After the glue bead was laid on without touching the adhesive tape I then thoroughly cleaned the fender surface with 91% alcohol to ensure any wax or surface contaminants were gone before working the prepped flare into place.
Taking extreme care not to let the adhesive come into contact with the metal I carefully worked the flare into place so that my tape markings matched up. Once this was assured I then locked it into place with a couple of body clip push pins at the bottom.
Then before pushing it tight to the body, I carefully pulled the tape backing away from the surfaces and slowly began to press it into place firmly. You want to apply pressure to the body in all of the locations where the adhesive and tape exist.
Once I was satisfied I had critical adhesion I then began installing the body clips into place. They can be challenging to work in but having the new clips made it a lot easier than reusing the old ones. Once all was in place I gave it a good round of pressure to assure it was stuck and removed the masking tape and cleaned it all up. A perfect it.
The job took about 2 hours for me and the temperature was about 95 degrees. If you are working in colder temperatures, the instructions recommend heating the surfaces with a heat gun as the adhesives may not bond well otherwise - so plan accordingly.
I am mostly satisfied with the product and the final result of installation but have a few thoughts. The good points are impeccable fit and finish, a good design that looks OEM with a surface texture that matches the factory trims.
The downsides are that the painted color is not a 100% match to factory color-through molded plastic of the lower body cladding. I was also dismayed at the high price tag, even with the significant discount I found it's still too much. At its price too I'm surprised it didn't come with the needed fasteners most people will need to make installation go smoothly.
Lastly because the installation utilizes both self adhesive tapes and liquid adhesive, installation is a one way ticket. If you need to remove them for any reason, they will likely be damaged and require replacement. Do these last if you have other modifications necessary like removing a bumper or lower body trims.
They retail for a pretty spendy $669 but at some dealerships that price can include installation. You can also search around online and even at local dealerships and find good deals on them down into the $450-500 range. I purchased mine online from a Ford dealership in the mid-west advertising them for just under $500 and with shipping they came in around $540.
They arrived in a large box measuring about 30 x 60 inches and in decent shape. Upon opening it I found immediately an instruction booklet that was very complete and detailed. I was surprised though that the packaging allowed the parts to loosely slide around in the box without much to secure them. The good news is that the flares themselves were well protected in foam sleeves to assure that they weren't scratched or damaged.
There was also a box marked “hardware” that included a tube of high strength industrial adhesive, but no other clips, screws or other parts that might be used to secure the flares to the truck.
Unwrapping the flares I found that the foam sleeves did a good job of protecting them during shipment and that each one of them is individually marked with a label that tells you front, rear, left and right. Upon inspection I was surprised they are actually molded in white plastic which is painted to match and not color through like the factory trims.
The process of installation for all four flares is well documented in the instructions with good detail and should be the basis for your own installation, but I will summarize here.
The first thing you must do is remove a selected number of the body clip push pins from the inner fender liners. You should use a tool made for this, easily found at your local auto parts store and cheap. It's good insurance not to destroy them or damage your vehicle.
I will point out here that I purchased new body clip push pins to use on my installation because reusing the old clips didn't work out to well. Some of them break coming out. More important though is that there are two different sizes, at least on my truck. The shorter ones do not reinstall very well with the fender flares due to the extra material thickness, they are just too short. So I purchased longer ones that did the trick. You can get these at most auto parts stores or cheapest online.
Next step is to test fit the flare in place by pressing it and snapping it up tightly into position, assuring top and bottom are where they should be. It's locked in place temporarily with a couple pins so you can mark its location precisely. The instructions call for you to use a grease pencil which is provided in the hardware box, but I chose to use masking tape as it was quicker for me and required less cleanup. Once positioning was set, I pulled the flare back off for preparation.
Laying the flare on a soft protected surface so I don't scratch or scuff it I flipped it over face down. It adheres to the truck with a combination of high-tack self adhesive tape and also liquid adhesive glue which is provided. There is a channel molded into the back of the flare for the adhesive which has to be applied with a 1/4” bead.
The tape itself needs to be pulled back slightly here and there in a way well detailed in the instructions so that it can be pulled off strategically during installation. The order and strategy of removing the backing here is slightly different from how the instructions call for but the point is that it's important you don't let the tape touch the metal until you're absolutely certain the flare is in the right spot. You only get one chance.
After the glue bead was laid on without touching the adhesive tape I then thoroughly cleaned the fender surface with 91% alcohol to ensure any wax or surface contaminants were gone before working the prepped flare into place.
Taking extreme care not to let the adhesive come into contact with the metal I carefully worked the flare into place so that my tape markings matched up. Once this was assured I then locked it into place with a couple of body clip push pins at the bottom.
Then before pushing it tight to the body, I carefully pulled the tape backing away from the surfaces and slowly began to press it into place firmly. You want to apply pressure to the body in all of the locations where the adhesive and tape exist.
Once I was satisfied I had critical adhesion I then began installing the body clips into place. They can be challenging to work in but having the new clips made it a lot easier than reusing the old ones. Once all was in place I gave it a good round of pressure to assure it was stuck and removed the masking tape and cleaned it all up. A perfect it.
The job took about 2 hours for me and the temperature was about 95 degrees. If you are working in colder temperatures, the instructions recommend heating the surfaces with a heat gun as the adhesives may not bond well otherwise - so plan accordingly.
I am mostly satisfied with the product and the final result of installation but have a few thoughts. The good points are impeccable fit and finish, a good design that looks OEM with a surface texture that matches the factory trims.
The downsides are that the painted color is not a 100% match to factory color-through molded plastic of the lower body cladding. I was also dismayed at the high price tag, even with the significant discount I found it's still too much. At its price too I'm surprised it didn't come with the needed fasteners most people will need to make installation go smoothly.
Lastly because the installation utilizes both self adhesive tapes and liquid adhesive, installation is a one way ticket. If you need to remove them for any reason, they will likely be damaged and require replacement. Do these last if you have other modifications necessary like removing a bumper or lower body trims.
Sponsored

")