
- Joined
- Jul 30, 2021
- Threads
- 15
- Messages
- 215
- Reaction score
- 330
- Location
- Central KY
- Vehicle(s)
- Maverick Lariat Hybrid
- Engine
- 2.5L Hybrid
- Thread starter
- #1
First, this installation is on a Hybrid Lariat with all the major options, so if you have a different model, there will be some differences, especially the power run.
Since there are a lot of differences between rigs and antennas, some things will not apply or apply differently. I installed an Icom IC-4100A that has a control head that I put on the dash, above the information screen and a mike not too far above the knee in the front of the cab. The main radio was placed under the passenger seat. In addition to the power and antenna cables, there is a cable that runs to the control head and one for the mike. When I was done with the installation, I used some double sided tape to keep the main part of the rig from sliding on the carpet under the seat.
The big thing that made this installation possible without drilling is Velcro® tape. This is not the ordinary Velcro tape but one they make for automotive installations. It is more expensive than their standard tape. Look for part number 90881 or make sure it is for automotive use. It is designed to stick to dashboards and automotive plastic and is supposed to be able to handle the heat in a car during the summer. The heat part remains to be seen until we get some warm weather here in Central Kentucky. As far as using the tape, take just as much care as you would if you were drilling and using screws. I assume some of the solvents used on cars to remove glue and other chemicals should be able to remove the sticky part of the Velcro tape. I haven’t tried it yet.
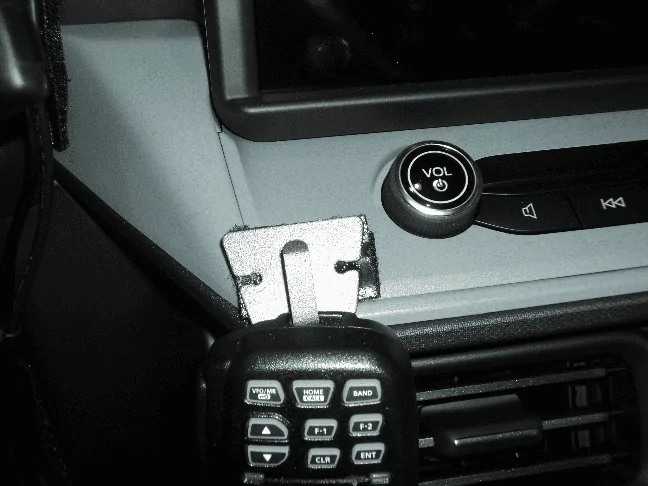
For the control head, due to the width, I cut the Velcro half width and placed one side on the bottom of the control head. The other side of the Velcro was taped to the top of the screen to put the control head right where I could see it and get to the knobs. Once the two parts of the tape were applied to each part, I carefully placed the control head above the screen. It sat there nicely but could be pushed back without separating the tape. I discovered that I could pull the control head off of the screen top and slightly reposition it with a slight angle to face the driver instead of facing directly to the rear. It wasn’t completely matched up with the Velcro, but it wasn’t going anywhere and was easier to see the display and control knobs.
I used the standard microphone hanger for my mike and stuck it to an area where I could reach it easily. The tape is strong enough to hold the weight of the mike. Future use will tell me if it will hold up.
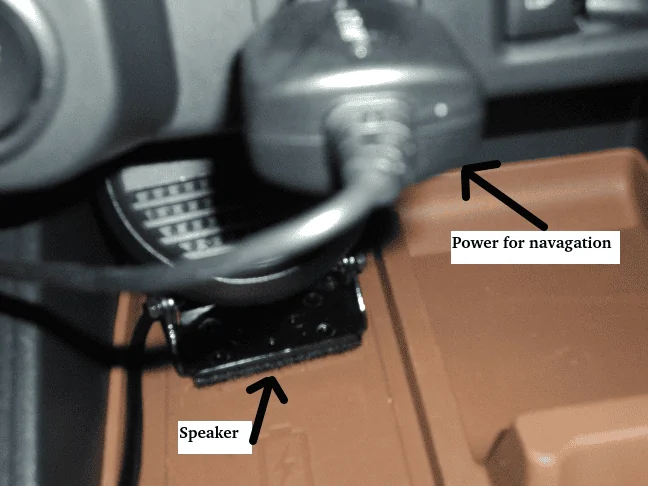
The speaker has a mount designed to be screwed on to a flat surface. I just put one side of the Velcro on the speaker mount and the other side of the surface just about where the recharging area is at the bottom of the dash area. I don’t need the recharging function for my phone. So, the speaker is facing forward and is in the back in the bottom dash area.
Now that the easy part is done, run the wires. Use some wire ties to keep them together and try to shove them under parts of the center console to run from the rig to up front. I had a few spots where I could not get the wires hidden so, to keep them from getting in the way, I took a strip of Velcro and stuck the wire tied cables to surface plastic where I couldn’t put them under something. Keeping the wires straight and tightly tied together helps the Velcro stick better to them. For the power cables, I took them under the mount for the passenger seat to the center console and straight back to the battery. The wires fit under the rear seat but the short run from the center console was visible. I used some thick black tape to cover the power wires and when the floor mats I ordered arrived, they covered the tape, so none of it could be seen. The power cable for my rig has fuses near the end of the cable where it connects to the source, so I’m protected there. Now, I just have to remember to turn my rig off when I leave the truck.
When I was looking over the truck to find a good place to mount the antenna instead of the best place, which is in the center of the roof, I was standing on the passenger side by the front wheel and noticed the hood near the windshield. There was a spot on the hood where the mount would fit, just like on the trunk! There is probably one of the same on the driver’s side but Ford says to keep RF away from the area due to the computer locations, so the passenger side it is.
After putting some oil on the set screws to attach the mount to the hood, it went on with no problem after I found the correct Allen wrench. I screwed the antenna on and opened and closed the hood to make sure everything fit and there were no conflicts.
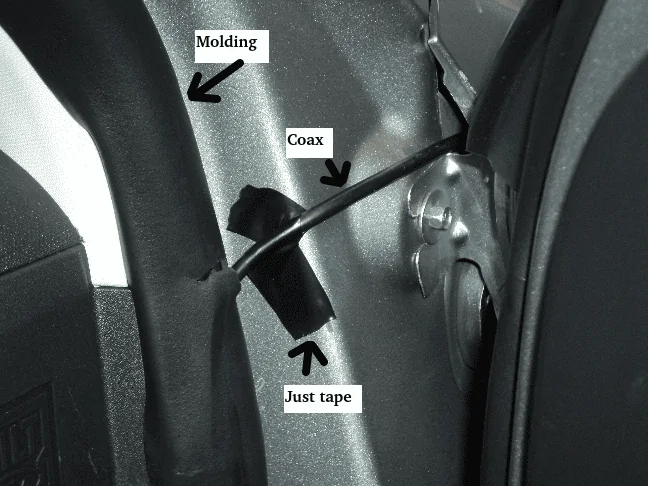
The coax ran under the hood OK but I could not find any holes or potential holes in the firewall to get the coax inside to the rig. I ended up running it to the passenger door molding and made a slice across it to insert the coax. I planned to snake the coax through the inside of the molding and run it down to the area of the passenger seat. I had to remove the connector on the coax so it would fit through the molding. When I tried to push the coax through the molding, it was not stiff enough to push it through. So, I had a “snake” used to pull electrical wire through conduit but it was a bit too big on the end for the molding. I looked around and found an old antenna rod to use to pull the coax through. Since it was stiff, when I got the coax down to the bottom where it curves, I couldn’t get it around the curve, so I had to make another cut in the molding and untape the rod from the coax and do it over again until I got it to the rear of the seat where I ran it under the seat mounts to directly under the seat, where I have the rig. I put on a new PL-259 and the antenna was ready to go.
As a bonus, I will mention my navigation system. Unlike those of you that are getting a 23 model year, those of us with the 22 model year had to do without or get our own. I had previously installed one on a motorcycle, so I had no problem with this one. It is the cheapest one Garmin has. I ordered one without the traffic option but did order the extra memory and the vehicle power cable that is long enough to reach from the windshield mount to the lighter outlet in the lower dash area. Since I no longer live in major metro areas, I don’t have to worry about traffic.


Since there are a lot of differences between rigs and antennas, some things will not apply or apply differently. I installed an Icom IC-4100A that has a control head that I put on the dash, above the information screen and a mike not too far above the knee in the front of the cab. The main radio was placed under the passenger seat. In addition to the power and antenna cables, there is a cable that runs to the control head and one for the mike. When I was done with the installation, I used some double sided tape to keep the main part of the rig from sliding on the carpet under the seat.
The big thing that made this installation possible without drilling is Velcro® tape. This is not the ordinary Velcro tape but one they make for automotive installations. It is more expensive than their standard tape. Look for part number 90881 or make sure it is for automotive use. It is designed to stick to dashboards and automotive plastic and is supposed to be able to handle the heat in a car during the summer. The heat part remains to be seen until we get some warm weather here in Central Kentucky. As far as using the tape, take just as much care as you would if you were drilling and using screws. I assume some of the solvents used on cars to remove glue and other chemicals should be able to remove the sticky part of the Velcro tape. I haven’t tried it yet.
For the control head, due to the width, I cut the Velcro half width and placed one side on the bottom of the control head. The other side of the Velcro was taped to the top of the screen to put the control head right where I could see it and get to the knobs. Once the two parts of the tape were applied to each part, I carefully placed the control head above the screen. It sat there nicely but could be pushed back without separating the tape. I discovered that I could pull the control head off of the screen top and slightly reposition it with a slight angle to face the driver instead of facing directly to the rear. It wasn’t completely matched up with the Velcro, but it wasn’t going anywhere and was easier to see the display and control knobs.
I used the standard microphone hanger for my mike and stuck it to an area where I could reach it easily. The tape is strong enough to hold the weight of the mike. Future use will tell me if it will hold up.
The speaker has a mount designed to be screwed on to a flat surface. I just put one side of the Velcro on the speaker mount and the other side of the surface just about where the recharging area is at the bottom of the dash area. I don’t need the recharging function for my phone. So, the speaker is facing forward and is in the back in the bottom dash area.
Now that the easy part is done, run the wires. Use some wire ties to keep them together and try to shove them under parts of the center console to run from the rig to up front. I had a few spots where I could not get the wires hidden so, to keep them from getting in the way, I took a strip of Velcro and stuck the wire tied cables to surface plastic where I couldn’t put them under something. Keeping the wires straight and tightly tied together helps the Velcro stick better to them. For the power cables, I took them under the mount for the passenger seat to the center console and straight back to the battery. The wires fit under the rear seat but the short run from the center console was visible. I used some thick black tape to cover the power wires and when the floor mats I ordered arrived, they covered the tape, so none of it could be seen. The power cable for my rig has fuses near the end of the cable where it connects to the source, so I’m protected there. Now, I just have to remember to turn my rig off when I leave the truck.
When I was looking over the truck to find a good place to mount the antenna instead of the best place, which is in the center of the roof, I was standing on the passenger side by the front wheel and noticed the hood near the windshield. There was a spot on the hood where the mount would fit, just like on the trunk! There is probably one of the same on the driver’s side but Ford says to keep RF away from the area due to the computer locations, so the passenger side it is.
After putting some oil on the set screws to attach the mount to the hood, it went on with no problem after I found the correct Allen wrench. I screwed the antenna on and opened and closed the hood to make sure everything fit and there were no conflicts.
The coax ran under the hood OK but I could not find any holes or potential holes in the firewall to get the coax inside to the rig. I ended up running it to the passenger door molding and made a slice across it to insert the coax. I planned to snake the coax through the inside of the molding and run it down to the area of the passenger seat. I had to remove the connector on the coax so it would fit through the molding. When I tried to push the coax through the molding, it was not stiff enough to push it through. So, I had a “snake” used to pull electrical wire through conduit but it was a bit too big on the end for the molding. I looked around and found an old antenna rod to use to pull the coax through. Since it was stiff, when I got the coax down to the bottom where it curves, I couldn’t get it around the curve, so I had to make another cut in the molding and untape the rod from the coax and do it over again until I got it to the rear of the seat where I ran it under the seat mounts to directly under the seat, where I have the rig. I put on a new PL-259 and the antenna was ready to go.
As a bonus, I will mention my navigation system. Unlike those of you that are getting a 23 model year, those of us with the 22 model year had to do without or get our own. I had previously installed one on a motorcycle, so I had no problem with this one. It is the cheapest one Garmin has. I ordered one without the traffic option but did order the extra memory and the vehicle power cable that is long enough to reach from the windshield mount to the lighter outlet in the lower dash area. Since I no longer live in major metro areas, I don’t have to worry about traffic.
Sponsored