
Sponsored

CuteLilTruck

2.5L Hybrid
Well-known member
First Name
Gabe
Joined
Apr 26, 2024
Threads
1
Messages
71
Reaction score
69
Location
California
Vehicle(s)
Subaru Maverick Hybrid
Engine
2.5L Hybrid
Any chance you post pics of the rubber pass through above the pedals and the v-shape in the bumper area?
I installed my WolfBox much like yours, the only thing remaining is the front bumper camera.

I'd love your thoughts on this.
I can't find an angle where I can use the G900 as a mirror (screen off) because the arms limited range and the cables sticking up into the plastic.
I also found the antiglare film to make the mirror function (screen off) useless.
 
OP
OP
rtphokie

rtphokie

2.5L Hybrid
Well-known member
First Name
Tony
Joined
May 4, 2025
Threads
13
Messages
219
Reaction score
595
Location
Raleigh, NC
Vehicle(s)
2025 Maverick XLT
Engine
2.5L Hybrid
any reason you ran power to odb port vs. tapping into the power already up there with a harness like this? does it require too much power?

https://www.etsy.com/listing/1882905345/22-26-ford-maverick-harness-to-add-auto
My understanding that is switched power which remains hot for only 10 minutes after shutting down the vehicle. That's a great solution for an auto-dimming mirror and or a basic dash cam.

By powering through the OBD port (or hardwiring to the fuse block), you get power all the time enabling the parking monitor features of the dash cam.

Worth noting that both the OBD and hardwire kits sold by Wolfbox have adjustable protection that stop drawing power once the 12V battery drops below a preset voltage.
 

Dave O

2.5L Hybrid
Well-known member
First Name
Dave
Joined
Jan 25, 2025
Threads
33
Messages
1,759
Reaction score
2,385
Location
New Smyrna Beach Florida
Vehicle(s)
2025 Ford Maverick Lariat AWD Hybrid, 2025 Subaru Forester, 04 Jeep Wrangler TJ
Engine
2.5L Hybrid
Clubs
 
My understanding that is switched power which remains hot for only 10 minutes after shutting down the vehicle. That's a great solution for an auto-dimming mirror and or a basic dash cam.

By powering through the OBD port (or hardwiring to the fuse block), you get power all the time enabling the parking monitor features of the dash cam.

Worth noting that both the OBD and hardwire kits sold by Wolfbox have adjustable protection that stop drawing power once the 12V battery drops below a preset voltage.
I also grabbed power using the WolfBox Adapter for the OBD II Port when I installed my WolfBox G900 TriPro works great👍
 

scottjl

2.5L Hybrid
Well-known member
Joined
Jan 8, 2025
Threads
13
Messages
495
Reaction score
1,078
Location
Midwest USA
Vehicle(s)
'25 Lariat Eruption Green, 4k, BAP
Engine
2.5L Hybrid
Clubs
 
My understanding that is switched power which remains hot for only 10 minutes after shutting down the vehicle. That's a great solution for an auto-dimming mirror and or a basic dash cam.
Yep, I can say this is true, my camera powers down after 10 minutes. I don't care about the parking features of my camera so that's fine for me. I live in the sticks and rarely am in a big city so it isn't an issue.

Your reason for using ODB makes sense if you need that capability. I have a bluetooth ODB reader in my port connected to an app on my phone so it really isn't an option for me anyway.

Thanks for the explanation!
 

Sponsored

Darthie

2.0L EcoBoost
Well-known member
First Name
Frank
Joined
Jan 5, 2025
Threads
78
Messages
1,074
Reaction score
1,434
Location
Florida
Vehicle(s)
2023 Maverick Tremor, 2016 MB AMG GTS
Engine
2.0L EcoBoost
Clubs
 
I don’t understand how this cam can connect to CarPlay and to the dash cam at the same time. Seems like all the others require an LTE dongle and a $10 per month connection?
 

boatfixer27

2.5L Hybrid
New member
First Name
Sven
Joined
May 16, 2026
Threads
0
Messages
2
Reaction score
5
Location
North Carolina
Vehicle(s)
26 Maverick XLT hybrid
Engine
2.5L Hybrid
Many thanks to rtphokie for answering my install questions.
I wanted to share my install findings to help the next person.
The red wire at the rear camera connection end is only to add back up lines if attached to the back up light input, it did not connect and just taped over since the Ford backup camera works fine with its lines.
I bought the Etsy rear camera mount to the 3rd brake light, I was able to run the rear camera wire through the headliner - there are some pegs visible when the rear brake light is out to squeeze which will lower the headliner an inch, and the door seals come out for access and fish tape use.
The front camera wire I fished through the front bumper cover to the passenger side and I cut a lip through the protruding nipple at the harness entry point behind the fuse box. I had to remove the splash shield and remover screws holding bumper cover to get my hand underneath to fish it.
Wolfbox sent me the hard wire fuse connector after I emailed / called to ask, got it in a day, easy to tap into #3 and #20 fuses.
Setting up the rear camera I realized I had to flip the image, and I didn't figure out the mirror left / right image flip until after I drove to work and the left side was on the right which made the commute that day interesting.
Early mornings has dew on the rear outside camera, have to figure out if there is a way to keep it clear for the commute without having to wipe it down before driving off.
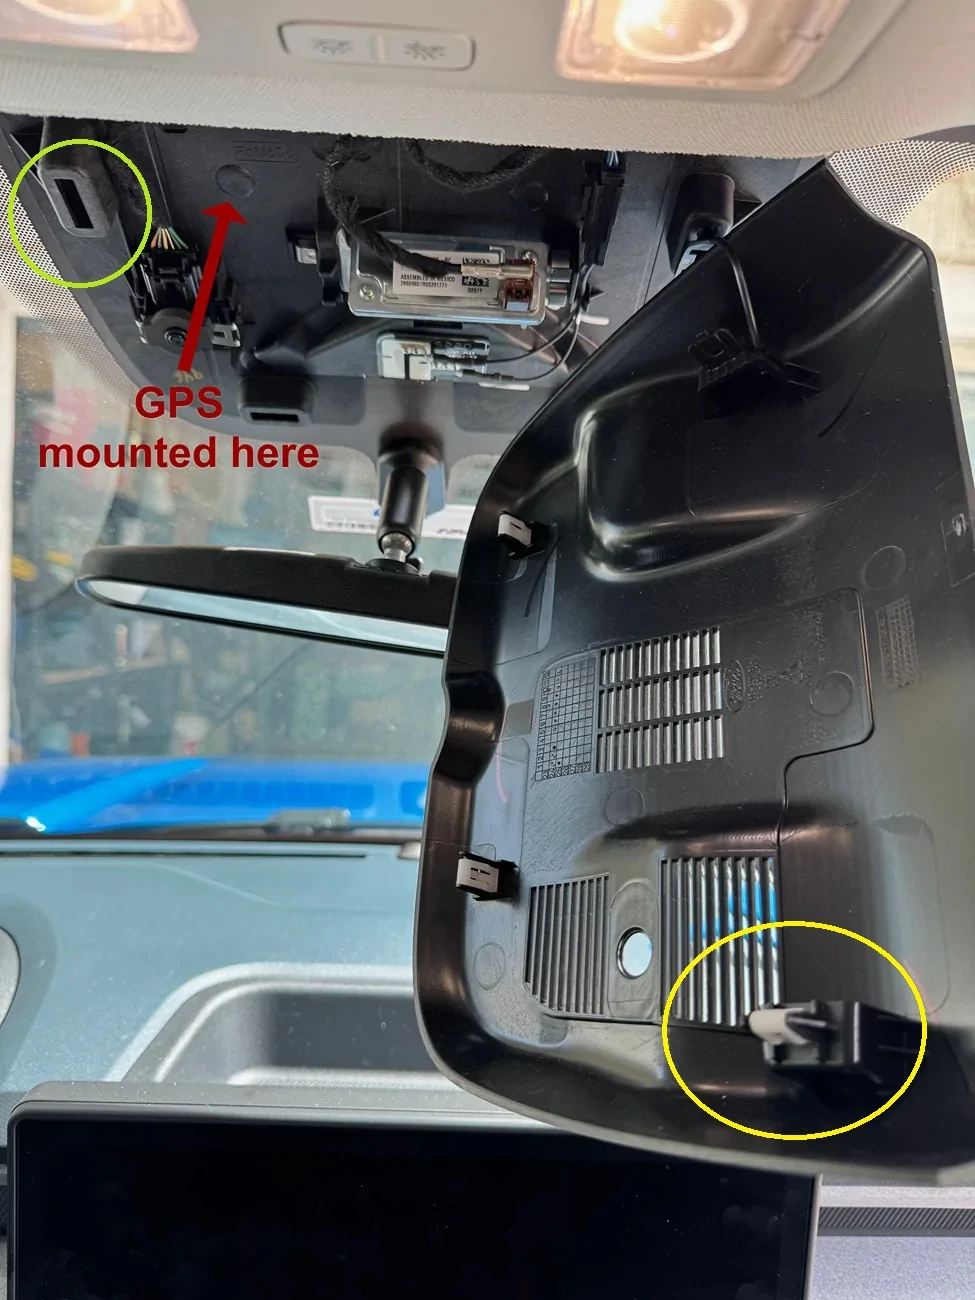
All the extra wire got coiled up and stuck in headliner, lots of room up there, GPS went there too. (No sunroof helps).
All in all not too difficult of an installation.
 

Retro1

2.5L Hybrid
Well-known member
First Name
Jon
Joined
Aug 21, 2026
Threads
1
Messages
162
Reaction score
215
Location
Inverness, FL
Vehicle(s)
2026 Maverick hybrid; 2023 RAV4 hybrid; 1970 Cougar 351C
Engine
2.5L Hybrid
Thanks again to rtphoke for an informative write up; just installed my Tri-Pro a couple days ago. Still not hard wired, powering through the cigarette lighter plug. I will post a separate review of the unit at a later date, but for now a couple "add-on" thoughts to the installation process.

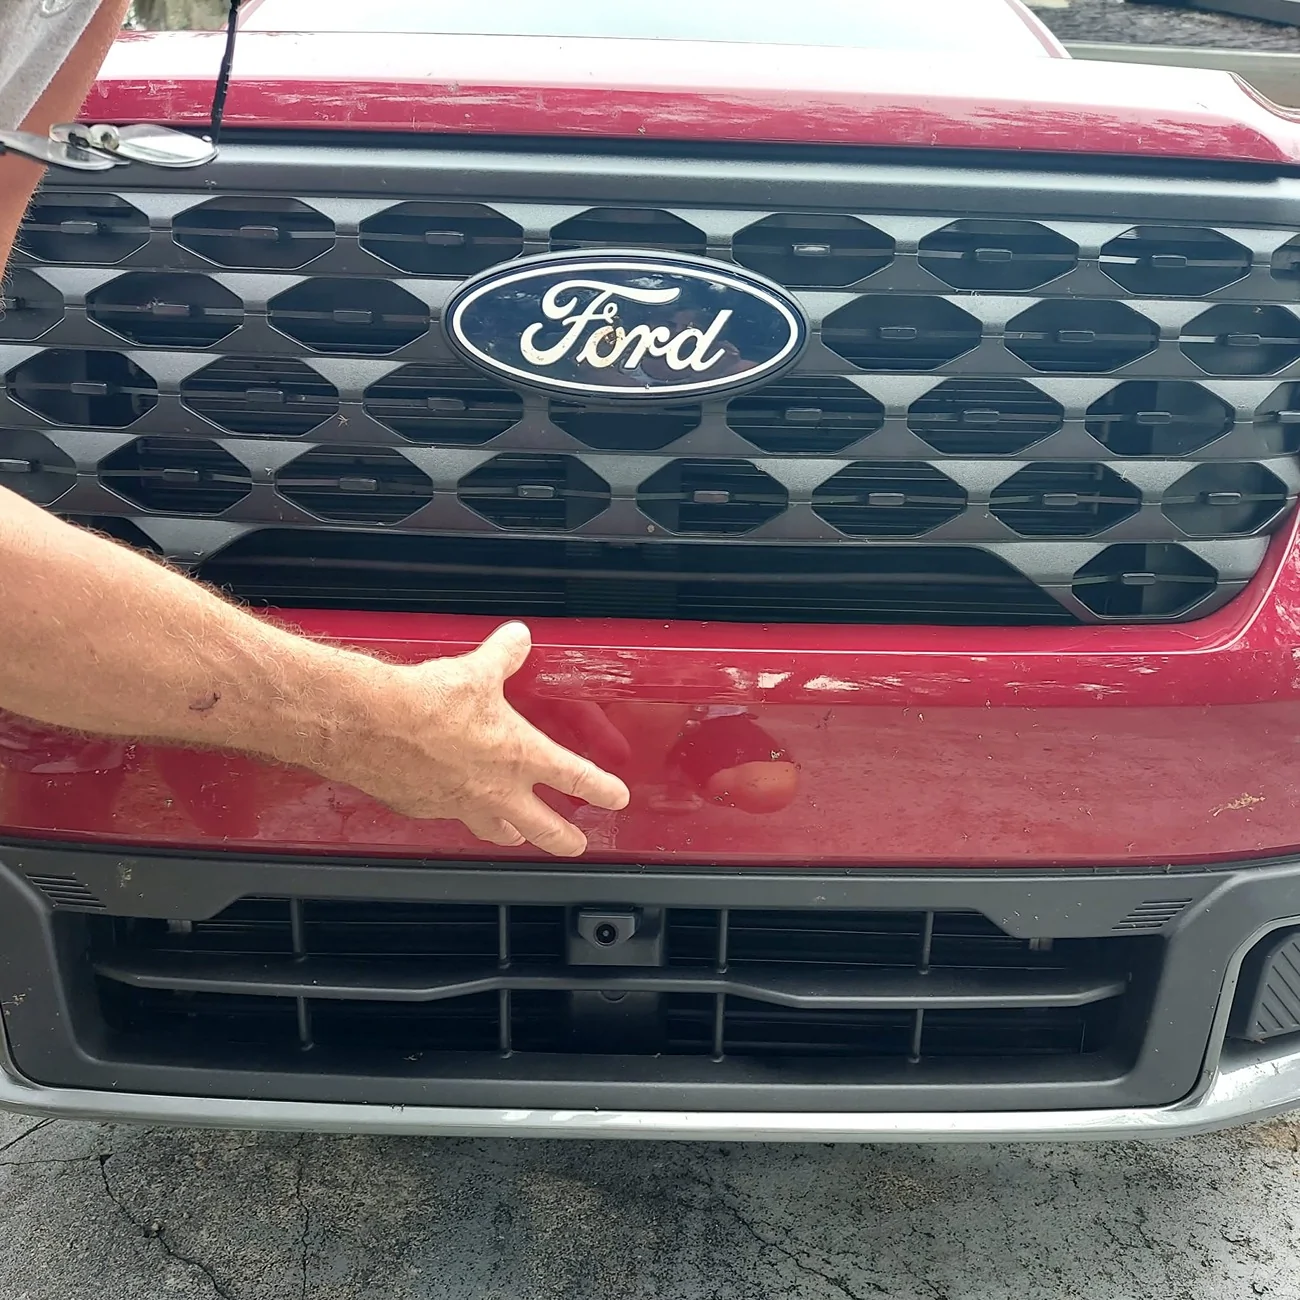
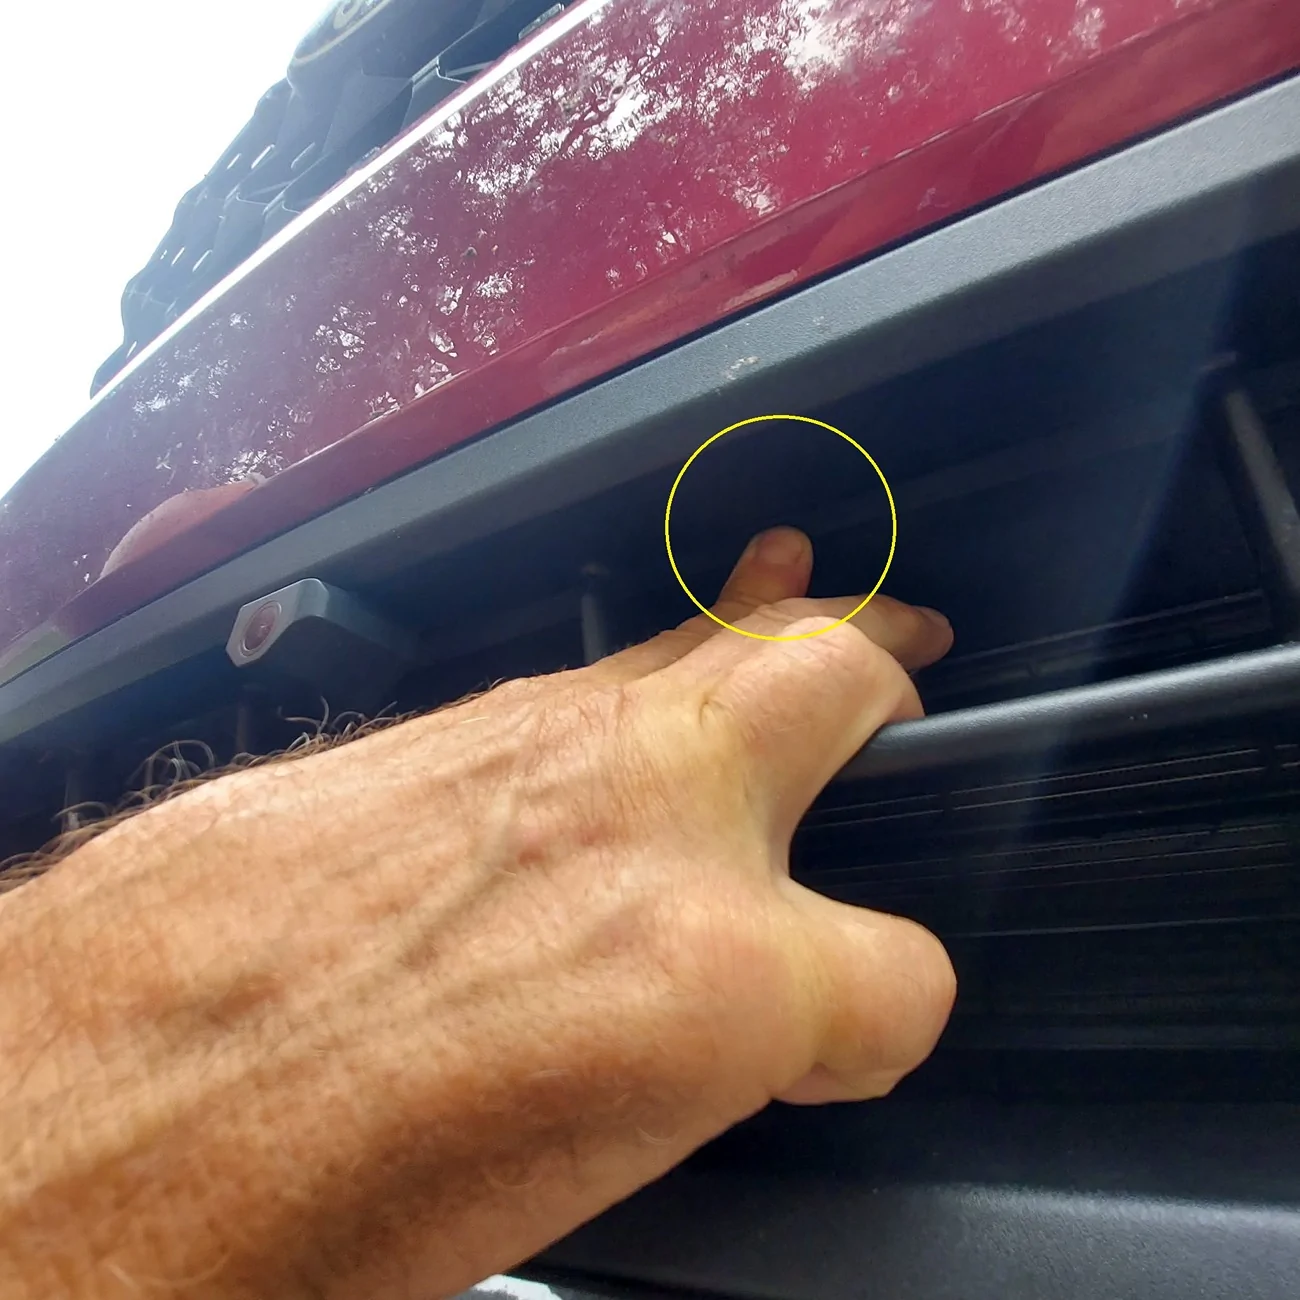
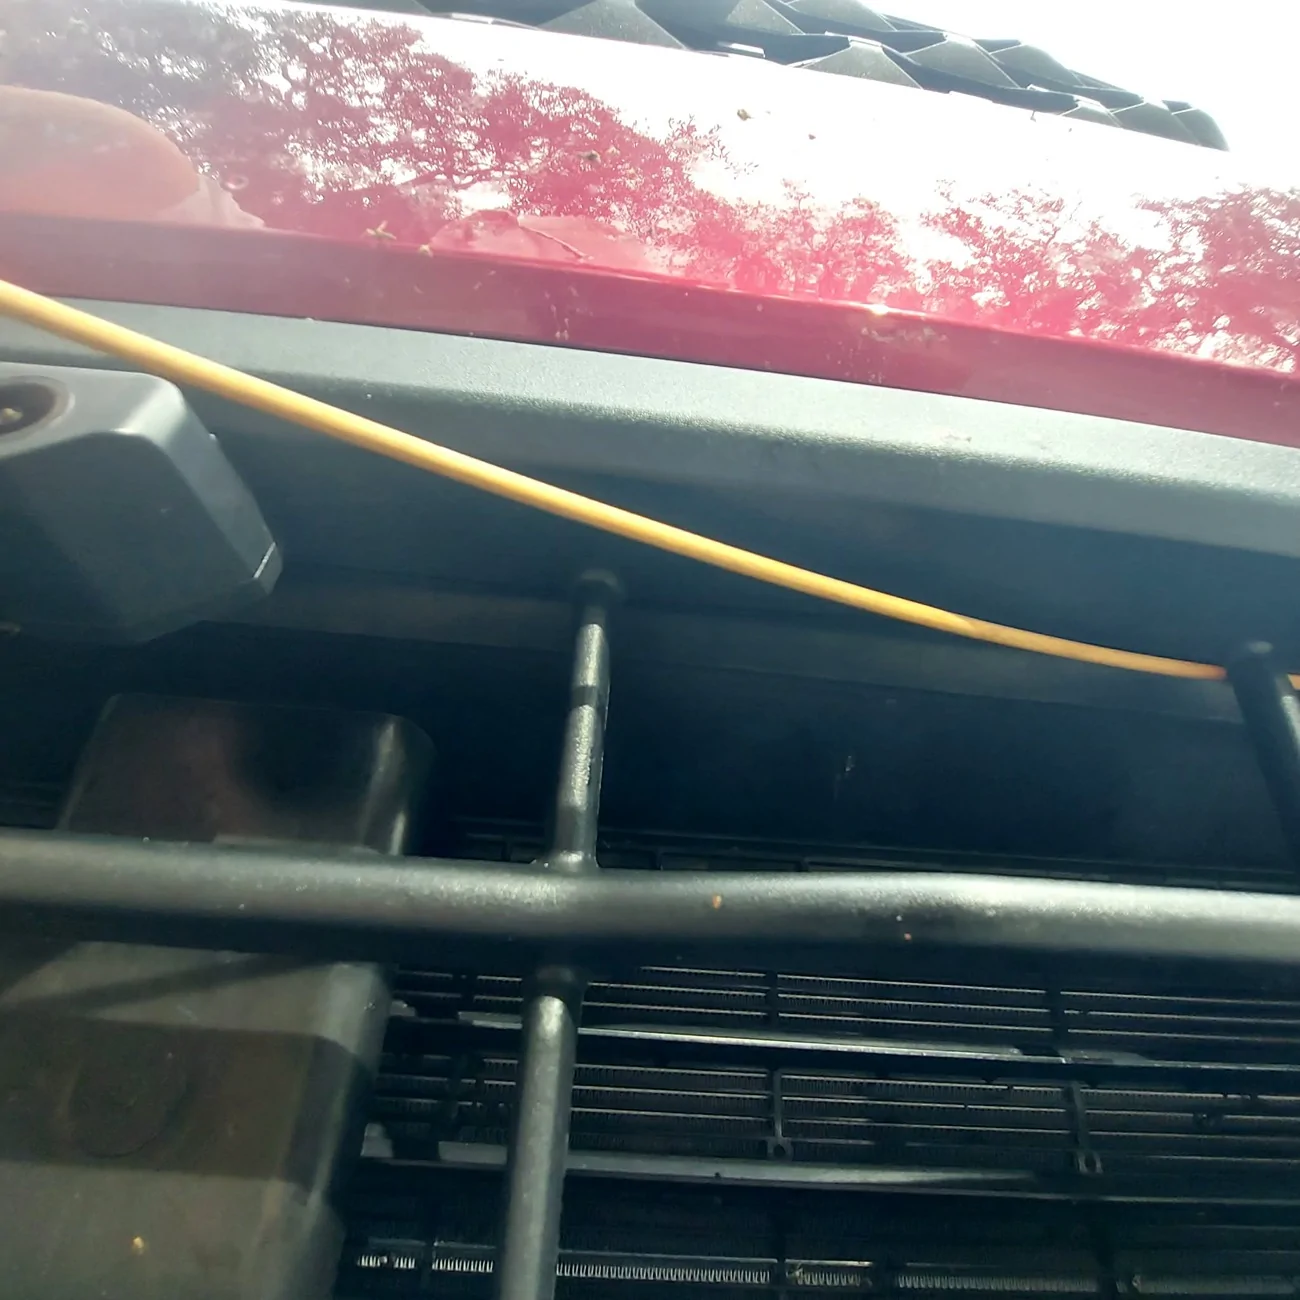
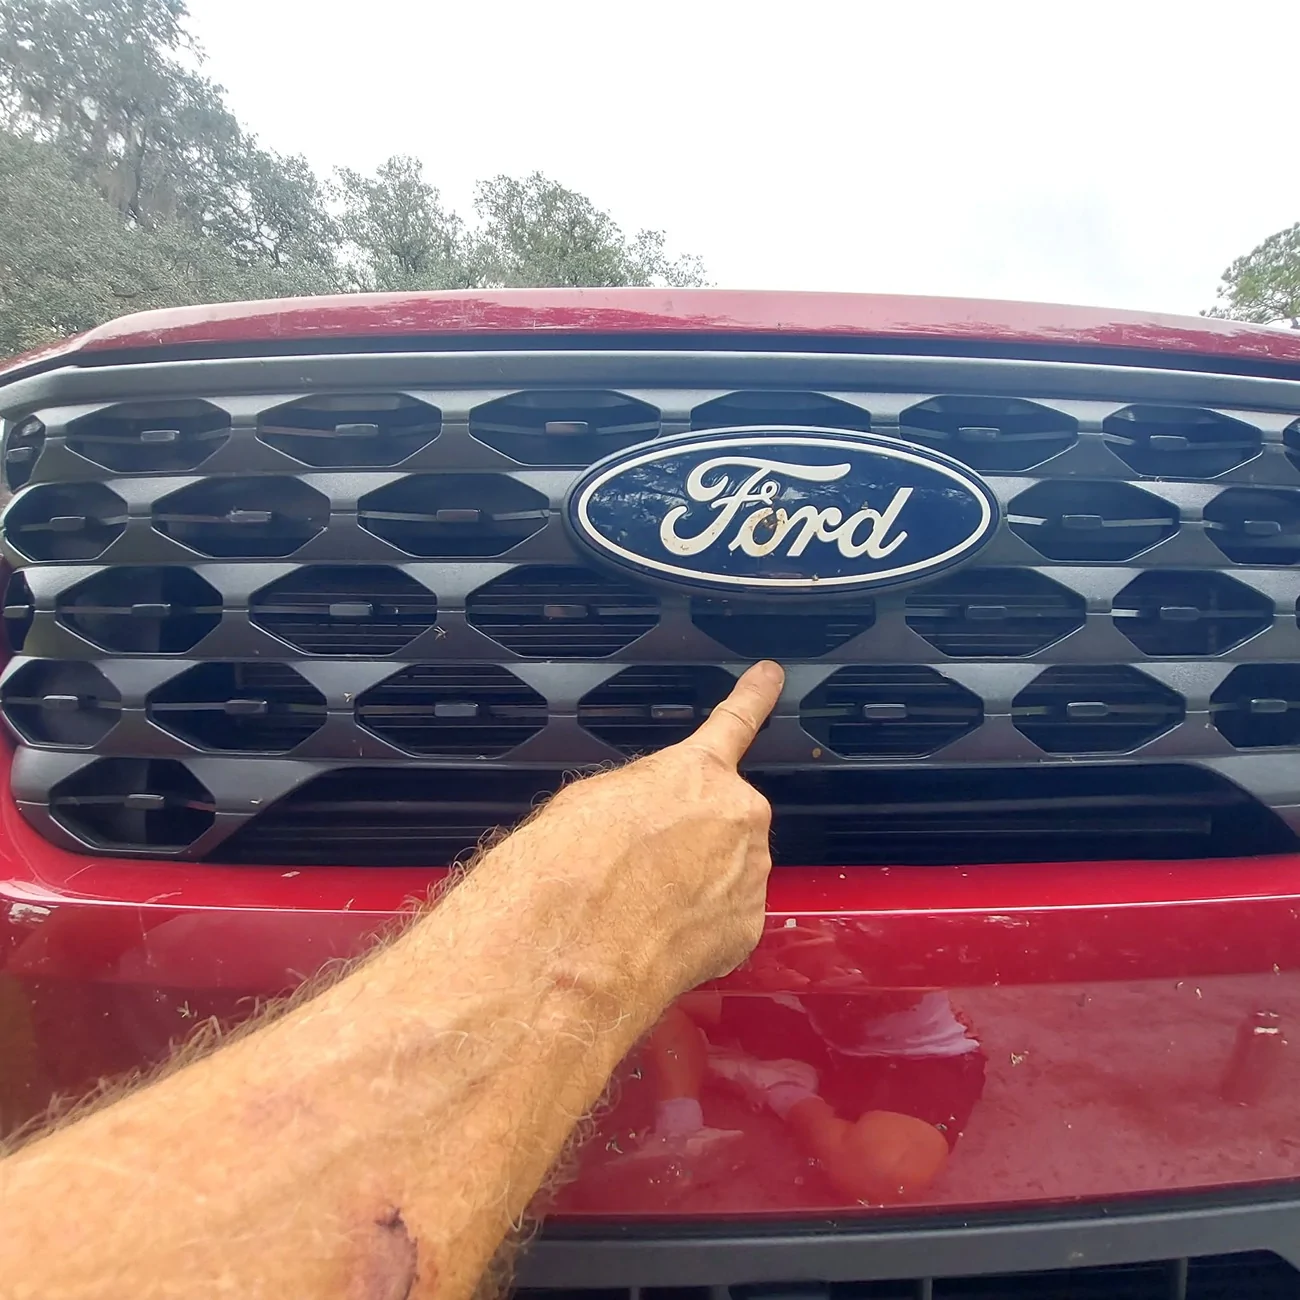
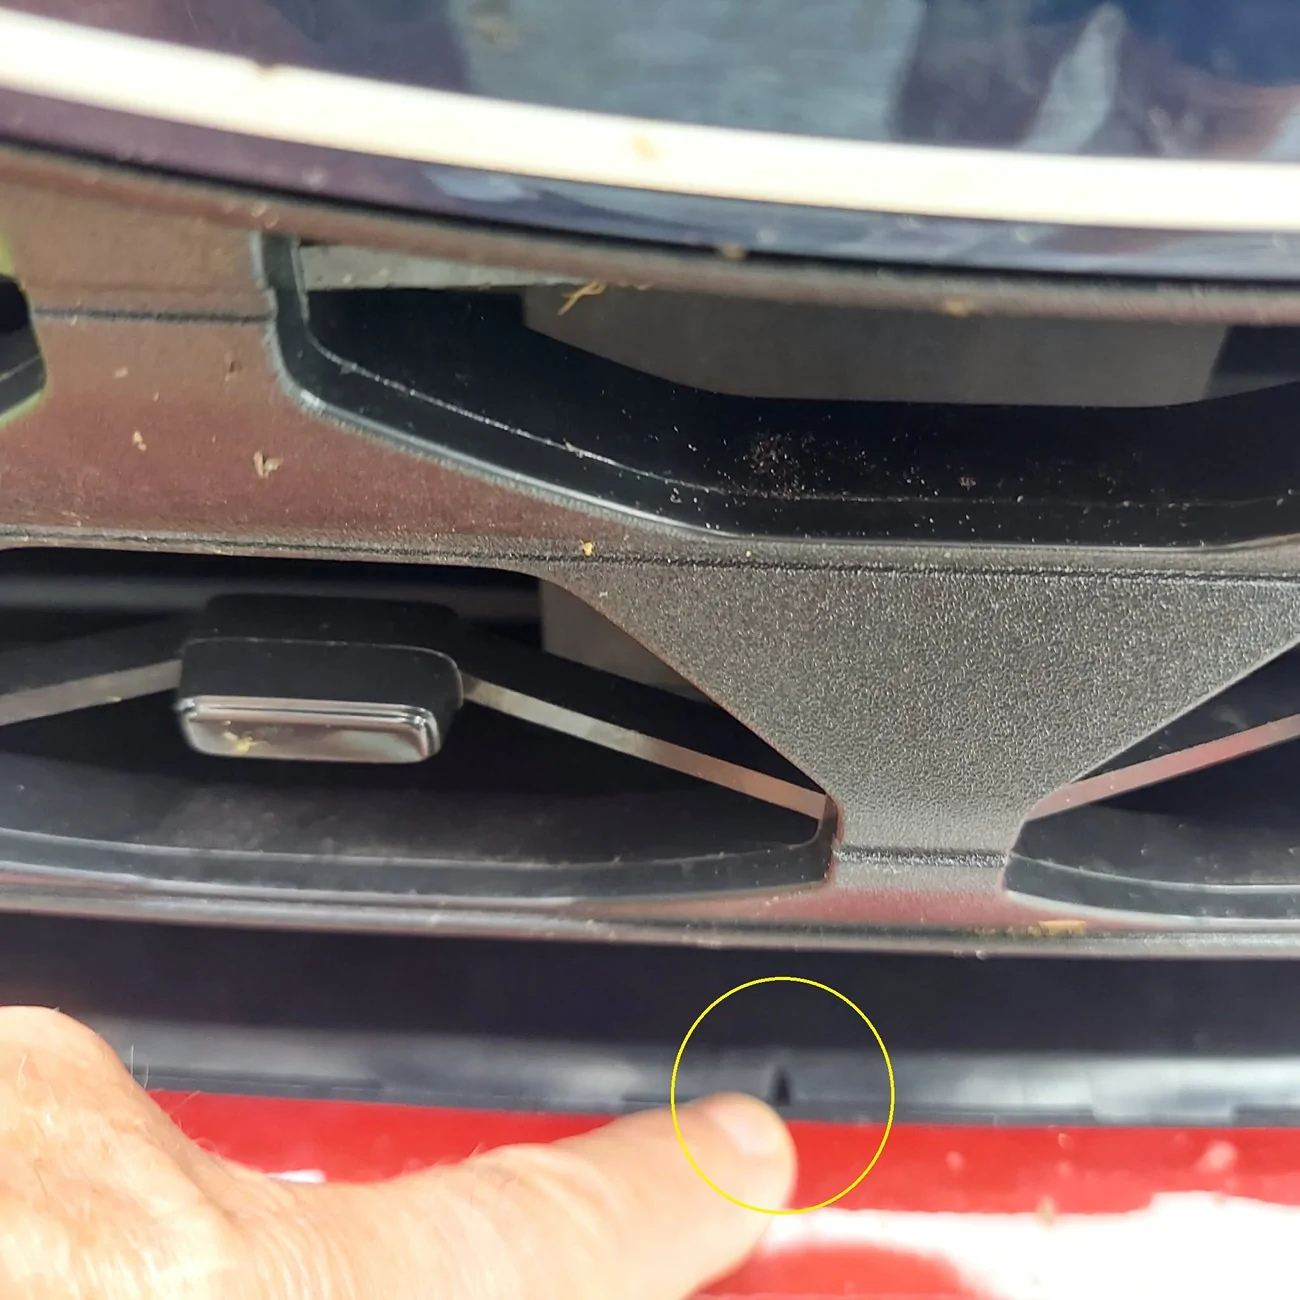
First, the front camera; I echo the experience of the OP designating it as the most complicated portion of the install. I ran my camera wire through the same grommet (11 o'clock to the brake pedal) but used a pointed drum stick to pierce the grommet to the side of the harness passing through it, I then taped the wire to the drumstick and pulled it back out into the engine bay. The grommet resealed beautifully around the new cable. I followed a similar route over the strut tower, under the plastic cover plate, and zip tied to the hood release cable - but entered the front grille somewhat differently. The best solution I believe may be behind the divider section between the upper and lower grill panels. (pic #1). If you put your hand inside the lower grill panel and feel "upward" you will find a rubber shield with a free edge that you can slip your fingers into. Inside there is a corrugated sleeve running wires across the nose. See pic #2. I took an 1/8" dowel about 36" long and fed it along that channel, using my free hand to guide it along the corrugated sleeve (pic #3), fished a little and it found it's exit somewhere behind the non-existent fog light. I then took the bottom five fender skirt push pins out and found the end of my dowel. I taped a thin rope to it and pulled it back through, then used that rope to pull my camera cable. I'm still not positive where I want my camera mounted, but opted for a lower position (as visible below my hand in pic #1). However, my alternate and maybe preferred position is just under the Ford emblem (pic #4). You must push it through from the back, but it fits VERY snuggly and I suspect will require no adhesive. To transition the wire out the top of the "chase" there is a pre-cut "V" notch just below this spot (pic #5).
New post as I continue on.

Ford Maverick Wolfbox G900TriPro install Grill face in front of chas


Ford Maverick Wolfbox G900TriPro install chase behind grill 2


Ford Maverick Wolfbox G900TriPro install Grill chase part again


Ford Maverick Wolfbox G900TriPro install upper camera mount


Ford Maverick Wolfbox G900TriPro install V notch
 

Retro1

2.5L Hybrid
Well-known member
First Name
Jon
Joined
Aug 21, 2026
Threads
1
Messages
162
Reaction score
215
Location
Inverness, FL
Vehicle(s)
2026 Maverick hybrid; 2023 RAV4 hybrid; 1970 Cougar 351C
Engine
2.5L Hybrid
I did choose to use the "new" mirror mount to keep from "strap on" mode. the biggest consideration here was the offset required for the front camera to clear the OEM mirror encumbered the driver's visor movement. It was an easy switch-out but I'm pretty sure you have to remove the upper console cover to get the new mount on. I had no issue getting the old one off without the cover removed, but the new mount base is just slightly larger. Herewith my new "issue". Using OP's picture: the yellow circle show the push clip which is two part - the white piece is separate from the base clip. When popping the cover off that white piece stayed inside the socket (green circle). It required some patient manipulation to get it turned inside the socket so that I could slip a tooth pick through the crotch of it and pull it back out. I tried repeatedly to pull it out with a pair of needle nose but it kept sliding off the clip. I would recommend getting your pry tool as close to the clip position as possible to afford the most direct pressure on removal.
Props to the OP for the suggestion on where to mount the camera GPS! Much cleaner than a dash mount.
The other head scratcher for me was the rear camera mount. Mine is inside the vehicle, but could not figure out any combination of mounting plates that would allow me to affix it to the glass, and still point out the window. As of right now, I have the mounting plate slipped up into the headliner, but it seems a bit tentative. I will report back once I come up with an acceptable solution - I am open for suggestions. I also have not yet figured out how to FULLY remove the A pillar covers and had to content myself with unclipping the top section and just working in the limited space.

Ford Maverick Wolfbox G900TriPro install overhead cover
 

brlowe

2.5L Hybrid
Active member
Joined
Oct 2, 2026
Threads
3
Messages
32
Reaction score
29
Location
Idaho
Vehicle(s)
2026 Maverick Lariat Hybrid, 2021 Mazda CX-5, 2022 Ford Transit 350HD DRW
Engine
2.5L Hybrid
Hello everyone,
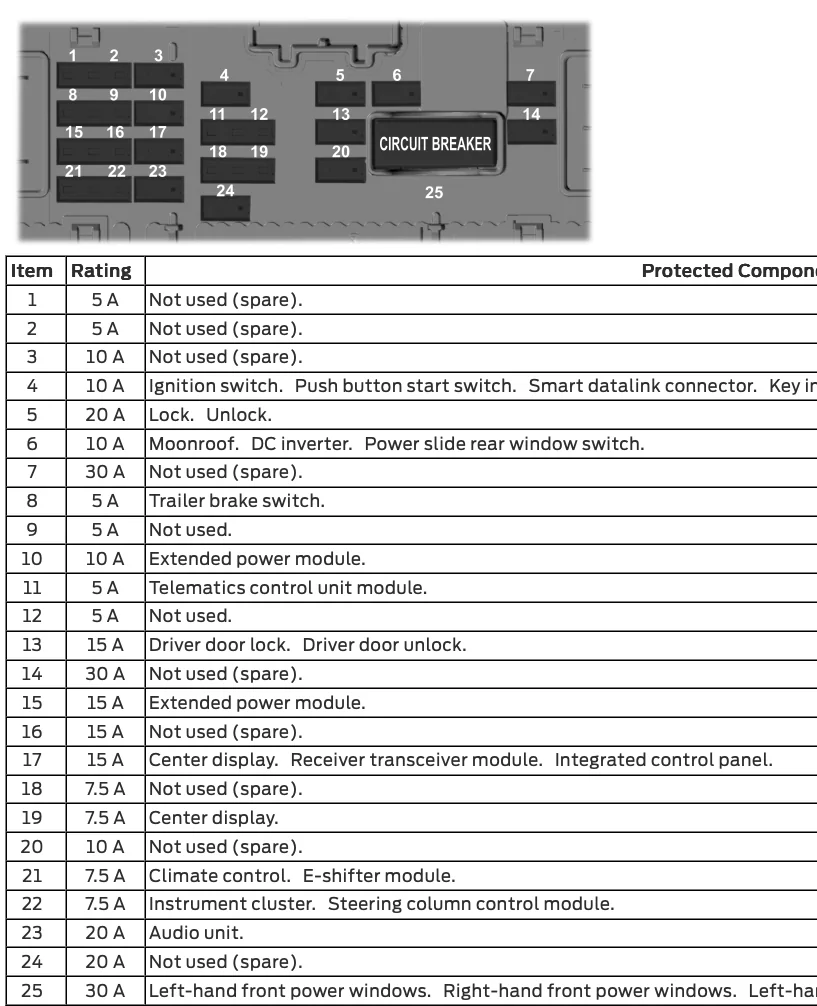
I'm currently installing my G900 Tripro also and have a question. I am hard wiring mine to the fuse block and not sure which fuse I should use. I see a few marked spare a figure I should use one of those unless someone has a good reason not to. In the picture below I see 1,2 and 3 are spares but 1 and 2 are only 5 amps and from what I can find it says it pulls about 4 amps. So thinking the 10 amp number 3 would work or I could use 16 or 24. What do you guys think?


Ford Maverick Wolfbox G900TriPro install Screenshot 2026-11-04 at 4.54.28 PM
 
Sponsored

brlowe

2.5L Hybrid
Active member
Joined
Oct 2, 2026
Threads
3
Messages
32
Reaction score
29
Location
Idaho
Vehicle(s)
2026 Maverick Lariat Hybrid, 2021 Mazda CX-5, 2022 Ford Transit 350HD DRW
Engine
2.5L Hybrid
I just noticed my power cable kit did not come with an adapter for the dual sided fuse so I will have to use 3, 7, 14, 20 or 24. I'm thinking 3 as the fuse in the kit is only 5 amps.
Would be nice to have a live one also if I decided to use the parking feature.
 

Retro1

2.5L Hybrid
Well-known member
First Name
Jon
Joined
Aug 21, 2026
Threads
1
Messages
162
Reaction score
215
Location
Inverness, FL
Vehicle(s)
2026 Maverick hybrid; 2023 RAV4 hybrid; 1970 Cougar 351C
Engine
2.5L Hybrid
I just noticed my power cable kit did not come with an adapter for the dual sided fuse so I will have to use 3, 7, 14, 20 or 24. I'm thinking 3 as the fuse in the kit is only 5 amps.
Would be nice to have a live one also if I decided to use the parking feature.
As OP stated in the first post: " I used the spare #3 fuse (5A spare) for the red (hot when the truck is powered on, main accessory power) wire, and #20 (10A, spare) for the yellow (always hot, parking mode power), " There are other options available, but I believe consensus follows this as a reasonable choice. Thanks again rtphokie!
Sponsored


Top