Sponsored

Delzona

2.5L Hybrid
Well-known member
First Name
Chris
Joined
Jul 3, 2021
Threads
11
Messages
4,378
Reaction score
9,209
Location
Tucson, AZ
Vehicle(s)
15 Breakout, 21 Road King Special, 22 Maverick XLT
Engine
2.5L Hybrid
Does anyone know if the DIBL can be installed on top of the factory SIBL - for added protection ? Would it fit ? Thank you.
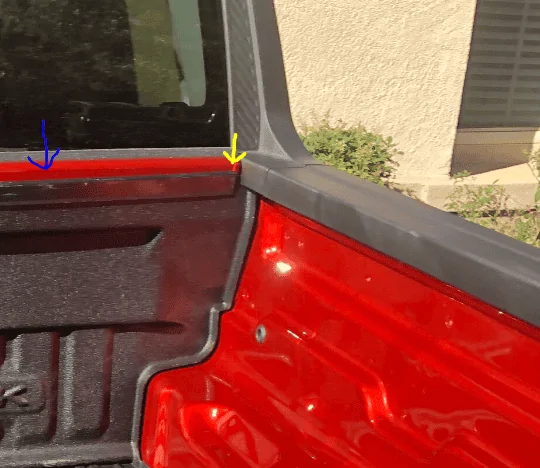
I don't see why you couldn't do it. You may have to clean some of SIBL out in order for DIBL to be installed. Depending on what you intend to put in your bed, maybe a bed rug would be better.
Sponsored


dano0726

2.0L EcoBoost
Well-known member
First Name
Daniel
Joined
Aug 12, 2020
Threads
0
Messages
196
Reaction score
276
Location
NW Houston
Vehicle(s)
2011 Jeep JK Wrangler Sport
Engine
2.0L EcoBoost
I would buy the horse stall mat at Tractor Supply (for the added protection on the bed itself...)
 

DuffCon

2.5L Hybrid
Well-known member
Joined
Sep 21, 2022
Threads
14
Messages
187
Reaction score
217
Location
Bay Area, CA
Vehicle(s)
Subaru Ascent
Engine
2.5L Hybrid
So just to follow up.


3M: Double sided tape + Adhesion Promoter works wonders. Wow.
Ended up using it for that bowing piece, the adhesive pad on the motorola wireless android adapter that was also junk adhesive, and even on some windshield clips that hold the dashcam cables.

On the bedliner piece, I just did a light firm push and it was almost like it was welded together instantly lol. So much easier than the included adhesive.
I’m having the same issue; is yours still holding and do you have a link for what you used?
 

DuffCon

2.5L Hybrid
Well-known member
Joined
Sep 21, 2022
Threads
14
Messages
187
Reaction score
217
Location
Bay Area, CA
Vehicle(s)
Subaru Ascent
Engine
2.5L Hybrid
I wanted to document some tips for those who are going to install the modular bedliner, hopefully prevent some others from having issues. Like some others here, I had an issue with the adhesive strip releasing.

In my opinion @Ford Motor Company and Penda should consider re-designing the clip section to sit on top of the bed, with the clip section facing downward a 90 degrees. This would be much stronger. (blue arrow)

Ford Maverick Factory Drop-in Bedliner Kit -- specs, part numbers, install instructions 1684338685268
(not my truck)

Secondly, the front panel is impossible to install without gouging the caulk seam at the front of the bed. Because it has to be slid under the side panel, the angle makes it a chisel and you will scrape the paint off the caulk, revealing it's white color underneath. It's not a huge deal; I just dabbed a bit of dark paint to blend it with the liner, but you might want to sand the top edge of the front panel make it less sharp. (yellow arrow)

Further, my front panel was somewhat warped out on the top, more than others pictured here. When I originally installed it, I assumed the adhesive would hold and I was wrong. Another issue is the clip itself was ever so sightly too long so it did not sit in between the caulk seams, making it even harder to sit flat against the bed.

One more note is that the adhesive strip was releasing on the clip side; meaning it was not applied by the manufacturer properly. It remained stuck to the bed without issue.

I called customer service twice, once they said they get back to me with a number to call to get a replacement clip, another person told me I had to go to the dealer. After wasting an hour with support I decided to solve this problem myself.

I researched adhesive tape, and I believe I discovered that the product used was something similar to 3m VHB tape.

My local hardware store had this gorilla tape:
Ford Maverick Factory Drop-in Bedliner Kit -- specs, part numbers, install instructions 1684338840411


Which after watching some comparison vids on youtube, proved that it was at least as strong, if not better:


Further the most important thing: as others have mentioned, the duration of how long you press the tape in matters. In the instructions for the bedliner, it just says press together with 35 pounds of force. It does not mention any duration.

The gorilla tape explicitly says it is important you press for 60 seconds for proper bonding. I can't say for sure that the duration matters for the factory tape, but for my re-do I followed this exactly.

Futher, the tape that failed is only about 1/2" wide, the gorilla tape is 1". A lot more surface area.

So with this research I did all the things:

Removed the old tape. This was the hardest part. I scraped off the majority with a plastic putty knife and removed the remainder by briefly soaking it with 92% isopropyl alcohol.

I sanded the backside of the clip to give it a rough surface to hold onto. I also sanded a side down a bit less than 1/8" to make sure it sat flat between the caulk seams.

I also removed the panel itself; it was hot from the sun, so I bent it backwards along the top 1/3 of the panel to get it as "flat" as possible so it would pull away less.

I cleaned the top and front of the bed with alcohol to make it as dust free as possible. I then put everything back together. Unlike the first go I only removed a section of the tape backing at a time (about the width of my feet). Using the tailgate as a back brace I used my feet to press the tape down for 60 seconds at a time, then peeling a bit more and doing the next section, etc. It took about 8-9 sections (your feet may vary).

So now the panel sits very flat and strong. Previously the top edge leaned out a bit. You could press it it and watch it move outwards slightly. Now, it is very firm.

I just did this last night and will check back if it happens again, but I think this should hold. Sorry if this is too detailed, but I hope that someone else will be spared this grief in the future.
Sponsored

 
Last edited:


Top