- First Name
- Scott
- Joined
- Apr 19, 2023
- Threads
- 3
- Messages
- 40
- Reaction score
- 75
- Location
- Kalispell, MT
- Vehicle(s)
- '23 CG Maverick XLT 2.0L AWD w/ FX4 & 4K Pkg.
- Engine
- 2.0L EcoBoost
- Thread starter
- #1
Hello group,
I just performed Compliance Recall 23C04 - "Trailer Tow Taillamp Wiring." If you're one of the lucky 2,716 affected 2023 Maverick owners, you may be wondering how hard it is to repair this yourself. Why would you do a recall yourself you ask? It could be because you've heard the horror stories about Ford technicians slicing up wiring harnesses and created a myriad of electrical issues on a previously good truck (just search these forums) ...or it could simply be that you don't want to wait months on backordered parts and then give up your vehicle for a day or more. Personally, I don't trust the quality of work dealerships do anymore, and I didn't want to take my truck in - have it "tested" just to be told what I already knew (my vehicle was affected) - then wait on parts and eventually take it in again for an appointment. All that is to say, I started doing research on what I needed to do the repair myself. I'm happy to say that it was pretty straightforward, and I think I can save you some time if you too want to do this repair yourself!
Let's get into it.
The Parts:
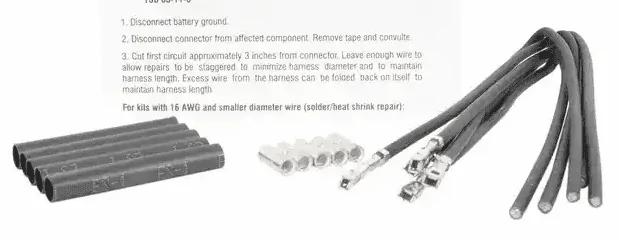
-Ford Wiring Kit "EU2Z-14474-AB" - Please note, this is a common Ford kit and is normally about $50 which gets you 5 x pre-pinned 12" wires, 5 x barrel splices, and 5 x 2" pieces of heat shrink. I purchased one of each for $7.28 ($12.02 shipped) and received the kit in less than a week. The Ford write-up below mentions more than this but this is all you actually need.
- Electrical tape & Harness tape. I prefer legit 3M black electrical tape because it doesn't get nasty when hot (like in an engine bay) and TESA tape for the harness. Feel free to substitute though.
- Some black zip ties.
- 3 feet of wire (20-22 gauge). I had some blue 20 gauge braided wire which I thought matched the factory wiring nicely.
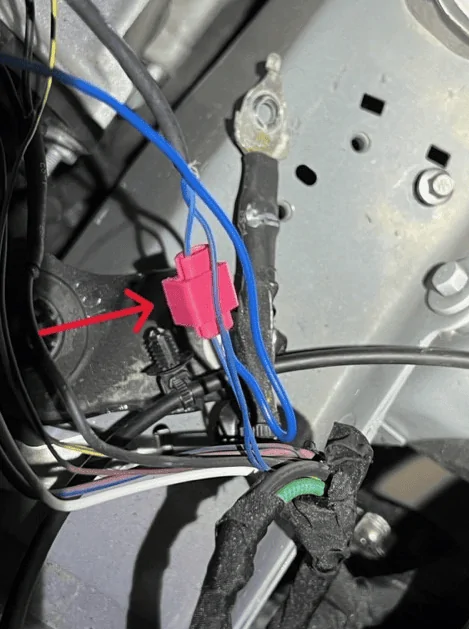
- A wire tap. There are many different kinds out there, but I had some on hand from tapping reverse wiring for car stereo backup camera signals. They'll work just fine in this circuit, but feel free to cut and solder or splice if you like.
The Tooling:
- Wire strippers, crimpers, diagonal cutters, razor blade, heat gun, flathead screwdriver, 1/4" drive ratchet with 7mm, 8mm, and 10mm sockets, and a zip tie gun if you got it. You can substitute a lot here and use your own discretion, but this is what I used. You'll need to remove the front driver's side wheel for access, so you'll also need a jack, jack stand, and torque wrench & socket to remove/install the wheel. 148 ft-lbs on the lug nuts...
The Repair:
** DISCLAIMER ** I took some photos along the way, but I did all this last night. A decent video was out of the question, but I snagged what I thought would be helpful for the overall process. If you're even considering this repair, you're likely very capable of doing it, as it was pretty easy. Just know that this isn't a super in depth write-up that'll show you every little detail. That being said, please message me if you have questions and I'd be more than happy to help you on here or over the phone. **
1. Disconnect your battery.
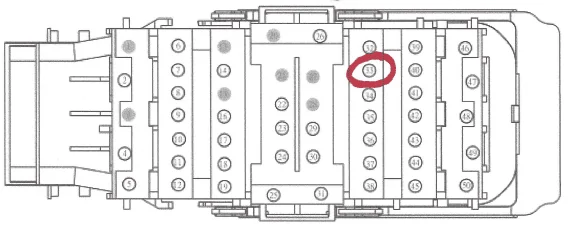
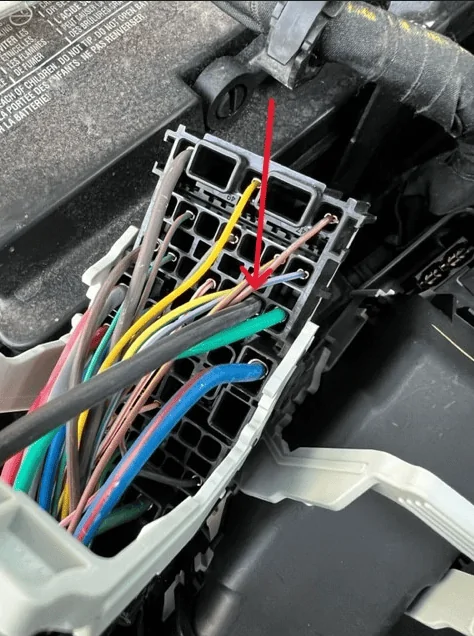
2. Remove your fuse box cover and disconnect both connectors 1035A (black) and 1035B (white). Once the connectors are unlocked you'll need to apply a little force and wiggle as you disconnect them - they are pretty snug. Look at the 1035A connector (left hand). You're likely missing pin 33 (reference the diagram below). The truck has all the wiring it needs from the fuse box to the 4/7 pin trailer connector in the rear. You simply need to get power to the fuse panel via pin 33.
2. You now need to gain access to the harness. Start by removing the drivers side wheel and pulling back the inner fender liner. I only removed a few small hex head screws at the bottom and five or six pop rivets along the fender. I then folded the liner back for easy access. You should now be able to see the large bundles coming off 1035A & B, and the route the harness takes to the front drivers side headlight. Once that is done, remove the airbox.
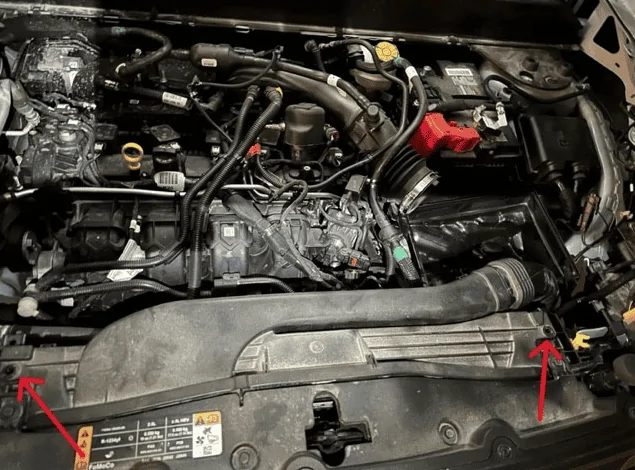
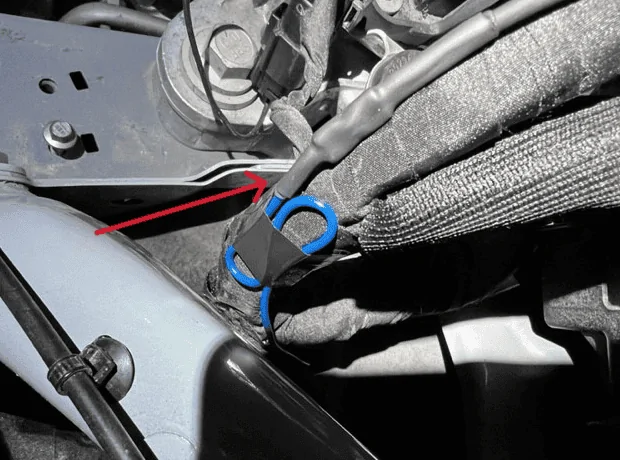
3. Airbox removal is slick and easy. I disconnected the airflow sensor connector and it's wiring clips, and then loosened the hose clamp. That way I could pop the latches on the filter and then remove the top of the airbox and air filter. You'll need to remove the two pop rivets on the air inlet (pictured) that connect to the radiator fan shroud. Once that is done the entire lower airbox and inlet assembly can be removed. Simply but carefully pull up on the lower airbox and it'll pop out of three rubber mounts.
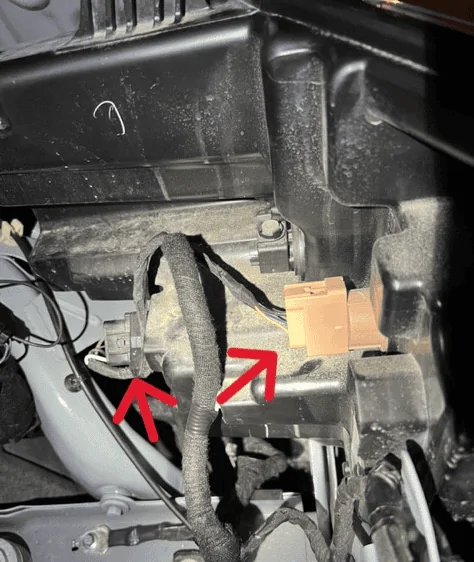
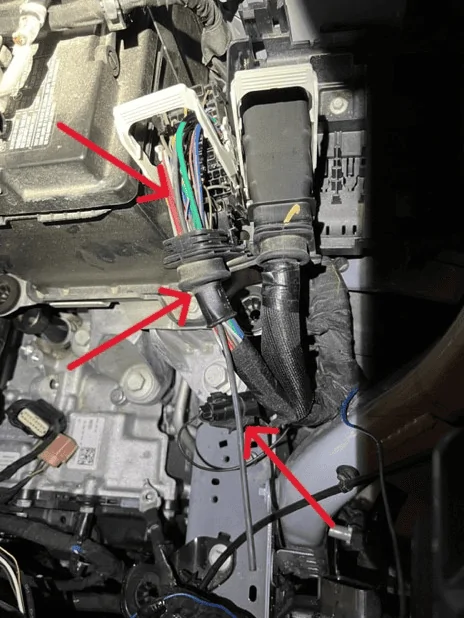
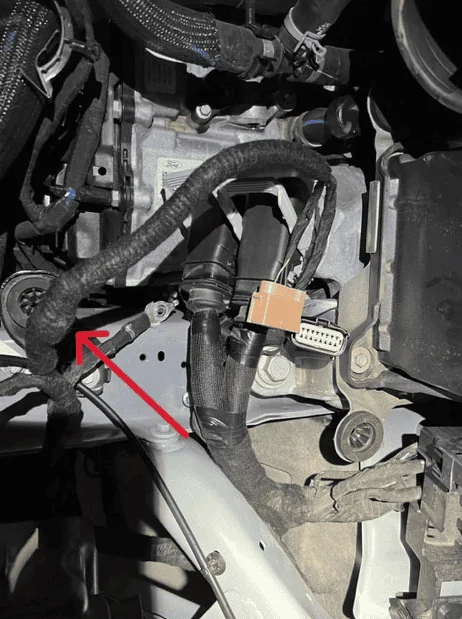
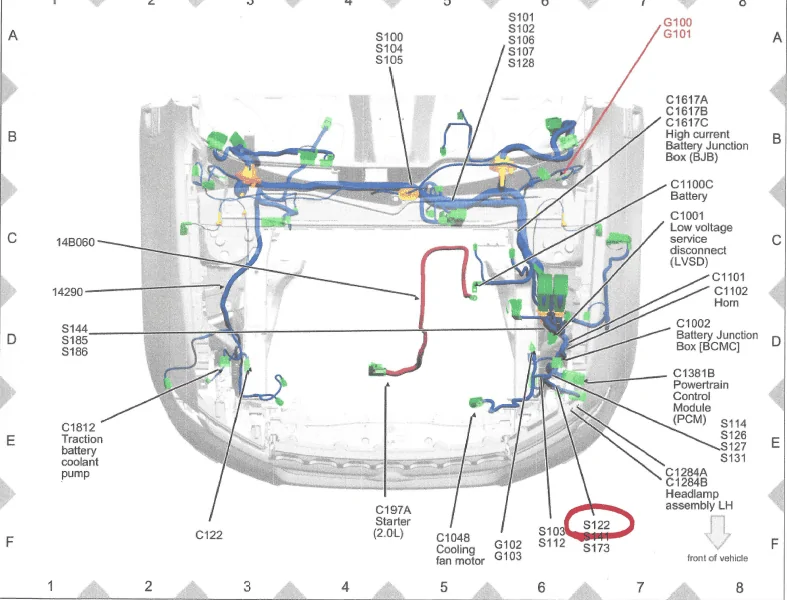
4. Now you should have good access to everything you need to do the repair. You'll see both driver's side headlight connectors, orange and black, (pictured) behind the headlight. Disconnect those and take a look at the center "blue and gray" wire on the orange connector. That's the lighting circuit you'll tap into. Gain access to the that wiring by carefully cutting back and removing the harness wrap and wire loom sections until you can see the splice point (pictured). I am not sure if this is splice point "S122" that the technician notes refer to, but it doesn't really matter. My guess is that it is. Anyway, this is where you can either cut and splice into this circuit, or tap it. I chose to tap it because it's low amperage, and I didn't want to cut the harness and splice if I had the wrong wire! I now know 100% that this is the correct wire, so do as you wish! I disconnected the ground wire that was on the frame and cut a few wire bundle clamps for more harness access. This helps to do the repair as well as wrap the bundle when complete.
5. Go back to the big 1035A connector and remove the back cover. You should now be looking at the backside of the wiring. Grab your pre-pinned wire from the kit you ordered and plug it in to the connector. There is a top and bottom of that pin, with a slight angle to it as well. Make sure you reference the existing pins in the connector. It doesn't take much force, but it'll click and lock in place when done correctly. Route the wire under and out the back of the harness with the rest of the factory wiring.
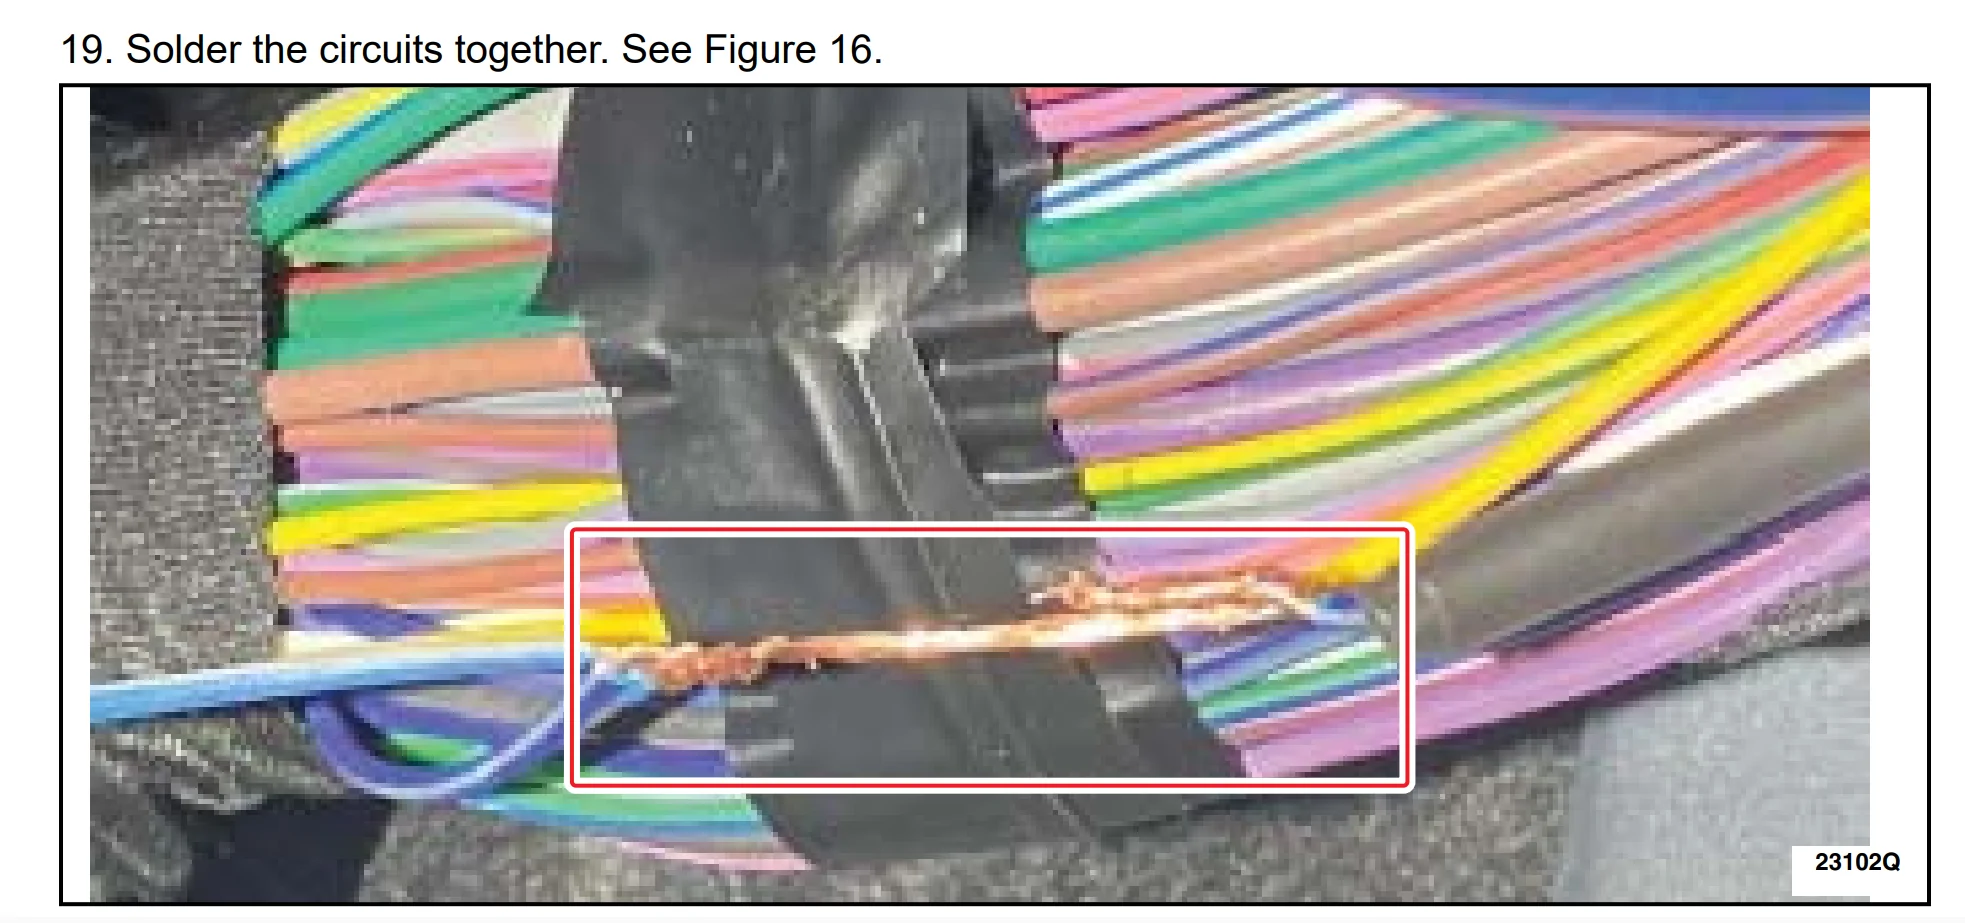
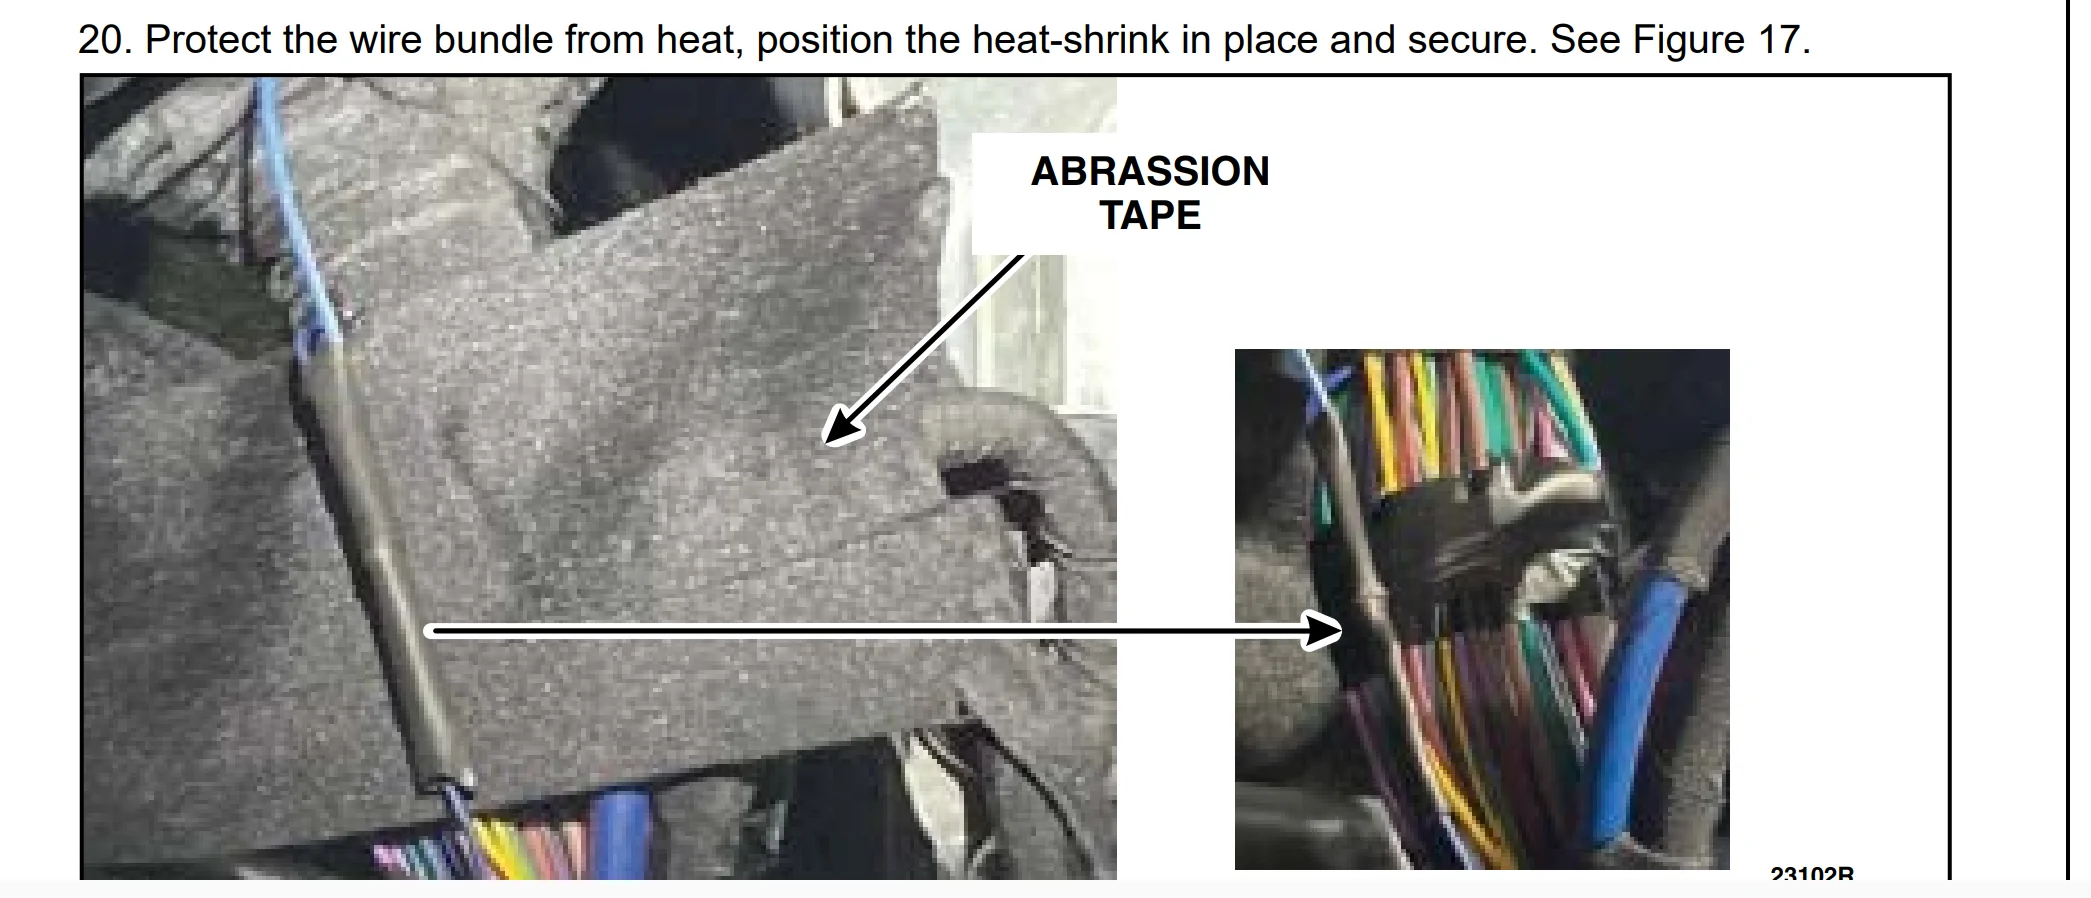
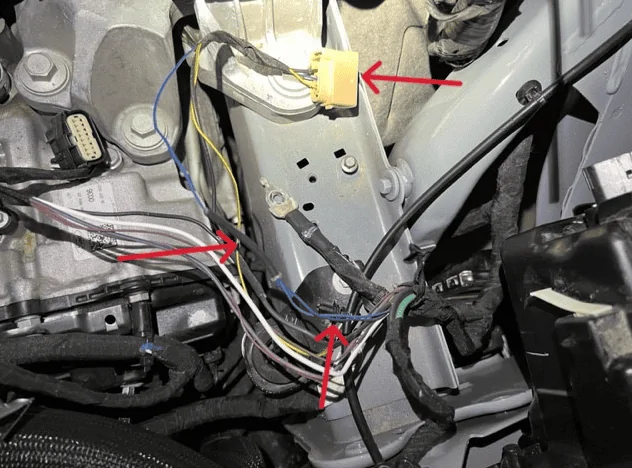
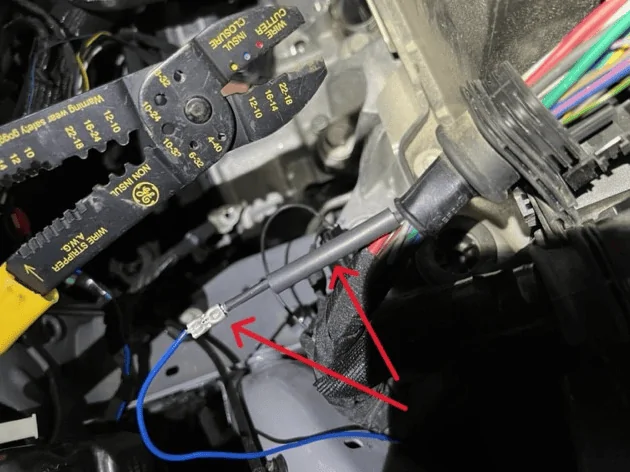
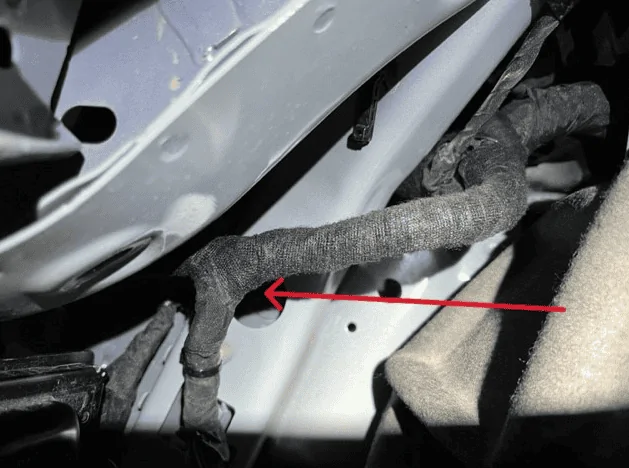
6. Piggybacking a wire on a bundle is an authorized repair, and that is exactly what you'll do here. Once you have spliced or tapped into the blue/gray (pictured) wire, run your new wiring along the bundle, taping it every few inches to secure it along the way. Once you've reached the newly installed connector wiring at 1035A you'll need to use the provided barrel splice and heat shrink from the kit. I folded my 20 gauge wire over on itself in order to make a more secure crimp to the larger barrel splice (pictured). Once happy with your splice, heat up your heat shrink and secure your connection (pictured). Lastly, work your way along the harness from 1035A to the headlight splice with harness wrap. Accessing some of it through the fender helps, and make sure to reinstall any of the wire loom. I noticed most of the loom were along the rub points on the truck that could chafe, so keep that in mind!
7. Once the wiring is all wrapped up, reinstall all of your clamps and secure the harness like it was from the factory. Ensure you reinstall any ground wires and other things you may have removed. You can reuse all of the factory clamps by cutting off the zip tie portion and sliding through them with new zip ties. Pretty slick and looks factory!
8. Reinstall your airbox, air filter, fuse box connectors, and the like. Then reconnect your battery.
9. Test it! I connected my trailer and I had running lights! I switched my headlights from AUTO to ON, and then ON to PARKING, and PARKING to OFF, and the trailer running lights were on and off accordingly.
Hopefully this helps somebody out there! I have attached the original Ford technician summary and diagrams below for reference. Thank you to whomever found these, it made life much easier.
Cheers!


I just performed Compliance Recall 23C04 - "Trailer Tow Taillamp Wiring." If you're one of the lucky 2,716 affected 2023 Maverick owners, you may be wondering how hard it is to repair this yourself. Why would you do a recall yourself you ask? It could be because you've heard the horror stories about Ford technicians slicing up wiring harnesses and created a myriad of electrical issues on a previously good truck (just search these forums) ...or it could simply be that you don't want to wait months on backordered parts and then give up your vehicle for a day or more. Personally, I don't trust the quality of work dealerships do anymore, and I didn't want to take my truck in - have it "tested" just to be told what I already knew (my vehicle was affected) - then wait on parts and eventually take it in again for an appointment. All that is to say, I started doing research on what I needed to do the repair myself. I'm happy to say that it was pretty straightforward, and I think I can save you some time if you too want to do this repair yourself!
Let's get into it.
The Parts:
-Ford Wiring Kit "EU2Z-14474-AB" - Please note, this is a common Ford kit and is normally about $50 which gets you 5 x pre-pinned 12" wires, 5 x barrel splices, and 5 x 2" pieces of heat shrink. I purchased one of each for $7.28 ($12.02 shipped) and received the kit in less than a week. The Ford write-up below mentions more than this but this is all you actually need.
- Electrical tape & Harness tape. I prefer legit 3M black electrical tape because it doesn't get nasty when hot (like in an engine bay) and TESA tape for the harness. Feel free to substitute though.
- Some black zip ties.
- 3 feet of wire (20-22 gauge). I had some blue 20 gauge braided wire which I thought matched the factory wiring nicely.
- A wire tap. There are many different kinds out there, but I had some on hand from tapping reverse wiring for car stereo backup camera signals. They'll work just fine in this circuit, but feel free to cut and solder or splice if you like.
The Tooling:
- Wire strippers, crimpers, diagonal cutters, razor blade, heat gun, flathead screwdriver, 1/4" drive ratchet with 7mm, 8mm, and 10mm sockets, and a zip tie gun if you got it. You can substitute a lot here and use your own discretion, but this is what I used. You'll need to remove the front driver's side wheel for access, so you'll also need a jack, jack stand, and torque wrench & socket to remove/install the wheel. 148 ft-lbs on the lug nuts...
The Repair:
** DISCLAIMER ** I took some photos along the way, but I did all this last night. A decent video was out of the question, but I snagged what I thought would be helpful for the overall process. If you're even considering this repair, you're likely very capable of doing it, as it was pretty easy. Just know that this isn't a super in depth write-up that'll show you every little detail. That being said, please message me if you have questions and I'd be more than happy to help you on here or over the phone. **
1. Disconnect your battery.
2. Remove your fuse box cover and disconnect both connectors 1035A (black) and 1035B (white). Once the connectors are unlocked you'll need to apply a little force and wiggle as you disconnect them - they are pretty snug. Look at the 1035A connector (left hand). You're likely missing pin 33 (reference the diagram below). The truck has all the wiring it needs from the fuse box to the 4/7 pin trailer connector in the rear. You simply need to get power to the fuse panel via pin 33.
2. You now need to gain access to the harness. Start by removing the drivers side wheel and pulling back the inner fender liner. I only removed a few small hex head screws at the bottom and five or six pop rivets along the fender. I then folded the liner back for easy access. You should now be able to see the large bundles coming off 1035A & B, and the route the harness takes to the front drivers side headlight. Once that is done, remove the airbox.
3. Airbox removal is slick and easy. I disconnected the airflow sensor connector and it's wiring clips, and then loosened the hose clamp. That way I could pop the latches on the filter and then remove the top of the airbox and air filter. You'll need to remove the two pop rivets on the air inlet (pictured) that connect to the radiator fan shroud. Once that is done the entire lower airbox and inlet assembly can be removed. Simply but carefully pull up on the lower airbox and it'll pop out of three rubber mounts.
4. Now you should have good access to everything you need to do the repair. You'll see both driver's side headlight connectors, orange and black, (pictured) behind the headlight. Disconnect those and take a look at the center "blue and gray" wire on the orange connector. That's the lighting circuit you'll tap into. Gain access to the that wiring by carefully cutting back and removing the harness wrap and wire loom sections until you can see the splice point (pictured). I am not sure if this is splice point "S122" that the technician notes refer to, but it doesn't really matter. My guess is that it is. Anyway, this is where you can either cut and splice into this circuit, or tap it. I chose to tap it because it's low amperage, and I didn't want to cut the harness and splice if I had the wrong wire! I now know 100% that this is the correct wire, so do as you wish! I disconnected the ground wire that was on the frame and cut a few wire bundle clamps for more harness access. This helps to do the repair as well as wrap the bundle when complete.
5. Go back to the big 1035A connector and remove the back cover. You should now be looking at the backside of the wiring. Grab your pre-pinned wire from the kit you ordered and plug it in to the connector. There is a top and bottom of that pin, with a slight angle to it as well. Make sure you reference the existing pins in the connector. It doesn't take much force, but it'll click and lock in place when done correctly. Route the wire under and out the back of the harness with the rest of the factory wiring.
6. Piggybacking a wire on a bundle is an authorized repair, and that is exactly what you'll do here. Once you have spliced or tapped into the blue/gray (pictured) wire, run your new wiring along the bundle, taping it every few inches to secure it along the way. Once you've reached the newly installed connector wiring at 1035A you'll need to use the provided barrel splice and heat shrink from the kit. I folded my 20 gauge wire over on itself in order to make a more secure crimp to the larger barrel splice (pictured). Once happy with your splice, heat up your heat shrink and secure your connection (pictured). Lastly, work your way along the harness from 1035A to the headlight splice with harness wrap. Accessing some of it through the fender helps, and make sure to reinstall any of the wire loom. I noticed most of the loom were along the rub points on the truck that could chafe, so keep that in mind!
7. Once the wiring is all wrapped up, reinstall all of your clamps and secure the harness like it was from the factory. Ensure you reinstall any ground wires and other things you may have removed. You can reuse all of the factory clamps by cutting off the zip tie portion and sliding through them with new zip ties. Pretty slick and looks factory!
8. Reinstall your airbox, air filter, fuse box connectors, and the like. Then reconnect your battery.
9. Test it! I connected my trailer and I had running lights! I switched my headlights from AUTO to ON, and then ON to PARKING, and PARKING to OFF, and the trailer running lights were on and off accordingly.
Hopefully this helps somebody out there! I have attached the original Ford technician summary and diagrams below for reference. Thank you to whomever found these, it made life much easier.
Cheers!
Sponsored
Last edited:
") )
)