
- First Name
- Lisa
- Joined
- May 22, 2024
- Threads
- 7
- Messages
- 58
- Reaction score
- 103
- Location
- Fort Worth, TX
- Vehicle(s)
- 2024 Maverick Lariat
- Engine
- 2.5L Hybrid
- Thread starter
- #1
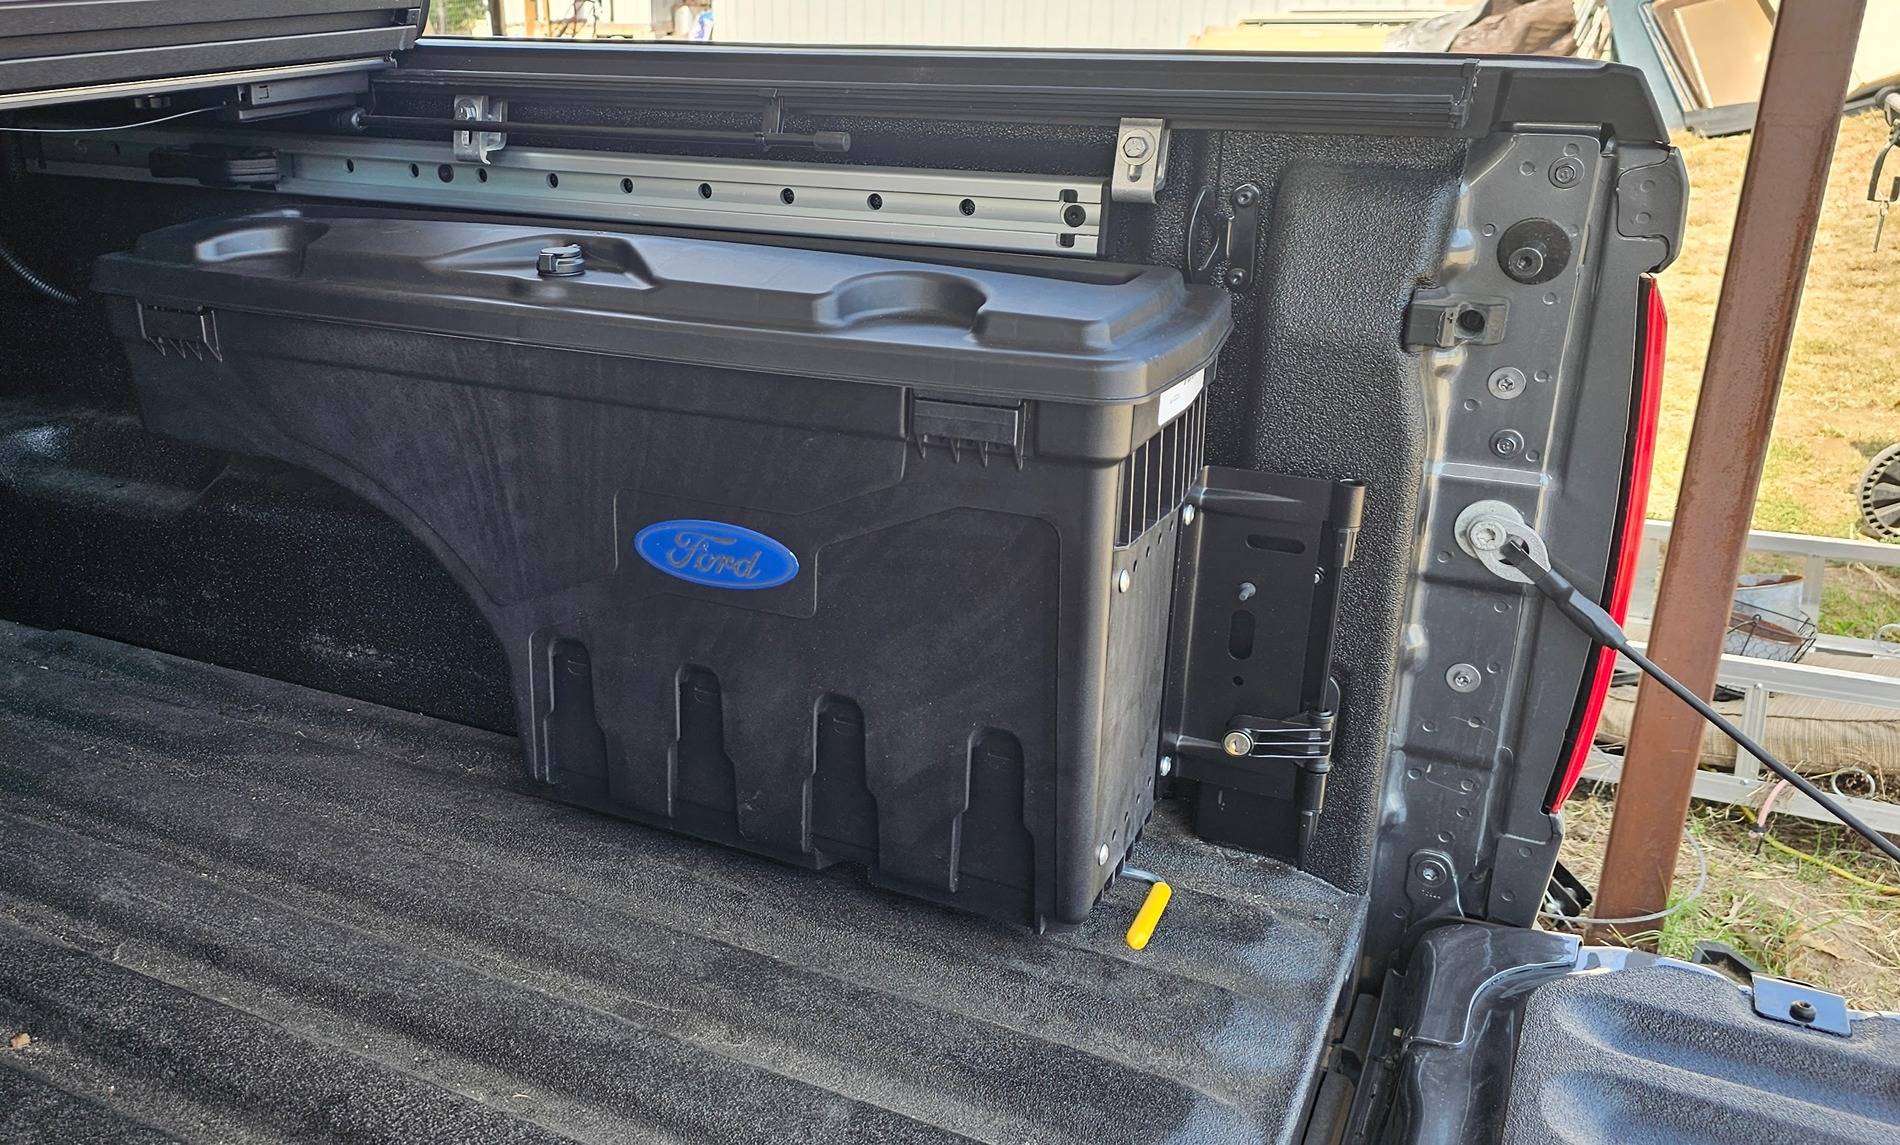
I used some of my Fort Reward points, ordered the Ford Right Side Swing out/Pivot toolbox for my truck bed, and installed it today. It was a fairly easy install, but I think the instructions should have been modified a bit. Here's my installation review (forgive the dust on the truck..I've been using it as a truck the last couple of days! ") ):
):
Steps one, two and three in the instructions explain how to install the striker plate bracket for the toolbox. The instructions state you should use a 3/8" drill bit and enlarge the holes in the bezel around the truck cubby to put two spacers in. You use the two inboard holes to mount the latching/striker bracket with longer supplied T30 bolts. I didn't have to enlarge the bezel. The spacers fit right up against the metal truck bed without having to do that, even though I do have the factory spray-in liner. Securing the bracket was easy.
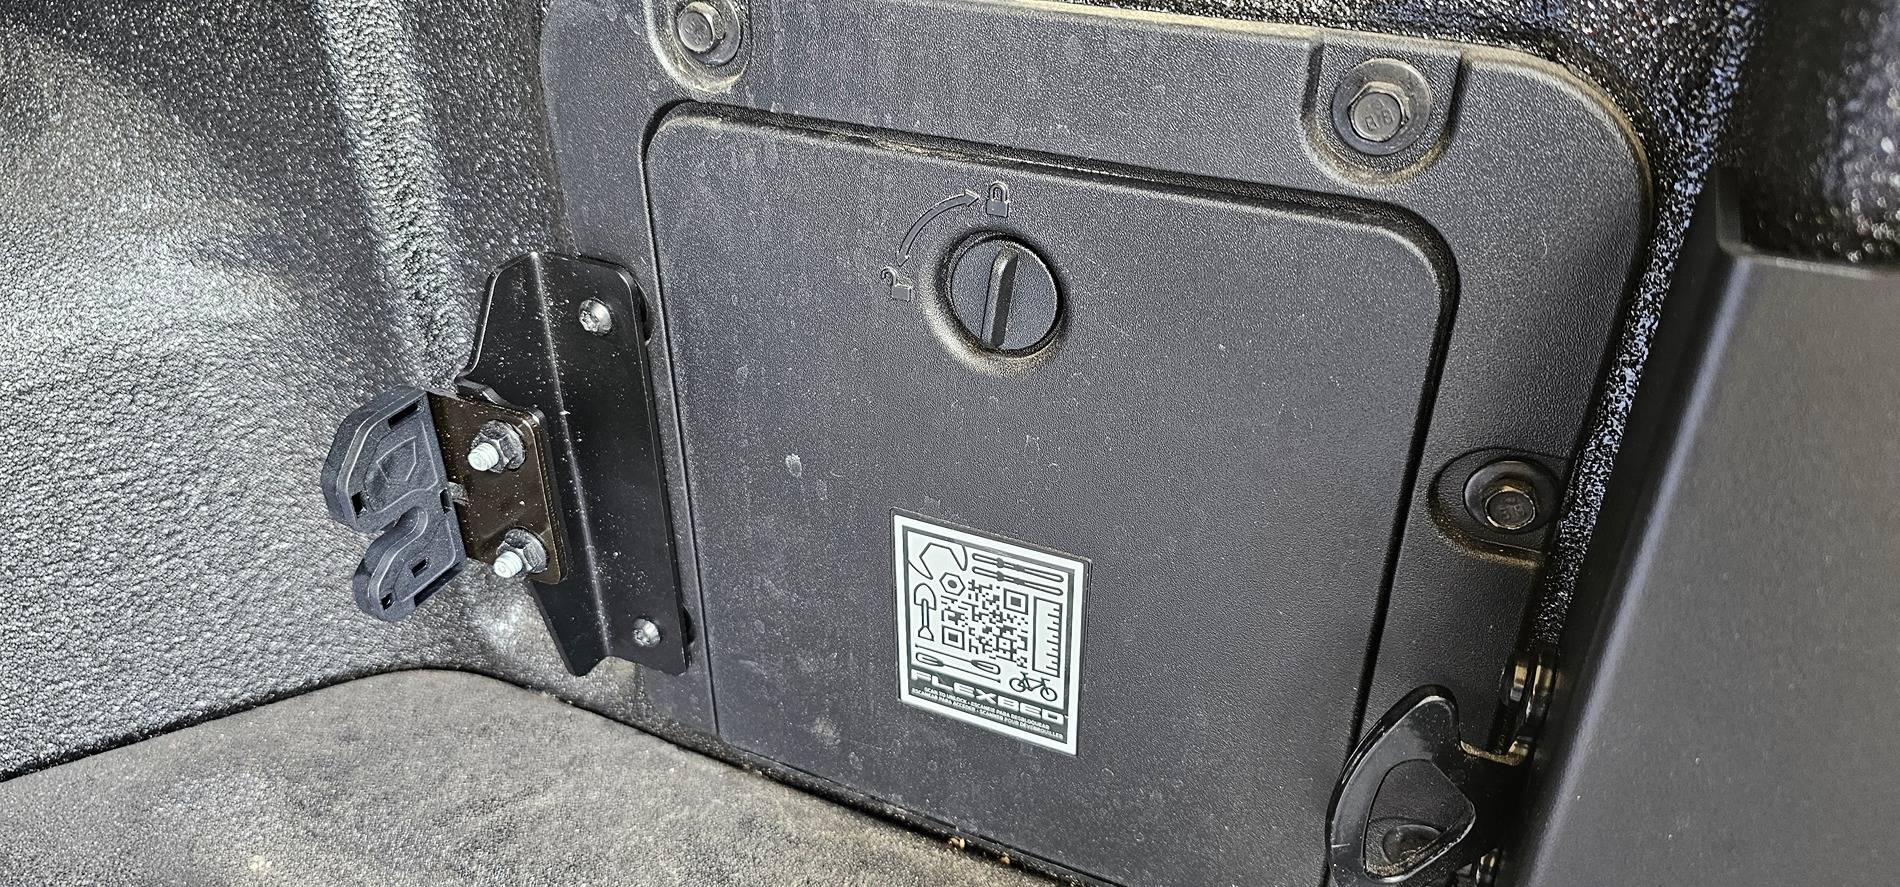
Step 4 in the instructions is how to remove the tie-down bracket from the tailgate area and install the toolbox mounting bracket. You simply remove the tie-down, place the bracket up against the back of the bed, and reinstall the tie-down bracket to secure it. After finishing my install, I'd recommend NOT doing this step at this point. More explanation below.
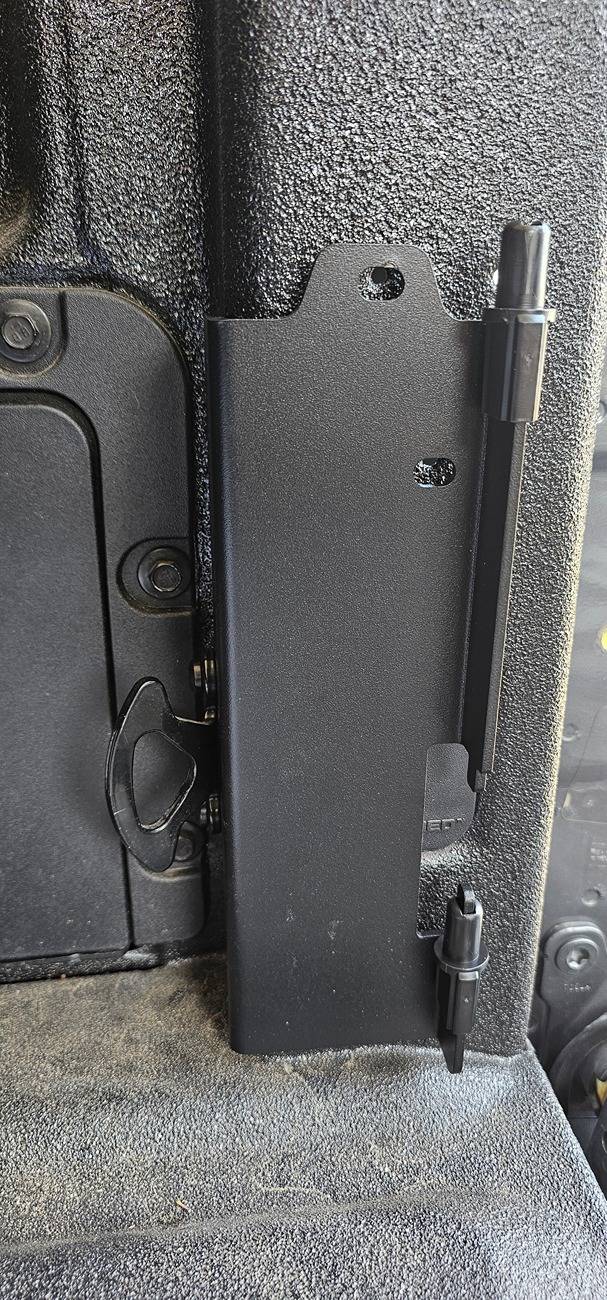
Step 5, you have to remove the tail light assembly (pretty easy, remove two screws from the inside wall of the bed that hold the tail light in, and pull the tail light out to disengage the posts holding in it two rubber grommets behind the light.). You then install a bracket with two posts on it from inside the tail light d-pillar through the tail light cavity into the bed through the mounting bracket. I would have moved this up to step 4 if I were writing the instructions. The holes in the D-Pillar were not big enough for the posts to fit through. It wasn't just because of the spray in liner either. I had to drill out the holes slightly so that the posts would fit. And to do that, I had to remove the mounting bracket I just installed. It also helped, once I got the bracket installed, to have the bolts on the tie-down a little loose so I could maneuver the mounting bracket onto the posts protruding from the d-pillar. So I'd recommend skipping step 4 at this point, except to remove the tie-down. Then remove the tail light, drill out the holes if needed, and loosely secure the mounting bracket with the nuts on the bracket posts before re-installing the tie-down over the bracket and tightening everything down. Then re-install the tail light.

From then on, the instructions are pretty straight forward. You place the tool box over the pins on the mounting bracket and test it to make sure it swings and latches correctly. Install the pivot bracket lock and you are done! Installation took me about 30 mins or so.

The only thing I didn't anticipate is that I don't have easy access to the lower tie-down point when the toolbox is in the secured position. I use a bed net across the back quite often to keep small items from bouncing around back there, and now I don't have that lower tie-down to clip the bottom carabiner to. Two holes in the mounting bracket look like they can be used to add a lock hasp on some trucks. I think I'll mount a small tie-down strap ring to that so I can clip the net to it.
I like the toolbox. It's not going to be used for heaving duty tools or anything. Just a little bit more security for stuff I don't want rattling around the cabin. I also have a back flip tonneau over the bed, so I'm not too worried about someone getting curious about what's in the toolbox.
):
Steps one, two and three in the instructions explain how to install the striker plate bracket for the toolbox. The instructions state you should use a 3/8" drill bit and enlarge the holes in the bezel around the truck cubby to put two spacers in. You use the two inboard holes to mount the latching/striker bracket with longer supplied T30 bolts. I didn't have to enlarge the bezel. The spacers fit right up against the metal truck bed without having to do that, even though I do have the factory spray-in liner. Securing the bracket was easy.
Step 4 in the instructions is how to remove the tie-down bracket from the tailgate area and install the toolbox mounting bracket. You simply remove the tie-down, place the bracket up against the back of the bed, and reinstall the tie-down bracket to secure it. After finishing my install, I'd recommend NOT doing this step at this point. More explanation below.
Step 5, you have to remove the tail light assembly (pretty easy, remove two screws from the inside wall of the bed that hold the tail light in, and pull the tail light out to disengage the posts holding in it two rubber grommets behind the light.). You then install a bracket with two posts on it from inside the tail light d-pillar through the tail light cavity into the bed through the mounting bracket. I would have moved this up to step 4 if I were writing the instructions. The holes in the D-Pillar were not big enough for the posts to fit through. It wasn't just because of the spray in liner either. I had to drill out the holes slightly so that the posts would fit. And to do that, I had to remove the mounting bracket I just installed. It also helped, once I got the bracket installed, to have the bolts on the tie-down a little loose so I could maneuver the mounting bracket onto the posts protruding from the d-pillar. So I'd recommend skipping step 4 at this point, except to remove the tie-down. Then remove the tail light, drill out the holes if needed, and loosely secure the mounting bracket with the nuts on the bracket posts before re-installing the tie-down over the bracket and tightening everything down. Then re-install the tail light.
From then on, the instructions are pretty straight forward. You place the tool box over the pins on the mounting bracket and test it to make sure it swings and latches correctly. Install the pivot bracket lock and you are done! Installation took me about 30 mins or so.
The only thing I didn't anticipate is that I don't have easy access to the lower tie-down point when the toolbox is in the secured position. I use a bed net across the back quite often to keep small items from bouncing around back there, and now I don't have that lower tie-down to clip the bottom carabiner to. Two holes in the mounting bracket look like they can be used to add a lock hasp on some trucks. I think I'll mount a small tie-down strap ring to that so I can clip the net to it.
I like the toolbox. It's not going to be used for heaving duty tools or anything. Just a little bit more security for stuff I don't want rattling around the cabin. I also have a back flip tonneau over the bed, so I'm not too worried about someone getting curious about what's in the toolbox.
Sponsored
Last edited:


