NOTE: THE MEMBERS MARKETPLACE SECTION IS FOR PERSONAL USE ONLY - I.E. SELLING ITEMS/PARTS FROM YOUR PERSONAL VEHICLE ONLY. ANY SALES OF ITEMS MADE FOR COMMERCIAL PURPOSES (I.E. MAKING/SELLING MULTIPLE ITEMS, TAKING ORDERS, ETC) BY ACCOUNTS NOT AUTHORIZED TO CONDUCT COMMERCIAL SALES ON THE SITE IS A DIRECT VIOLATION OF OUR FORUM RULES AND TERMS OF SERVICE AND WILL RESULT IN THE PERMANENT SUSPENSION OF YOUR ACCOUNT.
⛔️ EFFECTIVE JANUARY 13, 2023 ⛔️
ATTENTION SELLERS: All users who wish to sell in the marketplace are now required to abide by the following RULES. If a sales thread/post created ON OR AFTER January 13, 2023, does not comply, it is subject to DELETION without notice.
ATTENTION BUYERS: If you see a non-compliant sales thread, please REPORT the thread and take CAUTION when transacting.
Rule #1 - Post a picture of the actual item you are selling (NO stock photos).
Rule #2 - The picture must include a REAL piece of paper with your Username and the Date written on it next to the product you are selling. NO photoshop or digitally edited photos are allowed.
Rule #3 - NO "feeler" threads are permitted. This section is only for items that are actually available and ready to be sold currently.
Rule #4 - The listing must include an asking price. OBO (or best offer) is allowed but it must be accompanied by an asking price.
Rule #5 - No "threadcrapping." Classifieds threads are not meant for negative discussions. Comments on pricing are not allowed. Only people with genuine questions and interest in the item for sale should be posting in the classifieds threads.
@mikeakasully or Anyone else that knows, The Molex Pins Mouser #: 538-560023-0421-LP (Molex Part 560023-0421) That are referenced in the parts list to do a DIY interconnect pigtail / connector. Are these non-gender specific ? meaning does not require a male pin to mate with this part that looks like a female connector ? is this sort of like the way Anderson Power Pole uses same connector for connecting ? I have made up patch cords etc. using Molex brand connectors / in the past but they all had separate male OR female terminals that interconnected.
Getting ready to order to make my patch cable.
Thanks
I used the SAME molex pins on each end of the patch cable. They are pushed onto the pins in one end, and pushed and locked into the plastic socket on the other. I made three cables and realized this was the easiest way to prepare the wires. Pins on each end. Then the end with the pins that go over the socket pins need shrink tubing to keep them separate from each other, before wrapping with a nice cloth tape to make sure everything stays in place. IIRC, the pins are not actuallt square openings, more of a slight rectangle...so take care when you push them onto the pins.
Thanks, I got it Now. The Male matting pins are built into the Header housing. I had to look at the Data sheet closer to see it. Now it makes sense. Thanks for replying back and making this info on the harness available.
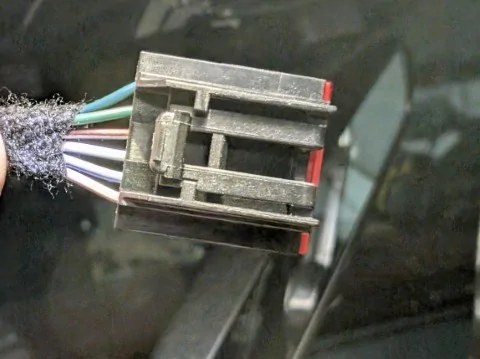
It appears that the MY2025 harness is a bit different. I have this connector that attaches to the driver facing camera on the windsheild. The one's listed from Mouser in this tread are not correct.
Can anyone help identify this connector so that I might be able to do a clean install ?
It appears that the MY2025 harness is a bit different. I have this connector that attaches to the driver facing camera on the windsheild. The one's listed from Mouser in this tread are not correct.
Can anyone help identify this connector so that I might be able to do a clean install ?
Do not use that connection to the front camera for the Auto Dimming Rear View Mirror. Use the Connection to the over Head Map Lights. The Overhead Map Light Pig tail and Molex Connectors are the same on the MY 2025 as they were on Previous MY. I just finished installing the Auto dimming / Homelink Mirror on my 2025 Lariat. Your holding the incorrect connector for the Overhead Map Light.
Do not use that connection to the front camera for the Auto Dimming Rear View Mirror. Use the Connection to the over Head Map Lights. The Overhead Map Light Pig tail and Molex Connectors are the same on the MY 2025 as they were on Previous MY. I just finished installing the Auto dimming / Homelink Mirror on my 2025 Lariat. Your holding the incorrect connector for the Overhead Map Light.
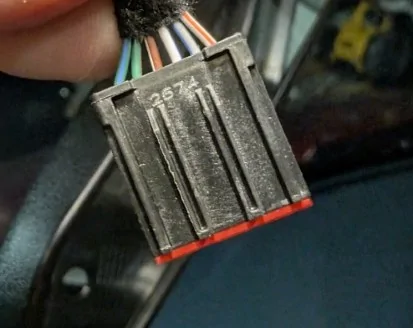
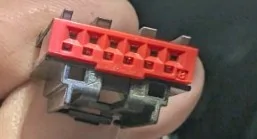
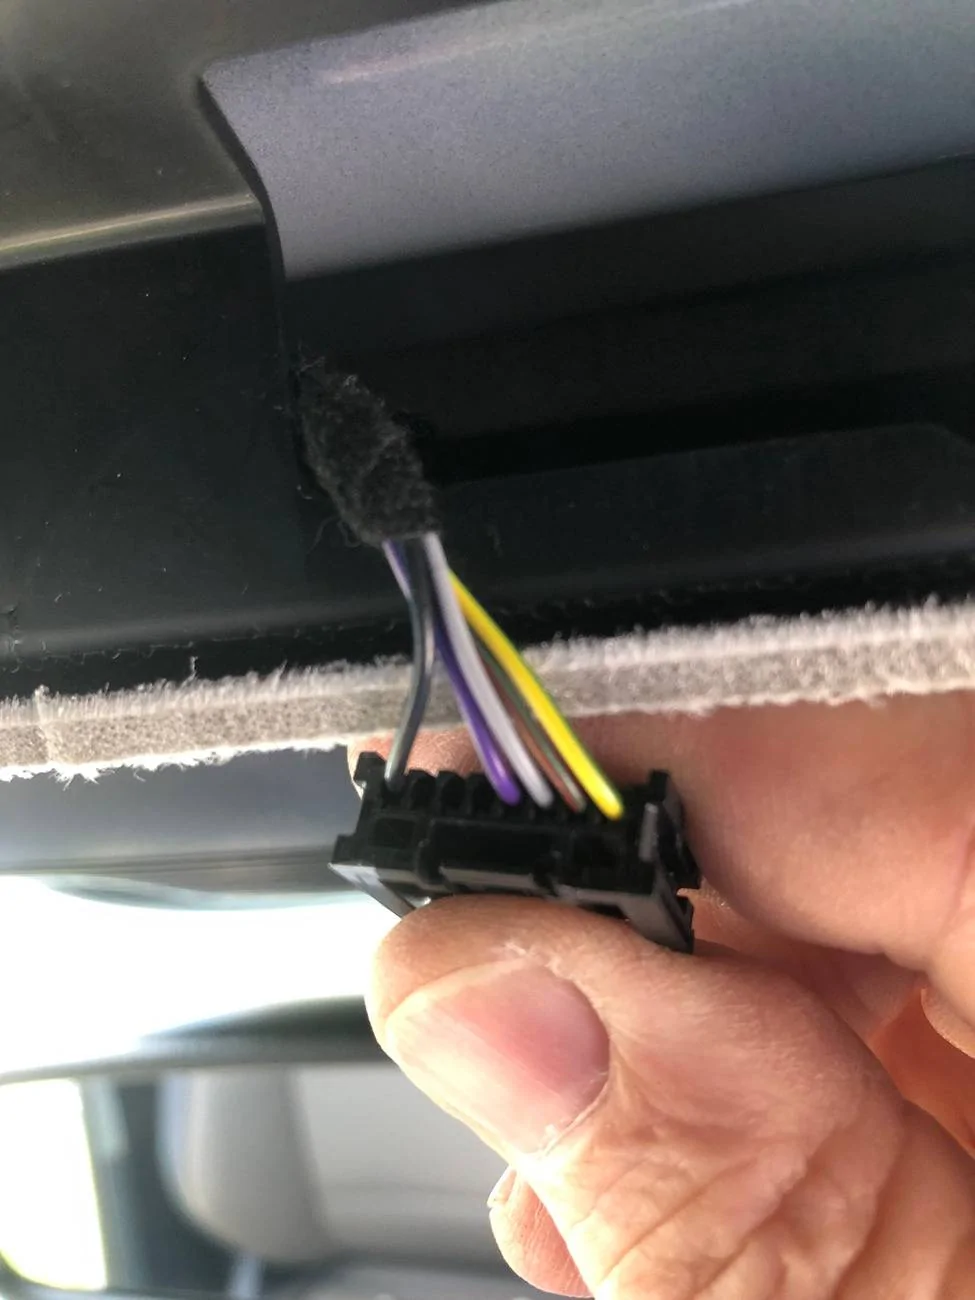
Here is a picture of my Factory Molex Connector I accessed AFTER removing the Overhead Console / Map light / Sunglass holder on my 2025 Lariat. Exact same as previous Model Years.
Here is a picture of my Factory Molex Connector I accessed AFTER removing the Overhead Console / Map light / Sunglass holder on my 2025 Lariat. Exact same as previous Model Years.
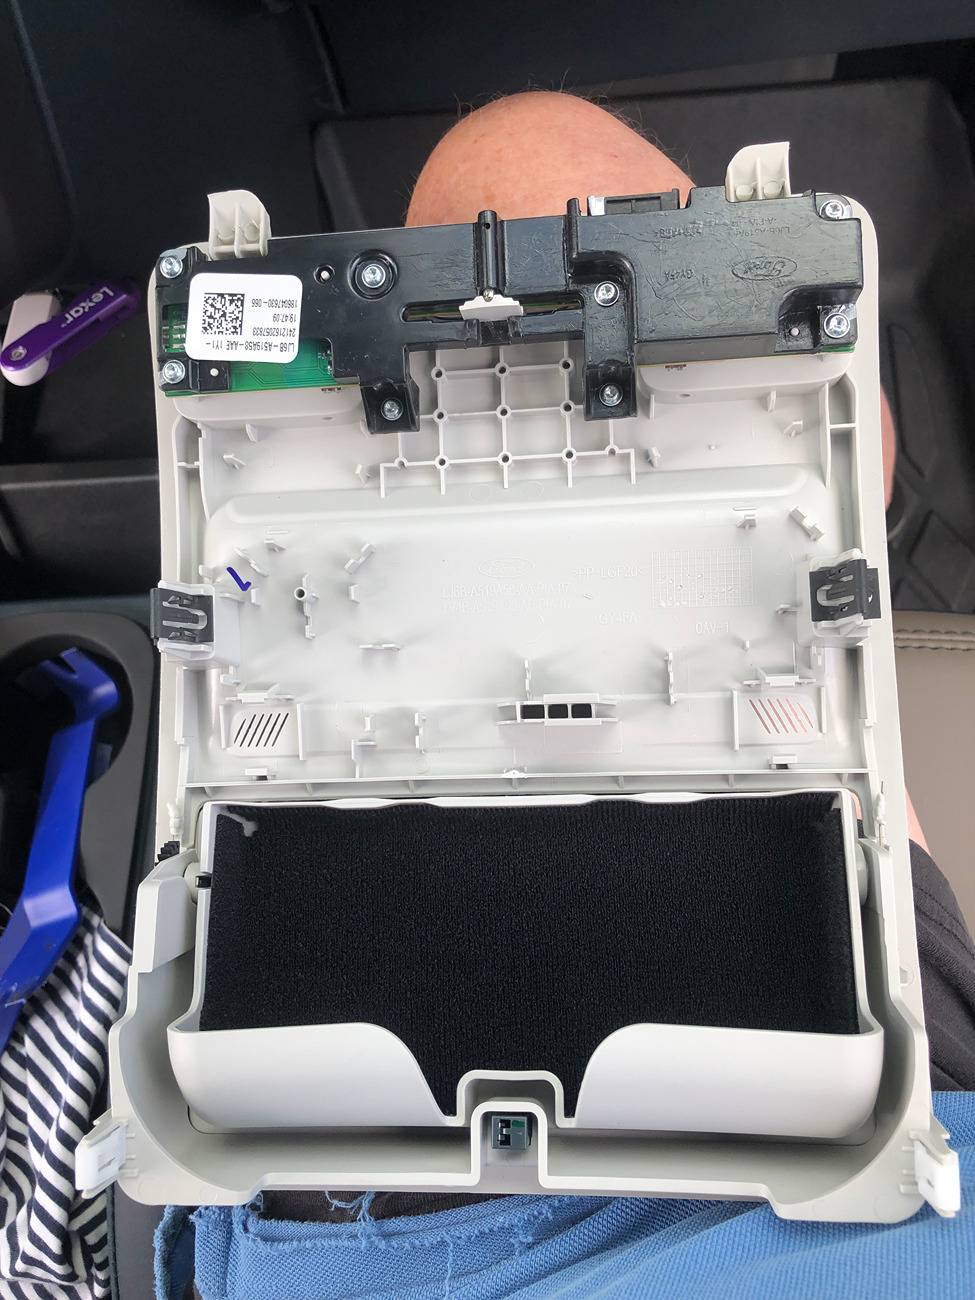
Here is a Picture of the Overhead Comsole removed so you can see where the attachment clips are located (2 while plastic at rear and 2 with metal tangs middle and there are 2 flanges at front end that do not clip but slide under the edge of the headliner)
Here is a Picture of the Overhead Comsole removed so you can see where the attachment clips are located (2 while plastic at rear and 2 with metal tangs middle and there are 2 flanges at front end that do not clip but slide under the edge of the headliner)
Yeah, its a little more difficult with a sunroof, but what helped was opening the sunroof all the way, and going down from the top if that makes sense. Getting to the clips without breaking them was the hardest part and one still popped off but luckily I didn't lose it.
Do not use that connection to the front camera for the Auto Dimming Rear View Mirror. Use the Connection to the over Head Map Lights. The Overhead Map Light Pig tail and Molex Connectors are the same on the MY 2025 as they were on Previous MY. I just finished installing the Auto dimming / Homelink Mirror on my 2025 Lariat. Your holding the incorrect connector for the Overhead Map Light.
You miss the point, he was trying to use the CAMERA connection that has been used by others as it has a stable switched 12V. The problem is the connector changed with the 2025 model year. It is no longer a MOLEX but another brand. You are correct in that the Map Light connector is the same Molex as previous years, but the purple switched lead being used is not 12V when measured.
As it turns out, I had the wrong connector and actually wanted to connect to the dome light. I found the correct connectors made a proper harness and completed the install.
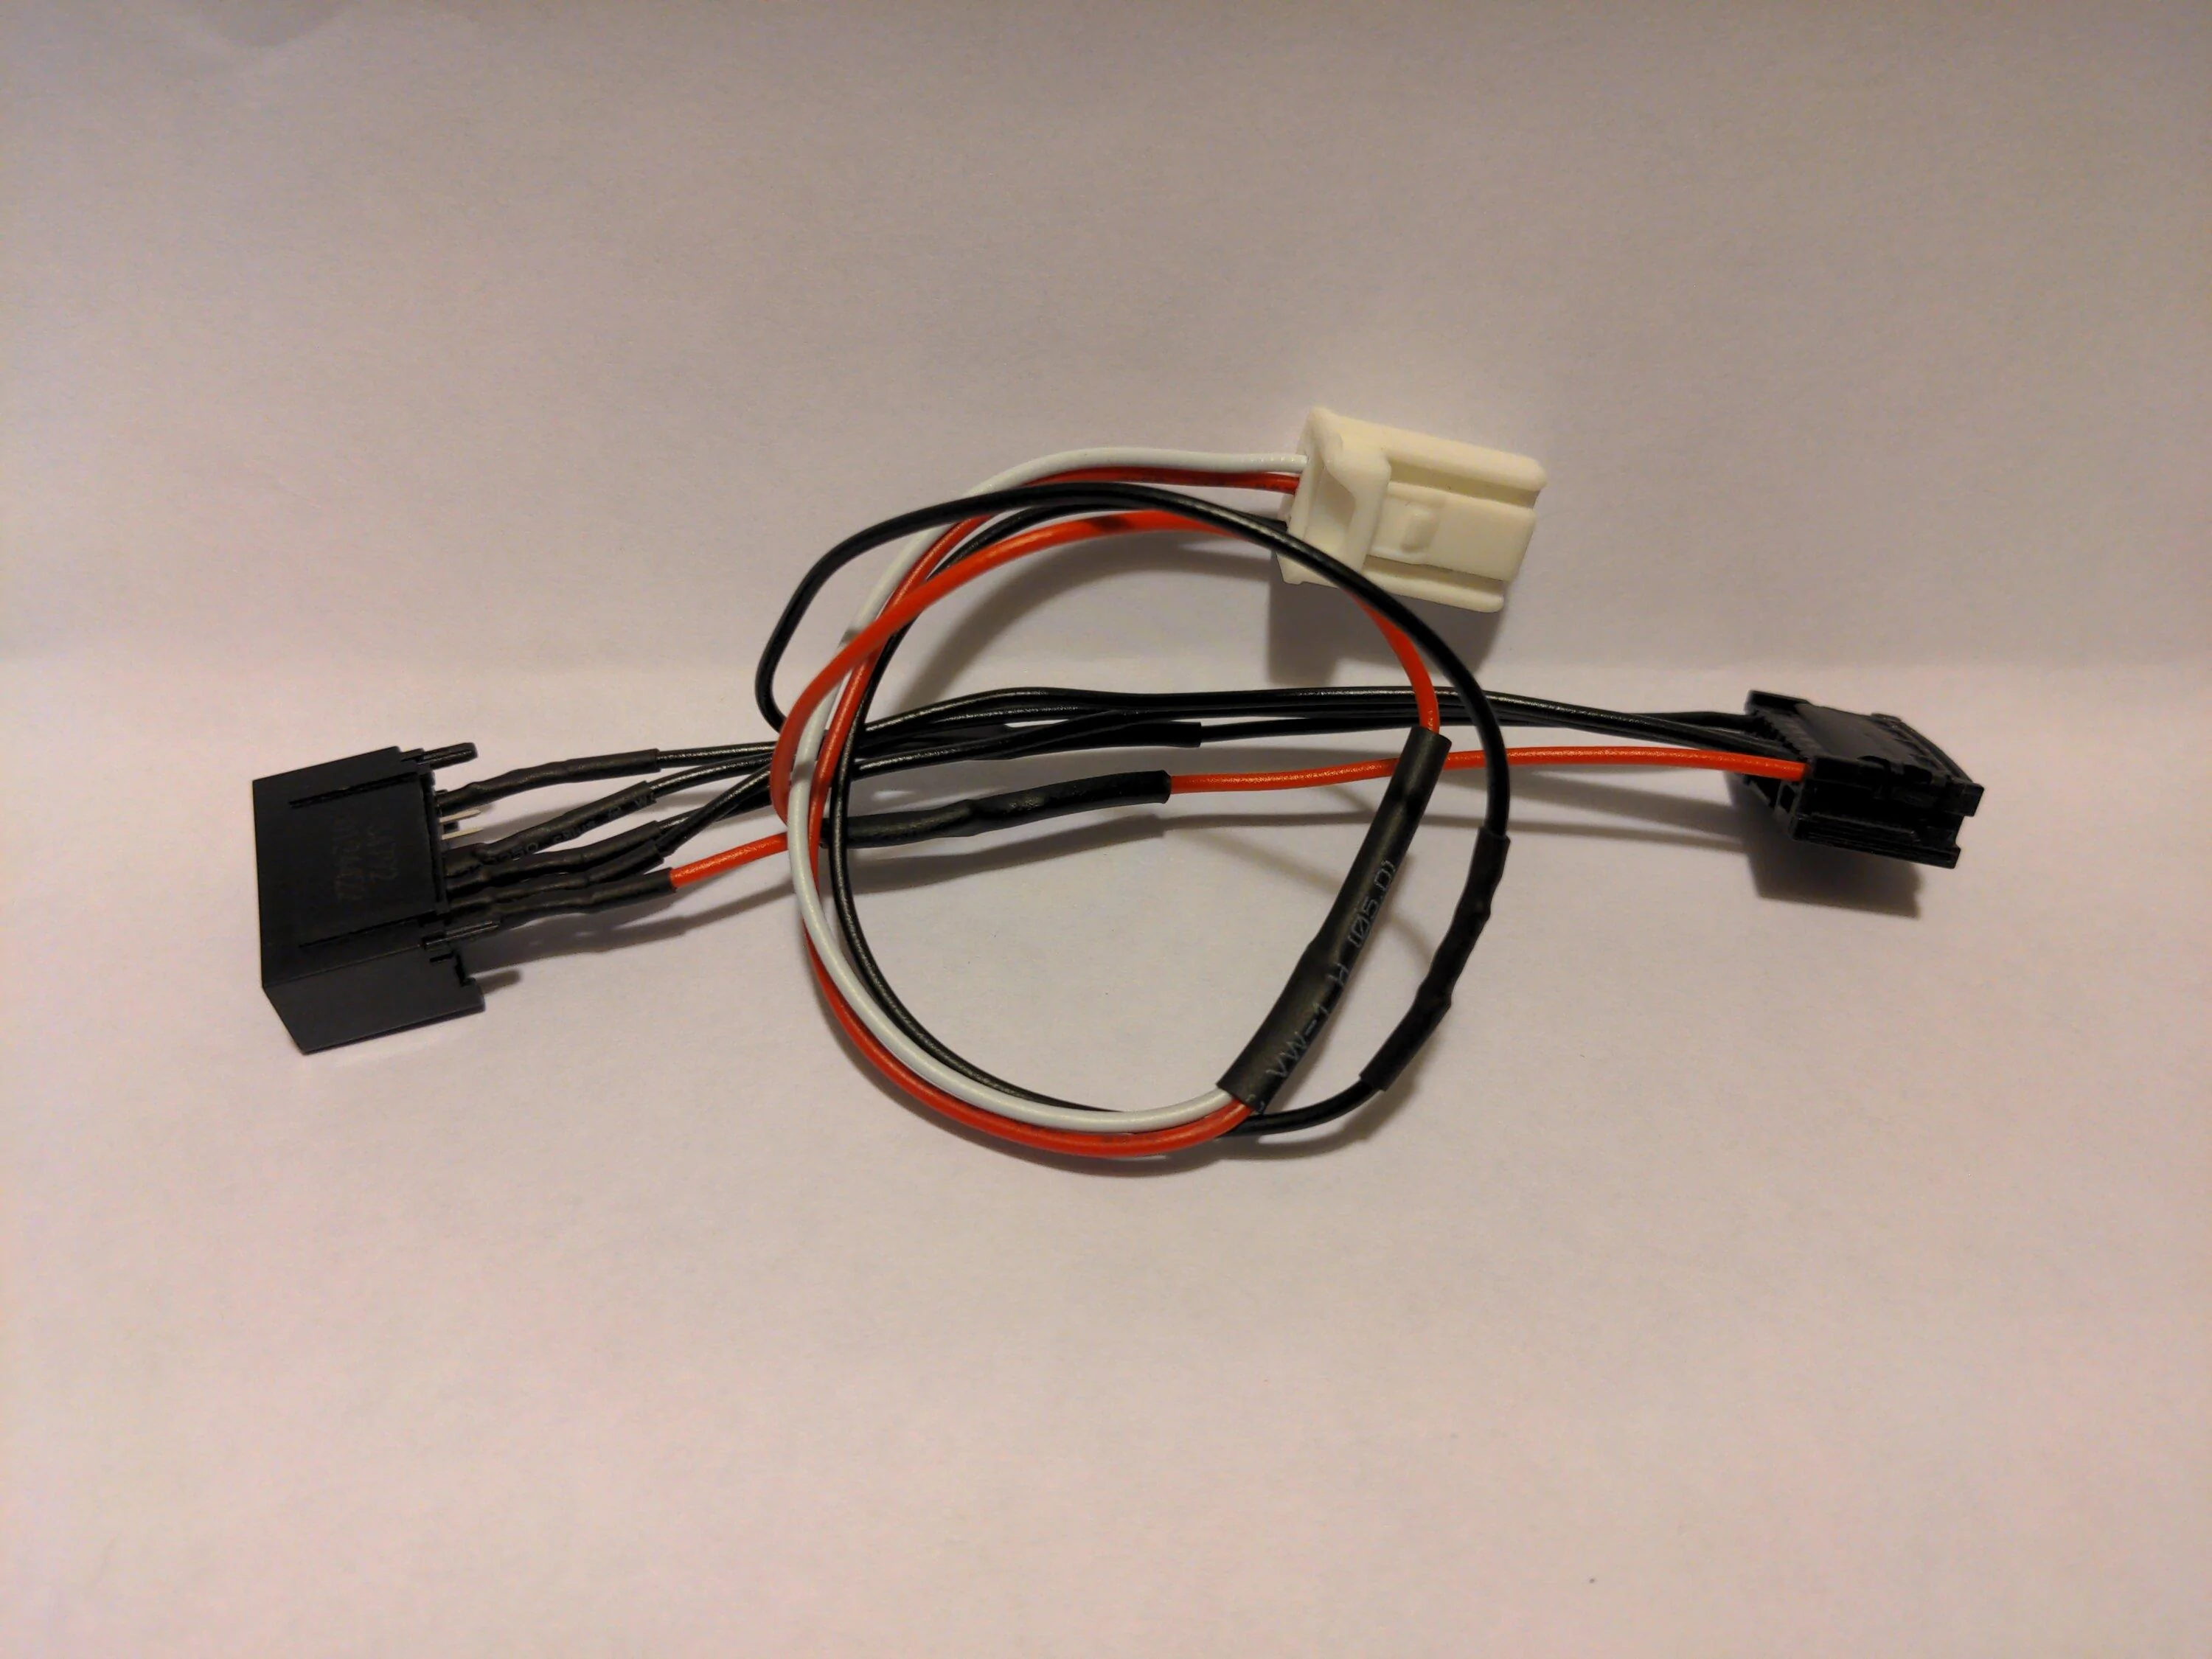
Not making anymore, but I'll provide some instruction.
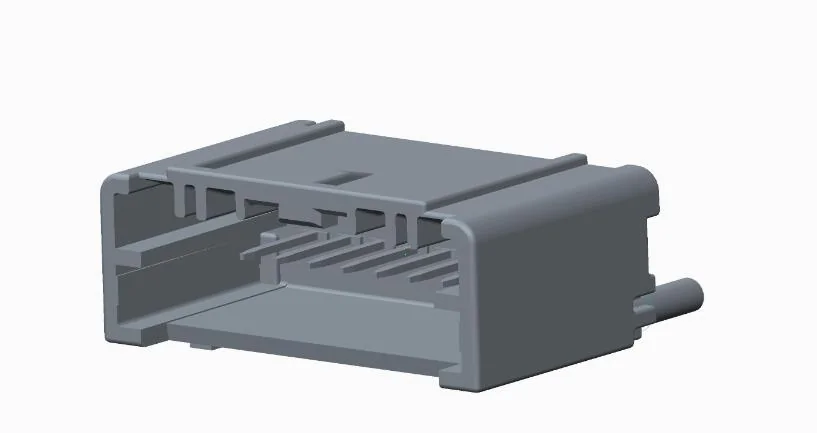
So for the pins you need 10 of these (order more than that for screw ups): https://www.mouser.com/ProductDetail/538-560023-0421-LP
1 Female connector: https://www.mouser.com/ProductDetail/538-34791-0080
1 Male connector: https://www.mouser.com/ProductDetail/538-34792-0080
To crimp the pins I recommend the following crimper on the smallest setting: https://amzn.to/45XiXsz
For the 5 pins that will go into the female connector you need to pinch them a bit after crimping with a needle-nose pliers to flatten them on the sides to get them to slide in. A good small pick helps pull them in if needed.
Attached is the pinout of the connector. I use pin 1 for positive power, and pin 8 for ground. When you get the connectors if you look close you can see the 1 and 8 numbers on them to determine which pins are which. Pins 2, 3, and 4, I just pass them through as they are used by the dome light.
There will be a 5 pin connector kit that will come with the mirror. The one with the white stripe and the wire next to it are positive, they can be spliced together and connect on the wire on pin 1. The last wire to the far side is the negative and can be spliced into the wire on pin 8.
If you have a small hot work station or mini butane torch these make splicing the wires on 1 and 8 easy: https://amzn.to/3P6qEWw
Also on the male connector I crimp on the pins and then solder them on and them cover them in heat shrink, but liquid electrical tape you can find at any hardware store works good to.