Sponsored

NSA Readybrute Elite II tow bar with Roadmaster base plate

Linda B

2.5L Hybrid
Well-known member
First Name
Linda
Joined
Jun 16, 2021
Threads
6
Messages
67
Reaction score
96
Location
Michigan
Vehicle(s)
Ford Maverick XLT Lux!!!, E450 Lazy Daze Motorhome
Engine
2.5L Hybrid
In August I purchased the NSA tow bar setup with a Roadmaster base plate for flat towing behind my motorhome. I've been putting off installation because I knew it would take me, an amateur, lots of time to do it. So this weekend I tackled installing the Roadmaster base plate. I used the directions that came with the base plate along with etrailer.com's video https://www.etrailer.com/tv-install-roadmaster-base-plate-kit-2022-ford-maverick-rm97rr.aspx

It took about two hours to remove the front fascia, the most difficult part was removing the 3 on each side inch or more long hex screws that hold it to the fenders. There is little wrench room and if you don't have a right angle electric socket wrench, it takes quite a bit of time to remove each screw. I also found it helps in removing the other bottom 3 screws and 1 pop fastener if you turn the wheels towards the side you're working on and reach over the tire to get to them. Then it took me another two hours to plan and cut into the parts of the bottom air dam system. That was enough for the first day.

Second day, it took me about 1 hour to attach the base plate. I had to borrow the neighbor's car to make a trip to the store for a 15mm deep socket. I am fully stocked with regular sockets, but not deep, and I didn't see mention of the need for that deep socket before I had my Mav in pieces in my garage.

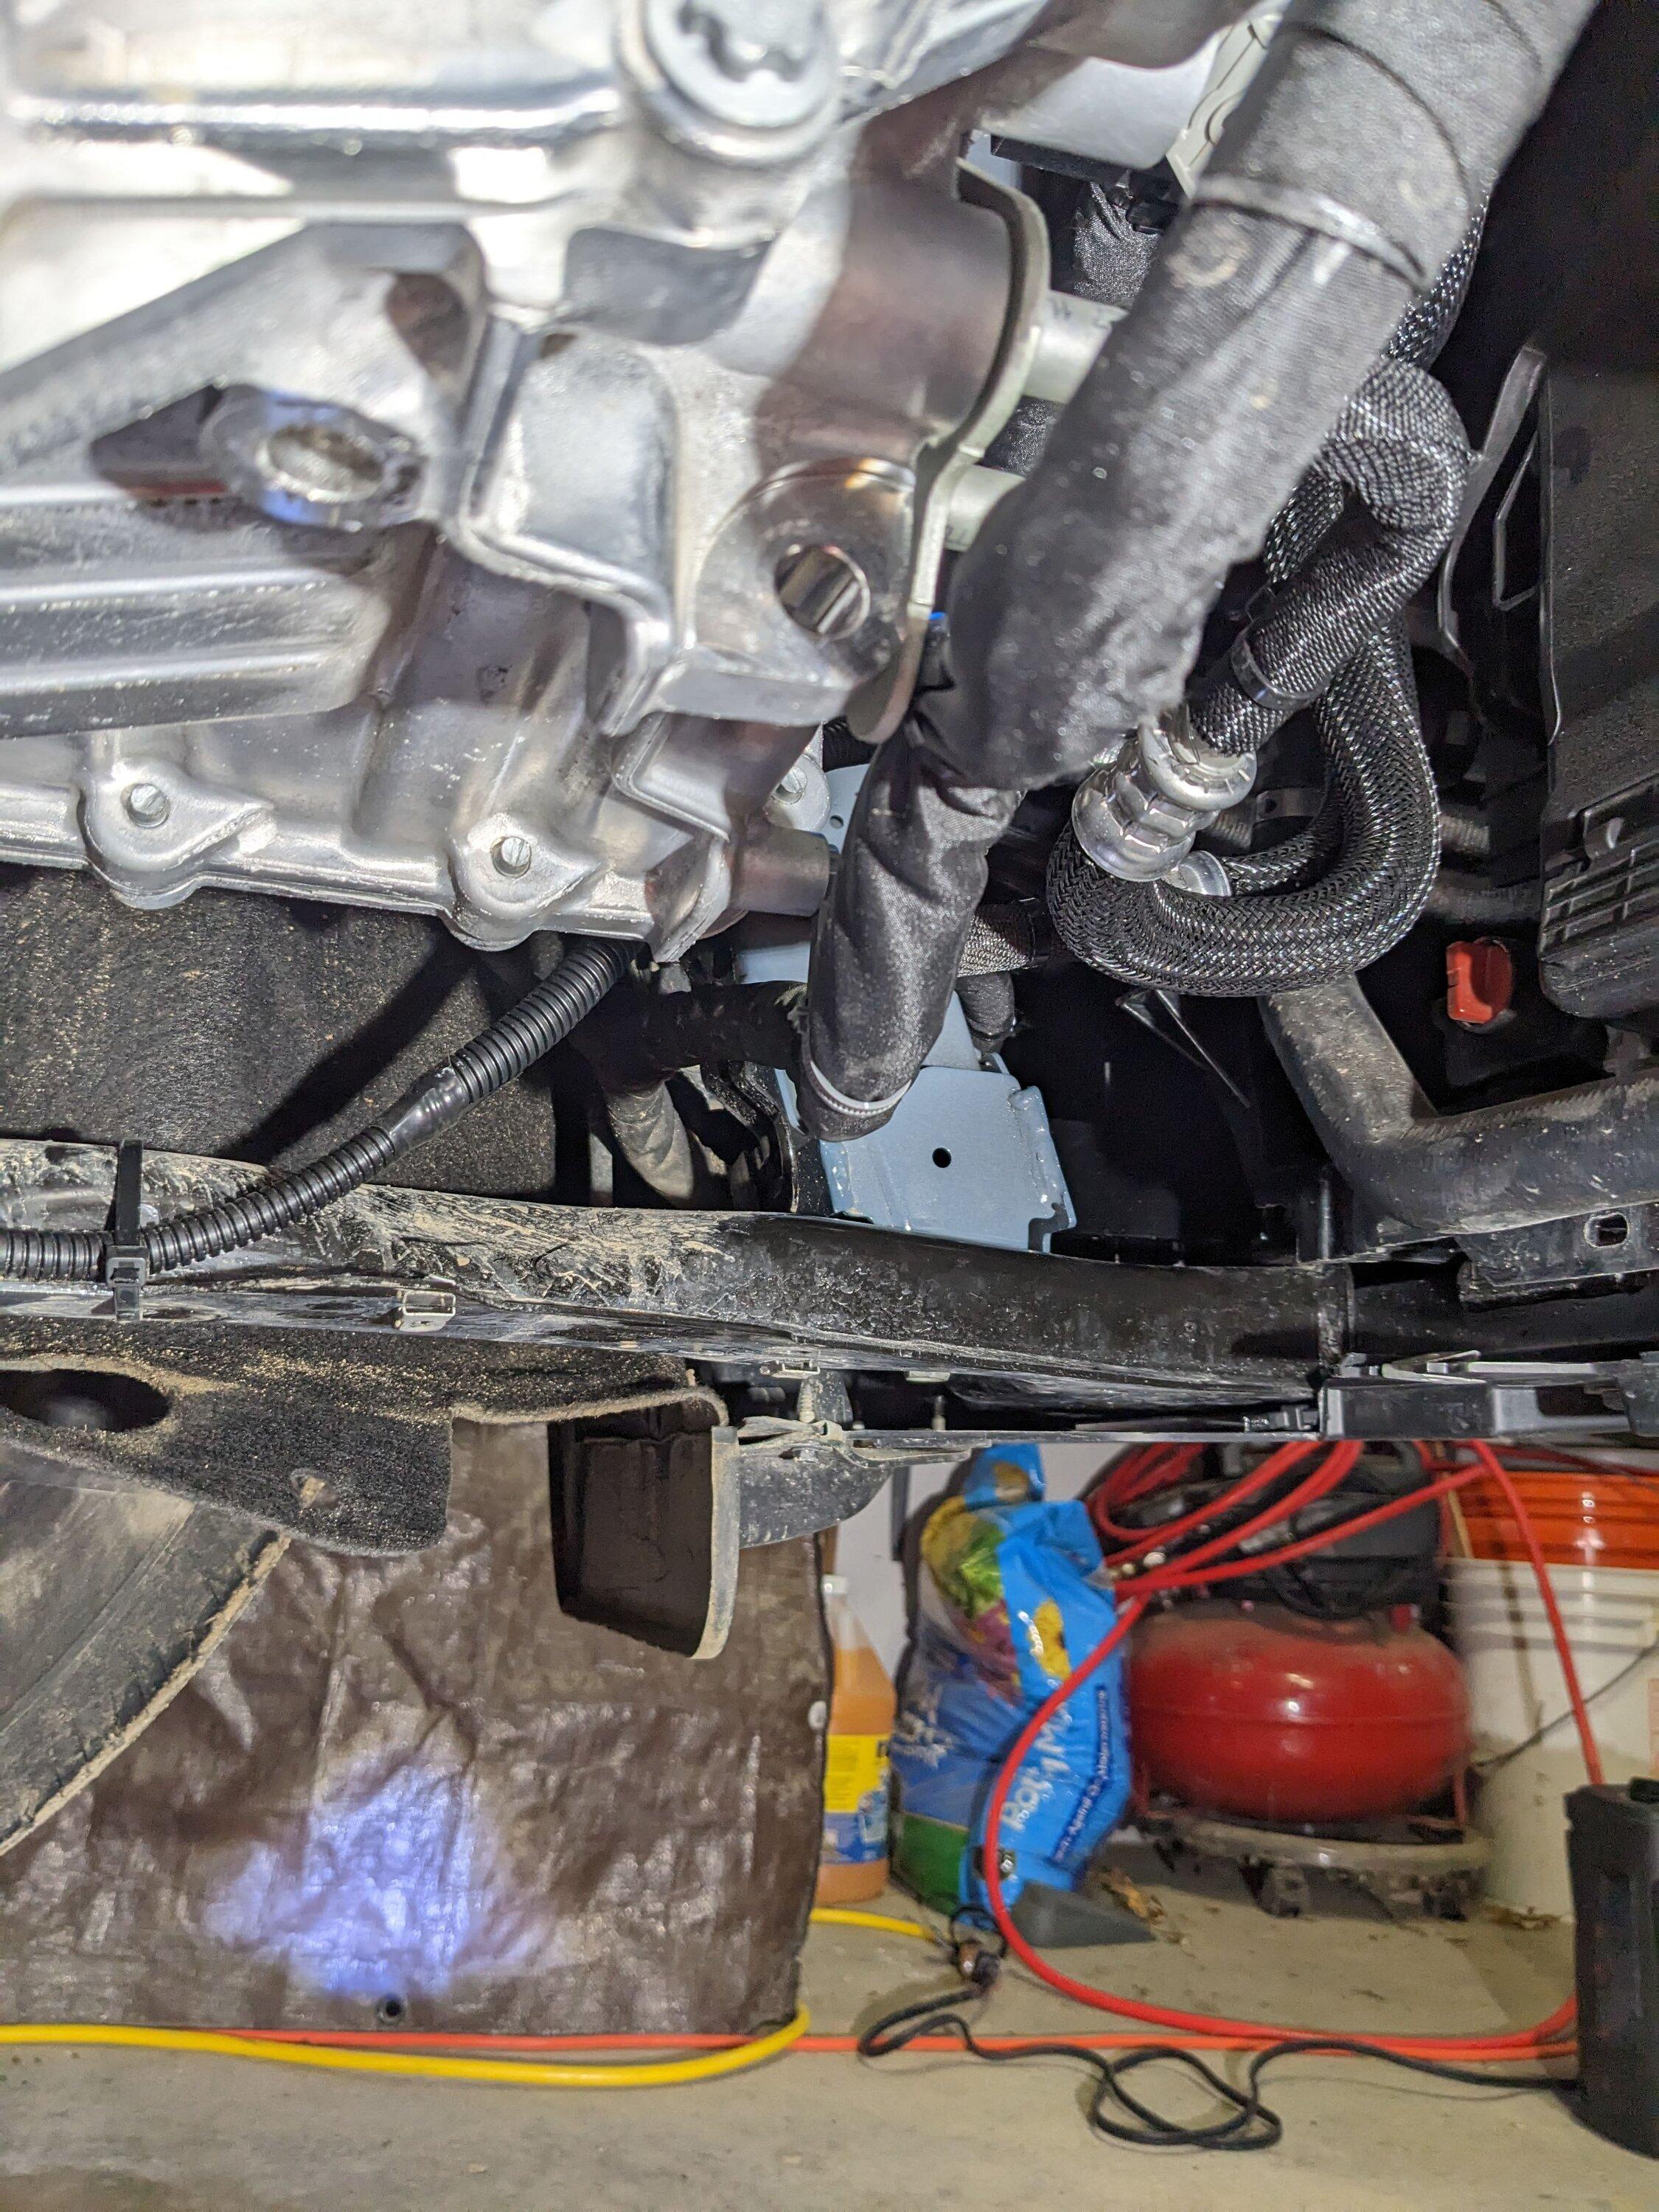
After that I tried tackling the Ready Brake brake cable and breakaway kit. In removing the fascia, you only have to remove the front 8 screws in the bottom engine cover. To see where things are, the rest of the 10 or so screws have to come out to totally remove that cover. I figure I'll route the brake cable along the blue frame to the front and then attach it with some sort of bracket to the little tab on the center of the base plate. Then follow along with the breakaway cable the same and attach it to the tab near the left side. I drilled the two holes in the firewall near the bottom left corner of the part where the firewall bows towards the engine to accommodate that arm that's there. I found this youtube video of a guy installing the system on his jeep, which helped me understand the braking system a lot better.

This is where I got stuck for two reasons. One, I don't have a bracket to attach to the tabs on the base plate. And two, because I haven't figured out where to put the little red breakaway box. So I ended up putting it all back together until I engineer the brake cable brackets. Putting the fascia and the under cover back on took about 30 minutes, mostly with those stupid hex screws.

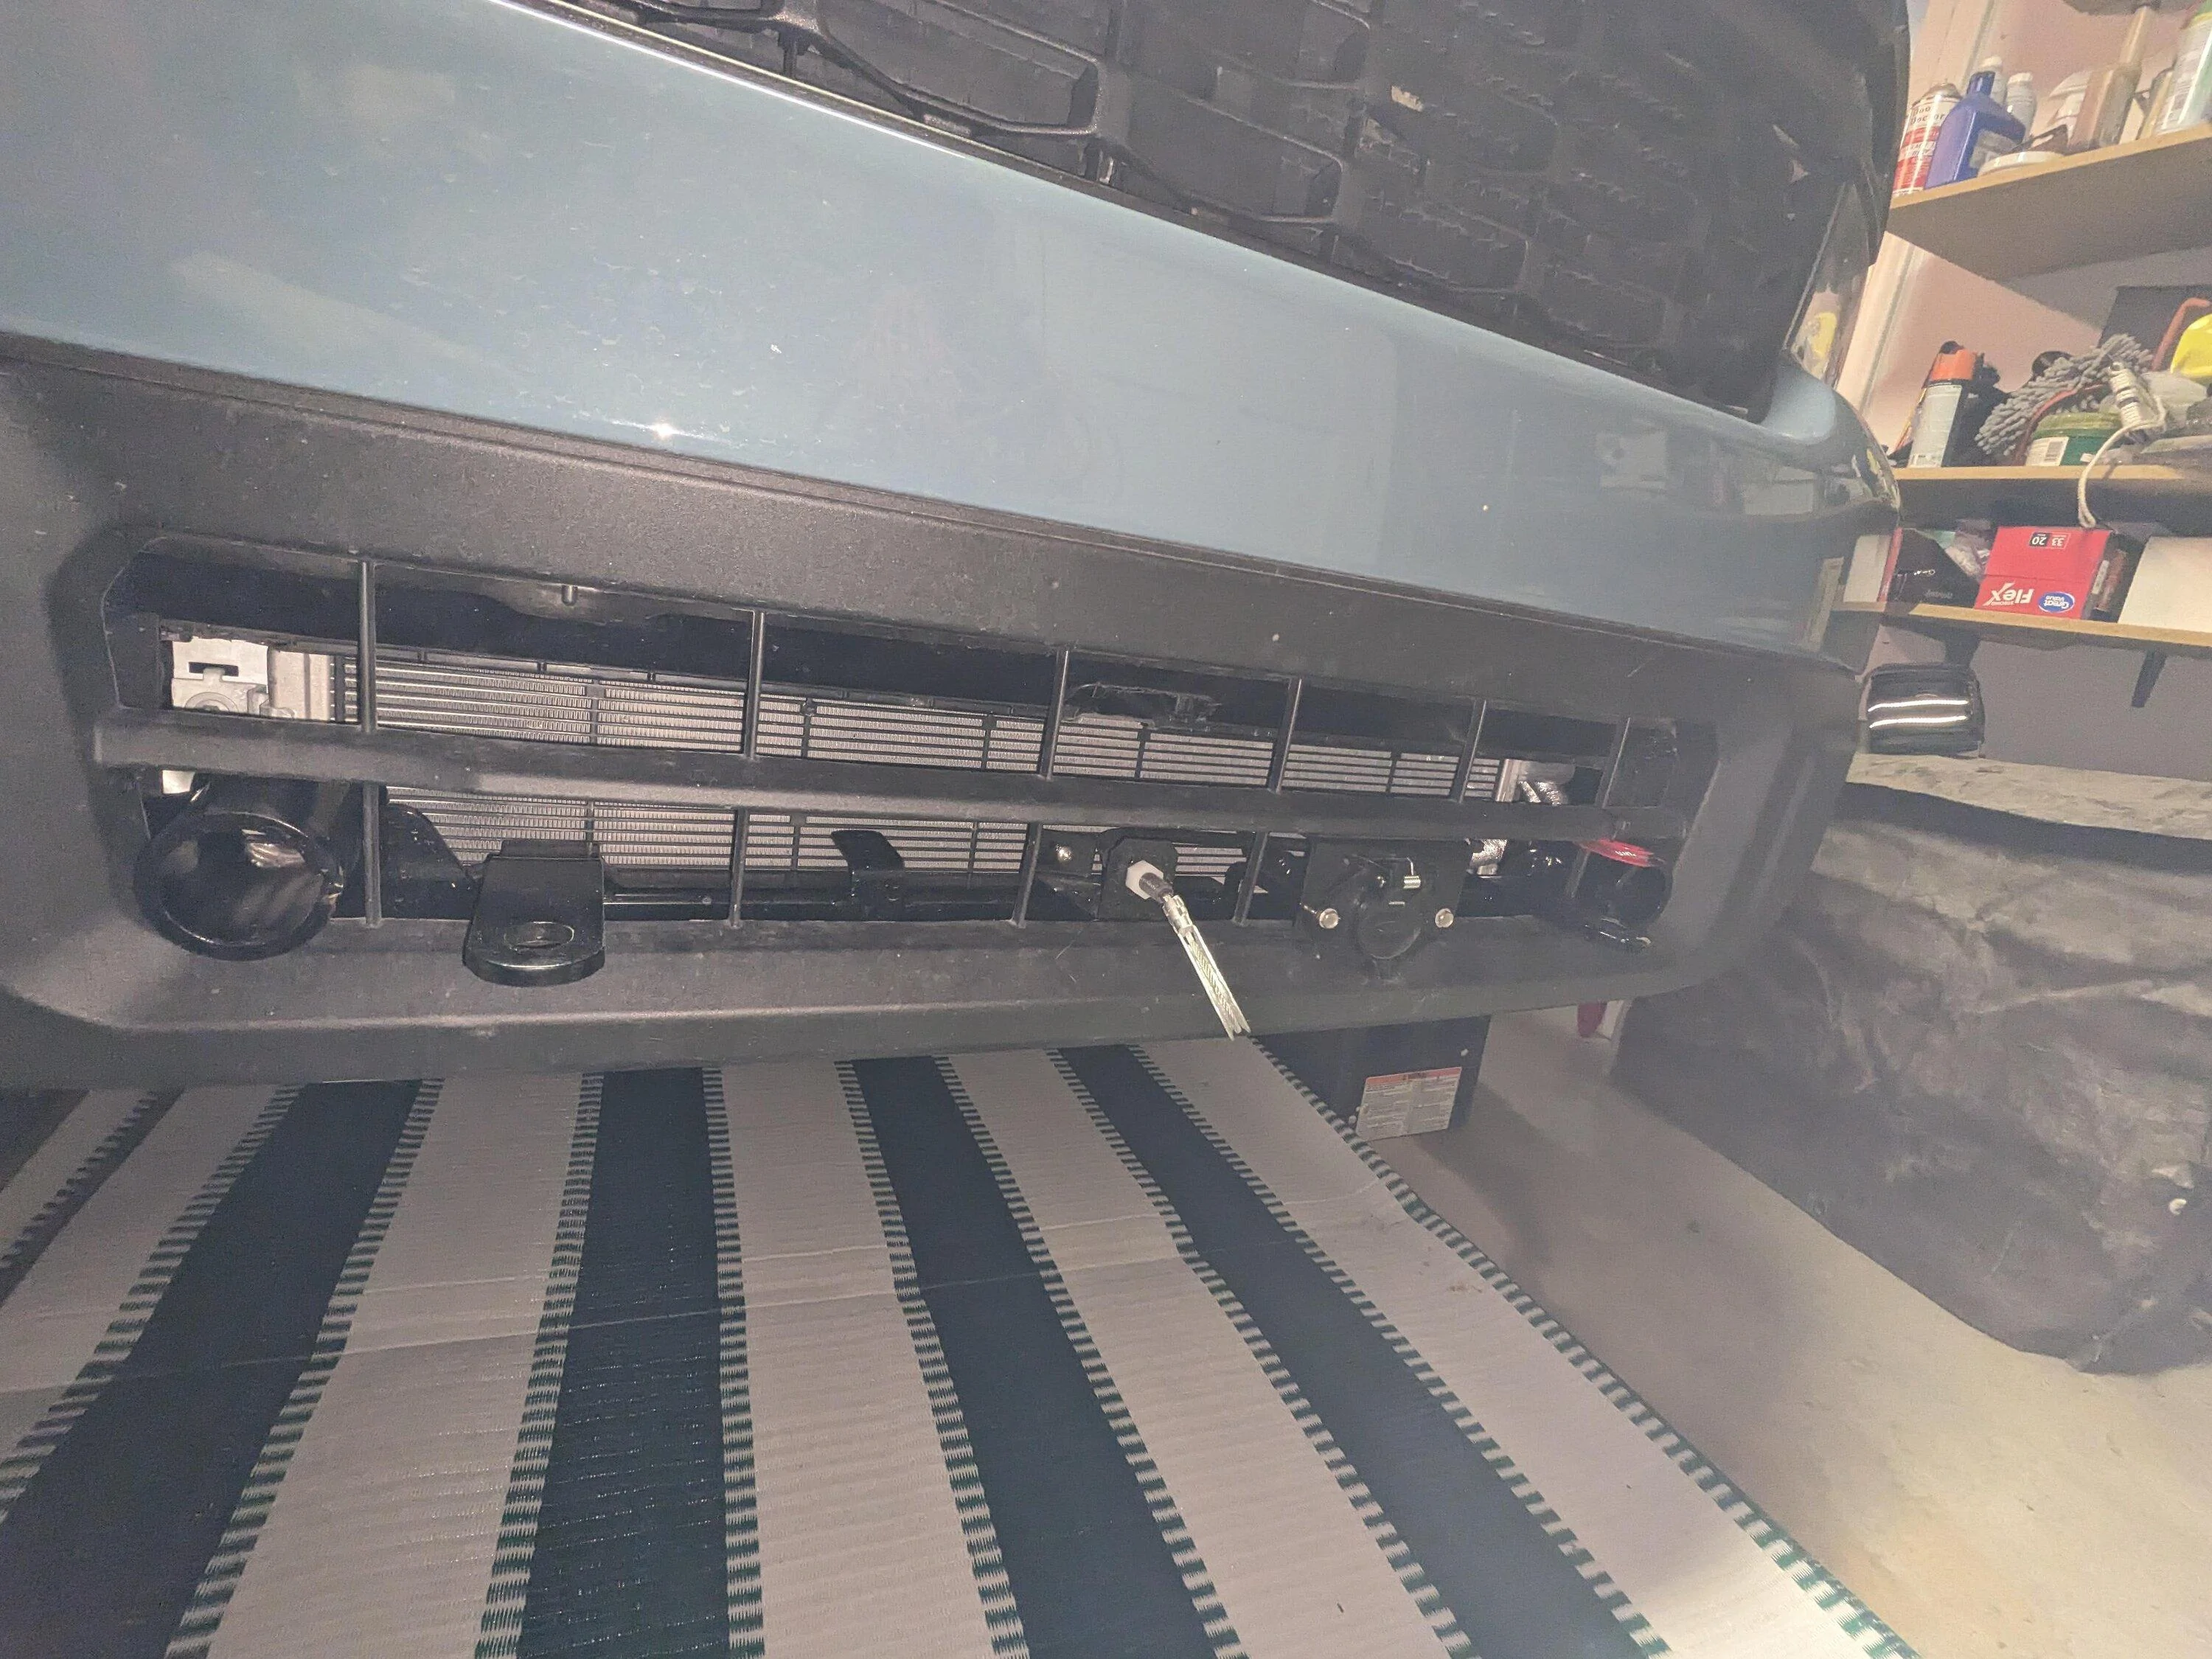
My Google-chi was not strong on finding a bracket for what is needed. But, I think I've got the brackets figured out. I'm not able to fabricate it from scratch, so I'll buy two of these https://www.lowes.com/pd/Simpson-Strong-Tie-A21Z-Angle-Z-Max/1114951 then drill screw holes in the right places and rivet them together to form a U-shaped bracket. Probably paint them black too. I figured I need to bring that front edge 3.5 to 4 inches forward of the tab to be able to install the brake cable.

My next problem will be the breakaway box. Any ideas out there as to where that should be installed? Does anyone have the NSA system installed that can send pics or descriptions?

I know @BDennis and @Chicago Mike have NSA systems. Chicago Mike posted a picture of his in post #8 https://www.mavericktruckclub.com/forum/threads/flat-towing-a-maverick.17274/#post-330067 It looks like the brake cable might be attached to the black plastic cross member of his grill. The breakaway loop is zip tied to the left side tab and the cable seems to go up and to the driver side. But where is that pesky little red box?

Any suggestions or help would be appreciated. I still have to do the wiring and I'd like to add in a battery charge wire. The routing of those will be my next puzzle.
Sponsored

 
Last edited:
OP
OP

Linda B

2.5L Hybrid
Well-known member
First Name
Linda
Joined
Jun 16, 2021
Threads
6
Messages
67
Reaction score
96
Location
Michigan
Vehicle(s)
Ford Maverick XLT Lux!!!, E450 Lazy Daze Motorhome
Engine
2.5L Hybrid
I installed the battery charge wire this weekend. Easy peasy once I figured out there is a positive jump post in the engine bay just forward of the fuse box. Didn't have to run the line to the battery in the back seat! I used Roadmaster's battery charge line kit that includes a self-resetting circuit breaker. Installed that on the blue frame part just under the horns. Ran a wire to the 6-pin in the front and a short wire to the jump post. All done!

Also did the tail-light wiring. Used a 4 diode kit. Worst problem was the whole underside is covered in splash guards. I totally removed the engine splash guard, then unscrewed the inside edge of the next two on the driver's side. I put the 4 wires inside a wire loom and threaded and zip tied that all the way to the back. There is a readily accessible ground screw near the spare tire. And a channel above the spare to go across to the passenger side. Had to remove the passenger side plastic cover to fish the wire to the tail light. It would be really nice if Ford had engineered some sort of cover on the underside of the driver's side by the exhaust. That area and the whole back side of the tail light is covered in dirt from my road. On my list for future mods is what mcc63303 did https://www.mavericktruckclub.com/f...-panel-for-left-rear-underbody-opening.13177/
 
Last edited:
OP
OP

Linda B

2.5L Hybrid
Well-known member
First Name
Linda
Joined
Jun 16, 2021
Threads
6
Messages
67
Reaction score
96
Location
Michigan
Vehicle(s)
Ford Maverick XLT Lux!!!, E450 Lazy Daze Motorhome
Engine
2.5L Hybrid
I installed the ReadyBrake Breakaway yesterday. Instructions say to put it somewhere accessible so it can be serviced and reset if needed. Also somewhere that the cable won't rip the engine apart if it does get used. Best I could find was a spot hiding under the engine splash guard.

There's a painted part just aft of the radiator and I screwed it on there and snaked the cable around the end of the radiator to the front. It's a difficult spot to drill holes. Without a right angle attachment to my impact driver, I couldn't have done it. As it was, I snapped off an impact rated drill/tap in one of the holes so it's only attached with 3 screws instead of the recommended 4.

Pictures below show the spot where the box was attached before and after, and the front end where I zip tied the cable to the front of the grill. Oh, and I live on a dirt road, so my poor Mav is usually dirty. I do have plugs for the Roadmaster tow plate openings, so that will protect it somewhat.

This process would have been much easier if I had use of a lift. I only have ramps.

Ford Maverick NSA Readybrute Elite II tow bar with Roadmaster base plate Mounting point


Ford Maverick NSA Readybrute Elite II tow bar with Roadmaster base plate Breakaway box


Ford Maverick NSA Readybrute Elite II tow bar with Roadmaster base plate Front vi
 
Last edited:
OP
OP

Linda B

2.5L Hybrid
Well-known member
First Name
Linda
Joined
Jun 16, 2021
Threads
6
Messages
67
Reaction score
96
Location
Michigan
Vehicle(s)
Ford Maverick XLT Lux!!!, E450 Lazy Daze Motorhome
Engine
2.5L Hybrid
Here's a picture of the Readybrake brake and breakaway brake cables where they come through the firewall and are attached to the brake arm. The blue wire is for the indicator light in the RV...not yet connected to the brake light switch.

Ford Maverick NSA Readybrute Elite II tow bar with Roadmaster base plate Cables
 

jmckinley

2.5L Hybrid
Active member
First Name
John
Joined
Apr 4, 2022
Threads
4
Messages
44
Reaction score
33
Location
South West Ohio
Vehicle(s)
2022 Mav Lariat, 2013 Ford C Max, 1995 Mazda Miat
Engine
2.5L Hybrid
Nice. That's my winter project. Very rewarding when you consider RV shop will charge up to $2K just for the install not counting parts.
 

Sponsored

OP
OP

Linda B

2.5L Hybrid
Well-known member
First Name
Linda
Joined
Jun 16, 2021
Threads
6
Messages
67
Reaction score
96
Location
Michigan
Vehicle(s)
Ford Maverick XLT Lux!!!, E450 Lazy Daze Motorhome
Engine
2.5L Hybrid
So now the only things left to do are put in the brake light relay and the light on the dash of the RV that shows the brake is on.

I bought the whole NSA towing kit. It includes a LED to put in the dash of the RV with 2 wire run for the toad and the RV, with a separate 2 wire umbilical. I'm going to use their LED, but I have a 6-pin plug that has the blue wire unused so I'm using that to run the signal to the LED. There is the blue wire and a ground running through the 6-pin connector and umbilical, so I don't see a need to add another 2 wires.

The brake light relay is needed because this braking system pulls the brake pedal which sends a signal to the tail lights, plus the RV is sending signals to those lights. This causes the Mav signal to override the RV blinker signal. So the Mav won't show brake lights and blink at the same time. The relay interrupts the Mav's brake signal so it will brake and blink at the same time.

NSA's relay is set up as normally closed, so it doesn't do anything until it is powered, then it will open and interrupt the brake signal. They want it powered with a 12v outlet. That won't work on the Mav because the 12v shuts off with the engine. I looked at Roadmaster's relay and theirs is set up as normally open and they power it by tapping into an ignition on fuse, which allows the Mav to do its thing when the ignition is on. Since 4-down towing is done with the ignition off, Roadmaster's version will be my way to go.

I almost did the connections yesterday. I figured out how to get more space to be able to find the brake signal switch. Following this I removed the lower covering on the steering wheel, which doesn't give a lot of space, but makes it so I don't have to be a contortionist to get to the brake signal switch. Following Roadmaster and etrailer's wisdom and my circuit tester, I found the purple/white wires on the right side are the ones I want to tap into. Then I went to remove the brake signal fuse because I don't want to be tapping into those signal wires and mess up some computer thing with hot wires. The owners manual says the fuse is #23 in the engine bay. The way to get into that fuse box is very strange. Have to remove the lid, then manual says to open two levers, pull the covers off, then pull the whole fuse box off and turn it upside down and the fuses will be there. I tried the levers and the Mav started talking to me with its ET clicks and I decided it was not the day to do this job. More research is needed. So again, I put my Mav back together to be worked on another day.

I struck out on Mav engine fuse box, but found info on 2020 Escape hybrid fuse box. This shows how to get into it. The Mav owners manual seems to be lacking.

I've attached a picture of the brake signal switch with the bottom steering wheel cowling removed. It's that light blue thing. The pin on the right has 2 purple/white wires going into it. They show 12v when the brake pedal is pressed. That is the one I'm going to tap into.

Ford Maverick NSA Readybrute Elite II tow bar with Roadmaster base plate Brake light switch
 
Last edited:
OP
OP

Linda B

2.5L Hybrid
Well-known member
First Name
Linda
Joined
Jun 16, 2021
Threads
6
Messages
67
Reaction score
96
Location
Michigan
Vehicle(s)
Ford Maverick XLT Lux!!!, E450 Lazy Daze Motorhome
Engine
2.5L Hybrid
Nice. That's my winter project. Very rewarding when you consider RV shop will charge up to $2K just for the install not counting parts.
Yep, that's why I'm doing it myself.
 
OP
OP

Linda B

2.5L Hybrid
Well-known member
First Name
Linda
Joined
Jun 16, 2021
Threads
6
Messages
67
Reaction score
96
Location
Michigan
Vehicle(s)
Ford Maverick XLT Lux!!!, E450 Lazy Daze Motorhome
Engine
2.5L Hybrid
As a final note to this thread, I towed my Mav from Michigan to TX for Christmas and the start of my snowbird journey this year.

The first night, I woke to a dead battery and had to jump it and let it run for a while. Second day, I noticed my TPMS sensors showed the pressure and temperature going up. I stopped with pressure 40 and temp 115° and waited for the temp to cool. Then, even though I could start the Mav, I couldn't get it back into neutral tow.

After lots of swearing and messing around, I think I discovered the problem. The brake pedal was not returning to full up position. I remembered in the instructions for the ready brake, they said some users bungie corded the brake pedal to the seat. I did that and the rest of my trip was uneventful.

I'm going to put some lube into the brake cable casing and also do the bungie cord for future trips.

I also need to install the relay and the RV cab light to show the Mav brakes are on, but I'm sure the TPMS saved the day on this trip. As they say, "Dont' leave home without it".
 

jmckinley

2.5L Hybrid
Active member
First Name
John
Joined
Apr 4, 2022
Threads
4
Messages
44
Reaction score
33
Location
South West Ohio
Vehicle(s)
2022 Mav Lariat, 2013 Ford C Max, 1995 Mazda Miat
Engine
2.5L Hybrid
As a final note to this thread, I towed my Mav from Michigan to TX for Christmas and the start of my snowbird journey this year.

The first night, I woke to a dead battery and had to jump it and let it run for a while. Second day, I noticed my TPMS sensors showed the pressure and temperature going up. I stopped with pressure 40 and temp 115° and waited for the temp to cool. Then, even though I could start the Mav, I couldn't get it back into neutral tow.

After lots of swearing and messing around, I think I discovered the problem. The brake pedal was not returning to full up position. I remembered in the instructions for the ready brake, they said some users bungie corded the brake pedal to the seat. I did that and the rest of my trip was uneventful.

I'm going to put some lube into the brake cable casing and also do the bungie cord for future trips.

I also need to install the relay and the RV cab light to show the Mav brakes are on, but I'm sure the TPMS saved the day on this trip. As they say, "Dont' leave home without it".
Yep, that's why I'm doing it myself.
Started my installation this week.
Some comments and observations:
1) This is my fourth Roadmaster baseplate installation over the past ten years and this is the worst so far. Destroying the whole lower shutter system was very traumatic.
2) I am very concerned about the attachment to the vehicle . Four 8mm bolts and two little 10mm nuts just doesn't seem like enough compared to the other installations I've done.
3) Readybrake has been tricky too. Drilling random holes in the firewall of a hybrid can be exciting. Definitely do not want to drill into one of those big orange 400 volt wires .
 

Grmpy

2.5L Hybrid
Member
First Name
Bill
Joined
Sep 1, 2022
Threads
0
Messages
14
Reaction score
18
Location
Atlanta
Vehicle(s)
Buick
Engine
2.5L Hybrid
Just completed the installation of the NSA system with the Roadmaster baseplate.
First, big thank you Linda B. your posts were a huge help!
The Roadmaster baseplate install was pretty straightforward, I think start to finish would have been about 4 hours or less if that was all I had to do. I agree with jmckinley though, tearing up the shutters on a brand new truck is not for the faint-of-heart.
The braking system install was pretty simple too., especially if you read Linda B's posts before starting the job. I used her suggestion for the bracket and had mine built and painted before starting.
What threw me was the breakaway device. I spend at least 3 hours trying to decide on the best routing, worrying about if a breakaway occurred how much of the maverick is going get torn up by the cable, will the pedal be bent, etc. Then I decided that if mavy breaks free probably some torn plastic is the least of my problems.
I think if I had to do this over again I would opt for a Blue Ox Patriot system, only because of the breakaway system.
 
Sponsored

capo99

2.5L Hybrid
Well-known member
First Name
Cam
Joined
Nov 2, 2021
Threads
5
Messages
133
Reaction score
90
Location
Victoria BC Canada
Vehicle(s)
Nissan Kicks
Engine
2.5L Hybrid
Just completed the installation of the NSA system with the Roadmaster baseplate.
First, big thank you Linda B. your posts were a huge help!
The Roadmaster baseplate install was pretty straightforward, I think start to finish would have been about 4 hours or less if that was all I had to do. I agree with jmckinley though, tearing up the shutters on a brand new truck is not for the faint-of-heart.
The braking system install was pretty simple too., especially if you read Linda B's posts before starting the job. I used her suggestion for the bracket and had mine built and painted before starting.
What threw me was the breakaway device. I spend at least 3 hours trying to decide on the best routing, worrying about if a breakaway occurred how much of the maverick is going get torn up by the cable, will the pedal be bent, etc. Then I decided that if mavy breaks free probably some torn plastic is the least of my problems.
I think if I had to do this over again I would opt for a Blue Ox Patriot system, only because of the breakaway system.
I finally settled on the Patriot 2022BRK. Thinking the breakaway cable will be easier to install and doesn’t require a clear run as it’s not a cable. Still thinking about using the new stick on LED signal lights over the diode kit. All I need now is the truck. Not looking forward to removing the shutters etc.
 

Grmpy

2.5L Hybrid
Member
First Name
Bill
Joined
Sep 1, 2022
Threads
0
Messages
14
Reaction score
18
Location
Atlanta
Vehicle(s)
Buick
Engine
2.5L Hybrid
That was what I was looking at too before going with NSA.
Something you might consider; I was going to buy a 22amp-hr booster to power the patriot. I'm planning on buying a booster anyway so it could do double duty. The Mav's battery is a weak point from what I've read.

I choose the stick on lights as well. I figure the less I mess around with the Mav's electrical system the better.
Good luck! Hope your Maverick arrives soon, so far I really like the truck, I'm averaging just over 40mpg combo highway and city
 

processwrench

2.5L Hybrid
Well-known member
First Name
justin
Joined
Feb 2, 2022
Threads
2
Messages
81
Reaction score
50
Location
Western PA
Vehicle(s)
2022 Mav Hybrid Lariat Lux hot pepper red
Engine
2.5L Hybrid
That was what I was looking at too before going with NSA.
Something you might consider; I was going to buy a 22amp-hr booster to power the patriot. I'm planning on buying a booster anyway so it could do double duty. The Mav's battery is a weak point from what I've read.

I choose the stick on lights as well. I figure the less I mess around with the Mav's electrical system the better.
Good luck! Hope your Maverick arrives soon, so far I really like the truck, I'm averaging just over 40mpg combo highway and city
If you could I'd Like to see some pics of those lights, and are they bright and noticeable?
 

capo99

2.5L Hybrid
Well-known member
First Name
Cam
Joined
Nov 2, 2021
Threads
5
Messages
133
Reaction score
90
Location
Victoria BC Canada
Vehicle(s)
Nissan Kicks
Engine
2.5L Hybrid
If you could I'd Like to see some pics of those lights, and are they bright and noticeable?
I would like to see the lights installed as well. Not much room at the end of each side of the box and the lights are already quite small. Was thinking they might be better off installed on each side of the bumper so the whole strip can be seen.
 

Grmpy

2.5L Hybrid
Member
First Name
Bill
Joined
Sep 1, 2022
Threads
0
Messages
14
Reaction score
18
Location
Atlanta
Vehicle(s)
Buick
Engine
2.5L Hybrid
Ford Maverick NSA Readybrute Elite II tow bar with Roadmaster base plate Lights

Here is what they look like installed. The right turn light is on in the pic. I drilled a hole in the bumper cover and ran the wires behind the bumper, pretty simple to do, the only thing that annoyed me was the wire gauge was pretty tiny coming from the light and it had to join a 16Ga wire so I was not comfortable with the crimped connector. I had go get some of the low temp solder connectors for the first time, an old dog learning a new trick.
Sponsored


Top