Sponsored

- First Name
- Travis
- Joined
- Jun 21, 2021
- Threads
- 18
- Messages
- 775
- Reaction score
- 1,903
- Location
- Madisonville, LA
- Vehicle(s)
- 2022 Ford Maverick
- Engine
- 2.0L EcoBoost
I’ve always done this. Crazy how people will spend a couple hundred bucks for a filter and an elbow. Good work!
- First Name
- Kevin
- Joined
- Oct 22, 2021
- Threads
- 9
- Messages
- 312
- Reaction score
- 385
- Location
- Asheville, NC
- Vehicle(s)
- 2022 Alto Blue Maverick XLT AWD
Hummmm ")
- First Name
- Jerry
- Joined
- Sep 3, 2021
- Threads
- 6
- Messages
- 38
- Reaction score
- 53
- Location
- Landrum, SC
- Vehicle(s)
- Ford Maverick Nissan Frontier
- Engine
- 2.0L EcoBoost
Excellent innovation. When you take out the lower part of the original air filter you will be able to see where is got it's air from and it could provide you your source of fresh air. Please update when you can.
- Joined
- Aug 26, 2021
- Threads
- 0
- Messages
- 13
- Reaction score
- 19
- Location
- New Jersey
- Vehicle(s)
- 2022 Maverick XLT AWD FX4
Love it! Deeply considering just doing this too.
Sponsored
- First Name
- Jerry
- Joined
- Sep 3, 2021
- Threads
- 6
- Messages
- 38
- Reaction score
- 53
- Location
- Landrum, SC
- Vehicle(s)
- Ford Maverick Nissan Frontier
- Engine
- 2.0L EcoBoost
A lesson I learned from a similar attempt years ago. Make sure rain and snow doesn't have direct access to the filter. Wet snow was my downfall. I was thinking thru the hurdles that need resolved. Ford got cooler fresh air from outside the engine bay (without the snow) but needed piping to get that accomplished. I would also assume that when driving, Ford's air cleaner intake pipe even has air forced in from the air coming thru the lower grill. Have fun working out all the issues.Thanks. Here's where the original intake pulls air from. Inlet looks to be behind the upper grille area and then it is routed to the filter housing:

Here's the part of that which I had to remove for my filter to fit, this is just a downward tube to direct air beneath the OEM filter:

As you can see below, the entire upper portion of the grille is molded solid, so no air coming in here. I'm hoping to open up the inlets in the between the grille bars so air can flow directly into the enclosure that I make. I'm not 100% sure if it will work as I'm planning though. I'll have a better idea of what exactly is going on under/behind all of this plastic once I remove it.


- First Name
- Tom
- Joined
- Aug 16, 2021
- Threads
- 9
- Messages
- 610
- Reaction score
- 529
- Location
- Tampa, Florida
- Vehicle(s)
- 2022 Hyundai Santa Cruz Ltd + Maverick Lariat Hybr
- Engine
- 2.5L Hybrid
- Banned
- #8
Curious what is the performance increase with this mod?I recently put together the first part of my custom intake, thought I'd share my progress as I go.
Parts used:
Spectre Performance SPE-9429 3" 22º Aluminum Elbow
Airaid 700-492 Universal Clamp-On Air Filter
Everbilt 1/2 in. Black Neoprene Grommet-812028
Tools required:
7mm socket for OEM hose clamp
Pry tools or flathead screw driver
Whichever size socket you need for your filter, in my case this was an 8mm
5/8" hole saw bit
I happened to find this particular filter on eBay for ~$25 so that's why I went with it, most universal filters with a 3" inner flange diameter will work, but here are the dimensions of the filter that I used for your reference. Fitment is pretty tight with the 8" tall filter, a 6-7" would likely be ideal.
Shape: Round Tapered
Flange ID: 3 in (76mm)
Filter Height: 8 in (203mm)
Filter Base Ø: 6 in (152mm)
Filter Top Ø: 4.625 in (117mm)
First, you will need to drill a hole in the Spectre elbow for the sensor. I used a 5/8" hole saw bit.
Next, insert the grommet into the newly drilled hole.
You can now remove the factory intake lid and filter. I disconnected and removed the sensor first. For the lid of the filter housing, there are two clips towards the driver's side fender, the factory hose clamp can be loosened with a 7mm socket. Part of the tube that directs fresh air into the intake box will also need to be removed, this has two small clips. I just used a small pry tool to remove this piece.
After removing the upper portion of the OEM intake, you can insert the elbow, insert and re-connect the sensor, attach the filter and tighten in place. I left the lower part of the OEM intake enclosure in place to support the filter for now.
For Part 2 I will be making a heat shield/enclosure, and eventually a Part 3 in which I hope to rework the upper grille to direct even more fresh air to the custom enclosure. I realized at the end that I did not take any in-progress pictures, sorry about that! It's pretty simple to get to this point, the next steps will be more involved so I plan to document those in greater detail. The truck was happy with the new intake, no check engine lights or odd driving characteristics. The added sound is great but not obnoxious by any means. There seems to be a noticeable improvement in throttle response but I have no definitive proof of any added gains. Total cost all-in thus far is just under $50.
View attachment 20256 View attachment 20257 View attachment 20258 View attachment 20259
- First Name
- John
- Joined
- Aug 14, 2021
- Threads
- 12
- Messages
- 368
- Reaction score
- 843
- Location
- Charlotte, NC
- Vehicle(s)
- Maverick XL, Mercedes C300
- Engine
- 2.5L Hybrid
Looking forward to parts 2 and 3!!I recently put together the first part of my custom intake, thought I'd share my progress as I go.
Parts used:
Spectre Performance SPE-9429 3" 22º Aluminum Elbow
Airaid 700-492 Universal Clamp-On Air Filter
Everbilt 1/2 in. Black Neoprene Grommet-812028
Tools required:
7mm socket for OEM hose clamp
Pry tools or flathead screw driver
Whichever size socket you need for your filter, in my case this was an 8mm
5/8" hole saw bit
I happened to find this particular filter on eBay for ~$25 so that's why I went with it, most universal filters with a 3" inner flange diameter will work, but here are the dimensions of the filter that I used for your reference. Fitment is pretty tight with the 8" tall filter, a 6-7" would likely be ideal.
Shape: Round Tapered
Flange ID: 3 in (76mm)
Filter Height: 8 in (203mm)
Filter Base Ø: 6 in (152mm)
Filter Top Ø: 4.625 in (117mm)
First, you will need to drill a hole in the Spectre elbow for the sensor. I used a 5/8" hole saw bit.
Next, insert the grommet into the newly drilled hole.
You can now remove the factory intake lid and filter. I disconnected and removed the sensor first. For the lid of the filter housing, there are two clips towards the driver's side fender, the factory hose clamp can be loosened with a 7mm socket. Part of the tube that directs fresh air into the intake box will also need to be removed, this has two small clips. I just used a small pry tool to remove this piece.
After removing the upper portion of the OEM intake, you can insert the elbow, insert and re-connect the sensor, attach the filter and tighten in place. I left the lower part of the OEM intake enclosure in place to support the filter for now.
For Part 2 I will be making a heat shield/enclosure, and eventually a Part 3 in which I hope to rework the upper grille to direct even more fresh air to the custom enclosure. I realized at the end that I did not take any in-progress pictures, sorry about that! It's pretty simple to get to this point, the next steps will be more involved so I plan to document those in greater detail. The truck was happy with the new intake, no check engine lights or odd driving characteristics. The added sound is great but not obnoxious by any means. There seems to be a noticeable improvement in throttle response but I have no definitive proof of any added gains. Total cost all-in thus far is just under $50.
View attachment 20256 View attachment 20257 View attachment 20258 View attachment 20259
- Banned
- #10
More intake noise along with the road noise isn't what I want. I'm sure the few hp gain isn't going to make much difference. To each his own.Curious what is the performance increase with this mod?
Sponsored
Is the spectre stuff still plastic?
- First Name
- Jeremy Page
- Joined
- Oct 18, 2021
- Threads
- 10
- Messages
- 70
- Reaction score
- 231
- Location
- Incline Village, NV 89451, USA
- Vehicle(s)
- 2011 F150, 1973 Maverick, 2012 Tundra, 2020 F250
You can also use this air filter for 1/2 the cost. Spectre Performance SPE-9732 Universal Clamp-On Air Filter: Round Tapered; 3 in/3.5 in/4 in (102 mm/89 mm/76 mm) Flange ID; 8.75 in (222 mm) Height; 6 in (152 mm) Base; 4.75 in (121 mm) TopI recently put together the first part of my custom intake, thought I'd share my progress as I go.
Parts used:
Spectre Performance SPE-9429 3" 22º Aluminum Elbow
Airaid 700-492 Universal Clamp-On Air Filter
Everbilt 1/2 in. Black Neoprene Grommet-812028
Tools required:
7mm socket for OEM hose clamp
Pry tools or flathead screw driver
Whichever size socket you need for your filter, in my case this was an 8mm
5/8" hole saw bit
I happened to find this particular filter on eBay for ~$25 so that's why I went with it, most universal filters with a 3" inner flange diameter will work, but here are the dimensions of the filter that I used for your reference. Fitment is pretty tight with the 8" tall filter, a 6-7" would likely be ideal.
Shape: Round Tapered
Flange ID: 3 in (76mm)
Filter Height: 8 in (203mm)
Filter Base Ø: 6 in (152mm)
Filter Top Ø: 4.625 in (117mm)
First, you will need to drill a hole in the Spectre elbow for the sensor. I used a 5/8" hole saw bit.
Next, insert the grommet into the newly drilled hole.
You can now remove the factory intake lid and filter. I disconnected and removed the sensor first. For the lid of the filter housing, there are two clips towards the driver's side fender, the factory hose clamp can be loosened with a 7mm socket. Part of the tube that directs fresh air into the intake box will also need to be removed, this has two small clips. I just used a small pry tool to remove this piece.
After removing the upper portion of the OEM intake, you can insert the elbow, insert and re-connect the sensor, attach the filter and tighten in place. I left the lower part of the OEM intake enclosure in place to support the filter for now.
For Part 2 I will be making a heat shield/enclosure, and eventually a Part 3 in which I hope to rework the upper grille to direct even more fresh air to the custom enclosure. I realized at the end that I did not take any in-progress pictures, sorry about that! It's pretty simple to get to this point, the next steps will be more involved so I plan to document those in greater detail. The truck was happy with the new intake, no check engine lights or odd driving characteristics. The added sound is great but not obnoxious by any means. There seems to be a noticeable improvement in throttle response but I have no definitive proof of any added gains. Total cost all-in thus far is just under $50.
View attachment 20256 View attachment 20257 View attachment 20258 View attachment 20259
- Banned
- #13
We it screw up emissions test?Nice work. How does it run? Any noticeable difference in power?
Here's a link to a video on grille removal.
Supposedly not. It's a simple, non destructive install. If you fail, just put the old parts back. However, there has been some debate as to whether you will invalidate your factory warranty. I wouldn't go to the dealer for service sporting that.We it screw up emissions test?
- First Name
- Bill
- Joined
- Oct 24, 2021
- Threads
- 6
- Messages
- 387
- Reaction score
- 571
- Location
- Johnson County Texas
- Vehicle(s)
- Maverick XLT, AWD, Carbonized Gray. Highlander Lim
- Engine
- 2.0L EcoBoost
Same here, used a 3" SS coupler normally used to connect silicone hoses, an Injen X-1058-BB filter, with a hydro-shield cover, and knocked up a quick brace from some AL bar stock. Drilled the SS coupler to 11/16 for the 1/2" grommet. Filter is a dry type, and is worth the extra money
Left the upper factory intake piping as did OP.
Time about 2 hours, cost with the Injen Filter just shy of $90.
SS coupler
Injen filter

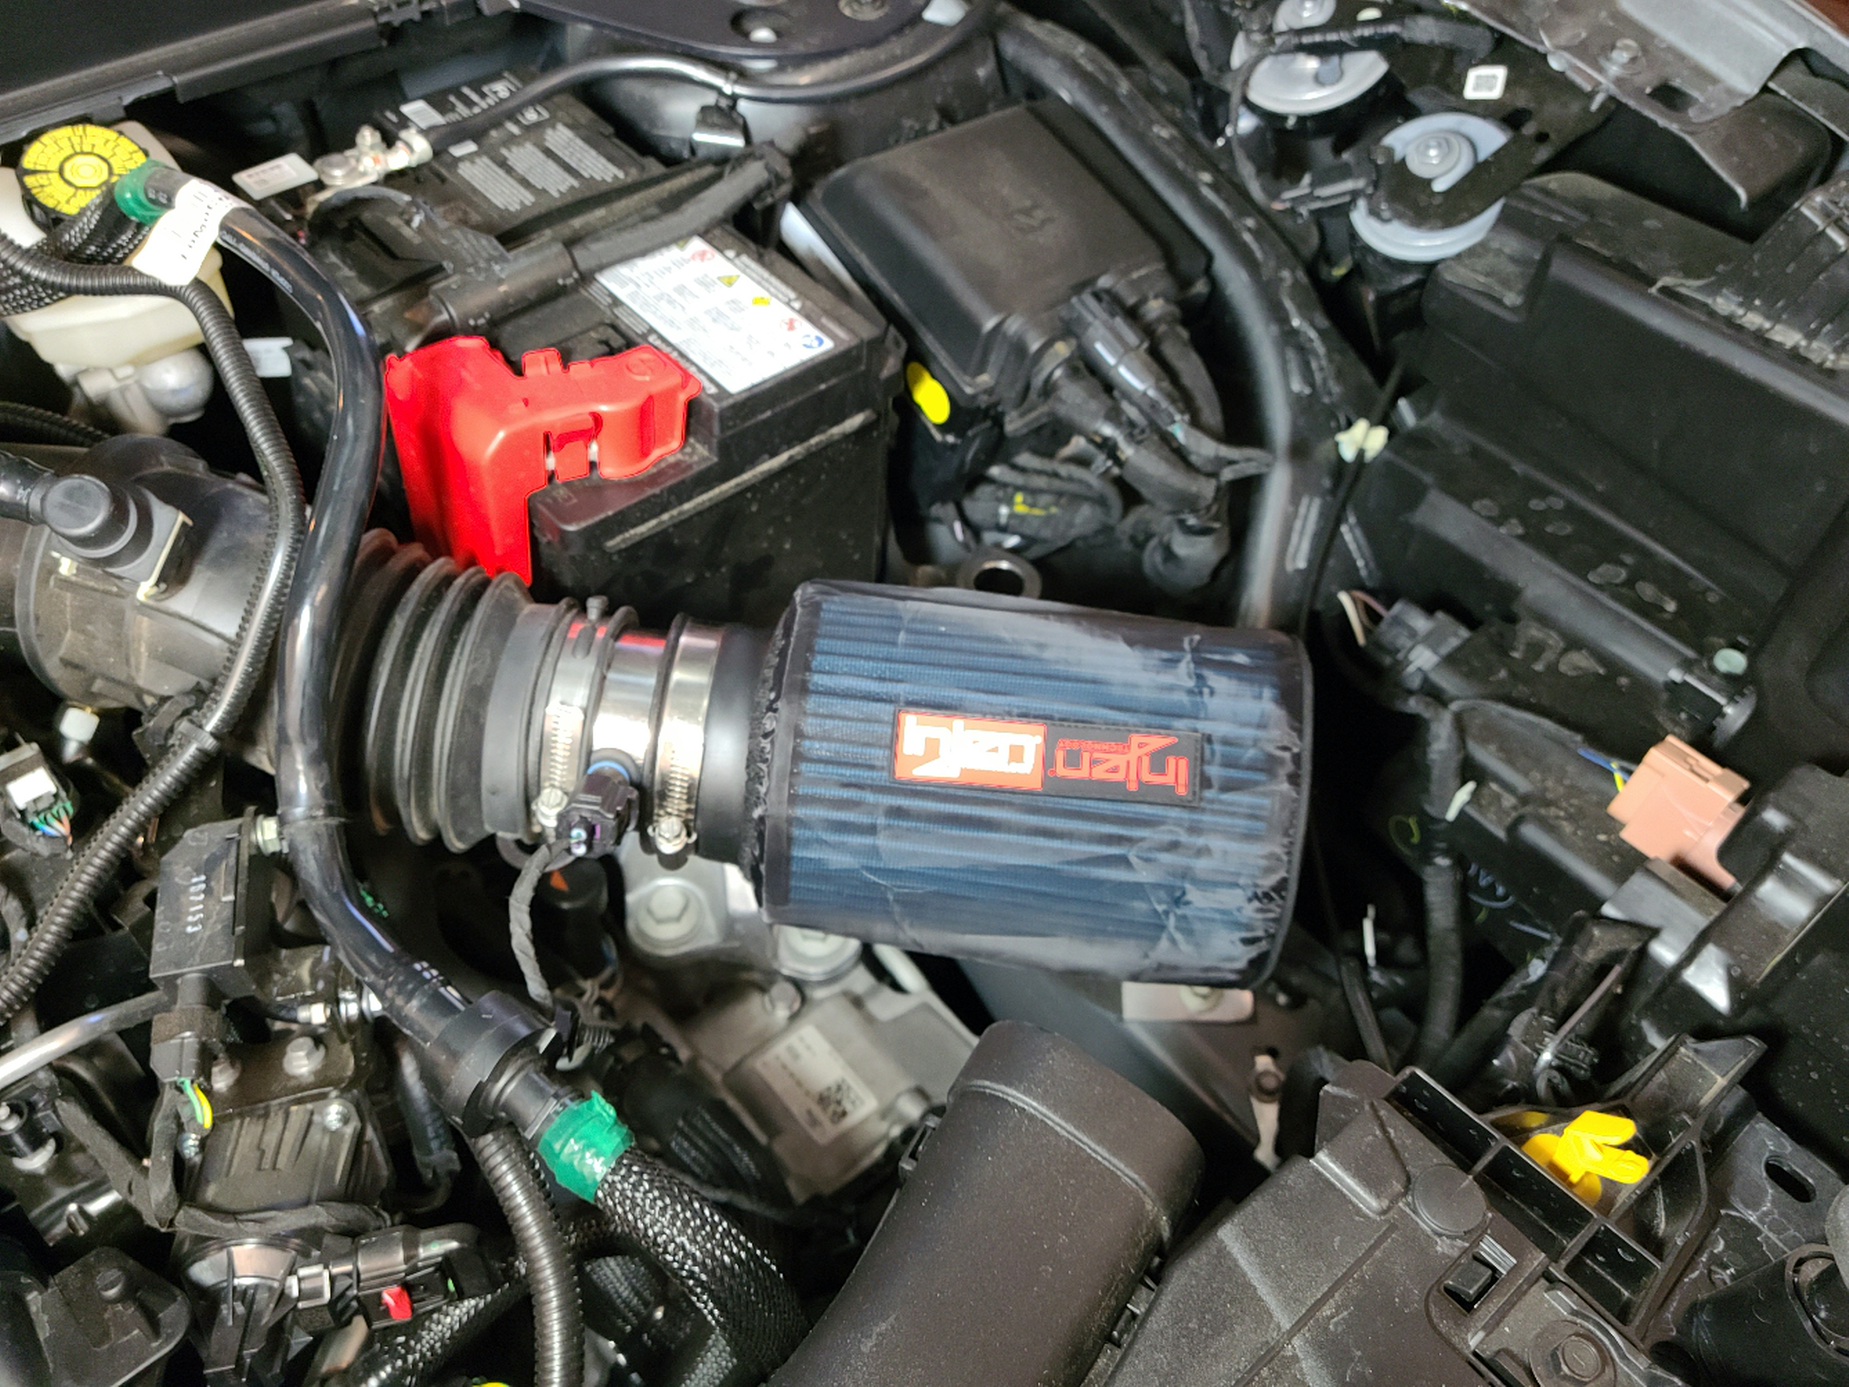
Left the upper factory intake piping as did OP.
Time about 2 hours, cost with the Injen Filter just shy of $90.
SS coupler
Injen filter
Sponsored